A damaged side mirror is more than just a cosmetic issue. It can reduce visibility, compromise safety, and even lead to traffic violations in some areas. The good news is that learning how to replace a Subaru side mirror is often much easier and more affordable than many vehicle owners expect.
Whether your Subaru side mirror was cracked in a parking lot accident, stopped responding to electrical controls, or suffered damage from road debris, replacing it yourself can save you a significant amount of money. Depending on the model and mirror features, professional replacement costs can quickly add up once labor fees are included. Fortunately, with a few basic tools and a little patience, many Subaru owners can complete this repair at home in under an hour.
This step by step guide will walk you through the entire Subaru side mirror replacement process, from gathering the necessary tools to testing the new mirror after installation. Along the way, you will also learn common mistakes to avoid and important considerations for mirrors equipped with features such as heating elements, turn signal indicators, and blind spot monitoring systems.
By the end of this guide, you will have the confidence to tackle this repair safely and restore your Subaru’s visibility and functionality without unnecessary expense.
Contents
- Signs That Your Subaru Side Mirror Needs Replacement
- Tools and Materials You Will Need
- Step 1: Turn Off the Vehicle and Prepare the Work Area
- Step 2: Remove the Interior Door Trim Panel
- Step 3: Disconnect the Mirror Wiring Harness
- Step 4: Remove the Damaged Subaru Side Mirror
- Step 5: Install the New Subaru Side Mirror
- Step 6: Reconnect the Electrical Components
- Step 7: Reinstall the Interior Door Panel
- Step 8: Test All Mirror Functions
- Common Mistakes to Avoid During Subaru Side Mirror Replacement
- How Much Does It Cost to Replace a Subaru Side Mirror?
- Conclusion
Signs That Your Subaru Side Mirror Needs Replacement
Before beginning the replacement process, it is important to determine whether the entire mirror assembly actually needs to be replaced. In some situations, only the mirror glass is damaged, while in others, the internal components have also been affected. Understanding the warning signs can help you make the right decision and avoid unnecessary expenses.
One of the most obvious indicators is visible physical damage. Cracked mirror glass, a broken housing, or a mirror that hangs loosely from the door often means replacement is necessary. Even minor cracks can distort reflections and reduce your ability to monitor surrounding traffic safely.
Electrical issues are another common reason Subaru owners choose to replace their side mirrors. If the power adjustment controls stop responding, the heating function no longer works, or the integrated turn signal fails to illuminate, the mirror assembly may have suffered internal damage. Vehicles equipped with blind spot monitoring systems may also display warning messages if the mirror sensors are no longer functioning properly.
Ignoring these problems can compromise both safety and convenience. A properly functioning side mirror plays a critical role in changing lanes, reversing, and maintaining awareness of nearby vehicles. Addressing the issue promptly helps ensure a safer driving experience while preventing additional damage over time.
Tools and Materials You Will Need
Having the right tools on hand before starting the repair can make the entire process smoother and significantly reduce the risk of damaging interior components. Fortunately, replacing a Subaru side mirror does not require specialized equipment that is only available to professional mechanics.
The most important item is the replacement mirror itself. Before purchasing a new unit, verify that it matches your Subaru’s model year and trim level. Features such as power adjustment, heating elements, turn signal indicators, and blind spot monitoring can vary between vehicles. Using the correct replacement part ensures compatibility and proper operation after installation.
In addition to the new mirror assembly, gather a Phillips screwdriver, a socket wrench set, and a plastic trim removal tool. The trim tool is particularly useful because it allows you to remove interior panels without scratching surfaces or breaking plastic clips. A flashlight can help improve visibility when working inside the door panel, while protective gloves can reduce the chance of minor injuries.
Preparing everything in advance minimizes interruptions during the repair process. It also gives you the opportunity to inspect each tool and confirm that you have everything needed to complete the job efficiently from start to finish.
Step 1: Turn Off the Vehicle and Prepare the Work Area
Proper preparation is an often overlooked part of vehicle maintenance, yet it can have a major impact on both safety and the success of the repair. Before removing any components, park your Subaru on a flat and stable surface where you have sufficient room to work comfortably around the affected door.
Turn off the engine completely and engage the parking brake. If your mirror contains electrical features, disconnecting the negative battery terminal is an additional precaution that can help prevent accidental short circuits during the replacement process. While this step may add a few extra minutes to the repair, it contributes to a safer working environment.
Next, organize your tools within easy reach and place a soft cloth near the work area to protect painted surfaces from accidental scratches. Good lighting is equally important, especially when locating fasteners hidden behind interior trim pieces or reconnecting electrical harnesses later in the installation.
Taking time to prepare properly can save you frustration as the repair progresses. Many mistakes occur because individuals rush into disassembly without establishing a safe and organized workspace. Starting with the right setup allows you to approach each stage of the Subaru side mirror replacement with greater confidence and precision.
Step 2: Remove the Interior Door Trim Panel
The next stage of the replacement process involves gaining access to the mounting hardware that secures the side mirror to the door. On most Subaru models, this requires removing the interior door trim panel. Although the task may seem intimidating at first, it is generally straightforward when approached with patience and care.
Begin by locating any visible screws around the door handle, armrest, or control panel area. Some fasteners may be hidden beneath small plastic covers designed to maintain a clean appearance. Carefully remove these covers using a plastic trim tool to avoid leaving scratches on the interior surfaces.
Once all screws have been removed, gently work the trim removal tool around the edges of the panel to release the retaining clips. Apply steady pressure rather than excessive force, as the clips can break if pulled too aggressively. After the clips have been detached, lift the door panel upward to separate it from the window channel.
If your Subaru is equipped with electrical controls integrated into the door panel, disconnect the corresponding wiring connectors before setting the panel aside. Placing the removed components in a safe location will help prevent accidental damage and make reassembly easier later in the process.
Step 3: Disconnect the Mirror Wiring Harness
With the interior panel removed, you should now have access to the wiring harness connected to the side mirror assembly. This step is especially important for vehicles equipped with power mirrors, heated mirrors, integrated turn signals, or blind spot monitoring systems.
Locate the electrical connector leading to the mirror. In most Subaru models, the harness is positioned near the upper front section of the door. Before attempting to separate the connection, inspect the locking mechanism that secures the plug in place. Most connectors feature a small release tab that must be pressed before the harness can be disconnected.
Press the release tab firmly and pull the connector apart carefully. Avoid pulling directly on the wires themselves, as doing so could damage the electrical system or create connection issues that may be difficult to diagnose later. If the connector appears stuck, check for additional locking features rather than forcing it apart.
Taking a few moments to inspect the condition of the wiring can also be beneficial. Look for signs of corrosion, frayed insulation, or loose terminals that could affect the performance of the replacement mirror. Addressing these issues during installation can help ensure that all mirror functions operate correctly once the repair is complete.
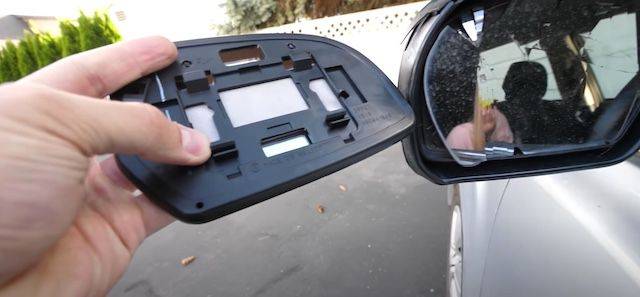
Step 4: Remove the Damaged Subaru Side Mirror
After disconnecting the electrical harness, you are ready to remove the damaged mirror assembly from the vehicle. At this stage, having a firm understanding of how the mirror is secured will help prevent accidental damage to the door or surrounding components.
Most Subaru side mirrors are attached using a series of mounting nuts located behind the interior trim panel. Using the appropriate socket size, loosen these fasteners while supporting the mirror from the outside of the vehicle with your free hand. This precaution prevents the mirror from falling unexpectedly once the final nut has been removed.
As you remove the last fastener, gently guide the mirror assembly away from the door. Take care not to scratch the paint or catch the wiring harness on any internal structures. If resistance is encountered, double check that all mounting hardware has been completely removed before applying additional force.
Once the damaged mirror has been detached, compare it with the replacement unit. Confirm that the mounting points, wiring connectors, and external features match precisely. Performing this verification before installation can save considerable time and frustration by ensuring that the new mirror is fully compatible with your Subaru model.
Step 5: Install the New Subaru Side Mirror
With the old mirror removed, you can begin installing the replacement unit. This stage requires attention to detail to ensure that the mirror is mounted securely and aligned correctly. Proper installation not only improves the appearance of your Subaru but also contributes to safe driving conditions.
Carefully position the new mirror against the mounting area on the exterior side of the door. Guide the wiring harness through the designated opening while aligning the mounting studs with the corresponding holes in the door frame. Taking your time during this step will help prevent pinched wires or improper positioning.
Once the mirror is seated correctly, hand tighten the mounting nuts from inside the door. Starting the fasteners by hand reduces the risk of cross threading, which can damage the mounting points and complicate future repairs. After all fasteners have been installed, use a socket wrench to tighten them evenly until the mirror feels secure.
Avoid overtightening the hardware. Excessive force can crack plastic components or place unnecessary stress on the mounting brackets. The mirror should sit firmly against the door without shifting when gentle pressure is applied.
Before moving to the next step, visually inspect the fitment from outside the vehicle. The mirror housing should align naturally with the body lines of the door and maintain consistent gaps around the mounting area.
Step 6: Reconnect the Electrical Components
After securing the replacement mirror in place, reconnect the electrical harness that powers the mirror’s integrated features. This step is essential for restoring full functionality, particularly on modern Subaru models equipped with advanced convenience and safety technologies.
Locate the wiring connector that was previously disconnected during the removal process. Align the connector carefully and push the two ends together until the locking tab clicks into place. This audible confirmation indicates that the connection has been secured properly.
Take a moment to inspect the routing of the wiring harness inside the door cavity. Ensure that the wires are positioned away from moving parts such as the window regulator and door latch mechanisms. Improper wire placement could lead to future electrical problems or damage during normal operation.
If your Subaru includes heated mirrors, power folding functions, integrated turn signals, or blind spot detection indicators, reconnecting the harness correctly becomes even more important. A loose connection may cause one or more features to malfunction.
Before reinstalling the door panel, consider performing a preliminary function check. Temporarily reconnect the battery if it was disconnected earlier and verify that the mirror responds to adjustment controls. Identifying potential issues now is much easier than reopening the door after final assembly.
Step 7: Reinstall the Interior Door Panel
Once all mirror functions have been confirmed, the final stage of the physical installation process involves reattaching the interior door panel. Reassembly should be completed with the same level of care used during disassembly to preserve the condition of the vehicle’s interior components.
Begin by reconnecting any electrical connectors associated with window switches, door locks, or courtesy lighting. Double check that each connector is fully engaged before repositioning the panel. Failure to reconnect these components properly can result in unnecessary troubleshooting later.
Align the upper edge of the door panel with the window channel and lower it gently into position. Once the panel is seated correctly, press around the perimeter to engage the retaining clips. You should hear each clip snap back into place as pressure is applied evenly across the surface.
Reinstall all screws removed earlier, paying attention to their original locations. Some screws may vary in length, making proper placement important for achieving a secure fit. Replace any decorative covers that conceal the fasteners to restore the factory appearance of the interior trim.
After completing reassembly, inspect the door panel carefully to ensure that all edges sit flush and that no gaps are present. A properly installed panel should feel solid, with no rattles or looseness during vehicle operation.
Step 8: Test All Mirror Functions
After completing the installation and reassembling the door panel, it is essential to test every function associated with the new side mirror. This final inspection ensures that the replacement was successful and that all systems are operating as intended.
Start the vehicle and use the mirror adjustment controls to move the mirror glass in all available directions. The movement should be smooth and responsive without hesitation or unusual noises. If the mirror fails to respond, inspect the electrical connections to confirm that the wiring harness is securely attached.
If your Subaru is equipped with heated side mirrors, activate the rear defroster and allow several minutes for the heating elements to engage. While the warming effect may not be immediately noticeable, this step helps verify that the feature remains functional following installation.
Owners of Subaru models featuring integrated turn signals should also test the indicator lights to ensure they illuminate correctly. In addition, vehicles equipped with blind spot monitoring systems should be checked for warning messages or indicator malfunctions. Consult your owner’s manual if recalibration procedures are required for specific models.
Finally, take the vehicle for a short drive to evaluate mirror stability. The mirror housing should remain firmly in place without excessive vibration at higher speeds. A thorough inspection at this stage provides peace of mind and confirms that your Subaru is ready to return to the road safely.
Common Mistakes to Avoid During Subaru Side Mirror Replacement
Although replacing a Subaru side mirror is considered a manageable repair for many vehicle owners, several common mistakes can turn a simple project into an expensive lesson. Understanding these pitfalls in advance can improve the outcome of your repair.
One of the most frequent errors involves purchasing an incompatible replacement mirror. Subaru offers different mirror configurations depending on the model year, trim level, and optional equipment package. Verifying compatibility before installation can prevent unnecessary delays and return shipping costs.
Another mistake is rushing through the door panel removal process. Applying excessive force while removing trim clips may result in broken fasteners or damaged interior panels. Working slowly and using appropriate trim tools helps preserve the vehicle’s appearance.
Some individuals also neglect to disconnect the battery when working with electrical components. Although not always mandatory, this precaution reduces the risk of accidental short circuits during installation.
Failing to test mirror functions before fully reassembling the door panel is another avoidable issue. Discovering a disconnected wire after reinstalling all trim pieces often means repeating a significant portion of the work.
Approaching the repair methodically and double checking each step can save time, money, and frustration while ensuring a professional quality result.
How Much Does It Cost to Replace a Subaru Side Mirror?
One of the primary reasons vehicle owners choose to perform this repair themselves is the potential cost savings. The total expense associated with replacing a Subaru side mirror depends on several factors, including the vehicle model, the mirror’s features, and whether original equipment manufacturer parts are used.
Basic mirror glass replacements generally represent the least expensive option. However, complete mirror assemblies equipped with power adjustment capabilities, heating elements, integrated turn signals, and blind spot monitoring systems tend to command higher prices.
Aftermarket replacement mirrors often provide a budget friendly alternative and may cost between 80 and 200 dollars depending on the application. Genuine Subaru mirror assemblies can range from 200 to 500 dollars or more, particularly for newer models with advanced safety technology.
Professional installation introduces additional labor charges that typically fall between 100 and 250 dollars. As a result, total replacement costs can increase significantly when repairs are performed at a dealership or independent repair facility.
By completing the repair at home, many Subaru owners can reduce overall expenses substantially while gaining valuable hands on experience with basic vehicle maintenance. For individuals who feel comfortable using common hand tools, a do it yourself approach may offer both financial and practical benefits.
Conclusion
Learning how to replace a Subaru side mirror can seem intimidating at first, especially for individuals with limited automotive repair experience. However, with the proper preparation, the right tools, and a clear understanding of each step involved, this task becomes much more approachable than many people expect.
Replacing a damaged mirror promptly is important for maintaining visibility, complying with local regulations, and ensuring overall driving safety. Whether your mirror has suffered cosmetic damage or experienced electrical failure, addressing the issue early can help prevent additional complications down the road.
This step by step guide has covered the entire process, from identifying the need for replacement and gathering essential tools to removing the old mirror, installing the new assembly, and verifying proper operation. Following these procedures carefully can help you achieve reliable results while avoiding common mistakes.
For many Subaru owners, completing this repair independently offers the added satisfaction of saving money and developing practical automotive skills. If at any point you feel uncertain about the process, seeking assistance from a qualified technician remains a sensible option.
Have you ever replaced a Subaru side mirror on your own? Share your experience, helpful tips, or questions in the comments section below. Your insights may help other Subaru owners complete their repairs with greater confidence and success.