Is your transmission hesitating, shifting hard, or refusing to change gears at all? If you are driving a vehicle equipped with a 4L60E transmission, these symptoms can quickly turn from a minor annoyance into a costly repair nightmare. Many vehicle owners assume the worst and prepare for a full transmission rebuild, but in reality, the issue is often much simpler. One of the most common causes is a faulty or misunderstood shift solenoid.
Understanding the exact 4L60E transmission shift solenoid location is the first step toward diagnosing and fixing the problem correctly. Without this knowledge, it is easy to replace the wrong part, waste money, or even create additional damage inside the transmission system. This is especially frustrating for DIY enthusiasts who are trying to save on repair costs but end up facing repeated issues.
In this complete guide, you will learn where the shift solenoids are located inside the 4L60E transmission, how to identify solenoid A and solenoid B, the most common symptoms of failure, and the exact steps to replace them safely. Whether you are troubleshooting a shifting problem or planning a repair, this guide will help you make confident and cost effective decisions.
You will also discover practical tips that mechanics often do not mention, helping you avoid common mistakes and unnecessary expenses. By the end of this article, you will have a clear understanding of how your transmission works and how to fix it without guesswork.
Contents
- What Is a Shift Solenoid in a 4L60E Transmission?
- 4L60E Transmission Shift Solenoid Location
- 4L60E Shift Solenoid A vs B: How to Identify
- Symptoms of a Bad 4L60E Shift Solenoid
- How to Replace 4L60E Shift Solenoid (Step by Step)
- Cost to Replace a 4L60E Shift Solenoid
- Common Mistakes When Locating or Replacing Shift Solenoids
- Conclusion
What Is a Shift Solenoid in a 4L60E Transmission?
A shift solenoid in a 4L60E transmission controls how your vehicle changes gears. It works like a small electronic valve that directs transmission fluid through the valve body. This flow of fluid allows the transmission to shift at the right time and in the correct sequence.
The system receives signals from the vehicle’s control module. Based on these signals, the solenoids open or close to control hydraulic pressure. This process directly affects how and when each gear engages. When everything works correctly, gear changes feel smooth and consistent.
The 4L60E transmission uses two main shift solenoids, known as Shift Solenoid A and Shift Solenoid B. These two components work together in different patterns to control gear selection. Each gear depends on a specific combination of these solenoids. If one fails, the transmission may shift poorly or stay stuck in a single gear.
The transmission also includes other solenoids, such as the TCC solenoid and the pressure control solenoid. These parts support overall performance, but they do not directly control gear changes like shift solenoids do. This distinction is important during diagnosis.
Many drivers misdiagnose transmission problems because the symptoms feel severe. In reality, a faulty shift solenoid can cause hard shifting, slipping, or gear hesitation. Fixing this small component often restores normal performance without major repair costs.
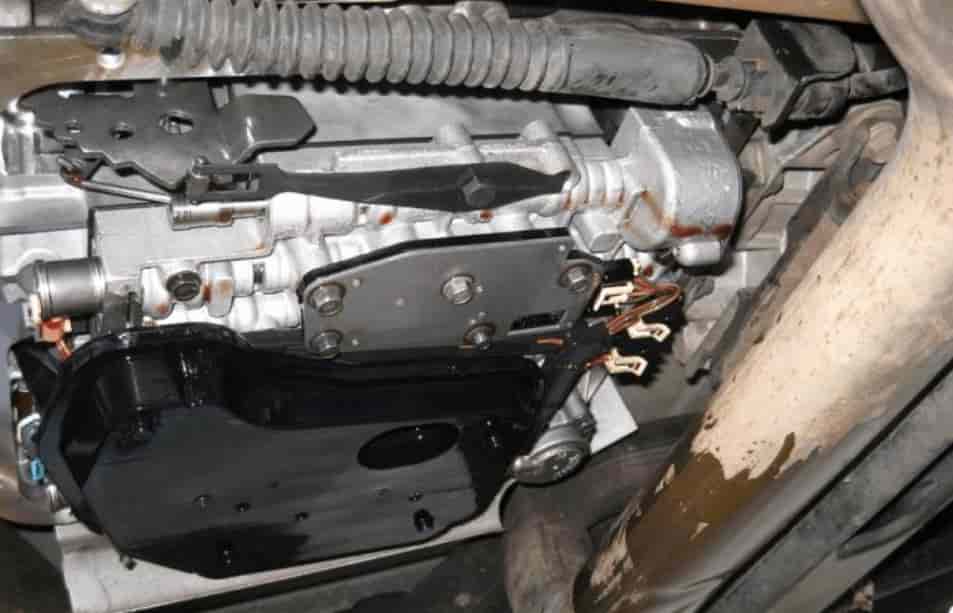
4L60E Transmission Shift Solenoid Location
Understanding the 4L60E transmission shift solenoid location is essential for proper diagnosis and repair. The shift solenoids are not located on the outside of the transmission. You will not see them without opening the transmission housing.
Inside the 4L60E transmission, the shift solenoids sit on the valve body. The valve body is located underneath the transmission oil pan. This means you must remove the transmission pan first to access them. Once the pan is removed, you will see the valve body mounted at the bottom of the transmission.
The solenoids are attached directly to the valve body. Shift Solenoid A and Shift Solenoid B sit close to each other. They connect to the internal wiring harness and receive signals from the vehicle control module. Their position allows them to control fluid flow inside the hydraulic system quickly and accurately.
You do not need to remove the entire transmission to reach the solenoids. However, you must drain the transmission fluid and remove the pan carefully. Once exposed, the valve body gives direct access to the solenoids for inspection or replacement.
It is also important to avoid confusing the shift solenoids with other components inside the valve body. Parts like the pressure control solenoid and TCC solenoid are located nearby. They look similar but serve different functions, so correct identification is critical during repair.
Many incorrect repairs happen because users assume the solenoids are external or easier to access. In reality, their position inside the valve body is what allows precise control of gear shifting under hydraulic pressure.
4L60E Shift Solenoid A vs B: How to Identify
The 4L60E transmission uses two shift solenoids, known as Solenoid A and Solenoid B. They look very similar, but they do not perform the same switching pattern. Identifying them correctly is important because mixing them up can cause shifting problems or incorrect gear behavior.
Both solenoids are mounted on the valve body inside the transmission. You can only see them after removing the transmission pan. Once exposed, you will notice that they sit close to each other and connect to the internal wiring harness.
Shift Solenoid A usually controls one set of gear shift combinations, while Shift Solenoid B controls another set. Together, they create different hydraulic pressure patterns that determine which gear engages. The transmission control module sends signals to each solenoid based on vehicle speed, throttle position, and
You can identify them using a wiring diagram specific to the 4L60E transmission. Manufacturers often label the solenoids in service manuals. If the label is missing, the wiring connector position and valve body diagram will help you distinguish them.
A common mistake is assuming both solenoids are interchangeable. While they may look identical physically, their control logic inside the transmission system is different. Installing them incorrectly or swapping them can lead to erratic shifting or limp mode.
Another useful tip is to inspect the electrical connector condition. If corrosion or damage exists, it can affect only one solenoid and create confusing symptoms that look like internal transmission failure.
Proper identification of Solenoid A and B ensures accurate diagnosis and prevents unnecessary part replacement. This step is critical before attempting any repair or replacement work.
Symptoms of a Bad 4L60E Shift Solenoid
When a shift solenoid starts to fail in a 4L60E transmission, the symptoms often appear as general transmission problems. Many drivers misinterpret these signs as a full transmission failure, but in many cases, the issue comes from a single faulty solenoid.
One of the most common symptoms is harsh or delayed shifting. The transmission may hesitate before changing gears or shift with a noticeable jerk. This happens because the solenoid fails to regulate hydraulic pressure correctly inside the valve body.
Another frequent sign is the transmission getting stuck in one gear. The vehicle may stay in second or third gear and refuse to shift up or down. This condition is often referred to as limp mode. It occurs when the control module detects a fault and limits gear operation to protect the transmission.
The check engine light is another clear indicator. Common diagnostic trouble codes include P0751 and P0756. These codes point directly to shift solenoid performance issues. A scan tool is usually required to read and confirm these errors.
Some vehicles may also experience gear slipping. This means the engine revs increase, but the vehicle does not accelerate properly. In other cases, the transmission may shift at the wrong time or skip gears entirely.
In severe cases, the transmission may refuse to shift out of first gear. This makes driving difficult and increases engine strain. While this symptom looks serious, it often traces back to electrical or solenoid failure rather than mechanical damage.
Early diagnosis is important because ignoring these symptoms can lead to more stress on the transmission system. Fixing a faulty shift solenoid early can restore normal shifting and prevent unnecessary repairs.
How to Replace 4L60E Shift Solenoid (Step by Step)
Replacing a shift solenoid in a 4L60E transmission is a manageable repair if you follow the correct process. You do not need to remove the entire transmission, but you must work carefully because the valve body and internal components are sensitive.
Before starting, make sure the vehicle is parked on a flat surface. Let the transmission cool down completely to avoid burns from hot fluid. Gather basic tools such as a socket set, drain pan, clean rags, and a new transmission filter and gasket if needed.
The first step is to drain the transmission fluid. Place a drain pan under the transmission and remove the transmission pan bolts slowly. Once the pan is removed, you will see residual fluid, so handle it carefully to avoid spills.
Next, inspect the inside of the transmission. The valve body will now be visible. The shift solenoids are mounted directly on it. Identify Shift Solenoid A and Shift Solenoid B using their position and wiring connections.
Disconnect the electrical connectors carefully. Do not pull on the wires directly because they can be fragile. Remove the bolts holding the faulty solenoid in place. Once removed, compare the old solenoid with the new one to ensure they match exactly.
Install the new solenoid in the same position. Tighten the bolts securely but do not overtighten them, as this can damage the valve body. Reconnect the wiring harness carefully and ensure each connector is fully seated.
After replacing the solenoid, clean the transmission pan and replace the gasket if it is worn or damaged. Reinstall the pan and tighten the bolts in a crisscross pattern to ensure even pressure.
Finally, refill the transmission with the correct type of fluid. Start the engine and let it idle. Shift through all gears slowly to allow the system to relearn fluid pressure. Check for leaks and confirm that shifting returns to normal.
Proper replacement of the shift solenoid can restore smooth gear changes and prevent expensive transmission repairs when done correctly.
Cost to Replace a 4L60E Shift Solenoid
The cost to replace a shift solenoid in a 4L60E transmission is relatively low compared to major transmission repairs. However, total expenses depend on whether you do the job yourself or hire a mechanic.
A single shift solenoid usually costs between 20 and 50 USD. If you replace both solenoids at the same time, the parts cost remains affordable. Many owners choose to replace both because they are located in the same area and have similar wear patterns.
Labor cost is where the price increases. A professional repair shop may charge between 150 and 400 USD depending on location and labor rates. This includes diagnosis, fluid replacement, and installation.
If you choose a DIY approach, your main costs are transmission fluid, a gasket, and basic tools. This can keep the total cost under 100 USD in many cases. However, accuracy is important because incorrect installation can cause further transmission issues.
Common Mistakes When Locating or Replacing Shift Solenoids
One common mistake is misidentifying the solenoids inside the valve body. Many users confuse Shift Solenoid A and B or mistake other components like the TCC solenoid for a shift solenoid. This leads to incorrect replacement and unresolved symptoms.
Another frequent error is not cleaning the transmission pan and valve body area before reassembly. Dirt or debris can affect fluid flow and cause shifting problems even after replacing the solenoid.
Some users also reuse old gaskets. This often results in fluid leaks, which can quickly lead to low transmission pressure and new shifting issues. Replacing the gasket is a simple step that prevents bigger problems.
Incorrect torque on bolts is another issue. Over tightening can damage the valve body, while under tightening can cause leaks. Following proper torque specifications is important for long term reliability.
Finally, many people forget to check or reset transmission codes after repair. Without clearing the error codes, the system may continue to operate in limp mode even after the issue is fixed.
Conclusion
Understanding the 4L60E transmission shift solenoid location is essential for accurate diagnosis and repair. The solenoids are located inside the valve body, which sits under the transmission pan. This means proper access requires careful disassembly, but not a full transmission removal.
By learning how to identify Solenoid A and B, recognizing failure symptoms, and following correct replacement steps, you can avoid unnecessary repair costs and misdiagnosis. Many shifting issues that appear serious are actually caused by simple electrical or solenoid problems.
Taking the time to diagnose correctly can save hundreds or even thousands of dollars in repair expenses. Whether you choose to repair it yourself or use a professional mechanic, understanding how the system works gives you a major advantage.
If your transmission is showing symptoms like harsh shifting, gear slipping, or limp mode, checking the shift solenoids should always be one of the first diagnostic steps.