Hyundai Elantra Brake Light Replacement is an important maintenance task for every driver. A working brake light helps other drivers see when you slow down or stop. This directly improves road safety for you and everyone on the road. A faulty brake light on a Hyundai Elantra can quickly increase accident risk, especially at night or in heavy traffic.
Brake light failure often happens without warning. A bulb may burn out after long use. A fuse may also blow and stop the system from working. In some cases, a loose socket or damaged wiring can cause the issue. Many drivers think they must go to a repair shop immediately. However, you can handle Hyundai Elantra Brake Light Replacement at home in most cases.
This guide shows you a simple and safe way to fix the problem. You will learn how to check the brake light system, remove the rear light assembly, and install a new bulb step by step. You will also learn how to test the light after installation. If the light still does not work, you will know how to check the fuse and wiring.
Brake lights play a key role in vehicle safety. You must work carefully during replacement to avoid damage to the light housing or electrical parts. Once you understand the process, the repair becomes simple and fast even for beginners.
Understanding Brake Light System on Hyundai Elantra
To complete a Hyundai Elantra Brake Light Replacement correctly, you first need to understand how the brake light system works. The brake light system on a Hyundai Elantra is part of the rear lighting and electrical system. It activates when you press the brake pedal. A switch near the pedal sends an electrical signal to the rear lights. This signal turns on the brake lights immediately.
The system includes several key components. These parts include the brake light bulb, the socket, the wiring harness, the brake pedal switch, and the fuse. Each component plays an important role. If one part fails, the brake light may stop working completely. In most cases, the issue starts from a simple bulb failure. The bulb burns out after long use or frequent braking in traffic.
The fuse protects the electrical circuit from overload. If the fuse blows, the brake lights stop working on both sides or sometimes only one side depending on the circuit design. Wiring problems can also happen due to vibration, heat, or moisture inside the rear light housing. These issues interrupt the electrical flow and prevent the light from turning on.
It is also important to understand the difference between brake lights and tail lights. Tail lights stay on when you turn on your headlights. Brake lights only activate when you press the brake pedal. Many beginners confuse these two functions, which can lead to incorrect diagnosis during repair.
Once you understand how the system works, you can identify the problem faster. This knowledge helps you avoid unnecessary replacement and focus only on the faulty part during Hyundai Elantra Brake Light Replacement.
Tools Needed for Brake Light Replacement
Before you start Hyundai Elantra Brake Light Replacement, you need to prepare the right tools. Proper preparation helps you work faster and avoid mistakes. It also reduces the risk of damaging parts on your Hyundai Elantra.
You only need a few basic tools for this job. A screwdriver is the most important tool because you will use it to remove the rear light assembly. A flathead or Phillips screwdriver usually works depending on the model year. You also need a replacement brake light bulb that matches your vehicle specification. Using the wrong bulb type can cause poor lighting or system errors.
It is a good idea to wear gloves during the replacement process. Gloves protect your hands and prevent oil from your skin from touching the bulb. Oil can shorten the lifespan of the new bulb. You should also keep a clean cloth nearby. You can use it to clean the socket area before installing the new bulb.
Some drivers also use a small flashlight. This helps you see inside the trunk area more clearly, especially in low light conditions. In some cases, a trim removal tool can help you remove plastic clips without scratching the surface.
You do not need advanced mechanical tools for this repair. The process stays simple when you use the correct basic tools. Once everything is ready, you can move to the next step with confidence and complete the Hyundai Elantra Brake Light Replacement safely and efficiently.
Step by Step Brake Light Removal Process
Now you can start the actual Hyundai Elantra Brake Light Replacement process. Work slowly and focus on safety while handling parts of your Hyundai Elantra. This step guides you through removing the rear brake light assembly without causing damage.
First, open the trunk and locate the rear light assembly behind the brake light position. You will see access points covered by a plastic panel or fabric lining. Carefully pull back the cover to expose the mounting area. Do not use excessive force because the clips can break easily.
Next, find the screws that hold the tail light assembly in place. Use a screwdriver to remove them slowly. Keep the screws in a safe place so you do not lose them. Once the screws are removed, gently pull the light housing outward. Support it with one hand while you remove it to avoid dropping or scratching it.
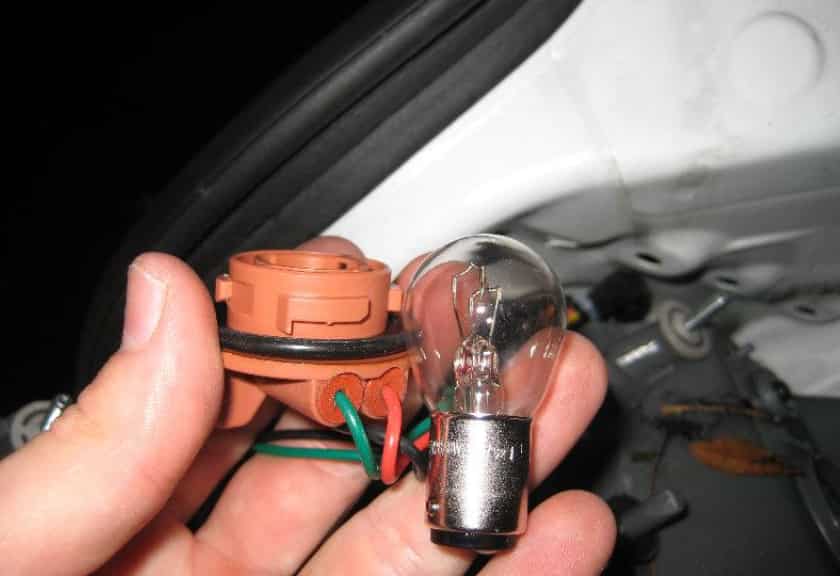
After removing the housing, locate the brake light socket on the back of the assembly. Turn the socket counterclockwise to release it. Then pull it out carefully. You will now see the old brake light bulb inside the socket.
Remove the old bulb by pulling it straight out. Avoid twisting it too hard because it may break. If the bulb is stuck, gently wiggle it until it comes loose. At this stage, you have completed the removal process and prepared the system for installation.
Now you are ready to install the new bulb in the next step of Hyundai Elantra Brake Light Replacement.
Installing New Brake Light Bulb
After removing the old bulb, you can continue with the installation part of Hyundai Elantra Brake Light Replacement. Work carefully to avoid damaging the socket or electrical contact on your Hyundai Elantra.
First, take the new brake light bulb and check that it matches the correct specification for your vehicle. A wrong bulb type can lead to poor brightness or system failure. Hold the bulb gently and avoid touching the glass surface with your bare hands. This helps prevent heat damage and extends the bulb lifespan.
Next, insert the new bulb into the socket. Push it straight in until it fits firmly. Do not force it too hard because this can damage the connection points. Once the bulb is in place, reconnect the socket to the rear light assembly. Turn it clockwise until it locks securely.
After that, place the light housing back into its original position. Align it with the mounting points carefully. Insert the screws and tighten them using a screwdriver. Make sure the housing sits evenly and does not move loosely.
Now you should test the brake light before closing everything. Ask someone to press the brake pedal while you check the rear lights. If the light turns on correctly, the installation is successful. If it does not work, check the socket connection again before moving to the next step.
At this stage, you have completed the main installation process of Hyundai Elantra Brake Light Replacement.
Testing and Troubleshooting
After you finish installing the new bulb, you need to test the system carefully. This step ensures your Hyundai Elantra Brake Light Replacement works correctly on your Hyundai Elantra. A quick check helps you confirm safety before you drive the car again.
First, press the brake pedal and observe the rear lights. Ask someone to help you if possible. Both brake lights should turn on immediately and stay bright while the pedal is pressed. If the lights respond correctly, the installation is successful.
If the brake light does not work, check the socket connection first. A loose connection is a common issue after installation. Remove the socket and reinstall it firmly. Then test the light again.
If the problem still exists, check the fuse. A blown fuse can stop the entire brake light system. Open the fuse box and locate the brake light fuse. Replace it if it looks damaged or burnt. This often solves the issue quickly.
If the fuse is fine, inspect the wiring. Look for signs of wear, corrosion, or loose connections. Wiring problems can interrupt the electrical flow and prevent the light from working.
In rare cases, the brake pedal switch may fail. If all other parts work correctly, this switch may need replacement.
Once the brake light works properly, you can close the trunk panel and complete the repair. Your Hyundai Elantra Brake Light Replacement is now finished safely and successfully.
Conclusion
Hyundai Elantra Brake Light Replacement is a simple but important maintenance task that improves driving safety and prevents accidents. When the brake lights stop working, you reduce the ability of other drivers to react in time. This increases risk, especially in heavy traffic or low visibility conditions.
By following the steps in this guide, you can complete the repair at home without advanced technical skills. You start by understanding how the brake light system works on a Hyundai Elantra. Then you prepare basic tools, remove the rear light assembly, install a new bulb, and test the system carefully. Each step helps you avoid mistakes and ensures the repair is done correctly.
This process also helps you save money compared to visiting a repair shop. More importantly, it gives you better control over your vehicle maintenance. You can quickly handle similar issues in the future without stress or delay.
Always remember that brake lights are part of a critical safety system. You should inspect them regularly and replace bulbs as soon as they show signs of failure. A few minutes of checking can prevent serious problems on the road.
With this knowledge, you can confidently manage Hyundai Elantra Brake Light Replacement anytime it is needed and keep your vehicle safe for every journey.