Replacing the cabin air filter in a Ford F-150 involves accessing the filter housing behind the passenger-side glove box, removing the old filter, and installing a compatible replacement with the correct airflow orientation. The procedure applies to 2015 and newer Ford F-150 models equipped with a factory-serviceable cabin air filter. Most 2014 and older F-150 models do not have a factory-installed cabin air filter, so owners should verify their truck’s configuration before purchasing replacement parts.
The cabin air filter captures airborne contaminants such as dust, pollen, and road debris before they enter the passenger compartment through the heating, ventilation, and air conditioning (HVAC) system. A clogged filter restricts airflow through the HVAC system and may contribute to weak ventilation, unpleasant odors, and reduced heating or cooling performance. Replacing the filter restores airflow when filter blockage is the underlying cause.
Ford F-150 cabin air filter replacement is a routine maintenance task that many owners can complete without professional assistance. This guide explains which model years have a replaceable filter, where the filter is located, which tools and parts are required, and how to remove and install it correctly. It also covers replacement intervals, warning signs, filter options, and DIY versus professional replacement costs.
Which Ford F-150 Model Years Have a Cabin Air Filter?
Ford F-150 models from 2015 onward generally have a factory-installed, replaceable cabin air filter, while 2014 and older models do not have a conventional factory-serviceable cabin air filter. Ford introduced a serviceable cabin filtration system with the redesigned 13th-generation F-150 in 2015, allowing owners to replace the filter as part of routine HVAC maintenance.
The availability of a cabin air filter depends primarily on the truck’s model year and HVAC configuration. Owners should verify the replacement part using their vehicle identification number (VIN), owner’s manual, or Ford parts catalog before beginning the procedure.
| Ford F-150 Model Years | Cabin Air Filter Availability | Replacement |
|---|---|---|
| 1997–2003 | No conventional factory-serviceable filter | Not applicable to standard factory configuration |
| 2004–2008 | No conventional factory-serviceable filter | Not applicable to standard factory configuration |
| 2009–2014 | No conventional factory-serviceable filter | Not applicable to standard factory configuration |
| 2015–2020 | Factory-serviceable cabin air filter | Replaceable behind the glove box |
| 2021–2026 | Factory-serviceable cabin air filter | Replaceable behind the glove box |
For example, a 2013 Ford F-150 owner cannot follow the standard glove-box filter replacement procedure used on a 2018 F-150 because the earlier truck lacks the same factory filter housing arrangement. Some older trucks may have aftermarket filtration modifications, but these installations require procedures specific to the installed components.
Ford F-150 owners should also distinguish the cabin air filter from the engine air filter. The cabin air filter cleans air entering the passenger compartment through the HVAC system, while the engine air filter removes airborne contaminants from the air entering the engine. Both require maintenance, but they have different locations, replacement parts, and functions.
Where Is the Cabin Air Filter Located in a Ford F-150?
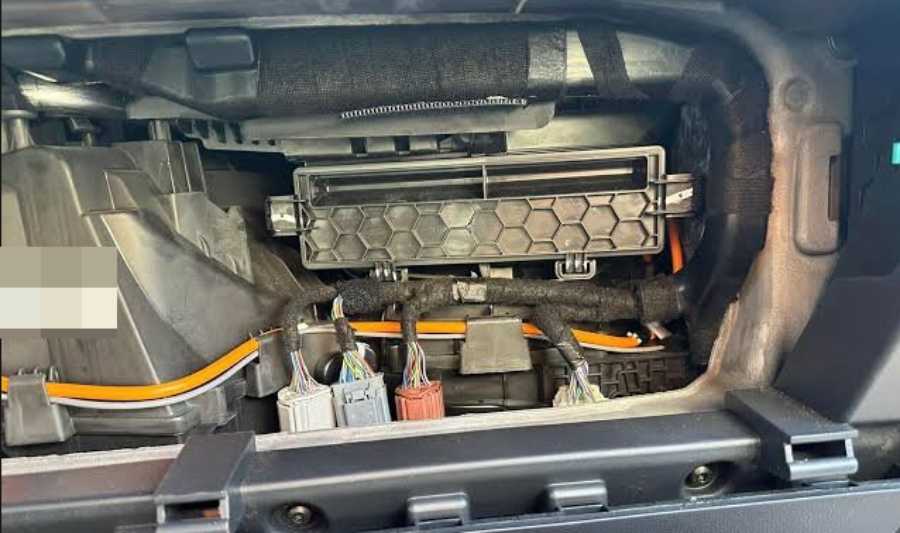
The cabin air filter in a 2015 and newer Ford F-150 is located behind the passenger-side glove box, inside the HVAC air distribution housing. Accessing the filter requires opening and lowering the glove box to expose the filter compartment. The exact glove box retaining mechanisms and access panel design vary between model generations.
On 2015–2020 Ford F-150 models, the filter housing sits behind the glove box assembly. Access involves releasing the glove box retaining features and moving the glove box out of the way. A rectangular filter access cover protects the cabin filter inside the HVAC housing. Depending on the configuration, additional trim or fastener removal may be necessary to reach the cover.
On 2021 and newer Ford F-150 models, the cabin filter remains behind the passenger-side glove box, although the glove box design and access procedure differ from the previous generation. Owners should follow the instructions for their specific model year to avoid damaging plastic retaining tabs, hinges, or surrounding trim.
The cabin air filter housing is part of the HVAC airflow path. Air passes through the filter media before circulating through the vehicle’s ventilation outlets. Dust, pollen, leaves, and other airborne particles accumulate in the filter over time, increasing resistance to airflow as the filter becomes loaded with debris.
To identify the correct compartment, locate the rectangular filter access cover behind the glove box rather than the engine air filter housing under the hood. The cabin filter should fit securely inside its designated compartment, and the airflow direction marking on the replacement filter must match the direction specified for the HVAC housing. Correct positioning prevents installation problems and helps maintain unrestricted airflow through the filter.
What Tools and Parts Do You Need to Replace a Ford F-150 Cabin Air Filter?
Replacing a Ford F-150 cabin air filter requires a compatible replacement filter and basic tools for accessing the HVAC housing behind the glove box. The exact tools depend on the model year because glove box retaining mechanisms, trim panels, and filter access covers differ between F-150 generations.
The following table identifies the parts and tools used during replacement.
| Tools and Parts | Purpose | Requirement |
|---|---|---|
| Replacement cabin air filter | Replaces the contaminated filter | Required |
| Screwdriver or nut driver | Removes applicable fasteners | Model-dependent |
| Plastic trim removal tool | Releases trim without damaging plastic surfaces | Optional |
| Microfiber cloth | Removes dust around the filter housing | Recommended |
| Small vacuum cleaner | Removes accessible leaves and loose debris | Optional |
| Vehicle owner’s manual | Confirms maintenance and access instructions | Recommended |
The replacement filter must match the truck’s model year and HVAC configuration. Ford offers Motorcraft cabin air filters designed for specific vehicle applications, while aftermarket manufacturers provide compatible alternatives. Filter dimensions, sealing edges, and airflow specifications must match the original equipment requirements.
For example, a cabin air filter listed for a 2018 Ford F-150 should not automatically be assumed compatible with a 2023 model. Even when filters appear similar, differences in dimensions or housing design can prevent proper installation. Verify fitment through the vehicle’s VIN, Ford parts catalog, or the filter manufacturer’s application guide before purchasing.
How Do You Replace the Cabin Air Filter in a Ford F-150?
To replace the cabin air filter in a Ford F-150, lower the passenger-side glove box, open the HVAC filter housing, remove the old filter, install the new filter in the correct airflow direction, and reassemble the glove box. The procedure applies to 2015 and newer models equipped with a factory-serviceable cabin filter, although the exact access steps vary by model year.
Most of the work involves reaching the filter compartment without damaging the glove box retaining components. Follow the model-specific access procedure and avoid forcing plastic clips or covers that do not release easily.
How Do You Remove the Glove Box and Old Cabin Air Filter?
Removing the old Ford F-150 cabin air filter requires accessing the HVAC housing behind the passenger-side glove box and releasing the filter compartment cover. The glove box must be lowered or moved out of the way before the filter can be removed.
Step 1: Turn off the engine and HVAC system.
Park the Ford F-150 on a level surface, switch off the ignition, and turn off the heating and air conditioning system. This prevents the blower motor from operating while the filter housing is open. Remove loose items from the glove box to reduce weight and prevent objects from falling during removal.
Step 2: Open and lower the passenger-side glove box.
Open the glove box fully and identify its retaining tabs, stops, or damping mechanism. Release the appropriate retaining components according to the vehicle’s model-year instructions. Some F-150 configurations require additional trim or fastener removal before the glove box can be lowered far enough to expose the HVAC housing.
Apply gentle pressure when releasing plastic retaining features. Excessive force can crack the glove box stops, damage the damping mechanism, or break surrounding trim.
Step 3: Locate and open the cabin air filter housing.
Identify the rectangular filter access cover on the HVAC housing behind the glove box. Release its retaining clips or remove the applicable fasteners, depending on the truck’s configuration. Set the cover aside in a clean location.
The filter should now be visible inside the compartment. Before removing it, inspect the orientation of the existing filter and note the direction of any airflow arrow printed on its frame.
Step 4: Remove the old cabin air filter.
Grip the exposed edge of the filter and pull it carefully out of the housing. Keep the filter as level as the available space allows to prevent accumulated dust, leaves, and other debris from falling into the HVAC compartment.
Inspect the removed filter for visible contamination, damaged pleats, and trapped debris. A heavily loaded filter may restrict airflow, although appearance alone does not establish whether the filter has reached its recommended replacement interval.
Use a small vacuum or microfiber cloth to remove accessible loose debris around the filter opening. Avoid pushing dirt deeper into the HVAC housing or contacting internal electrical components.
How Do You Install the New Ford F-150 Cabin Air Filter?
Install the new Ford F-150 cabin air filter by aligning its airflow direction marking with the HVAC housing’s specified airflow direction and sliding the filter fully into its compartment. Correct installation requires matching the filter’s dimensions, orientation, and sealing surfaces to the housing.
Step 5: Verify the replacement filter.
Compare the new filter with the removed filter before installation. Check the overall length, width, thickness, and frame design. The replacement must fit the housing without substantial gaps or excessive compression.
Confirm that the new filter is approved for the truck’s specific model year. A filter that is too small may allow unfiltered air to bypass its edges, while an oversized filter may deform during installation.
Step 6: Check the airflow direction arrow.
Locate the airflow direction arrow printed on the replacement filter. Align it with the airflow direction specified by the vehicle’s filter housing or service instructions.
Do not assume that every arrow printed on a filter represents airflow. Some filters use markings that indicate installation orientation instead. Follow the replacement filter manufacturer’s instructions and the vehicle’s specified installation direction when the markings differ.
Step 7: Insert the replacement cabin air filter.
Slide the new filter into the HVAC housing using the same insertion path as the original filter. Guide the filter into position without crushing its pleats or bending its frame beyond what the manufacturer’s instructions permit.
Ensure the filter sits fully inside the compartment and that its sealing edges align with the housing. A correctly fitted filter should not protrude into the access cover’s closing path.
Step 8: Reinstall the filter housing cover.
Position the access cover over the filter compartment and secure its retaining clips or fasteners. Check that the cover sits flush against the housing and that no filter material is trapped between the mating surfaces.
An improperly secured cover can allow air to bypass the filter or create unwanted noise during HVAC operation.
How Do You Reassemble the Glove Box After Replacing the Filter?
Reassemble the Ford F-150 glove box by restoring its retaining mechanisms, reconnecting any removed damping components, and checking that the glove box opens and closes normally. The reassembly sequence generally reverses the access procedure used to reach the cabin filter.
Step 9: Restore the glove box assembly.
Raise the glove box into its original position and reconnect the retaining stops, hinges, or damping mechanism as applicable. Reinstall any trim panels or fasteners removed during access.
Check that each retaining component is properly engaged before closing the glove box. Loose or misaligned components can cause rattling, uneven movement, or difficulty closing the compartment.
Step 10: Test the HVAC system.
Start the vehicle or activate the ignition as required for HVAC operation. Turn on the ventilation system and test several blower speeds. Confirm that air flows through the dashboard vents without unusual whistling, rattling, or vibration.
Switch between available airflow modes to verify normal operation. If airflow is unexpectedly weak or new noises appear immediately after replacement, switch off the blower and recheck the filter seating, access cover, and surrounding components.
The replacement is complete once the filter housing is secured, the glove box operates normally, and the HVAC system functions without installation-related problems.
What Tools and Parts Do You Need to Replace a Ford F-150 Cabin Air Filter?
Replacing a Ford F-150 cabin air filter requires a compatible replacement filter and basic tools for accessing the HVAC housing behind the glove box. The exact tools depend on the model year because glove box retaining mechanisms, trim panels, and filter access covers differ between F-150 generations.
The following table identifies the parts and tools used during replacement.
| Tools and Parts | Purpose | Requirement |
|---|---|---|
| Replacement cabin air filter | Replaces the contaminated filter | Required |
| Screwdriver or nut driver | Removes applicable fasteners | Model-dependent |
| Plastic trim removal tool | Releases trim without damaging plastic surfaces | Optional |
| Microfiber cloth | Removes dust around the filter housing | Recommended |
| Small vacuum cleaner | Removes accessible leaves and loose debris | Optional |
| Vehicle owner’s manual | Confirms maintenance and access instructions | Recommended |
The replacement filter must match the truck’s model year and HVAC configuration. Ford offers Motorcraft cabin air filters designed for specific vehicle applications, while aftermarket manufacturers provide compatible alternatives. Filter dimensions, sealing edges, and airflow specifications must match the original equipment requirements.
For example, a cabin air filter listed for a 2018 Ford F-150 should not automatically be assumed compatible with a 2023 model. Even when filters appear similar, differences in dimensions or housing design can prevent proper installation. Verify fitment through the vehicle’s VIN, Ford parts catalog, or the filter manufacturer’s application guide before purchasing.
How Do You Replace the Cabin Air Filter in a Ford F-150?
To replace the cabin air filter in a Ford F-150, lower the passenger-side glove box, open the HVAC filter housing, remove the old filter, install the new filter in the correct airflow direction, and reassemble the glove box. The procedure applies to 2015 and newer models equipped with a factory-serviceable cabin filter, although the exact access steps vary by model year.
Most of the work involves reaching the filter compartment without damaging the glove box retaining components. Follow the model-specific access procedure and avoid forcing plastic clips or covers that do not release easily.
How Do You Remove the Glove Box and Old Cabin Air Filter?
Removing the old Ford F-150 cabin air filter requires accessing the HVAC housing behind the passenger-side glove box and releasing the filter compartment cover. The glove box must be lowered or moved out of the way before the filter can be removed.
Step 1: Turn off the engine and HVAC system.
Park the Ford F-150 on a level surface, switch off the ignition, and turn off the heating and air conditioning system. This prevents the blower motor from operating while the filter housing is open. Remove loose items from the glove box to reduce weight and prevent objects from falling during removal.
Step 2: Open and lower the passenger-side glove box.
Open the glove box fully and identify its retaining tabs, stops, or damping mechanism. Release the appropriate retaining components according to the vehicle’s model-year instructions. Some F-150 configurations require additional trim or fastener removal before the glove box can be lowered far enough to expose the HVAC housing.
Apply gentle pressure when releasing plastic retaining features. Excessive force can crack the glove box stops, damage the damping mechanism, or break surrounding trim.
Step 3: Locate and open the cabin air filter housing.
Identify the rectangular filter access cover on the HVAC housing behind the glove box. Release its retaining clips or remove the applicable fasteners, depending on the truck’s configuration. Set the cover aside in a clean location.
The filter should now be visible inside the compartment. Before removing it, inspect the orientation of the existing filter and note the direction of any airflow arrow printed on its frame.
Step 4: Remove the old cabin air filter.
Grip the exposed edge of the filter and pull it carefully out of the housing. Keep the filter as level as the available space allows to prevent accumulated dust, leaves, and other debris from falling into the HVAC compartment.
Inspect the removed filter for visible contamination, damaged pleats, and trapped debris. A heavily loaded filter may restrict airflow, although appearance alone does not establish whether the filter has reached its recommended replacement interval.
Use a small vacuum or microfiber cloth to remove accessible loose debris around the filter opening. Avoid pushing dirt deeper into the HVAC housing or contacting internal electrical components.
How Do You Install the New Ford F-150 Cabin Air Filter?
Install the new Ford F-150 cabin air filter by aligning its airflow direction marking with the HVAC housing’s specified airflow direction and sliding the filter fully into its compartment. Correct installation requires matching the filter’s dimensions, orientation, and sealing surfaces to the housing.
Step 5: Verify the replacement filter.
Compare the new filter with the removed filter before installation. Check the overall length, width, thickness, and frame design. The replacement must fit the housing without substantial gaps or excessive compression.
Confirm that the new filter is approved for the truck’s specific model year. A filter that is too small may allow unfiltered air to bypass its edges, while an oversized filter may deform during installation.
Step 6: Check the airflow direction arrow.
Locate the airflow direction arrow printed on the replacement filter. Align it with the airflow direction specified by the vehicle’s filter housing or service instructions.
Do not assume that every arrow printed on a filter represents airflow. Some filters use markings that indicate installation orientation instead. Follow the replacement filter manufacturer’s instructions and the vehicle’s specified installation direction when the markings differ.
Step 7: Insert the replacement cabin air filter.
Slide the new filter into the HVAC housing using the same insertion path as the original filter. Guide the filter into position without crushing its pleats or bending its frame beyond what the manufacturer’s instructions permit.
Ensure the filter sits fully inside the compartment and that its sealing edges align with the housing. A correctly fitted filter should not protrude into the access cover’s closing path.
Step 8: Reinstall the filter housing cover.
Position the access cover over the filter compartment and secure its retaining clips or fasteners. Check that the cover sits flush against the housing and that no filter material is trapped between the mating surfaces.
An improperly secured cover can allow air to bypass the filter or create unwanted noise during HVAC operation.
How Do You Reassemble the Glove Box After Replacing the Filter?
Reassemble the Ford F-150 glove box by restoring its retaining mechanisms, reconnecting any removed damping components, and checking that the glove box opens and closes normally. The reassembly sequence generally reverses the access procedure used to reach the cabin filter.
Step 9: Restore the glove box assembly.
Raise the glove box into its original position and reconnect the retaining stops, hinges, or damping mechanism as applicable. Reinstall any trim panels or fasteners removed during access.
Check that each retaining component is properly engaged before closing the glove box. Loose or misaligned components can cause rattling, uneven movement, or difficulty closing the compartment.
Step 10: Test the HVAC system.
Start the vehicle or activate the ignition as required for HVAC operation. Turn on the ventilation system and test several blower speeds. Confirm that air flows through the dashboard vents without unusual whistling, rattling, or vibration.
Switch between available airflow modes to verify normal operation. If airflow is unexpectedly weak or new noises appear immediately after replacement, switch off the blower and recheck the filter seating, access cover, and surrounding components.
The replacement is complete once the filter housing is secured, the glove box operates normally, and the HVAC system functions without installation-related problems.
What Are the Signs That a Ford F-150 Cabin Air Filter Needs Replacement?
The four main signs that a Ford F-150 cabin air filter needs replacement are reduced HVAC airflow, unpleasant cabin odors, visible filter contamination, and unusual ventilation noise. These symptoms develop when dust, pollen, leaves, and other airborne particles accumulate in the filter or interfere with airflow through the HVAC system. However, similar symptoms can also result from unrelated ventilation problems.
1. Reduced airflow from the HVAC vents. A clogged cabin air filter increases resistance to airflow, reducing the volume of air passing through the ventilation system. The blower motor may continue operating at its selected speed while less air reaches the passenger compartment. For example, an F-150 with a heavily contaminated filter may produce noticeably weaker airflow at the same fan setting than it did with a clean filter.
2. Musty or unpleasant odors inside the cabin. Moisture, organic debris, and trapped contaminants can contribute to unpleasant smells when the HVAC system operates. A dirty cabin filter may retain odor-producing material, particularly in humid environments. However, persistent musty odors can also originate from microbial growth on the air conditioning evaporator or moisture accumulation inside the HVAC housing. Replacing the filter addresses odors caused by contaminated filter media but does not eliminate every source of cabin odor.
3. Visible dirt and debris on the filter. A cabin filter covered with dust, leaves, insects, or other debris may require replacement before its scheduled maintenance interval. Inspecting the filter provides direct evidence of contamination, although visible appearance does not measure filtration efficiency or airflow resistance precisely. A filter with damaged pleats, a deformed frame, or excessive debris should be replaced with a compatible new filter.
4. Unusual noise from the ventilation system. Restricted airflow or loose debris near the filter compartment may contribute to whistling, rattling, or changes in blower sound. These noises do not automatically indicate a clogged filter because worn blower motor bearings, damaged fan blades, and loose HVAC components can produce similar symptoms. Inspect the filter housing and surrounding components before identifying the cabin filter as the cause.
Ford F-150 owners should inspect the cabin air filter when these symptoms appear, even if the truck has not reached its scheduled replacement mileage. If symptoms persist after installing a correctly fitted filter, further HVAC diagnosis is necessary.
How Much Does It Cost to Replace a Ford F-150 Cabin Air Filter?
Ford F-150 cabin air filter replacement costs depend on the replacement filter, model year, and whether the work is performed at home or by a professional technician. DIY replacement generally costs less because the owner pays for the filter without a separate labor charge. Professional service adds labor and may include a parts markup or inspection fee.
For preliminary budgeting, a compatible aftermarket cabin air filter may cost approximately $15–$35, while some OEM or premium activated carbon options may cost $25–$50 or more. Professional replacement may bring the total to approximately $50–$120, depending on local labor rates and the vehicle’s access requirements. These are illustrative US budgeting ranges rather than verified current quotations, and actual prices should be checked against the specific vehicle and service provider.
| Replacement Option | Estimated Parts Cost | Estimated Total Cost |
|---|---|---|
| DIY with aftermarket filter | $15–$35 | $15–$35 |
| DIY with OEM or premium filter | $25–$50+ | $25–$50+ |
| Professional replacement | Varies by filter | $50–$120 |
The price difference between filters reflects factors such as brand, filtration media, and product construction. Standard particulate filters primarily capture airborne particles, while activated carbon filters include an adsorbent layer designed to reduce certain odors and gaseous contaminants. A higher price does not guarantee better fitment or performance for every Ford F-150 configuration.
Professional replacement costs also vary by service location. Dealerships, independent repair shops, and automotive maintenance chains may use different labor pricing structures. Owners should confirm whether a quoted price includes the filter, labor, taxes, and any additional service charges.
How Much Can You Save by Replacing the Cabin Air Filter Yourself?
Replacing a Ford F-150 cabin air filter yourself can eliminate the labor portion of a professional replacement bill. The actual savings equal the professional service total minus the cost of the filter and any tools purchased specifically for the job.
For example, if a repair shop charges $80 for replacement and a compatible filter costs $25, completing the work at home saves approximately $55, assuming no additional tool expenses. The savings increase when the owner already has the necessary tools and can access the filter without purchasing additional equipment.
DIY replacement also allows owners to inspect the removed filter, verify the replacement part, and confirm that the filter housing is properly secured. Many owners can complete the procedure in approximately 15–30 minutes, although unfamiliar glove box retaining mechanisms or model-specific trim removal can extend the process.
Professional replacement remains a practical option when the glove box assembly is difficult to remove, retaining components are damaged, or the owner cannot confidently identify the correct filter housing. Incorrect removal or installation can damage interior trim or leave the filter improperly seated, potentially offsetting the savings from performing the work independently.
Read more: Toyota Cabin Air Filter Replacement: Step-by-Step Guide
Which Cabin Air Filter Type Is Best for a Ford F-150?
The best cabin air filter for a Ford F-150 is a vehicle-compatible filter that provides the required particle filtration, fits the HVAC housing correctly, and meets the owner’s air quality needs. Standard particulate filters are suitable for capturing dust, pollen, and road debris, while activated carbon filters provide additional protection against certain odors and gaseous contaminants.
Ford F-150 owners can choose between Motorcraft original equipment manufacturer (OEM) filters and compatible aftermarket alternatives. Motorcraft filters are designed for specified Ford applications, providing a straightforward option when the correct part number is selected. Aftermarket manufacturers offer additional choices, including conventional particulate filters, activated carbon filters, and products with enhanced particle filtration media.
The following table compares three common cabin air filter options.
| Filter Type | Primary Function | Best Application |
|---|---|---|
| Standard particulate filter | Captures dust, pollen, and airborne particles | Routine cabin air filtration |
| Activated carbon filter | Captures particles and adsorbs certain odors and gases | Urban traffic and odor exposure |
| High-efficiency particulate filter | Targets smaller airborne particles, depending on its tested efficiency | Drivers prioritizing fine-particle filtration |
Standard particulate filters use pleated filtration media to capture airborne particles as air passes through the HVAC system. These filters are suitable for routine driving conditions, including paved highways, suburban roads, and areas with seasonal pollen exposure. Their performance depends on filtration efficiency, media construction, and the quality of the seal inside the filter housing.
Activated carbon cabin air filters combine particle filtration with a carbon layer that adsorbs certain gaseous compounds and odors. Activated carbon contains a porous structure that provides a large surface area for adsorption. For example, an activated carbon filter may reduce some traffic-related odors entering the cabin, although its effectiveness depends on the specific contaminants, carbon quantity, and filter design.
High-efficiency particulate filters use specialized media designed to capture smaller particles. Some aftermarket products advertise HEPA-level performance, but these claims should be evaluated using the manufacturer’s documented testing standards. A filter marketed as high-efficiency does not necessarily provide certified HEPA performance when installed in a vehicle HVAC system.
Filter efficiency must also be balanced against airflow resistance. A filter with dense media may create additional resistance if its construction is not suitable for the vehicle’s ventilation system. Choosing a filter specifically approved for the Ford F-150 helps maintain the intended balance between particle capture and airflow.
For most Ford F-150 owners, a compatible OEM-quality particulate filter provides a practical replacement option. An activated carbon filter is worth considering when odor reduction is a priority. Regardless of filter type, verify the exact model-year application, dimensions, and installation instructions before purchasing.
Can You Clean and Reuse a Ford F-150 Cabin Air Filter?
Standard disposable Ford F-150 cabin air filters should be replaced rather than washed and reused. Their filtration media is designed to capture airborne contaminants during a specified service life, and cleaning does not reliably restore the original filtration performance or structural condition.
Most conventional cabin filters use pleated synthetic fibers, paper-based media, or combinations of filtration materials. Dust and fine particles become trapped within the media structure rather than remaining exclusively on the surface. Shaking or vacuuming the filter may remove loose debris, but it does not reliably eliminate particles embedded in the filtration layers.
Washing a disposable cabin air filter can damage its media, deform its pleats, or weaken the bonding materials that hold the filter together. Moisture retained inside the filter may also contribute to unwanted odors or microbial growth when the HVAC system operates. For these reasons, washing should not be used as a substitute for replacement unless the filter manufacturer explicitly permits it.
Reusable aftermarket cabin filters are a separate category. These products may use washable synthetic media and require specific cleaning and drying procedures. A reusable filter should only be cleaned according to its manufacturer’s instructions and reinstalled after it has dried completely.
For example, a Ford F-150 equipped with a conventional disposable Motorcraft cabin filter should receive a compatible new filter when replacement is due. An F-150 equipped with an aftermarket washable filter may follow a different maintenance procedure, provided the filter is approved for the vehicle and remains in serviceable condition.
Replacing a contaminated disposable filter maintains the intended filtration characteristics and avoids damage caused by improper cleaning. Owners should inspect the filter during scheduled maintenance and select a new, correctly fitted replacement whenever the existing filter reaches its recommended service interval or shows significant contamination.