Seeing the Honda Pilot DRL light on can be confusing, especially when the vehicle seems to drive normally and no other warning appears. In most cases, this light indicates a problem with the daytime running light system rather than a serious engine or transmission issue. However, ignoring it for too long may reduce daytime visibility and could hide a larger electrical problem.
The cause may be as simple as a burned out bulb, a loose connector, or a blown fuse. In other cases, the warning can result from a faulty relay, damaged wiring, low battery voltage, moisture inside the headlight housing, or a problem with the lighting control module. The exact cause often depends on the Honda Pilot model year, trim level, and headlight design.
This guide explains what the Honda Pilot DRL light on warning means, whether it is safe to keep driving, and how to diagnose the problem step by step. You will also learn the most common fixes, possible reset methods, and typical repair costs. By checking the easiest causes first, you can avoid replacing working parts and reduce unnecessary repair expenses.
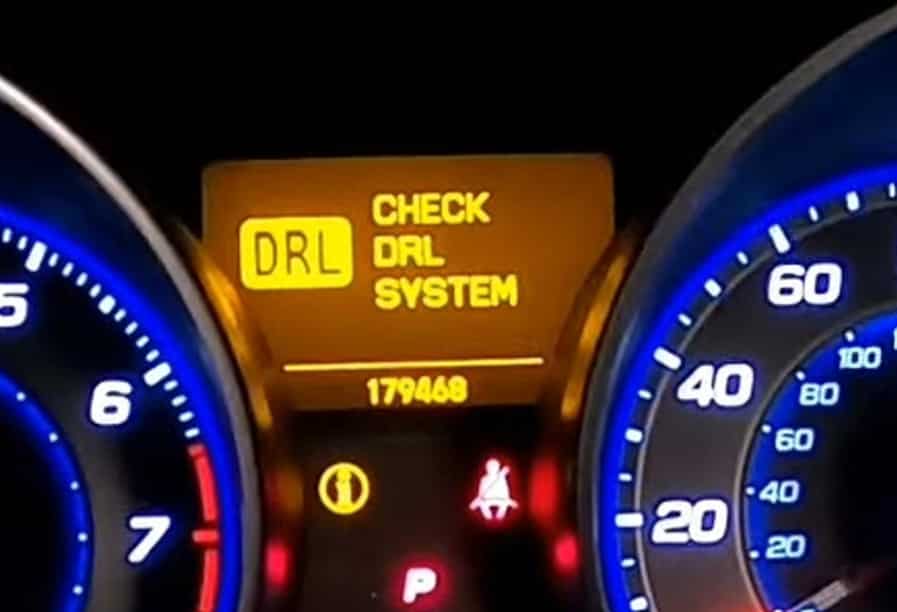
What Does the Honda Pilot DRL Light Mean?
The Honda Pilot DRL light usually indicates a problem with the daytime running light system. DRL stands for daytime running lights, which are designed to make your vehicle more visible to other drivers during daylight hours. These lights normally turn on automatically when the engine is running and certain operating conditions are met.
On many Honda Pilot models, the DRL system uses the high beam bulbs at reduced intensity. Other versions may use separate bulbs or integrated LED lighting. The exact design depends on the model year, trim level, and headlight configuration. This is important because the repair process can vary significantly between older and newer vehicles.
A normal DRL indicator confirms that the daytime running lights are active. A DRL warning light, however, means the system has detected a fault. One or both daytime running lights may not be working correctly, even if the main headlights still operate normally.
Common causes include a burned out bulb, an incorrect replacement bulb, a blown fuse, a faulty relay, damaged wiring, or a corroded connector. Newer Honda Pilot models may also display the warning when an LED driver, headlight assembly, or lighting control module develops a fault.
The warning does not usually mean that the engine or transmission has a serious problem. However, it should not be ignored. Daytime running lights improve visibility, especially during cloudy weather, rain, fog, and low light conditions. A failed system can make the vehicle less noticeable to other road users.
You should first check whether both daytime running lights are working. Then inspect the low beam headlights, high beams, turn signals, brake lights, and parking lights. If several exterior lights are affected, the problem may involve a fuse, wiring circuit, battery, alternator, or control module rather than a single bulb.
Is It Safe to Drive With the Honda Pilot DRL Light On?
In many cases, you can continue driving for a short period when the Honda Pilot DRL light is on, provided that the main headlights, brake lights, turn signals, and other essential exterior lights still work correctly. The warning usually affects daytime visibility rather than basic vehicle operation.
However, the vehicle should still be inspected as soon as possible. A DRL problem may appear minor, but it can sometimes reveal a larger electrical issue. Damaged wiring, a weak battery, poor grounding, or moisture inside the headlight assembly may eventually affect other lighting systems.
Before driving, test all important exterior lights. Start the vehicle and confirm whether both daytime running lights illuminate. Turn on the low beam headlights and high beams. Check the front and rear turn signals, brake lights, and hazard lights. Ask another person to help if necessary.
You should avoid driving at night if the DRL warning appears together with a failed low beam or high beam. Reduced visibility can create a serious safety risk. You should also stop driving and arrange professional assistance if you notice burning smells, melted connectors, repeated fuse failure, flickering headlights, or multiple electrical warnings on the dashboard.
Weather conditions also matter. Driving without functioning daytime running lights may be more dangerous during heavy rain, fog, snow, or overcast conditions. Even when local laws do not require DRLs, they help other drivers see your vehicle sooner.
A DRL warning may also cause legal or inspection problems in some locations. Lighting requirements vary, so a vehicle with a failed daytime running light system may not pass a safety inspection.
The safest approach is to treat the warning as a maintenance issue that needs timely attention. You may be able to drive to a repair shop if all critical lights are working, but you should not delay diagnosis for weeks or months.
Burned Out DRL Bulb
A burned out bulb is one of the most common reasons for the Honda Pilot DRL light to appear. Bulbs weaken over time because of heat, vibration, electrical cycles, and normal use. In many cases, one daytime running light stops working while the other remains functional.
The easiest way to check for a failed bulb is to park the vehicle on a level surface and observe both front lights while the engine is running. The parking brake may need to be released before the daytime running lights activate. Make sure the vehicle is secure before performing this test.
A failed bulb may have a broken filament, darkened glass, or visible discoloration. However, visual inspection alone is not always reliable. Some bulbs look normal even when the internal filament has failed. Testing the bulb with a multimeter or installing a known compatible replacement can confirm the diagnosis.
When replacing a DRL bulb, use the correct specification for your Honda Pilot model year. A bulb with the wrong wattage or resistance may not work properly and can trigger the warning again. It may also cause flickering, uneven brightness, excessive heat, or damage to the socket.
Replacing bulbs in pairs is often a practical choice. If both bulbs were installed at the same time, the second bulb may be close to failure. Matching bulbs also help maintain consistent brightness and color.
Do not touch the glass surface of a halogen bulb with bare fingers. Oil from your skin can create hot spots that shorten the life of the bulb. Hold it by the base or use clean gloves during installation.
If the warning remains after replacing the failed bulb, inspect the connector and socket. Look for corrosion, loose terminals, melted plastic, or signs of overheating. A new bulb cannot work correctly if the electrical connection is damaged.
Incorrect Replacement Bulb
The Honda Pilot DRL light may remain on after a bulb replacement when the new bulb does not match the original specification. This problem is especially common when owners install aftermarket LED bulbs or choose a bulb based only on physical size.
The DRL system may monitor electrical resistance and current flow. A bulb with different electrical characteristics can cause the control system to interpret the circuit as faulty, even when the light appears to work.
An incorrect bulb may create several symptoms. The light may flicker, appear dimmer than the opposite side, turn off after a few seconds, or trigger a warning on the dashboard. In some cases, the high beam function may also behave incorrectly because the same bulb is used for both high beam lighting and daytime running lights.
Low quality LED conversions are a frequent cause of DRL warnings. LED bulbs consume less power than halogen bulbs, which can create a resistance mismatch. Some products include resistors or control modules to improve compatibility, but these components may generate heat or fail over time.
The safest solution is to confirm the correct bulb number in the owner’s manual, service information, or a reliable parts catalog for the exact model year and trim. Do not assume that all Honda Pilot models use the same bulb.
Check that the bulb is fully seated and locked into position. A loose installation can interrupt the connection when the vehicle vibrates. Also inspect the connector to confirm that it is attached securely.
If the correct bulb is installed and the warning continues, compare the brightness of both sides and inspect the socket for heat damage or corrosion. The issue may be in the wiring, fuse, relay, or control module rather than the bulb itself.
Blown DRL Fuse
A blown fuse is another common reason the Honda Pilot DRL light turns on. Every lighting circuit is protected by a fuse that prevents excessive electrical current from damaging the wiring and other components. When the current exceeds the designed limit, the fuse opens the circuit and stops the flow of electricity.
A fuse can fail because of a temporary power surge, a short circuit, moisture inside the headlight assembly, damaged wiring, or an aging electrical component. Simply replacing the fuse without identifying the real cause may solve the problem only for a short time. If the new fuse blows again, another fault is likely present in the circuit.
Start by locating the correct fuse box for your Honda Pilot. Depending on the model year, the DRL fuse may be located in the engine compartment or inside the cabin. Refer to the owner’s manual or the fuse box diagram to identify the correct position. Pull the fuse carefully and inspect the metal strip inside. If the strip is broken or burned, the fuse has failed.
Always replace the fuse with another one that has the same amperage rating. Installing a fuse with a higher rating increases the risk of overheating the wiring and may cause expensive electrical damage. After installing the new fuse, start the engine and verify whether the daytime running lights operate normally.
If the replacement fuse fails immediately or after a short period, inspect the wiring harness, connectors, and headlight assembly before installing another fuse. Repeated fuse failure almost always indicates an underlying electrical problem that should be repaired rather than ignored.
Faulty DRL Relay
The DRL relay acts as an electrical switch that controls power to the daytime running light system. When the relay receives a signal from the vehicle’s control system, it closes an internal circuit and allows electricity to reach the lights. As the relay ages, its internal contacts can wear out, creating intermittent or complete power loss.
A faulty relay often produces symptoms that seem inconsistent. The daytime running lights may work one day and fail the next. The warning light may disappear after restarting the engine only to return later. Temperature changes can also affect a worn relay, causing the problem to appear more frequently during very hot or very cold weather.
Some drivers notice a clicking sound coming from the fuse or relay box when the system attempts to activate the daytime running lights. Although a clicking sound does not always indicate failure, it may suggest that the relay is not making proper electrical contact.
To diagnose the relay, inspect it for signs of overheating, melted plastic, or corrosion. If another relay with the same part number and electrical specification is available in the fuse box, you may temporarily exchange them for testing purposes. Never substitute a relay with a different specification because it may damage the circuit or produce misleading test results.
If replacing the relay restores normal operation and the warning light disappears, the original relay was likely defective. If the problem remains, continue inspecting other components within the lighting system.
Damaged Wiring or Corroded Connectors
Electrical wiring carries power from the battery and control modules to the daytime running lights. Even a small amount of corrosion or physical damage can interrupt this flow and trigger the Honda Pilot DRL light.
Wiring problems often develop slowly. Moisture, road salt, engine heat, vibration, previous collision repairs, and rodent activity can all damage electrical circuits over time. Connectors located near the headlights are especially vulnerable because they are constantly exposed to water, dust, and changing temperatures.
Inspect the wiring carefully around both headlight assemblies. Look for cracked insulation, exposed copper, loose terminals, melted connectors, green corrosion, or signs of water intrusion. Any of these conditions can increase electrical resistance and prevent the DRL system from operating correctly.
Corroded connectors may appear slightly discolored at first, but severe corrosion often produces a green or white buildup on the terminals. This buildup reduces electrical conductivity and can create intermittent faults that are difficult to diagnose. Cleaning the connector with an appropriate electrical contact cleaner may restore proper operation if the corrosion is minor. Severely damaged terminals should be replaced rather than cleaned.
Pay close attention to the bulb socket as well. Excessive heat from a failing bulb or poor electrical connection may melt the plastic housing and prevent the bulb from maintaining consistent contact. A damaged socket should always be replaced before installing another bulb.
After any wiring repair, secure the harness correctly to prevent future vibration damage. Loose wiring can rub against metal brackets or moving engine components, eventually creating another electrical fault.
Weak Battery or Charging System Problem
Although the daytime running light system is designed to operate reliably, it depends on a stable electrical supply. A weak battery or charging system problem can cause the Honda Pilot DRL light to appear even when the lighting components themselves are functioning properly.
As a battery ages, its ability to provide consistent voltage decreases. Low system voltage can affect multiple electronic modules throughout the vehicle. Besides the DRL warning, drivers may notice slow engine cranking, dim headlights, flickering interior lights, unstable dashboard displays, or random electrical warnings.
The alternator is equally important because it maintains battery charge while the engine is running. If the alternator cannot provide sufficient output, the battery gradually loses power and sensitive electronic systems may begin reporting faults.
Before replacing expensive lighting components, evaluate the condition of the battery and charging system. Inspect the battery terminals for corrosion and ensure the cable connections are tight. Loose battery terminals can create voltage drops that affect the entire electrical system.
If several electrical symptoms appear together, the problem may extend beyond the DRL circuit. A professional charging system test can quickly determine whether the battery and alternator are operating within normal specifications.
Correcting a low voltage problem often restores normal operation without replacing bulbs, relays, or other lighting components unnecessarily.
Faulty DRL Control Module
Some Honda Pilot models rely on a dedicated lighting control module or an integrated body control module to manage the daytime running light system. This module receives information from multiple sensors and switches before determining when the DRLs should operate.
When the control module develops an internal fault, the Honda Pilot DRL light may remain illuminated even though the bulbs, fuse, relay, and wiring all appear to be in good condition. In some cases, both daytime running lights stop working completely. In others, the warning appears only occasionally before becoming permanent.
Control module problems can be difficult to diagnose because they often resemble simpler electrical faults. Replacing parts without proper testing may increase repair costs while failing to solve the original problem.
Professional diagnostic equipment is usually required to communicate with the lighting control system and retrieve manufacturer specific diagnostic trouble codes. These codes help identify whether the module is receiving proper power, ground, and input signals.
A control module should never be replaced simply because the DRL warning light is present. Every other common cause should be inspected first. Once bulbs, fuses, relays, wiring, connectors, and battery voltage have been verified, module testing becomes the logical next step.
Replacing a control module may also require software programming or calibration before it can communicate correctly with the vehicle. This procedure is normally performed using factory level diagnostic equipment or equivalent professional tools.
Headlight Assembly or LED Unit Failure
Newer Honda Pilot models often use integrated LED headlights instead of traditional halogen bulbs. While LED technology offers better brightness, lower energy consumption, and a longer service life, it also changes the repair process. Unlike conventional bulbs that can be replaced individually, many LED systems are built into the headlight assembly.
When an LED driver, internal circuit board, or lighting module fails, the Honda Pilot DRL light may appear even though the headlight lens looks normal from the outside. One daytime running light may become noticeably dimmer than the other, flicker during operation, or stop working completely.
Heat is one of the most common factors that affects LED components. Over time, repeated heating and cooling cycles can weaken electronic circuits inside the headlight assembly. Moisture intrusion can also damage sensitive electronic parts and accelerate corrosion.
Because many LED components are sealed inside the housing, repair options depend on the vehicle design. Some models allow replacement of the LED driver or lighting module, while others require replacing the entire headlight assembly. Always confirm the repair procedure for your specific Honda Pilot model year before purchasing replacement parts.
Installing low quality aftermarket LED assemblies may create additional problems, including poor light output, water leaks, compatibility issues, and repeated dashboard warnings. Choosing high quality replacement parts helps ensure reliable operation and proper beam performance.
Moisture Inside the Headlight Housing
Moisture inside the headlight housing is another condition that can trigger the Honda Pilot DRL light. Water entering the housing may damage bulbs, sockets, connectors, wiring, and electronic control components. Even a small amount of moisture can increase electrical resistance and create intermittent faults.
Light condensation on the inside of the lens is not always a cause for concern. Small amounts of fog often disappear after the headlights warm up during normal operation. Persistent condensation or visible water droplets, however, indicate that the housing seal may have failed.
Inspect both headlights carefully. Look for water accumulation, cracked lenses, damaged seals, or missing vent caps. Moisture can also enter through impact damage that may not be immediately visible from the outside.
If water has reached the electrical connector, disconnect the battery before inspecting the wiring. Dry the affected area completely and check for corrosion on the terminals. Severely corroded connectors should be replaced because cleaning alone may not restore a reliable electrical connection.
Replacing damaged seals or repairing small cracks early can prevent more expensive repairs in the future. Ignoring water intrusion may eventually damage the entire headlight assembly or the lighting control electronics.
How to Diagnose a Honda Pilot DRL Warning Light
Finding the exact cause of a Honda Pilot DRL light requires a systematic inspection. Starting with the simplest checks helps eliminate common problems before moving to more complex electrical testing. This approach reduces unnecessary parts replacement and saves both time and money.
Step 1: Confirm Which Light Is Not Working
Begin by parking the vehicle on a level surface in a safe location. Start the engine and confirm that the daytime running lights should be active according to the operating conditions for your Honda Pilot. On some models, the parking brake must be released before the DRLs illuminate.
Walk around the front of the vehicle and compare both lights. Check whether one side is completely off, noticeably dimmer, or flickering. Also verify that the low beam headlights, high beams, parking lights, turn signals, and fog lights operate normally. If several lighting systems fail at the same time, the problem is likely electrical rather than a single burned out bulb.
Step 2: Inspect the Bulbs
If your Honda Pilot uses replaceable bulbs, remove the suspected bulb and inspect it carefully. Look for a broken filament, darkened glass, signs of overheating, or physical damage.
Compare the old bulb with the replacement part to confirm that the specifications match exactly. An incorrect bulb may create electrical differences that trigger the warning even when the light appears to function normally.
If both bulbs have been in service for many years, consider replacing them as a pair. Equal brightness improves visibility and reduces the chance of another bulb failing shortly after the repair.
Step 3: Check the Fuses
Locate the appropriate fuse box and identify the DRL fuse using the diagram provided in the owner’s manual or on the fuse box cover.
Remove the fuse and inspect the metal strip inside. A broken or burned strip confirms that the fuse has failed. Replace it only with another fuse that has the same amperage rating.
If the replacement fuse blows again within a short period, stop replacing fuses and investigate the electrical circuit. Repeated fuse failure almost always indicates a wiring fault, short circuit, or damaged electrical component.
Step 4: Test the Relay
Inspect the DRL relay for signs of overheating, corrosion, or physical damage. If another relay with the same specification is available, use it only as a temporary test to determine whether the original relay has failed.
A defective relay may cause intermittent lighting problems that appear only under certain temperatures or driving conditions. If replacing the relay restores normal operation, the diagnosis is straightforward. If not, continue inspecting the remaining electrical components.
Step 5: Inspect the Wiring and Connectors
Follow the wiring harness from the headlight assembly toward the fuse box. Look for loose connectors, damaged insulation, exposed wires, corrosion, melted plastic, or evidence of previous repairs.
Pay special attention to areas where the wiring passes near sharp metal edges or moving components. Continuous vibration can wear through insulation and eventually create a short circuit.
Repair damaged wiring using automotive grade materials that are designed to withstand heat, vibration, and moisture. Temporary household electrical repairs are not suitable for automotive applications.
Step 6: Check the Battery and Charging System
If multiple electrical warnings appear together, inspect the battery before replacing lighting components. Clean any corrosion from the battery terminals and ensure the cable connections are secure.
A weak battery or charging system problem can create unstable voltage that affects several electronic modules. If the battery is old or the vehicle has experienced repeated starting problems, testing the charging system is a logical next step.
Step 7: Scan for Diagnostic Trouble Codes
Modern Honda Pilot models store diagnostic information inside electronic control modules. While a basic code reader can retrieve engine related fault codes, it may not access body control or lighting system modules.
A professional scan tool can identify manufacturer specific diagnostic trouble codes related to the daytime running light system. These codes provide valuable information that helps narrow the diagnosis before replacing expensive components.
Scanning the vehicle after completing the basic inspection often confirms whether the problem is electrical, mechanical, or related to the control module itself.
How to Fix the Honda Pilot DRL Light
Once you have identified the cause of the Honda Pilot DRL light, the next step is choosing the correct repair. Always begin with the simplest and least expensive solution before replacing larger components. A careful repair process reduces unnecessary costs and helps prevent the warning from returning.
Replace the Failed Bulb
If inspection confirms that the daytime running light bulb has failed, install a replacement that matches the original specification for your Honda Pilot. Turn off the engine and allow the headlight assembly to cool before starting the repair.
Remove the old bulb carefully without damaging the socket or surrounding wiring. When installing a halogen bulb, avoid touching the glass with your bare fingers because oil from your skin can shorten the bulb’s lifespan. Hold the bulb by its base and ensure it locks securely into position.
After installation, start the engine and verify that both daytime running lights operate correctly. If the warning disappears, no further repair may be necessary.
Replace a Blown Fuse
A blown fuse should always be replaced with another fuse that has the same amperage rating. Using a larger fuse may allow excessive current to flow through the circuit, increasing the risk of wiring damage or electrical fire.
If the new fuse fails immediately, stop replacing fuses and inspect the circuit for a short, damaged wire, or failed electrical component. Repeated fuse failure is a symptom rather than the actual problem.
Replace the DRL Relay
If testing confirms that the relay is defective, install a new relay with the same part number and electrical specification. A quality replacement relay restores reliable power delivery to the daytime running light system.
After installation, start the vehicle several times to verify that the warning does not return. Intermittent relay failures may only appear after repeated operating cycles, so observing the system for several days is a good practice.
Clean or Replace Corroded Connectors
Minor corrosion can often be removed using an automotive electrical contact cleaner and a soft brush. Once the connector is clean and completely dry, reconnect it securely and verify that the terminals fit tightly.
If corrosion has severely damaged the terminals or the plastic housing has melted, replacing the connector is the better long term solution. Poor electrical contact increases resistance and can eventually damage additional components.
Repair Damaged Wiring
Damaged wiring should be repaired using automotive grade wire, sealed connectors, and heat shrink tubing. Proper repairs restore electrical continuity while protecting the circuit from moisture and vibration.
Avoid twisting wires together or covering damaged sections with ordinary household tape. Temporary repairs often fail after exposure to heat, water, or engine vibration.
After completing the repair, secure the wiring harness with the correct clips or retainers to prevent future wear.
Replace the Headlight Assembly
If the Honda Pilot uses an integrated LED headlight and the internal electronics have failed, replacing the complete headlight assembly may be necessary. Some models allow replacement of the LED driver or lighting module, while others require replacing the entire unit.
Choose replacement parts that meet original equipment specifications. High quality components provide better reliability, beam accuracy, and long term performance than many inexpensive aftermarket alternatives.
Diagnose the Control Module
The lighting control module should only be considered after every other common cause has been eliminated. Confirm that the bulbs, fuses, relays, wiring, connectors, and battery are all functioning correctly before suspecting module failure.
If diagnostic testing identifies an internal module fault, replacement may require programming to match the vehicle. This process is normally completed with professional diagnostic equipment.
How to Reset the Honda Pilot DRL Light
Many drivers assume the warning light requires a manual reset. In reality, the Honda Pilot DRL light often clears automatically once the underlying problem has been repaired and the system completes another self check.
Perform a Basic Reset
After replacing the failed component, turn the ignition off and wait for a short period before restarting the vehicle. Allow the daytime running light system to complete its normal startup sequence.
Observe the dashboard carefully. If the repair was successful, the warning should no longer appear. Walk around the vehicle and confirm that both daytime running lights operate normally.
Disconnect the Battery
Disconnecting the battery may clear temporary electrical memory on some vehicles, but it should never be used as a substitute for proper diagnosis. If the original fault remains, the warning will usually return after the system performs another self check.
Battery disconnection may also reset the clock, radio settings, and certain vehicle memory functions. Some Honda Pilot models require additional relearning procedures after battery power has been restored.
Always follow the recommendations in the owner’s manual before disconnecting the battery.
Clear Stored Fault Codes
If the warning remains after the repair, a diagnostic scan tool may be required to clear stored fault codes from the body control module or lighting control system.
Keep in mind that clearing codes without correcting the underlying problem rarely provides a permanent solution. If the fault still exists, the Honda Pilot DRL light will typically return during the next system check.
Why the DRL Light Stays On After Replacing the Bulb
Replacing the bulb does not always solve the problem. Many Honda Pilot owners become frustrated when the warning remains even after installing a new bulb.
One possible explanation is that the replacement bulb does not match the factory specification. A bulb with different electrical characteristics may cause the control system to detect an abnormal circuit.
The second bulb may also be approaching the end of its service life. Even if only one bulb has failed, replacing both bulbs often produces more consistent performance.
Inspect the bulb socket for heat damage, corrosion, or loose terminals. A poor electrical connection may interrupt current flow even when the bulb is new.
Next, verify the fuse and relay. Both components should be tested rather than assumed to be functional. Continue by inspecting the wiring harness for damaged insulation, corrosion, or previous repair work.
If every visible component appears normal, scan the lighting control system for diagnostic trouble codes. The stored information may indicate a control module issue or another fault that cannot be identified through visual inspection alone.
Following a logical diagnostic sequence is far more effective than replacing parts one at a time without confirming the actual cause.
Honda Pilot DRL Repair Cost
Repair costs vary depending on the model year, headlight design, labor rates, and the exact cause of the warning. Simple repairs are usually inexpensive, while electrical diagnosis or LED headlight replacement can become significantly more costly.
| Repair | Typical Cost Level | Difficulty |
|---|---|---|
| DRL bulb replacement | Low | Easy to Moderate |
| Fuse replacement | Very Low | Easy |
| Relay replacement | Low to Moderate | Easy |
| Connector repair | Moderate | Moderate |
| Wiring repair | Moderate to High | Moderate to Difficult |
| Battery replacement | Moderate | Moderate |
| Control module diagnosis | High | Difficult |
| LED headlight assembly replacement | High | Difficult |
Vehicles equipped with traditional halogen headlights are generally less expensive to repair because individual bulbs can be replaced separately. Models equipped with integrated LED assemblies may require replacing larger and more expensive components.
Labor costs also vary depending on how easily technicians can access the affected parts. Some repairs require only a few minutes, while others involve removing bumper covers or major body panels.
Obtaining an accurate diagnosis before purchasing replacement parts is often the most effective way to reduce total repair costs.
When Should You Visit a Mechanic?
Some Honda Pilot DRL problems can be resolved with basic tools and careful inspection. However, certain situations require professional diagnosis because the fault may involve complex electrical systems or specialized equipment.
Schedule a professional inspection if both daytime running lights stop working at the same time or if the warning remains after replacing the bulb, fuse, or relay. These symptoms often indicate a wiring problem, a failed control module, or an issue within the body control system.
You should also seek professional assistance if the fuse continues to blow after replacement. Repeated fuse failure usually points to a short circuit that requires detailed electrical testing. Continuing to replace fuses without repairing the underlying problem may lead to more serious electrical damage.
Water inside the headlight housing is another reason to have the vehicle inspected. Moisture can damage connectors, wiring, LED drivers, and electronic control components. If corrosion has already developed, replacing only the bulb is unlikely to solve the problem.
A professional inspection is also recommended when you notice multiple dashboard warning lights, flickering headlights, battery charging problems, or inconsistent electrical behavior. These symptoms may indicate a larger issue affecting several vehicle systems rather than the daytime running lights alone.
Choosing an accurate diagnosis before replacing expensive parts can save both time and money. Modern Honda Pilot models contain advanced electronic systems that often require manufacturer specific diagnostic equipment for reliable testing.
How to Prevent Future Honda Pilot DRL Problems
Preventive maintenance is the most effective way to reduce the risk of future DRL system failures. A few routine inspections can help identify small issues before they become expensive repairs.
Use replacement bulbs that match the original factory specifications. Bulbs with incorrect electrical characteristics may shorten component life and trigger unnecessary warning lights. If your Honda Pilot is equipped with LED headlights, choose replacement parts that meet original equipment standards whenever possible.
Inspect the headlight assemblies regularly for cracks, damaged seals, or signs of water intrusion. Repairing a damaged seal early can prevent corrosion and protect sensitive electrical components inside the housing.
Check the wiring and electrical connectors whenever the headlights are serviced. Look for loose terminals, damaged insulation, or early signs of corrosion. Cleaning connectors before corrosion becomes severe helps maintain reliable electrical contact.
Keep the battery in good condition because stable system voltage is essential for modern electronic control modules. If the battery is approaching the end of its service life or the vehicle has experienced slow starting, have the charging system tested before electrical problems become more serious.
Avoid delaying repairs when exterior lights begin flickering or operating intermittently. Small electrical faults often become larger problems if they are ignored for an extended period.
Routine maintenance not only improves reliability but also helps reduce repair costs throughout the life of your Honda Pilot.
Frequently Asked Questions
What does the Honda Pilot DRL light mean?
The Honda Pilot DRL light indicates that the daytime running light system has detected a fault. The problem may involve a burned out bulb, blown fuse, faulty relay, damaged wiring, corroded connector, weak battery, or lighting control module.
Can I drive with the Honda Pilot DRL light on?
In many situations, you can continue driving if the low beam headlights, brake lights, and turn signals are working normally. However, the problem should be diagnosed and repaired as soon as possible because the warning may indicate a developing electrical issue.
Will the Honda Pilot DRL light reset itself?
Yes. In many cases, the warning clears automatically after the underlying problem has been repaired and the system completes another self check. If the fault remains, the warning will usually return.
Why is the DRL light still on after replacing the bulb?
The replacement bulb may have the wrong specification, the connector may be damaged, the fuse or relay may have failed, or another electrical fault may still be present. A stored diagnostic trouble code can also keep the warning active.
Can a weak battery cause the Honda Pilot DRL light?
Yes. Low or unstable battery voltage can affect electronic control modules and trigger lighting related warnings. If multiple electrical symptoms appear together, the battery and charging system should be inspected.
Where is the DRL fuse located on a Honda Pilot?
The fuse location depends on the model year and trim level. It may be located in the engine compartment fuse box or the interior fuse panel. Refer to the owner’s manual or the fuse box diagram for the correct location.
Does every Honda Pilot use a separate DRL bulb?
No. Some Honda Pilot models use dedicated daytime running light bulbs, while others use reduced intensity high beam bulbs or integrated LED headlight systems. The design varies by generation and equipment level.
Can aftermarket LED bulbs trigger the DRL warning?
Yes. Some aftermarket LED bulbs have different electrical characteristics than the original equipment. This difference may cause the vehicle to detect an abnormal circuit and illuminate the DRL warning light.
Conclusion
A Honda Pilot DRL light on warning should never be ignored, even if the vehicle appears to drive normally. In many cases, the problem is caused by a burned out bulb, a blown fuse, a faulty relay, or a loose electrical connector. More complex cases may involve damaged wiring, moisture inside the headlight assembly, low battery voltage, or a malfunctioning lighting control module.
The most effective approach is to diagnose the system in a logical order. Begin by checking whether both daytime running lights operate correctly. Inspect the bulbs, verify the fuse and relay, examine the wiring and connectors, and evaluate the condition of the battery before considering more expensive components. This step by step process helps avoid unnecessary repairs and reduces overall maintenance costs.
If the warning remains after completing these basic checks, a professional diagnostic inspection is the next step. Advanced scan tools can identify manufacturer specific fault codes that are not accessible with basic code readers.
By understanding the most common causes and following the correct troubleshooting procedure, you can restore the daytime running light system with confidence and keep your Honda Pilot operating safely in all driving conditions.