To use a DeWalt jump starter, check that the unit is sufficiently charged, turn off your vehicle, connect the red clamp to the positive (+) battery terminal, and attach the black clamp to the approved negative connection point. Next, activate the jump-start function according to your DeWalt model’s instructions and start the engine. Once the engine is running, turn off the jump-start function as directed and disconnect the clamps in the manufacturer’s specified order.
DeWalt jump starters provide portable power to start vehicles with weak or discharged 12-volt batteries without requiring another vehicle. Models such as the DeWalt DXAEJ14 include additional features, but their controls, charging methods, and operating procedures can differ. Checking the specific model’s instructions is essential for safe operation.
Incorrect clamp connections, insufficient jump starter charge, and prolonged engine cranking can prevent a successful jump-start or damage electrical components. This guide explains how to prepare and operate a DeWalt jump starter, connect and remove its battery clamps, recharge the unit, and troubleshoot common starting problems. It also covers essential safety precautions and maintenance practices to keep the device ready for future emergencies.
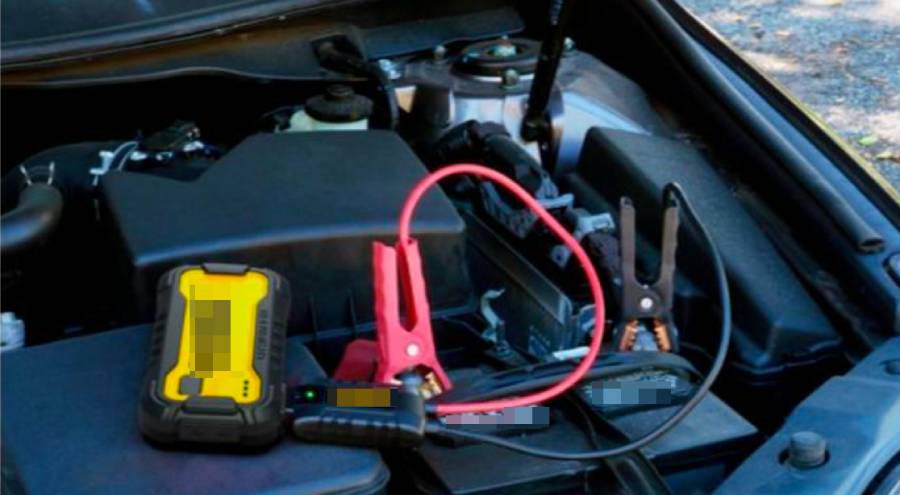
How Do You Use a DeWalt Jump Starter Step by Step?
To use a DeWalt jump starter, prepare the device, connect the battery clamps with the correct polarity, activate the jump-start function, start the vehicle, and disconnect the clamps safely. The exact controls and connection requirements vary by model, so follow the instructions for your specific DeWalt jump starter and vehicle.
The following eight steps explain the general jump-starting procedure for compatible 12-volt vehicles.
Step 1: Check the DeWalt Jump Starter’s Battery Level
Check the jump starter’s battery charge indicator before connecting it to your vehicle. A sufficiently charged unit provides the electrical power needed to turn the starter motor when the vehicle battery cannot deliver enough current. Recharge the jump starter if its indicator shows insufficient power.
Step 2: Turn Off the Vehicle and Electrical Accessories
Place the vehicle in Park for an automatic transmission or Neutral for a manual transmission, engage the parking brake, and switch off the ignition. Turn off electrical accessories, including the headlights, radio, and climate control system. These precautions reduce unnecessary electrical loads and help prevent unexpected vehicle movement during the jump-starting process.
Step 3: Locate the Vehicle Battery Terminals
Identify the positive (+) and negative (−) battery terminals or the manufacturer’s designated jump-start connection points. The positive terminal typically has a red cover or a plus symbol. Some vehicles have remote jump-start terminals under the hood even when the battery is located elsewhere. Consult the vehicle owner’s manual before attaching the clamps.
Step 4: Connect the Red Positive Clamp
Attach the red clamp to the positive (+) battery terminal or designated positive jump-start point. Make sure the clamp grips a clean, conductive metal surface securely. A loose or corroded connection increases electrical resistance and can prevent sufficient current from reaching the vehicle’s starting system.
Step 5: Connect the Black Negative Clamp
Attach the black clamp to the negative connection point specified by the vehicle and jump starter manufacturers. Depending on the vehicle and device, this may be a designated chassis ground or the negative battery terminal. Keep the clamps separated and ensure neither cable contacts moving engine components.
Step 6: Activate the Jump-Start Function
Check the jump starter’s polarity and status indicators before enabling the jump-start function. Activate the appropriate control according to your DeWalt model’s operating instructions. Some models require a dedicated jump-start switch, while others use different activation procedures. Do not attempt to start the engine if the device indicates reverse polarity or another unsafe condition.
Step 7: Start the Vehicle’s Engine
Turn the ignition key or press the vehicle’s start button to crank the engine. Follow the DeWalt model’s maximum cranking duration and required cooling interval between attempts. Repeated or prolonged cranking can overheat the jump starter and place excessive stress on its internal components. Stop attempting to start the vehicle if the device reports a fault or the engine repeatedly fails to start.
Step 8: Disconnect the Jump Starter Safely
Once the engine starts, deactivate the jump-start function if required by the device’s instructions. Remove the black negative clamp first and then the red positive clamp when that sequence is specified by the manufacturer. Keep the clamps from touching each other or exposed metal surfaces, and return them to their storage positions.
A successful jump-start restores engine operation but does not confirm that the vehicle battery is healthy. If the vehicle requires repeated jump-starts, test the battery and charging system to identify problems such as reduced battery capacity or alternator failure.
How Do You Prepare a DeWalt Jump Starter Before Using It?
To prepare a DeWalt jump starter, check its battery charge, inspect the jumper cables, confirm vehicle compatibility, and identify the correct battery connection points. These checks help ensure the device can deliver starting power without creating unnecessary electrical or safety risks.
Start by checking the jump starter’s battery level using its built-in charge indicator. A low charge reduces the electrical energy available for starting the engine, particularly when the vehicle battery is severely discharged. Recharge the unit according to its owner’s manual if the indicated charge is insufficient. Inspect both battery clamps for corrosion, damaged insulation, loose connections, or exposed wiring. Do not use the jump starter if its cables or housing show signs of damage.
Next, confirm that the vehicle’s electrical system matches the jump starter’s supported voltage and battery specifications. DeWalt automotive jump starters such as the DXAEJ14 are designed for compatible 12-volt vehicle battery systems. Do not connect a 12-volt jump starter to a 24-volt electrical system. Check the vehicle owner’s manual for designated jump-start terminals, especially if the battery is installed in the trunk or beneath a seat.
Finally, inspect the vehicle battery for visible cracks, leaks, swelling, or signs of freezing. Do not attempt to jump-start a damaged or frozen battery because it may rupture or release hazardous gases. Position the jump starter on a stable, dry surface away from moving engine parts before connecting the clamps.
How Do You Connect DeWalt Jump Starter Clamps Correctly?
To connect DeWalt jump starter clamps correctly, attach the red clamp to the positive (+) battery terminal and the black clamp to the approved negative connection point specified by the vehicle and jump starter manufacturers. Correct polarity allows starting current to reach the vehicle’s electrical system while reducing the risk of reverse-polarity damage.
The red clamp carries the positive electrical connection and must be attached to the terminal marked with a plus (+) symbol. This terminal commonly has a red protective cover, although terminal markings are more reliable than color alone. Remove the protective cover if necessary and secure the clamp to a clean, exposed conductive surface. Corrosion or loose contact increases electrical resistance, which can reduce the current delivered to the starter motor.
The black clamp provides the negative electrical connection. Depending on the vehicle and DeWalt model, the manufacturer may specify a designated chassis grounding point, an engine grounding point, or the negative battery terminal. A chassis ground is a conductive metal connection electrically linked to the vehicle’s negative system. Using the designated grounding point can help keep potential sparks away from the battery. Always follow the connection location and sequence specified in both owner’s manuals rather than assuming every vehicle uses the same arrangement.
After attaching both clamps, verify that they are secure and separated from each other. Check the DeWalt jump starter’s status indicators before activating the jump-start function. A reverse-polarity warning indicates that the connections require inspection and correction. Do not activate the jump starter until the warning is resolved.
Keep both jumper cables clear of radiator fans, drive belts, pulleys, and other moving components. These parts can move when the engine starts, potentially damaging the cables or pulling the clamps loose. Correct clamp placement and secure electrical contact are essential for transferring starting current safely and effectively.
How Do You Turn On a DeWalt Jump Starter?
To turn on a DeWalt jump starter, connect the battery clamps correctly, check the device’s status indicators, and activate the jump-start function using the control specified for your model. DeWalt jump starters have different operating controls, so the activation procedure depends on the device’s design.
For models equipped with a dedicated jump-starter power switch, follow the owner’s manual to determine when to move the switch to the ON position. The DeWalt DXAEJ14, for example, uses a dedicated jump-starter power switch. Check that the clamps are securely connected and that no reverse-polarity warning is present before activating the jump-start function. A polarity warning indicates an unsafe connection that must be corrected before proceeding.
Once the jump-start function is activated and the device indicates it is ready, attempt to start the vehicle according to the manufacturer’s instructions. Keep each starting attempt within the specified cranking limit and allow the required cooling period between attempts. The jump-start function is separate from auxiliary features such as USB charging, work lights, and air compressors, so activating those features does not necessarily enable engine starting.
How Do You Disconnect a DeWalt Jump Starter After Starting the Car?
To disconnect a DeWalt jump starter after starting the car, deactivate the jump-start function, remove the negative clamp, and then remove the positive clamp, following the manufacturer’s specified procedure. Disconnecting the clamps in the correct sequence reduces the risk of accidental short circuits and electrical damage.
Once the engine starts, follow the DeWalt model’s instructions for switching off the jump-start function. On models with a dedicated jump-starter power switch, this generally involves moving the switch to the OFF position before removing the clamps. Keep the vehicle stationary with the parking brake engaged and avoid touching moving engine components while disconnecting the equipment.
Remove the black negative clamp from its designated grounding point or negative terminal first, followed by the red positive clamp from the positive terminal, when this is the sequence specified by the manufacturer. Keep the disconnected clamps separated and prevent them from touching exposed metal surfaces. Secure both clamps in their designated storage holders to protect the cables and prevent accidental electrical contact.
After disconnecting the jump starter, check the vehicle’s battery and charging system if starting problems persist. A jump starter supplies temporary starting power but does not repair a discharged or deteriorated battery. Repeated starting failures may indicate a weak battery, faulty alternator, or another electrical system problem.
How Do You Charge a DeWalt Jump Starter?
To charge a DeWalt jump starter, connect the unit to a compatible power source using the charging method specified in its owner’s manual and monitor the battery charge indicator until charging is complete. DeWalt jump starters use different charging connections depending on the model, so the correct procedure must match the device’s specifications.
For example, the DeWalt DXAEJ14 has a built-in AC charging adapter that allows the unit to recharge through a compatible extension cord connected to a household electrical outlet. Other DeWalt models may use different charging accessories or connections. Turn off the jump-start function before charging, inspect the charging equipment for damage, and use only the charging method approved for your device.
A DeWalt jump starter’s charging status is displayed through its battery indicator system. Depending on the model, the display may show illuminated battery segments, a charge percentage, or status lights. A full-charge indication means the device has completed its charging cycle according to its built-in monitoring system. Consult the owner’s manual to identify the exact indicator pattern rather than assuming all DeWalt jump starters display charging status identically.
Charging time depends on the model, battery capacity, charging method, and remaining charge level. A deeply discharged jump starter requires more time to recharge than a partially charged unit. The manufacturer’s specified charging duration provides the appropriate reference for each model. Recharge the device after jump-starting a vehicle and check its charge periodically during storage to keep it ready for emergencies.
What Safety Precautions Should You Follow When Using a DeWalt Jump Starter?
The main safety precautions when using a DeWalt jump starter are verifying battery compatibility, preventing reverse polarity, avoiding damaged batteries, controlling engine cranking time, and keeping cables away from moving components. These precautions reduce the risk of electrical damage, overheating, sparks, and personal injury during jump-starting.
Verify voltage compatibility before connecting the clamps. A DeWalt jump starter designed for 12-volt automotive batteries must not be connected to an incompatible electrical system, such as a 24-volt vehicle battery system. Check the vehicle manufacturer’s instructions and the jump starter’s specifications to confirm compatibility.
Prevent reverse polarity and accidental short circuits. Connect the red clamp to the designated positive terminal and the black clamp to the approved negative connection point. Never allow the clamps to touch each other or bridge conductive metal components. Stop immediately if the jump starter displays a reverse-polarity warning, and correct the connections before proceeding.
Inspect the vehicle battery and surrounding area. Do not attempt to jump-start a frozen, leaking, cracked, or visibly damaged battery. Lead-acid batteries can release flammable hydrogen gas, and electrical sparks near the battery can create an explosion hazard. Keep flames, cigarettes, and other ignition sources away from the battery, and use the designated grounding point when required.
Follow the manufacturer’s engine cranking limits. Prolonged or repeated starting attempts can overheat the jump starter and damage its internal components. Allow the specified cooling interval between attempts and stop using the device if it displays an overheating warning or other fault indication. Keep jumper cables clear of radiator fans, belts, and pulleys, which may begin moving when the engine starts.
Why Is My DeWalt Jump Starter Not Starting My Car?
A DeWalt jump starter may fail to start a car because of insufficient battery charge, incorrect clamp connections, poor electrical contact, an incompatible vehicle battery, or a problem with the vehicle’s starting system. Identifying the cause requires checking the jump starter’s status indicators, battery connections, and engine response.
A fully charged jump starter cannot start every vehicle. The device must supply enough starting current for the engine, and the vehicle’s electrical and mechanical systems must be functional. For example, a faulty starter motor or damaged battery connection can prevent the engine from cranking even when the jump starter operates correctly.
Why Does My DeWalt Jump Starter Show a Reverse Polarity Warning?
A DeWalt jump starter displays a reverse-polarity warning when its protection system detects an incorrect positive or negative clamp connection. This warning helps prevent electrical damage caused by reversed battery connections.
Turn off the jump-start function and inspect both clamps before attempting another start. Verify that the red clamp is connected to the positive (+) terminal and the black clamp is attached to the approved negative connection point. Check the battery terminal markings rather than relying exclusively on cable colors.
Do not attempt to bypass the reverse-polarity protection. If the warning remains after verifying the connections, stop using the jump starter and consult the model’s troubleshooting instructions.
Why Does My Car Still Not Start With a DeWalt Jump Starter?
A car may still fail to start with a DeWalt jump starter because the unit has insufficient charge, the clamps cannot establish reliable electrical contact, or the vehicle has a fault unrelated to battery power.
Insufficient jump starter charge reduces the current available for engine cranking. Recharge the device according to its owner’s manual before attempting another jump-start.
Loose or corroded battery connections increase electrical resistance and restrict current flow. Inspect the battery terminals and ensure the clamps contact clean, conductive metal surfaces.
A defective starter motor or starting circuit can prevent the engine from turning even when sufficient electrical power is available. If the engine cranks normally but does not start, the problem may involve fuel delivery, ignition, or engine management rather than the battery.
Overheating or an activated protection system can temporarily prevent the jump starter from operating. Stop cranking, check the device’s warning indicators, and follow the manufacturer’s required cooling and reset procedures.
If the vehicle remains unresponsive after these checks, stop repeated jump-start attempts and have the battery and starting system inspected by a qualified automotive technician.
Read more: TriboTEX Review: Does It Really Work and Is It Worth It?
Can You Use a DeWalt Jump Starter on a Completely Dead Battery?
A DeWalt jump starter can start a vehicle with a deeply discharged battery if the device provides sufficient starting current and the battery meets the manufacturer’s operating requirements. However, a completely dead battery may prevent some jump starters from activating because their protection systems cannot detect an acceptable battery voltage.
A deeply discharged battery has insufficient electrical energy to crank the engine, but it may still accept a jump-start. Some jump starters require a minimum detectable battery voltage before delivering power. If the battery voltage falls below that threshold, the device may refuse to operate even when its internal battery is fully charged. DeWalt models have different operating limits, so consult the specific owner’s manual before attempting to start a vehicle with an extremely discharged battery.
A damaged battery presents a different problem. Internal short circuits, defective cells, or physical damage can prevent successful starting and create safety hazards. Do not bypass the jump starter’s protection features or attempt to jump-start a frozen, leaking, or visibly damaged battery. Have the battery tested or replaced if it cannot safely support normal vehicle operation.
How Do You Maintain a DeWalt Jump Starter Between Uses?
To maintain a DeWalt jump starter, recharge its battery regularly, store it in suitable conditions, inspect its cables, and check its charge level before emergencies. Proper maintenance helps preserve battery capacity and ensures the device is ready when the vehicle needs starting assistance.
Recharge the jump starter after each use and follow the manufacturer’s recommended maintenance charging schedule during storage. Recharge intervals vary by model and battery chemistry. Allowing the internal battery to remain deeply discharged for extended periods can reduce its usable capacity and shorten its service life.
Store the jump starter in a clean, dry location within the temperature range specified in its owner’s manual. Avoid prolonged exposure to extreme heat, freezing conditions, and moisture. Excessive heat accelerates battery deterioration, while low temperatures can temporarily reduce the power available for engine starting.
Inspect the jumper cables, clamps, charging connections, and housing periodically. Check for cracked insulation, corrosion, loose connections, or physical damage. Keep the clamps clean and secured in their designated storage positions. Before a long trip, check the battery indicator and recharge the unit if necessary. These maintenance practices help keep the DeWalt jump starter ready for unexpected battery failures.