Dodge Journey Battery Saver Mode is a built-in protection feature that activates when the vehicle detects low battery voltage or an abnormal charging system. Instead of allowing the battery to drain completely, the system reduces power to non-essential electrical components such as the radio, interior lighting, or climate control to preserve enough energy for critical functions, including starting the engine and maintaining vehicle operation.
If the Battery Saver Mode message appears on your dashboard, it does not automatically mean the battery has failed. In most cases, the warning indicates that the electrical system is no longer maintaining the proper charging voltage. A weak battery, a failing alternator, corroded battery terminals, damaged ground connections, excessive electrical load, or a malfunction within the charging system can all trigger the warning. Identifying the actual cause early helps prevent unexpected breakdowns and avoids replacing parts unnecessarily.
This guide explains what Dodge Journey Battery Saver Mode means, why it turns on, how to diagnose the underlying problem, and the most effective repair solutions. You’ll also learn how to reset the warning after the fault is corrected, when it is safe to continue driving, the typical repair costs for common causes, and practical maintenance tips that reduce the risk of the warning returning. By following a systematic diagnostic process, you can determine whether the issue requires a simple battery service or a more comprehensive charging system repair.
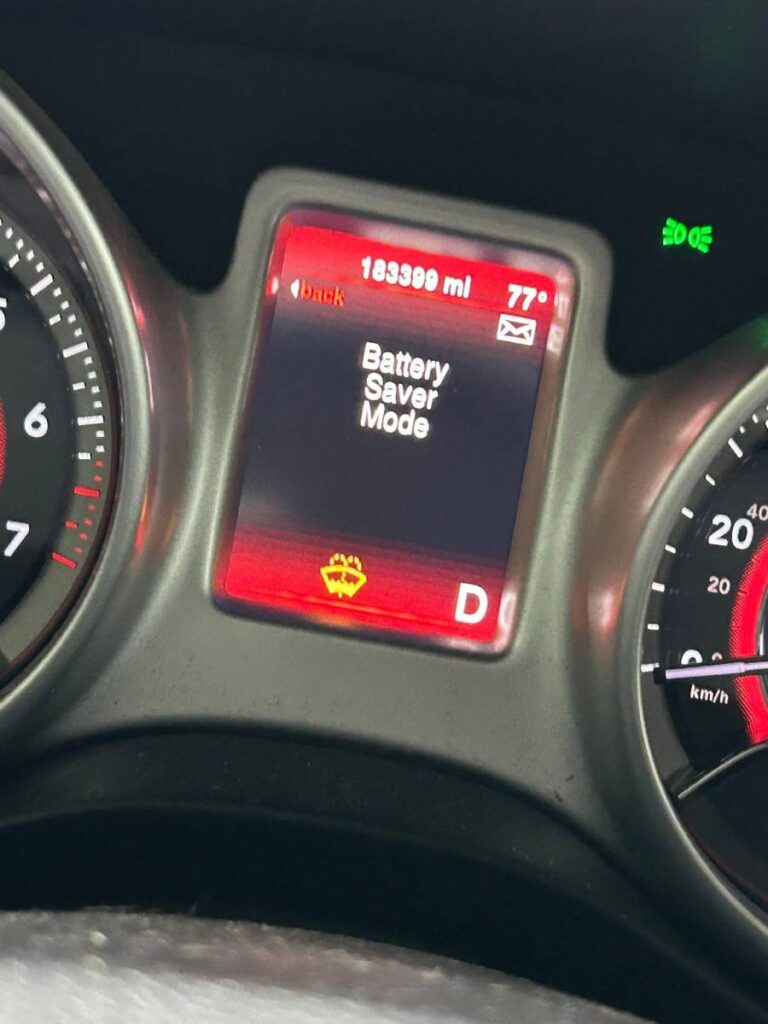
What does Battery Saver Mode mean on a Dodge Journey?
Battery Saver Mode is an automatic power management feature that activates when the Dodge Journey detects that battery voltage is too low or the charging system cannot supply sufficient electrical power. Instead of allowing the battery to discharge completely, the vehicle reduces power consumption by limiting non-essential electrical accessories while maintaining enough energy for critical systems such as the engine control module, ignition, and safety-related electronics.
The Dodge Journey continuously monitors battery voltage and charging system performance through the vehicle’s electrical control modules. When the system detects that the battery is discharging faster than it is being recharged, it enters Battery Saver Mode to reduce electrical demand. This protective strategy helps prevent a completely discharged battery that could leave the vehicle unable to start.
In many cases, Battery Saver Mode is a symptom rather than the actual problem. The warning indicates that the vehicle has detected an abnormal operating condition within the electrical system, but it does not identify which component has failed. The root cause may range from a weak battery and failing alternator to poor cable connections, excessive electrical load, or charging system faults that require further diagnosis.
Why does Dodge activate Battery Saver Mode?
Dodge activates Battery Saver Mode to preserve battery power when the charging system cannot maintain normal operating voltage. Modern vehicles depend on a stable electrical supply for dozens of electronic modules, sensors, and control units. If battery voltage drops below the expected range, these systems may become unstable or stop functioning correctly.
To reduce the risk of a no-start condition, the Body Control Module (BCM) can temporarily disable or reduce power to comfort features before critical systems are affected. Depending on vehicle conditions, the driver may notice the radio turning off automatically, interior lighting dimming, reduced HVAC performance, or other accessories shutting down while the engine continues to run.
This strategy is designed to maximize the remaining battery capacity. By lowering unnecessary electrical consumption, the vehicle increases the likelihood that sufficient power remains available for engine restarting and essential vehicle operation until the underlying charging issue is repaired.
What systems are limited when Battery Saver Mode is active?
Battery Saver Mode primarily reduces power to non-essential electrical accessories. The exact functions affected vary depending on battery voltage and vehicle configuration, but the system typically prioritizes components that are required for safe driving.
Common systems that may be limited include:
- Interior lighting
- Infotainment system
- Radio and media functions
- HVAC blower performance
- Heated seats
- Power outlets and USB charging ports
- Other comfort-related electrical accessories
Critical systems such as engine management, braking systems, steering assistance (where applicable), and exterior safety lighting remain prioritized for as long as sufficient battery power is available. This allows the vehicle to continue operating while warning the driver that the charging system requires attention.
Is Battery Saver Mode a warning or a vehicle failure?
Battery Saver Mode is a warning message, not a mechanical failure by itself. The message indicates that the vehicle has detected an electrical condition requiring attention, but additional testing is necessary to determine the actual fault.
Many Dodge Journey owners discover that the warning is triggered by components with normal wear, such as an aging battery or alternator. Others may find loose battery terminals, corrosion, damaged ground straps, parasitic battery drain, or charging system wiring issues. In less common cases, a malfunctioning battery sensor or Body Control Module may produce incorrect voltage readings that activate Battery Saver Mode.
Because multiple faults can generate the same warning, replacing the battery immediately without testing the charging system may not resolve the problem. Performing a complete charging system diagnosis—including battery voltage testing, alternator output measurement, inspection of battery cables, and scanning for diagnostic trouble codes—is the most reliable way to identify the root cause.
What Causes Battery Saver Mode on a Dodge Journey?
Can a weak battery trigger Battery Saver Mode?
Yes. A weak or aging battery is one of the most common causes of Battery Saver Mode on a Dodge Journey. As automotive batteries age, their ability to hold a full charge decreases because the internal lead plates gradually lose capacity. Even if the battery still starts the engine under normal conditions, it may no longer maintain sufficient voltage when multiple electrical systems operate simultaneously.
Low battery voltage forces the charging system to work harder to support the vehicle’s electrical demand. If the battery cannot maintain the required voltage range, the Body Control Module interprets the condition as a risk of battery depletion and activates Battery Saver Mode to reduce electrical load.
Drivers often notice additional symptoms before complete battery failure, including slow engine cranking, dim headlights after starting, intermittent dashboard warnings, or electronic accessories behaving unpredictably. If the battery is more than three to five years old or repeatedly fails a load test, replacement is generally the most effective solution.
Can a failing alternator cause Battery Saver Mode?
Yes. A failing alternator is another leading cause of Battery Saver Mode because it cannot recharge the battery while the engine is running. Under normal operation, the alternator supplies electricity to the vehicle and simultaneously replenishes the battery. When alternator output decreases, the battery begins supplying electrical power on its own until its voltage falls below the system threshold.
Alternator problems may develop gradually as internal bearings, brushes, diodes, or the voltage regulator wear over time. During the early stages of failure, Battery Saver Mode may appear intermittently before the alternator stops charging altogether.
Typical signs of alternator failure include:
- Battery warning light
- Flickering headlights
- Dim interior lighting
- Electrical accessories shutting off
- Burning odor near the engine
- Whining noises from the alternator
- Repeated battery discharge despite installing a new battery
A charging system voltage test is usually the fastest way to determine whether the alternator is producing adequate output.
Can loose or corroded battery terminals cause the warning?
Yes. Loose or corroded battery terminals can trigger Battery Saver Mode by restricting electrical current between the battery and the vehicle’s charging system. Even if the battery and alternator are functioning normally, poor electrical connections increase resistance and reduce the voltage reaching the vehicle’s control modules.
Battery terminal corrosion usually appears as a white, blue, or green powder around the battery posts. This corrosion develops when battery acid vapors react with the metal terminals, gradually creating resistance that interferes with charging efficiency. Loose battery clamps create a similar problem by interrupting current flow whenever the vehicle encounters vibration or rough road conditions.
A poor battery connection often produces intermittent electrical problems rather than a complete failure. Drivers may notice dashboard warning messages appearing randomly, headlights flickering, electronic accessories resetting, or the engine cranking slowly on some starts but not others. Because these symptoms can closely resemble a failing battery or alternator, battery terminals should always be inspected before replacing expensive components.
Cleaning corrosion with a battery terminal cleaner or a baking soda solution, tightening loose terminal clamps, and inspecting both positive and negative cables for damage often restore normal charging performance. If corrosion has spread inside the battery cables or the cable ends are damaged, replacing the affected cables is usually the most reliable repair.
Can electrical accessories drain the battery?
Yes. Excessive electrical demand can contribute to Battery Saver Mode when the charging system cannot supply enough power for all operating components. Although the alternator normally provides sufficient electricity during driving, multiple high-current accessories operating simultaneously increase the load placed on the charging system.
Electrical demand is highest when drivers use several accessories together, including headlights, heated seats, rear window defrosters, climate control blowers, windshield wipers, and aftermarket audio equipment. During cold weather or stop-and-go traffic, alternator output may decrease while electrical demand increases, causing battery voltage to drop below the system’s expected range.
Aftermarket electrical modifications can further increase the risk. High-power amplifiers, auxiliary lighting, winches, refrigerators, or poorly installed accessories may consume more electricity than the factory charging system was designed to support. In these situations, Battery Saver Mode activates to reduce non-essential power consumption before battery voltage reaches a critical level.
A parasitic battery drain can also trigger the warning after the vehicle has been parked. Components such as malfunctioning control modules, glove box lights that remain on, defective relays, or aftermarket electronics that fail to enter sleep mode may slowly discharge the battery overnight. The vehicle may then enter Battery Saver Mode during the next drive because the battery begins with an insufficient state of charge.
Can a faulty BCM or charging system sensor trigger Battery Saver Mode?
Yes. A malfunctioning Body Control Module (BCM), battery monitoring sensor, or charging system sensor can activate Battery Saver Mode even when the battery and alternator are operating normally. These electronic components monitor battery voltage, charging current, and overall electrical system performance. If they transmit inaccurate data, the vehicle may incorrectly assume that battery power is critically low.
The BCM communicates with other control modules over the CAN Bus network and determines when electrical load reduction is necessary. Software glitches, damaged wiring, poor module grounds, or internal electronic failures can interrupt this communication and generate false Battery Saver Mode warnings.
Similarly, battery current sensors or Intelligent Battery Sensors (on equipped models) measure battery charging and discharging activity. Incorrect sensor readings may cause the charging system to reduce alternator output or activate battery protection strategies unnecessarily. These faults are generally more difficult to diagnose because they require scan tools capable of reading live sensor data and manufacturer-specific diagnostic trouble codes.
If the battery, alternator, and electrical connections all test within specification but Battery Saver Mode continues to appear, a professional diagnostic inspection of the BCM, charging system sensors, and CAN Bus communication network is recommended before replacing additional components.
What Symptoms Usually Appear with Battery Saver Mode?
Why do interior lights become dim?
Dim interior lights are one of the earliest symptoms of Battery Saver Mode because the vehicle reduces power to non-essential electrical systems to conserve battery energy. Interior lighting operates on the vehicle’s low-voltage electrical network and is one of the first comfort features affected when available battery power begins to decrease.
As battery voltage falls below normal operating levels, lighting intensity may fluctuate during engine idle, brighten when engine speed increases, or dim whenever additional electrical accessories are switched on. This behavior indicates that the charging system is struggling to maintain stable voltage rather than supplying a consistent electrical output.
If dim interior lighting occurs together with Battery Saver Mode, slow engine cranking, or repeated battery warnings, the vehicle should undergo a complete charging system inspection. Ignoring these symptoms increases the likelihood of a complete battery discharge and an eventual no-start condition.
Why does the radio or HVAC turn off?
The radio, infotainment system, and HVAC blower may shut off because Battery Saver Mode temporarily disconnects high-power accessories to preserve electrical energy. These systems consume significantly more electricity than essential control modules, making them primary targets for automatic load reduction.
The Body Control Module continuously prioritizes electrical loads based on vehicle operating requirements. Entertainment systems, heated seats, USB charging ports, and climate control components are considered comfort features rather than safety-critical equipment. When battery voltage decreases, these accessories may be disabled automatically while engine management and vehicle safety systems continue operating normally.
Drivers often interpret these shutdowns as individual component failures, but they are frequently the result of battery protection logic rather than defective radios or HVAC controls. Once the underlying charging problem is corrected and normal battery voltage is restored, these accessories generally resume normal operation without requiring replacement.
Why does the engine crank slowly?
A slow engine crank usually indicates that the battery cannot deliver sufficient current to the starter motor. The starter requires several hundred amps for a short period during engine startup. If battery capacity has deteriorated or charging voltage remains too low, the starter motor rotates more slowly than normal, making the engine difficult to start.
Slow cranking often develops gradually before complete battery failure. Drivers may first notice that the engine takes slightly longer to start in the morning, especially during cold weather. As battery capacity continues to decline, Battery Saver Mode may appear more frequently because the vehicle repeatedly detects low voltage conditions after each engine start.
If slow cranking occurs together with Battery Saver Mode, the battery should be load-tested and charging voltage measured before replacing parts. This approach identifies whether the problem originates from the battery itself, the alternator, poor electrical connections, or another charging system fault.
Which dashboard warning lights commonly appear together?
Battery Saver Mode frequently appears alongside other dashboard warnings that indicate charging system or electrical problems. These additional warnings help narrow the diagnostic process by identifying related systems experiencing abnormal voltage.
The most common warning indicators include:
- Battery warning light
- Check Engine Light
- Electronic Throttle Control warning
- ABS warning light
- Traction Control warning
- Electronic Stability Control warning
- Service Charging System message
Multiple warning lights do not necessarily indicate multiple component failures. Modern vehicles rely on stable electrical voltage for communication between electronic modules. When charging voltage becomes unstable, several systems may temporarily report faults even though the underlying problem originates from a single charging system failure. Restoring proper battery voltage often eliminates secondary warning messages after diagnostic trouble codes are cleared.
How Do You Diagnose Battery Saver Mode on a Dodge Journey?
How do you check battery voltage?
Checking battery voltage is the first step in diagnosing Battery Saver Mode because it quickly determines whether the battery has sufficient charge before more advanced testing begins. A digital multimeter provides the most accurate measurement and helps distinguish between a discharged battery and a charging system problem.
Begin by turning the engine off and allowing the vehicle to sit for at least 15 to 30 minutes. This removes the temporary surface charge created during driving and provides a more accurate resting voltage. Connect the multimeter’s positive probe to the positive battery terminal and the negative probe to the negative terminal.
A healthy, fully charged 12-volt battery typically measures around 12.6 volts with the engine off. Readings between 12.4 and 12.5 volts generally indicate a partially charged battery, while 12.2 volts or lower suggests the battery requires charging or further testing. A reading below 12.0 volts often indicates a deeply discharged battery or significant battery deterioration.
Voltage alone does not confirm battery condition because a weak battery may still display normal voltage after charging. If Battery Saver Mode repeatedly appears even after charging the battery, perform a battery load test to verify that the battery can maintain voltage under high current demand.
How do you test the alternator?
Testing alternator output determines whether the charging system is supplying enough electrical power while the engine is running. A failing alternator allows the battery to discharge continuously, eventually triggering Battery Saver Mode even if the battery itself remains in good condition.
Start the engine and measure battery voltage again using the multimeter. Under normal operating conditions, charging voltage should typically remain between 13.5 and 14.8 volts, depending on engine load and battery condition. If voltage remains close to the battery’s resting voltage or gradually decreases while the engine is running, the alternator may not be charging correctly.
Next, increase electrical demand by switching on the headlights, rear defroster, blower motor, and other major accessories. A properly functioning alternator should continue maintaining stable charging voltage despite the increased load. Significant voltage drops, fluctuating readings, or charging voltage below specification indicate that the alternator, voltage regulator, or charging circuit requires further inspection.
Alternator testing should also include inspection of the serpentine belt. A worn, loose, or slipping belt reduces alternator speed and charging efficiency, creating symptoms similar to alternator failure even when the alternator itself remains functional.
How do you inspect battery terminals and ground cables?
Battery terminals and ground cables should be inspected for corrosion, looseness, damaged insulation, and poor electrical contact. These components provide the primary path for electrical current between the battery, starter, alternator, and vehicle electronics. Even minor resistance can reduce charging efficiency enough to activate Battery Saver Mode.
Begin by visually inspecting both battery terminals. White, blue, or green corrosion around the battery posts indicates oxidation that increases electrical resistance. The battery clamps should fit tightly without movement. Loose clamps can interrupt charging whenever engine vibration changes cable position.
Follow both battery cables from the battery to their connection points. Inspect the positive cable leading toward the starter and fuse box as well as the negative cable connected to the engine block or chassis ground. Look for cracked insulation, damaged conductors, burned sections, loose fasteners, or evidence of overheating.
Ground connections deserve particular attention because poor grounding creates numerous intermittent electrical problems. A corroded ground strap may cause fluctuating voltage, communication errors between control modules, and repeated Battery Saver Mode activation despite a healthy battery and alternator.
An OBD-II scan helps identify charging system faults that cannot be detected through visual inspection alone. Reading stored and pending diagnostic trouble codes allows technicians to narrow the possible causes before replacing components.
Codes commonly associated with Battery Saver Mode include charging system faults, battery voltage abnormalities, communication errors, and alternator performance problems. Examples include charging voltage codes, generator control circuit faults, battery voltage out-of-range conditions, and CAN Bus communication errors between electronic modules.
Live data provides additional diagnostic value beyond stored codes. A professional scan tool can display charging voltage, battery current, alternator command signals, battery temperature, and control module communication status while the engine is operating. Comparing these values under different electrical loads often reveals intermittent charging problems that are difficult to identify with a multimeter alone.
If no diagnostic codes are present but Battery Saver Mode continues to appear, the technician should inspect wiring harnesses, battery sensors, and control module software before replacing major charging system components.
How Do You Fix Battery Saver Mode on a Dodge Journey?
Replace a weak battery
Replacing a weak battery is the correct repair when testing confirms that the battery can no longer maintain adequate voltage or fails a load test. Automotive batteries gradually lose capacity due to repeated charging cycles, temperature extremes, vibration, and natural aging. Once internal capacity falls below acceptable levels, charging alone cannot permanently restore performance.
Always install a replacement battery that matches the manufacturer’s recommended specifications for capacity, cold cranking amps (CCA), and physical dimensions. Installing an undersized battery may result in repeated Battery Saver Mode activation because the battery cannot support the vehicle’s electrical demand during heavy accessory use.
After replacement, verify charging voltage and clear any stored diagnostic trouble codes if necessary. Some Dodge Journey models may also require battery registration or adaptive system relearning depending on model year and electrical configuration.
Repair or replace the alternator
An alternator should be repaired or replaced when testing confirms insufficient charging output or unstable voltage regulation. Because the alternator supplies nearly all electrical power while the engine is running, its failure eventually forces the battery to support the entire electrical system until Battery Saver Mode activates.
Alternator replacement typically includes inspecting the voltage regulator, drive pulley, electrical connectors, and mounting hardware. If the serpentine belt shows signs of glazing, cracking, stretching, or contamination, replacing the belt at the same time helps prevent future charging problems.
After installation, confirm that charging voltage remains stable across idle and higher engine speeds with multiple electrical accessories operating simultaneously. A successful repair should eliminate Battery Saver Mode and restore normal electrical system performance.
Clean battery terminals
Cleaning battery terminals restores proper electrical conductivity by removing corrosion that restricts current flow. This repair is inexpensive and often resolves intermittent Battery Saver Mode warnings caused by poor electrical connections rather than failed components.
Disconnect the negative battery cable before removing the positive cable. Clean both battery posts and terminal clamps using an approved battery terminal cleaner or a mixture of baking soda and water. Remove all corrosion until clean metal surfaces are visible, then rinse and dry the terminals thoroughly before reassembly.
After reconnecting the battery, tighten both terminal clamps securely and apply a battery terminal protectant if available. This protective coating slows future corrosion and helps maintain reliable electrical contact over time.
Repair damaged wiring
Damaged wiring should be repaired whenever voltage drop testing or visual inspection identifies broken conductors, loose connectors, or deteriorated insulation. Electrical wiring carries charging current throughout the vehicle, and even a small increase in circuit resistance can interfere with charging system performance.
Inspect wiring between the battery, alternator, starter, fuse box, and Body Control Module. Areas exposed to engine heat, vibration, moisture, or previous repair work are especially susceptible to insulation damage and connector failure.
Repairs should follow manufacturer-approved wiring procedures using proper connectors, sealed splices, and adequate wire protection. Temporary repairs such as twisted wires or electrical tape alone often create additional resistance and reduce long-term reliability.
Repair charging system faults
Repairing charging system faults requires correcting the underlying cause that prevents normal battery charging. Depending on diagnostic results, repairs may involve replacing a faulty voltage regulator, repairing alternator control circuits, replacing damaged fuses, correcting poor ground connections, or repairing charging system wiring.
Each repair should be verified by measuring charging voltage under various engine speeds and electrical loads. Stable voltage confirms that the charging system can maintain battery charge without repeatedly activating Battery Saver Mode.
Update or replace the BCM if necessary
The Body Control Module should only be updated or replaced after all battery, alternator, wiring, and charging system faults have been eliminated. BCM failures are considerably less common than battery or alternator problems, making module replacement a later step in the diagnostic process rather than an initial repair.
Manufacturers occasionally release software updates that improve charging system management or correct false Battery Saver Mode activation. Reprogramming the BCM with the latest calibration may resolve software-related issues without replacing the module.
If diagnostic testing confirms an internal BCM failure, replacement typically requires module programming, vehicle configuration, and security system initialization using manufacturer-level diagnostic equipment. Because of these programming requirements, BCM replacement is generally performed by a dealership or qualified repair facility.
How Do You Reset Battery Saver Mode?
Does Battery Saver Mode reset automatically?
Yes. Battery Saver Mode usually resets automatically after the charging system returns to normal operation. The warning is designed to protect the electrical system rather than function as a permanent fault indicator. Once the battery reaches an acceptable state of charge and the alternator supplies stable charging voltage, the Body Control Module typically restores normal operation and reactivates previously limited electrical accessories.
In many cases, the message disappears after repairing the underlying issue and driving the vehicle through several ignition cycles. This allows the control modules to verify that battery voltage remains within the expected operating range under different driving conditions.
If the warning remains after replacing the failed component, additional diagnostic testing is necessary. Persistent Battery Saver Mode often indicates that another charging system fault still exists or that diagnostic trouble codes have not been cleared.
How do you perform a manual battery reset?
A manual battery reset can help the vehicle reinitialize certain electrical modules after battery or charging system repairs. This procedure should only be performed after confirming that the original fault has been corrected. Resetting the system without repairing the underlying problem will not prevent Battery Saver Mode from returning.
A typical battery reset procedure includes the following steps:
- Turn the ignition completely off.
- Remove the key or switch off the push-button ignition.
- Disconnect the negative battery terminal.
- Wait approximately 10 to 15 minutes to allow electrical modules to power down.
- Reconnect the negative battery terminal securely.
- Start the engine and verify that charging voltage remains within specification.
- Drive the vehicle under normal operating conditions while monitoring for warning messages.
During the first few drive cycles after reconnecting the battery, some systems may temporarily relearn operating parameters. Features such as automatic windows, idle speed, transmission shift adaptation, or radio settings may require reinitialization depending on the Dodge Journey model year.
When should you clear diagnostic trouble codes?
Diagnostic trouble codes should be cleared only after the charging system has been properly repaired and verified. Clearing codes before correcting the root cause only removes the stored warning from the control module. If the electrical fault remains, Battery Saver Mode and related warning lights will usually return after the vehicle detects the same problem again.
A professional OBD-II scan tool should be used to erase stored and pending diagnostic trouble codes. After clearing the codes, drive the vehicle through several operating conditions, including idle, city driving, highway speeds, and accessory use. This verification confirms that the charging system continues operating normally and that no additional faults are detected.
If Battery Saver Mode returns immediately after clearing diagnostic codes, further diagnosis should focus on charging voltage, wiring integrity, battery condition, alternator output, and electronic control module communication.
Can You Drive with Battery Saver Mode On?
When is it safe to continue driving?
It is generally safe to continue driving for a short distance if the vehicle operates normally and no severe charging system symptoms are present. Battery Saver Mode itself does not automatically indicate an immediate mechanical failure. Instead, it warns that the electrical system is attempting to conserve battery power because charging performance has declined.
If the engine starts normally, dashboard lights remain stable, steering and braking operate correctly, and no battery warning light or overheating condition is present, drivers can usually continue driving to a nearby repair facility. Limiting unnecessary electrical loads by turning off heated seats, high-power audio systems, or other non-essential accessories may reduce battery consumption during the trip.
However, Battery Saver Mode should never be ignored for an extended period. Continued driving without diagnosing the charging system increases the risk of complete battery discharge, leaving the vehicle unable to restart after the engine is turned off.
When should you stop driving immediately?
You should stop driving immediately if Battery Saver Mode is accompanied by signs of complete charging system failure. Once the alternator stops supplying electrical power, the vehicle relies entirely on the remaining battery charge. As battery voltage continues to decrease, critical electronic systems may begin shutting down.
Drivers should safely stop the vehicle if any of the following symptoms occur:
- Battery warning light remains illuminated.
- Headlights become significantly dim.
- Dashboard displays begin flickering or shutting off.
- Power steering assistance decreases.
- Engine begins misfiring or loses power.
- Burning electrical smell develops.
- Engine temperature warning appears.
- The engine stalls or repeatedly struggles to remain running.
Continuing to drive under these conditions increases the likelihood of a complete loss of electrical power, which may affect vehicle operation and roadside safety.
What damage can happen if you ignore the warning?
Ignoring Battery Saver Mode can eventually lead to complete battery discharge, repeated no-start conditions, and additional charging system damage. Although the warning itself does not damage vehicle components, the underlying fault continues affecting the electrical system until repaired.
A weak battery forced to operate in a low-charge condition deteriorates more rapidly than a properly maintained battery. Likewise, a failing alternator may overwork remaining electrical components while attempting to compensate for declining charging capacity. Extended operation with unstable voltage can also generate communication errors between electronic control modules, resulting in multiple dashboard warning messages and difficult diagnostic procedures.
Addressing Battery Saver Mode shortly after it first appears is generally less expensive than waiting until multiple charging system components require replacement.
How Much Does It Cost to Fix Battery Saver Mode?
Repair costs vary because Battery Saver Mode is a warning rather than a single component failure. The final cost depends on which part of the charging system requires repair.
| Repair | Typical Cost (Parts + Labor) |
|---|---|
| Battery replacement | $150–$350 |
| Alternator replacement | $450–$900 |
| Battery terminal cleaning | $20–$80 |
| Battery cable replacement | $80–$250 |
| Wiring repair | $100–$500 |
| BCM software update | $100–$250 |
| BCM replacement and programming | $500–$1,200 |
| Charging system diagnostic | $80–$180 |
Battery replacement is the least expensive repair and also one of the most common solutions for older Dodge Journey vehicles. However, replacing the battery without confirming alternator performance may only provide temporary relief if the charging system cannot maintain proper voltage.
Alternator replacement represents one of the more significant repairs because labor often involves removing the drive belt and surrounding engine components. Vehicles with damaged wiring or intermittent electrical faults may require additional diagnostic time before repairs begin.
Electronic control module repairs generally represent the highest repair cost. Fortunately, BCM failures are considerably less common than weak batteries, poor cable connections, or alternator problems. A complete charging system diagnosis before replacing major components remains the most cost-effective approach because it identifies the actual source of Battery Saver Mode instead of relying on trial-and-error part replacement.
How Can You Prevent Battery Saver Mode from Returning?
Test the battery regularly
Testing the battery at regular intervals is the most effective way to prevent Battery Saver Mode from returning. Battery capacity gradually declines with age, even if the vehicle starts normally. Identifying a weakening battery before it fails reduces the likelihood of unexpected warning messages and starting problems.
Battery health should be checked at least once a year and before extreme summer or winter temperatures. Vehicles driven infrequently or used primarily for short trips may require more frequent testing because the battery has less opportunity to recharge fully.
If a battery repeatedly measures low voltage or fails a professional load test, replacing it before complete failure helps maintain charging system stability and prevents unnecessary strain on the alternator.
Inspect the charging system during routine maintenance
Routine charging system inspections help identify developing alternator problems before they trigger Battery Saver Mode. During scheduled maintenance, charging voltage should be measured with the engine running to verify that the alternator continues supplying sufficient electrical power.
Technicians should also inspect the serpentine belt for cracks, glazing, stretching, or contamination. A slipping belt reduces alternator speed and charging efficiency, especially during heavy electrical demand. Replacing a worn belt before it fails is considerably less expensive than repairing damage caused by charging system failure.
Keep battery terminals clean
Clean battery terminals provide low-resistance electrical connections that allow the charging system to operate efficiently. Corrosion gradually increases electrical resistance, reducing charging performance and creating intermittent voltage fluctuations that may activate Battery Saver Mode.
Inspect both battery terminals during every oil change or routine service. If corrosion begins to develop, clean the terminals promptly and ensure the battery clamps remain securely tightened. Applying dielectric grease or a battery terminal protectant after cleaning helps slow future corrosion.
Reduce unnecessary electrical loads
Limiting unnecessary electrical demand reduces stress on the charging system, especially when the battery is aging or operating under heavy load. Although the alternator is designed to power multiple accessories simultaneously, excessive electrical consumption leaves less reserve capacity during low engine speeds or cold weather.
Whenever possible, avoid operating high-power accessories that are not needed. Heated seats, rear window defrosters, auxiliary lighting, aftermarket amplifiers, and portable power devices all increase electrical demand. Reducing these loads helps maintain stable charging voltage and extends battery life.
Replace aging batteries before failure
Replacing an aging battery before it reaches the end of its service life significantly reduces the likelihood of Battery Saver Mode. Most automotive batteries provide reliable performance for approximately three to five years under normal driving conditions. High temperatures, repeated deep discharges, and frequent short-distance driving may shorten this lifespan.
Waiting until the battery fails completely often results in roadside breakdowns and additional stress on the charging system. Preventive replacement based on battery age and testing results is generally more reliable than waiting for warning messages to appear.
Which Dodge Journey Model Years Commonly Report Battery Saver Mode?
Battery Saver Mode is not limited to a single Dodge Journey model year. Reports from owners span multiple production years because the warning is associated with the vehicle’s electrical and charging systems rather than a specific manufacturing defect.
Higher-mileage vehicles are more likely to experience Battery Saver Mode because batteries, alternators, wiring connections, and charging system components naturally wear over time. Vehicles operating in extremely hot climates, very cold environments, or heavy stop-and-go traffic may also experience charging system issues earlier than vehicles driven under moderate conditions.
Regardless of model year, the diagnostic process remains the same. Battery condition, charging voltage, cable integrity, alternator performance, and control module communication should all be verified before replacing components.
What Problems Are Often Confused with Battery Saver Mode?
Dead battery
A dead battery and Battery Saver Mode are related but not identical conditions. Battery Saver Mode is an early warning that the electrical system is attempting to conserve power, whereas a dead battery indicates that available electrical energy has already been exhausted.
A vehicle displaying Battery Saver Mode may still start and drive normally for a limited time. A completely discharged battery, however, typically prevents the engine from cranking or starting.
Bad alternator
A failing alternator is one of the most common causes of Battery Saver Mode, but the warning itself does not confirm alternator failure. Similar symptoms can result from a weak battery, damaged wiring, loose terminals, or charging system control faults.
Testing alternator output under electrical load remains the most reliable method of determining whether the alternator requires replacement.
Battery warning light
The battery warning light and Battery Saver Mode serve different purposes. The battery warning light generally indicates that the charging system is not functioning correctly, while Battery Saver Mode represents an automatic power-saving response to low system voltage.
Many vehicles display both warnings simultaneously when alternator output decreases significantly. However, either warning may appear independently depending on the specific fault detected by the vehicle’s control modules.
Check Charging System message
A “Check Charging System” message usually provides a more direct indication of charging system malfunction than Battery Saver Mode. While Battery Saver Mode focuses on conserving electrical power, the charging system warning specifically indicates that battery charging performance has fallen outside normal operating limits.
When both messages appear together, diagnostic attention should focus on battery voltage, alternator output, charging cables, and related electrical components.
Parasitic battery drain
Parasitic battery drain is frequently mistaken for Battery Saver Mode because both conditions involve low battery voltage. The difference is that parasitic drain occurs while the vehicle is parked, whereas Battery Saver Mode activates after the vehicle detects insufficient electrical power during operation.
Common causes of parasitic drain include malfunctioning relays, interior lights that remain on, aftermarket electronics, or control modules that fail to enter sleep mode after the vehicle is turned off.
Frequently Asked Questions About Dodge Journey Battery Saver Mode
Will disconnecting the battery reset Battery Saver Mode?
Disconnecting the battery may temporarily clear the warning, but it will not permanently resolve Battery Saver Mode unless the underlying charging system problem has been repaired. If battery voltage continues falling after reconnection, the warning will return.
Can cold weather trigger Battery Saver Mode?
Yes. Cold temperatures reduce battery efficiency and increase the electrical current required to start the engine. An older battery that performs adequately during warm weather may experience significant voltage loss in winter, increasing the likelihood of Battery Saver Mode.
Can Battery Saver Mode prevent the engine from starting?
Yes. If battery voltage continues decreasing after Battery Saver Mode activates, insufficient electrical power may remain for the starter motor. At that point, the engine may crank slowly or fail to start completely.
How long does Battery Saver Mode stay on?
Battery Saver Mode usually remains active until the charging system returns to normal operating voltage. Once the battery is properly charged and the underlying fault has been repaired, the warning often clears automatically after one or more drive cycles.
Can a new battery still trigger Battery Saver Mode?
Yes. Installing a new battery does not eliminate problems caused by a failing alternator, damaged wiring, loose battery terminals, defective sensors, or Body Control Module faults. If the charging system cannot maintain proper voltage, Battery Saver Mode may continue appearing even after battery replacement.