If you’ve recently received a brake service estimate that seemed surprisingly expensive, you’re not alone. Many Subaru owners are shocked to learn that a routine brake pad replacement can cost anywhere from $250 to $600 or more at a repair shop, depending on the model and labor rates in their area. The good news is that replacing brake pads is one of the most beginner-friendly maintenance tasks you can perform yourself, and it can save you a significant amount of money while helping you better understand your vehicle.
Your Subaru’s braking system is one of its most important safety components. Whether you drive a Forester, Outback, Crosstrek, Impreza, or WRX, properly functioning brake pads ensure reliable stopping power in daily traffic, adverse weather conditions, and emergency situations. Ignoring worn brake pads can lead to longer stopping distances, rotor damage, and much higher repair costs down the road.
Many first-time DIY mechanics hesitate to tackle brake maintenance because they worry about making mistakes or compromising safety. Fortunately, with the right tools, careful preparation, and a step-by-step approach, replacing Subaru brake pads is a straightforward project that most beginners can complete in a few hours.
In this guide, you’ll learn how to perform a DIY Subaru brake pad replacement from start to finish. We’ll cover the tools you’ll need, important safety precautions, detailed installation steps, common mistakes to avoid, and final inspection procedures to ensure your Subaru is ready for the road with confidence.
Contents
- Why Brake Pad Maintenance Matters for Your Subaru
- Tools and Supplies Needed for DIY Subaru Brake Pad Replacement
- Safety Preparations Before Starting
- Step 1: Remove the Wheel
- Step 2: Remove the Brake Caliper
- Step 3: Remove the Old Brake Pads
- Step 4: Compress the Caliper Piston
- Step 5: Install the New Brake Pads
- Step 6: Reinstall the Brake Caliper
- Step 7: Reinstall the Wheel
- Step 8: Perform Final Brake Checks
- Common DIY Subaru Brake Pad Replacement Mistakes to Avoid
- How Much Money Can You Save by Replacing Subaru Brake Pads Yourself?
- Frequently Asked Questions
- Conclusion
Why Brake Pad Maintenance Matters for Your Subaru
Brake pads are a critical part of your Subaru’s braking system. Every time you press the brake pedal, the brake pads clamp against the rotors to create friction, slowing down and eventually stopping the vehicle. Over time, this friction causes the pads to wear down naturally, making regular inspection and replacement essential for maintaining safe driving conditions.
One of the first signs that your Subaru needs new brake pads is a high-pitched squealing noise when braking. Most modern brake pads include built-in wear indicators designed to produce this sound when the friction material becomes thin. If ignored, the noise may progress into a grinding sound, indicating that the brake pad material has worn away completely and metal components are contacting the rotor surface.
Other warning signs include reduced braking performance, increased stopping distance, vibrations through the brake pedal, or dashboard brake warnings. While some symptoms may seem minor at first, they often indicate that immediate attention is needed.
Neglecting worn brake pads can lead to expensive repairs. Once the pads wear beyond their safe limit, the brake rotors may become damaged, requiring resurfacing or replacement. What could have been a relatively inexpensive brake pad replacement can quickly turn into a much larger repair bill. Routine brake maintenance not only protects your investment but also helps ensure the safety of everyone in the vehicle.
Tools and Supplies Needed for DIY Subaru Brake Pad Replacement
Before beginning your DIY Subaru brake pad replacement, gather all necessary tools and materials. Having everything ready beforehand will make the process smoother and reduce the risk of mistakes.
Essential tools include a floor jack, a pair of jack stands, a lug wrench, a socket set, a ratchet, a torque wrench, and a C-clamp or brake caliper compression tool. These tools allow you to safely lift the vehicle, remove components, and correctly reinstall them according to Subaru specifications.
You will also need replacement brake pads designed specifically for your Subaru model. Choosing quality brake pads is important because they directly affect braking performance, durability, noise levels, and driving comfort. In addition to the pads themselves, brake lubricant and brake cleaner are highly recommended to ensure proper installation and operation.
Safety equipment should never be overlooked. Protective gloves help keep your hands clean and protected from sharp edges, while safety glasses shield your eyes from brake dust and debris.
For those looking to perform a more thorough inspection, optional tools such as a rotor thickness gauge or caliper measuring tool can help determine whether the brake rotors remain within service specifications.
The financial benefit of doing the job yourself is significant. While a professional brake pad replacement may cost several hundred dollars, a DIY project typically requires only the cost of parts and a few basic supplies. For many Subaru owners, the savings can be substantial over the lifetime of the vehicle.
Safety Preparations Before Starting
Safety should always be your top priority when working on any braking system. Even a simple maintenance task can become dangerous if proper precautions are ignored.
Begin by selecting a safe work area. A flat, level surface such as a garage floor or paved driveway provides the stability needed to safely lift and support the vehicle. Avoid working on uneven ground, gravel, or soft surfaces that could allow the jack or jack stands to shift unexpectedly.
Once parked, place the transmission in Park for automatic models or in gear for manual transmissions. Apply the parking brake unless you are servicing the rear brakes on a vehicle where the parking brake system may interfere with the procedure. Wheel chocks should be positioned behind the tires that will remain on the ground to prevent vehicle movement.
Before lifting the Subaru, slightly loosen the wheel lug nuts while the tires are still in contact with the ground. This prevents the wheel from spinning when force is applied. Consult the owner’s manual to identify the correct jacking points and support locations. Improper lifting can damage vehicle components or create an unstable working environment.
After raising the vehicle, always support it with jack stands. Never rely solely on a hydraulic jack to hold the vehicle while you work underneath or around it. Once the vehicle is securely supported, gently shake it to verify stability before proceeding.
Finally, take a few minutes to review your Subaru owner’s manual. Brake component layouts, torque specifications, and maintenance recommendations may vary slightly between models. Having this information available will help ensure a safe and successful brake pad replacement.
Step 1: Remove the Wheel
The first step in a DIY Subaru brake pad replacement is gaining access to the braking components by removing the wheel. If you have already loosened the lug nuts before lifting the vehicle, this part will be much easier.
With the Subaru securely supported on jack stands, fully remove the lug nuts and place them in a safe location where they will not roll away or become contaminated with dirt. Carefully pull the wheel straight toward you and set it aside. If the wheel feels stuck due to corrosion or rust buildup around the hub, gently tap the tire sidewall with the palm of your hand to loosen it.
Once the wheel is removed, take a moment to inspect the visible brake components. Look for uneven rotor wear, signs of fluid leaks, damaged brake hoses, or excessive rust. A quick visual inspection can help identify potential issues before they become major repairs.
This is also a good opportunity to compare the condition of the brake assembly on both sides of the vehicle. Significant differences in wear patterns may indicate a sticking caliper or another issue that should be addressed during maintenance.
Step 2: Remove the Brake Caliper
With the brake assembly exposed, the next step is removing the caliper. The caliper houses the brake pads and applies pressure to them when the brake pedal is pressed.
Locate the caliper mounting bolts on the rear side of the caliper. Depending on your Subaru model, these bolts may require a socket or hex key for removal. Carefully loosen and remove the bolts while supporting the caliper with your free hand.
Once the bolts are removed, gently slide the caliper away from the rotor. Avoid forcing it if resistance is present. A slight rocking motion can help release the caliper from the old brake pads.
One of the most common beginner mistakes is allowing the caliper to hang by the flexible brake hose. The hose is not designed to support the weight of the caliper and may become damaged if stretched or stressed. Instead, use a bungee cord, wire hook, or zip tie to suspend the caliper from a nearby suspension component.
With the caliper safely supported, inspect its condition. Look for damaged rubber boots, fluid leaks around the piston, or excessive corrosion. Identifying these issues now can prevent future braking problems and improve long-term reliability.
Step 3: Remove the Old Brake Pads
After removing the caliper, the old brake pads can be taken out. In most Subaru models, the pads slide out of their mounting bracket with minimal effort. Some may be held in place by clips or retaining hardware that should also be inspected.
As you remove the old pads, examine their wear pattern carefully. Even wear across both pads generally indicates normal operation. Uneven wear, however, may suggest a sticking caliper piston, seized guide pins, or improper brake hardware function.
Measure the remaining friction material if possible. Most brake pads should be replaced when the friction material reaches approximately 3 to 4 millimeters in thickness. Waiting longer increases the risk of rotor damage and reduced braking effectiveness.
Next, inspect the brake rotor. The rotor surface should appear relatively smooth and free from deep grooves, cracks, or severe discoloration. Minor surface marks are normal, but excessive scoring may indicate the rotor needs resurfacing or replacement.
Pay close attention to the pad hardware and anti-rattle clips. These components help ensure proper pad movement and reduce brake noise. Worn, bent, or heavily corroded hardware should be replaced whenever new brake pads are installed.
Taking the time to thoroughly inspect each component at this stage can prevent recurring brake issues and help maximize the lifespan of your new brake pads.
Step 4: Compress the Caliper Piston
Before the new brake pads can be installed, the caliper piston must be pushed back into its housing. This is necessary because the new pads are significantly thicker than the worn pads that were removed. Without retracting the piston, there will not be enough space to fit the caliper over the new brake pads and rotor.
Position one of the old brake pads against the piston face to distribute pressure evenly. Using a C-clamp or a dedicated brake caliper compression tool, slowly compress the piston back into the caliper bore. Apply steady pressure and avoid forcing the piston too quickly, as this may damage internal seals or cause brake fluid to overflow from the master cylinder reservoir.
As the piston retracts, periodically check the brake fluid level under the hood. If the reservoir is already near the maximum mark, some fluid may need to be removed to prevent overflow.
During this step, pay attention to how smoothly the piston moves. Excessive resistance, sticking, or uneven movement may indicate a seized caliper that requires further inspection or replacement.
Once fully compressed, the piston should sit flush inside the caliper housing, creating enough clearance for the new brake pads.
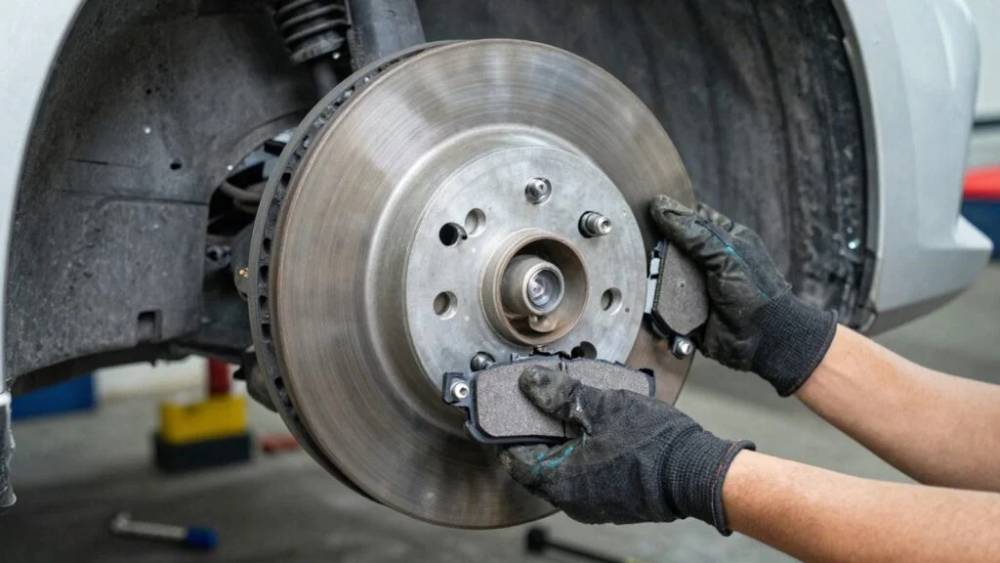
Step 5: Install the New Brake Pads
With the piston retracted, you can begin installing the new brake pads. Start by cleaning the caliper bracket and hardware mounting points using brake cleaner. Removing dirt, rust, and debris helps ensure smooth pad movement and reduces the risk of uneven wear.
If your brake pad kit includes new hardware clips, install them now. Fresh hardware often improves performance and helps eliminate brake noise that can occur when old clips become worn or corroded.
Apply a thin layer of brake lubricant to the designated contact points where the brake pads meet the hardware. Avoid getting lubricant on the friction surface of the pads or the rotor, as contamination can significantly reduce braking effectiveness.
Slide the new brake pads into position within the caliper bracket. They should fit securely while still moving freely within the guides. Verify that both the inner and outer pads are correctly oriented according to the manufacturer’s instructions.
Take a final look at the assembly to ensure everything is seated properly. Proper alignment at this stage helps prevent premature wear, vibration, and brake noise after installation.
Step 6: Reinstall the Brake Caliper
With the new brake pads installed, carefully reposition the caliper over the rotor and brake pads. Thanks to the compressed piston, the caliper should slide into place without excessive force.
Align the caliper mounting holes with the bracket and reinstall the caliper bolts. Thread each bolt by hand first to avoid cross-threading. Once seated, tighten the bolts according to the torque specifications provided in your Subaru owner’s manual.
Proper torque is extremely important. Under-tightened bolts may loosen over time, while over-tightened bolts can damage threads or components. A quality torque wrench is one of the best investments for any DIY mechanic.
After tightening the bolts, inspect the brake hose to ensure it is not twisted, stretched, or pinched. Confirm that all hardware is secure and that the brake pads remain correctly positioned within the bracket.
Perform a final visual inspection before moving to the next step. Everything should appear clean, properly aligned, and securely fastened.
Step 7: Reinstall the Wheel
Once the brake assembly is complete, reinstall the wheel onto the hub. Align the wheel with the wheel studs and carefully slide it into place.
Thread the lug nuts by hand to avoid cross-threading. Tighten them in a star pattern until they are snug, but do not fully torque them while the vehicle remains elevated.
Using the floor jack, carefully raise the vehicle just enough to remove the jack stands. Lower the Subaru until the tire makes firm contact with the ground.
Now use a torque wrench to tighten the lug nuts to the manufacturer’s recommended specification. Tightening in a star pattern ensures even clamping force and helps prevent rotor distortion.
Many DIY beginners underestimate the importance of proper wheel torque. Incorrect torque can lead to wheel vibration, uneven rotor wear, and potential safety hazards. Taking a few extra minutes to perform this step correctly can prevent significant problems later.
With the wheel securely installed, repeat the entire process on the opposite side of the vehicle if necessary.
Step 8: Perform Final Brake Checks
Before driving your Subaru, several important checks must be completed to ensure the braking system is functioning properly.
Start by sitting in the driver’s seat and pressing the brake pedal several times. The pedal may initially feel soft or travel farther than normal because the caliper pistons need to reposition themselves against the new brake pads. Continue pumping the pedal until it becomes firm and responsive.
Next, inspect the brake fluid reservoir and verify that the fluid level remains within the recommended range. Add the correct type of brake fluid if necessary, following Subaru’s specifications.
Walk around the vehicle and visually inspect each wheel area. Look for loose hardware, leaking brake fluid, or components that appear out of place. Even a quick inspection can help catch installation errors before they become serious safety concerns.
Once everything appears normal, perform a low-speed test drive in a safe area. Apply the brakes gently several times to confirm proper operation. Listen for unusual noises and pay attention to pedal feel, stopping performance, and vehicle stability.
Many manufacturers recommend a bedding-in procedure for new brake pads. This process helps transfer an even layer of friction material onto the rotor surface, improving braking performance and extending pad life. Follow the instructions provided by the brake pad manufacturer whenever possible.
Common DIY Subaru Brake Pad Replacement Mistakes to Avoid
Even though replacing brake pads is considered a beginner-friendly repair, certain mistakes can negatively impact performance and safety.
One of the most common errors is forgetting to pump the brake pedal before driving. This can result in little or no braking force during the first few pedal applications, creating a potentially dangerous situation.
Another frequent mistake involves applying too much brake lubricant. While lubrication is important at specific contact points, excessive grease can attract dirt and contaminate braking surfaces.
Many DIY mechanics focus solely on replacing the brake pads and overlook the condition of the rotors. Installing new pads on severely worn or damaged rotors can reduce braking effectiveness and shorten the lifespan of the new components.
Ignoring torque specifications is another issue. Caliper bolts and wheel lug nuts must be tightened according to Subaru’s recommendations. Guessing or overtightening can create unnecessary problems and increase the risk of component failure.
Finally, purchasing low-quality brake pads simply to save money often leads to increased noise, excessive brake dust, inconsistent performance, and shorter service life. Investing in reputable brake components usually provides better value in the long run.
How Much Money Can You Save by Replacing Subaru Brake Pads Yourself?
One of the biggest motivations for performing a DIY Subaru brake pad replacement is cost savings.
Professional brake pad replacement services typically range from $250 to $600 per axle depending on the Subaru model, geographic location, labor rates, and the type of brake pads used. If rotor replacement is also required, costs can increase significantly.
By performing the work yourself, your primary expenses are the replacement brake pads, lubricant, cleaner, and any tools you may need to purchase. Many Subaru owners can complete the job for less than half the cost of a professional repair.
For example, a quality set of brake pads may cost between $40 and $120, while brake cleaner and lubricant add only a small additional expense. Once basic tools are acquired, they can be used for future maintenance projects as well.
Over the lifetime of a vehicle, repeated DIY brake services can save hundreds or even thousands of dollars. These savings become especially significant for households that own multiple vehicles.
Beyond financial benefits, many Subaru owners appreciate the confidence and satisfaction that comes from maintaining their own vehicles and understanding how critical systems operate.
Frequently Asked Questions
How often should Subaru brake pads be replaced?
Brake pad lifespan varies depending on driving habits, road conditions, vehicle weight, and brake pad material. Most Subaru brake pads last between 30,000 and 70,000 miles. Regular inspections are the best way to determine when replacement is needed.
Can a beginner replace Subaru brake pads?
Yes. Brake pad replacement is often considered one of the most accessible maintenance tasks for beginners. With proper tools, attention to safety, and a detailed guide, many first-time DIY mechanics successfully complete the job.
How long does a DIY Subaru brake pad replacement take?
For beginners, the process typically takes two to four hours. As experience increases, many DIY enthusiasts can complete the job much more quickly.
Should brake rotors be replaced at the same time?
Not always. Rotors should be inspected for thickness, cracks, excessive grooves, and heat damage. If they remain within specifications and are in good condition, replacement may not be necessary.
What are the best brake pads for Subaru vehicles?
The best brake pads depend on your driving style and vehicle usage. Ceramic brake pads are popular for daily driving because they produce less dust and noise, while performance-oriented pads may offer improved stopping power for aggressive driving conditions.
Conclusion
Performing a DIY Subaru brake pad replacement is one of the most practical and rewarding maintenance projects for vehicle owners who want to save money while keeping their Subaru in excellent condition. Although the task may seem intimidating at first, the process becomes much more manageable when broken down into clear, step-by-step instructions.
By gathering the right tools, following proper safety procedures, and taking the time to inspect each component carefully, even beginners can successfully replace their Subaru’s brake pads and restore reliable braking performance. The money saved compared to professional service can be substantial, and the skills gained can help build confidence for future automotive maintenance projects.
Remember that your braking system plays a critical role in vehicle safety. Never rush the job, always follow manufacturer specifications, and perform thorough inspections before returning your Subaru to the road.
Whether you drive a Subaru Forester, Outback, Crosstrek, Impreza, Legacy, or WRX, learning how to complete a DIY Subaru brake pad replacement is a valuable skill that can help extend the life of your vehicle while reducing long-term maintenance costs.
Have you replaced your Subaru brake pads yourself? Share your experience, tips, or questions in the comments and help other Subaru owners complete their next brake service with confidence.