Changing a blower motor resistor involves locating the resistor near the HVAC blower motor, disconnecting its electrical connector, removing the mounting fasteners, installing the replacement resistor, and testing every fan speed. On many vehicles, the job requires only basic hand tools because the resistor is accessible behind the glove box, beneath the passenger-side dashboard, or near the blower motor housing. The exact location and removal procedure depend on the vehicle’s year, make, and model.
A failed blower motor resistor commonly causes the cabin fan to work at only certain speeds, lose one or more speed settings, or operate intermittently. However, these symptoms do not always confirm a bad resistor. A blown fuse, damaged electrical connector, wiring fault, failing blower motor, or blower motor control module can produce similar problems. Checking the likely cause before installing a new part prevents unnecessary replacement.
This guide explains how to identify a faulty blower motor resistor, find it in your vehicle, select the required tools, remove the old resistor, install the replacement, and test the HVAC system afterward. It also covers what to check if the blower still does not work after the new resistor is installed.
How Do You Know If the Blower Motor Resistor Needs to Be Replaced?
A blower motor resistor may need replacement when the HVAC blower loses one or more fan speeds, works only at specific speeds, becomes stuck at one speed, or operates intermittently. The resistor controls blower speed on HVAC systems that use resistance to reduce the voltage or current delivered to the blower motor at lower speed settings. When part of the resistor circuit fails, the affected speed settings can stop working while other settings remain available.
One of the most recognizable symptoms is a blower that works on high speed but not on one or more lower speeds. High speed may use a different electrical path that bypasses some or all of the resistor circuit, depending on the vehicle design. A partial resistor failure can therefore disable lower settings without stopping the blower completely. However, fan-speed behavior varies between HVAC designs, so the symptom should be treated as diagnostic evidence rather than proof that the resistor itself has failed.
Check the fuse, electrical connector, wiring, and blower motor before replacing the resistor when the cause is uncertain. Inspect the resistor connector for melted plastic, darkened terminals, corrosion, or loose connections. Heat damage around the connector can indicate excessive resistance at the connection or another electrical problem that requires repair in addition to replacing the resistor.
A blower that does not operate at any speed requires broader diagnosis. Depending on the vehicle, the fault may involve the fuse, relay, blower motor, wiring, climate-control switch, or an electronic blower motor control module rather than a conventional resistor. Identifying which speed settings fail and inspecting the circuit before purchasing parts reduces the risk of replacing a functioning resistor.
What Tools Do You Need to Change a Blower Motor Resistor?
Most blower motor resistor replacements require a screwdriver or small socket and ratchet, a flashlight, and the correct replacement resistor. The exact fastener type and tool size depend on the vehicle’s year, make, model, and HVAC design. Checking vehicle-specific service information before starting helps determine whether additional trim or dashboard components must be removed.
A flashlight helps locate the resistor when it sits underneath the dashboard or behind the glove box. A screwdriver or socket removes the resistor mounting fasteners, while a trim-removal tool can help remove interior panels without damaging their clips. Keep a small container nearby for screws and clips because these fasteners are easy to lose in the passenger footwell.
A multimeter is useful when the resistor has not been positively diagnosed. It can support electrical checks of the circuit, although the correct test procedure and expected readings depend on the vehicle’s wiring design. Do not assume that the same resistance or voltage specification applies to every blower motor resistor.
Use a replacement resistor that matches the vehicle and HVAC configuration. Two resistors that look similar can have different connectors, resistance characteristics, mounting arrangements, or applications. Matching the replacement by year, make, model, engine or HVAC configuration when required, and part number reduces the chance of installing an incompatible component.
Where Is the Blower Motor Resistor Located?
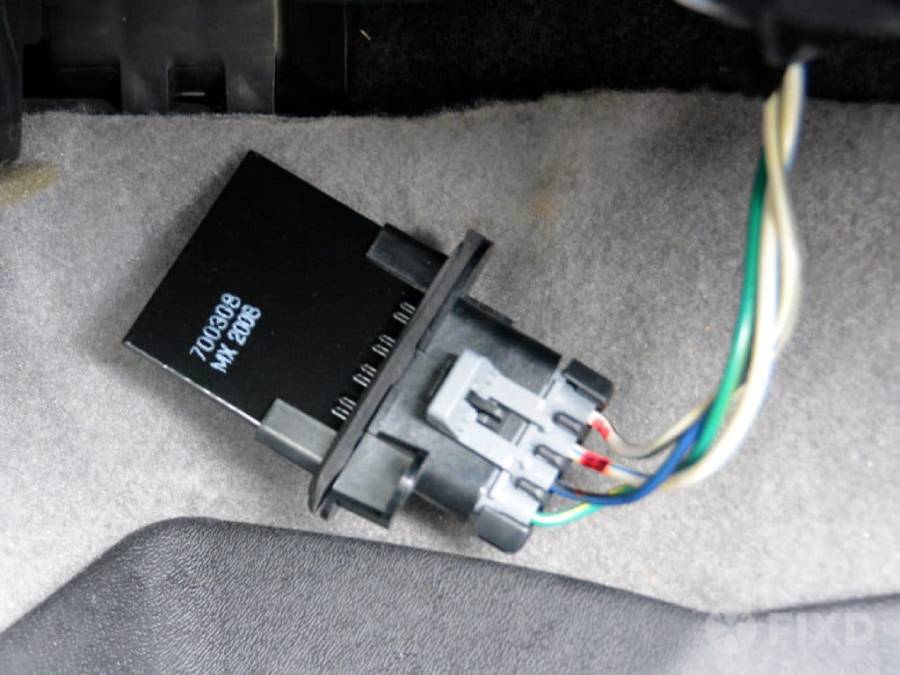
The blower motor resistor is typically mounted near the blower motor in the HVAC housing, commonly behind the glove box, below the passenger-side dashboard, or in the passenger footwell. Its exact position varies by vehicle. Many resistor designs place the resistive element inside the HVAC air duct so moving air can remove heat generated during blower operation.
Start by locating the blower motor, which is commonly installed on the passenger side of the HVAC case. Look for a small component mounted to the nearby housing with an electrical connector and two or more fasteners. Part of the resistor assembly may extend into the air duct while its connector remains accessible from outside the HVAC housing.
Do not remove dashboard components based only on a generic resistor location. Verify the location using the vehicle’s year, make, and model before disassembly. Vehicle-specific service information, a repair manual, or a parts diagram can identify which panel must be removed and where the resistor is mounted. This is especially important because some vehicles use an electronic blower motor control module instead of a conventional resistor.
Once the resistor is located, inspect the surrounding area before removing it. Check the wiring harness and connector for heat damage, corrosion, loose terminals, or damaged insulation. Finding these problems before installing the new resistor matters because replacing only the resistor may not correct an underlying electrical fault.
How Do You Change a Blower Motor Resistor Step by Step?
You can change a blower motor resistor in 6 main steps: prepare the vehicle, access the resistor, disconnect its electrical connector, remove the old resistor, install the replacement, and test every blower speed. The exact procedure varies by vehicle because manufacturers use different resistor locations, fasteners, connectors, and HVAC layouts. Confirm the vehicle-specific service procedure before removing interior panels or electrical components.
Step 1: How Do You Prepare the Vehicle?
Prepare the vehicle by switching off the ignition, removing the key or moving it away from the vehicle, and turning the HVAC system off before touching the resistor or its connector. Park the vehicle on a stable surface and make sure you have enough lighting and working space around the passenger footwell or glove box.
Follow the vehicle manufacturer’s electrical service procedure when determining whether the negative battery cable must be disconnected. Some repairs require battery disconnection before an electrical connector is removed, while procedures vary between vehicles. Battery disconnection can also affect stored settings or systems on certain models, so it should not be treated as a universal step without checking the appropriate service information.
Move floor mats or other objects that restrict access to the lower dashboard. Keep the replacement resistor and required tools within reach before beginning disassembly. Preparing the work area reduces the chance of losing screws, clips, or trim fasteners during the repair.
Step 2: How Do You Access the Blower Motor Resistor?
Access the blower motor resistor by removing the glove box, lower dashboard panel, trim panel, or other component specified for your vehicle. Some vehicles provide direct access from the passenger footwell, while others require one or more interior panels to be removed before the HVAC housing becomes visible.
Locate the blower motor first when the resistor is difficult to identify. The resistor is generally mounted in or near the same HVAC housing, with an electrical connector visible from outside the housing. Its position allows the resistor assembly to interact with airflow inside the HVAC case on designs that use airflow for cooling.
Remove trim carefully rather than forcing a panel away from the dashboard. Interior panels can use screws, push clips, retaining tabs, or combinations of these fasteners. Check for hidden fasteners when a panel remains firmly attached after the visible screws have been removed.
Step 3: How Do You Disconnect the Electrical Connector?
Disconnect the blower motor resistor connector by releasing its locking tab and pulling the connector from the resistor body rather than pulling on the wires. Pulling the wiring harness can damage individual wires or loosen terminals inside the connector.
Inspect the connector immediately after disconnecting it. Look for melted plastic, brown or black discoloration, corrosion, loose terminals, damaged insulation, or signs that the connector has overheated. A damaged connector can create a poor electrical connection and should not automatically be reused with a new resistor.
Pay particular attention to heat damage when the old resistor has failed repeatedly. Installing another resistor without addressing a damaged connector, wiring fault, or other underlying electrical problem can leave the original cause unresolved.
Step 4: How Do You Remove the Old Blower Motor Resistor?
Remove the old blower motor resistor by taking out its mounting screws or bolts and carefully pulling the resistor assembly from the HVAC housing. Most designs use a small number of fasteners, but their size, position, and quantity vary between vehicles.
Support the resistor as the final fastener is removed. Pull the component straight out when possible and avoid using excessive force against the HVAC housing. The portion inside the air duct may contain resistor coils, fins, or other elements that extend beyond the mounting surface.
Compare the removed part with the replacement before proceeding. Check the connector shape, mounting holes, overall dimensions, and part identification. A physical resemblance alone does not guarantee compatibility, so the replacement should also match the specified vehicle application.
Step 5: How Do You Install the New Blower Motor Resistor?
Install the new blower motor resistor by positioning it correctly in the HVAC housing, securing its mounting fasteners, and reconnecting the electrical connector. The resistor should sit flush against its mounting surface without requiring force to align the mounting holes.
Start the screws or bolts by hand when possible before tightening them with a tool. This reduces the risk of cross-threading a fastener or positioning the resistor incorrectly. Tighten the fasteners to the vehicle manufacturer’s specification when a torque value is provided rather than overtightening them against a plastic HVAC housing.
Reconnect the electrical connector until its locking mechanism engages. The connector should fit securely without being forced. Reinstall the glove box, trim panel, or lower dashboard cover after confirming that the resistor and wiring harness are properly positioned.
Step 6: How Do You Test the New Blower Motor Resistor?
Test the new blower motor resistor by operating the HVAC blower through every available fan-speed setting and confirming that the blower responds correctly at each setting. Testing all speeds is important because a resistor-related fault can affect individual speed circuits rather than stopping the blower completely.
Start at the lowest fan setting and move through each intermediate setting to the highest speed. Listen for stable blower operation and confirm that fan speed changes correspond with the selected controls. A successful repair should restore the speed settings that were previously unavailable when the resistor was the cause of the fault.
Stop testing if you notice a burning smell, smoke, unusual heat around the connector, or another electrical abnormality. These signs indicate that the circuit requires further inspection rather than continued operation. If the blower still fails at one or more speeds after the new resistor is installed, diagnose the blower motor, fuse, wiring, connector, control circuit, or blower motor control module before replacing additional parts.
What Should You Do If the Blower Motor Still Does Not Work After Replacing the Resistor?
Check the fuse, electrical connector, wiring, blower motor, relay, and HVAC control circuit if the blower still does not work after replacing the resistor. A new resistor will not restore normal fan operation when another component in the blower circuit is causing the problem. The next diagnostic step should depend on whether the blower is completely inoperative, works intermittently, or still fails only at specific speeds.
Start with the resistor connector and wiring that were disturbed during replacement. Confirm that the connector is fully seated and its locking tab has engaged. Inspect the terminals for corrosion, looseness, discoloration, or melted plastic. A damaged terminal can create excessive electrical resistance and heat, resulting in an unreliable connection even when the resistor itself is new.
Check the blower circuit fuse and applicable relay according to the vehicle’s wiring information. A blown fuse can prevent the blower from operating, but replacing the fuse alone does not correct a circuit fault that caused it to open. Diagnose the circuit further if a replacement fuse blows again.
Inspect the blower motor when a resistor fails repeatedly or the blower remains unreliable after resistor replacement. A worn or failing blower motor can create an abnormal electrical load in some failure conditions. Connector damage, wiring faults, poor connections, and insufficient cooling around the resistor can also contribute to overheating. Repeated resistor failure therefore requires diagnosis of the surrounding circuit rather than installing another resistor without identifying the cause.
The vehicle may also use an electronic blower motor control module instead of, or as part of a system different from, a conventional resistor pack. If the replacement resistor is correct but fan-speed control remains abnormal, verify the HVAC system design and follow the vehicle-specific diagnostic procedure before replacing another component.
How Long Does It Take to Change a Blower Motor Resistor?
Changing a blower motor resistor can be a relatively short repair when the component is directly accessible, but the total replacement time depends primarily on its location and the amount of interior disassembly required. A resistor positioned underneath the passenger-side dashboard requires less work to access than one located behind a glove box, trim panels, or other HVAC components.
The replacement itself consists of only a few operations: disconnecting the electrical connector, removing the mounting fasteners, exchanging the resistor, reconnecting the wiring, and testing the blower. Access often accounts for a larger portion of the job than removing the resistor itself. Vehicle design therefore has a greater effect on repair time than the basic replacement procedure.
DIY repair can also take longer when the resistor location is unfamiliar or when diagnosis is required before installation. Checking service information before starting helps identify the access procedure, fastener locations, and required tools. This prevents unnecessary dashboard disassembly and reduces the risk of breaking interior clips or panels.
How Much Does It Cost to Replace a Blower Motor Resistor?
The total cost to replace a blower motor resistor consists of the price of the replacement part plus labor when a repair shop performs the work. There is no single replacement price that applies to every vehicle because resistor design, part source, accessibility, and local labor rates vary.
Part cost depends on the vehicle’s year, make, model, HVAC configuration, and whether an OEM or aftermarket component is selected. Vehicles equipped with an electronic blower motor control module may also require a different and potentially more complex component than vehicles using a conventional resistor pack. Confirming the exact component before comparing prices prevents a resistor and control module from being treated as interchangeable parts.
Labor cost is primarily influenced by access time. A resistor that can be reached directly from the passenger footwell requires less disassembly than one located behind several panels. Additional repair costs can also arise when inspection reveals a melted connector, damaged wiring, or a failing blower motor that contributed to the original problem.
DIY replacement eliminates the labor charge but does not eliminate the need for accurate diagnosis. Replacing an inexpensive resistor will not solve a fault caused by the blower motor, wiring, fuse, relay, or HVAC control system. Diagnosis should therefore come before cost comparison when the failure symptoms do not clearly identify the resistor.
Read more: How to Fix a Clogged Catalytic Converter: Diagnosis, Cleaning, and Replacement
Can You Replace a Blower Motor Resistor Yourself?
You can replace a blower motor resistor yourself if the component is accessible, the fault has been correctly diagnosed, and the repair requires only basic removal of electrical connectors, fasteners, and interior trim. On vehicles where the resistor sits below the passenger-side dashboard or behind an easily removable glove box, the mechanical part of the repair is relatively straightforward. The difficulty increases when dashboard components must be removed or when the problem requires electrical diagnosis rather than simple part replacement.
Before choosing a DIY repair, confirm that the symptoms point to the blower motor resistor. A blower that operates at some speeds but not others can indicate a resistor-related problem on systems that use a conventional resistor pack. A blower that does not operate at any speed requires broader diagnosis because the fuse, relay, wiring, blower motor, HVAC controls, or another electrical component may be responsible.
The condition of the electrical connector is another factor in deciding whether to complete the repair yourself. A melted connector, burned terminal, damaged wire, or repeated resistor failure indicates that replacing the resistor alone may not solve the problem. These conditions require the underlying electrical fault to be identified and repaired. Installing a new resistor while leaving a damaged connection in the circuit can result in unreliable blower operation or another failure.
Professional diagnosis is the better option when the resistor repeatedly fails, electrical damage is present, the blower remains inoperative after replacement, or the correct cause cannot be identified. DIY replacement is most appropriate when the component has been properly identified, access is straightforward, and the repair can be completed according to vehicle-specific service information.
What Is the Difference Between a Blower Motor Resistor and a Blower Motor Control Module?
A blower motor resistor controls blower speed through resistive electrical circuits, while a blower motor control module uses electronic circuitry to regulate blower motor operation. Both components can influence cabin fan speed, but they are not interchangeable and do not necessarily use the same diagnostic or replacement procedure.
A conventional blower motor resistor commonly provides several fixed blower-speed settings. Different resistance paths alter the electrical conditions supplied to the blower motor, allowing the fan to operate at different speeds. A failure within the resistor assembly can therefore eliminate individual speed settings while leaving others operational.
A blower motor control module uses electronic control rather than relying only on fixed resistor paths. This design can provide more precise or continuously variable blower-speed control and is found in many vehicles with automatic or electronically controlled climate systems. Depending on the vehicle, the component may be described in service information or parts catalogs as a blower motor control module, blower control module, power transistor, or another manufacturer-specific term.
Identify which component your vehicle uses before ordering a replacement. The vehicle’s year, make, model, HVAC configuration, connector design, and part number can help distinguish a conventional resistor from an electronic control module. A part that occupies a similar location near the blower motor is not automatically a blower motor resistor.
This distinction also affects troubleshooting. Replacing a conventional resistor based on symptoms from a vehicle that uses electronic blower control can lead to an incorrect diagnosis. Verify the HVAC system design and follow vehicle-specific service information when the fan-speed behavior does not match the expected operation of a resistor-controlled blower system.