A Dodge Dart park light out problem is most commonly caused by a burned-out bulb, a blown fuse, a damaged socket, faulty wiring, or a malfunctioning Body Control Module (BCM). In most cases, the issue can be identified by following a systematic diagnosis, starting with the simplest components before moving to the vehicle’s electrical control system.
The parking lights are part of the Dodge Dart’s exterior lighting system and improve the vehicle’s visibility during low-light conditions, such as dawn, dusk, heavy rain, or nighttime parking. While a failed parking light does not always prevent the vehicle from being driven, it reduces visibility to other road users and may indicate an underlying electrical fault that could eventually affect additional lighting circuits.
This guide explains how the Dodge Dart parking light system works, the seven most common causes of parking light failure, and the exact diagnostic process used to locate the fault. You’ll learn how to inspect the bulb, check the fuse, test the socket for voltage, examine the wiring harness, verify the ground circuit, and determine whether the Body Control Module requires further diagnosis.
By following these troubleshooting steps in order, you can identify the root cause efficiently, avoid replacing unnecessary parts, and decide whether the repair is suitable for a DIY approach or requires professional electrical diagnostics.
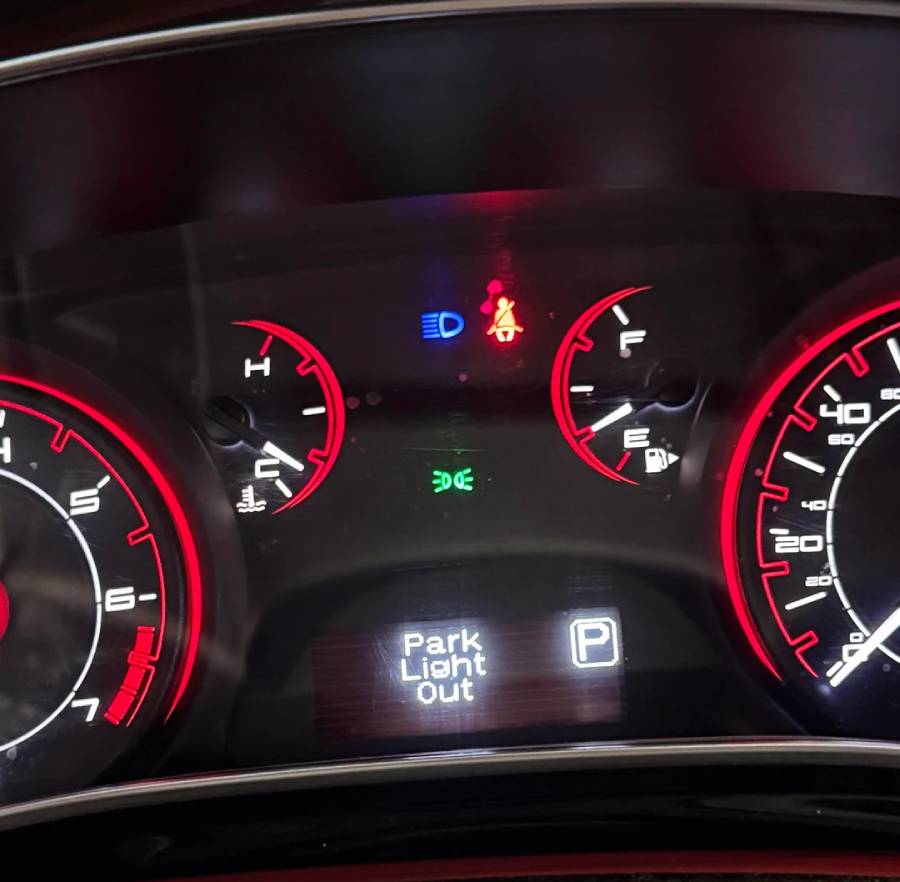
Why Is My Dodge Dart Park Light Out?
A Dodge Dart park light can stop working because of a failed bulb, a blown fuse, a damaged socket, broken wiring, a faulty headlight switch, or a malfunctioning Body Control Module (BCM). Most failures originate from one of these components, making a structured inspection the fastest way to identify the root cause.
The parking light circuit on the Dodge Dart supplies power to the front and rear parking lamps whenever the lighting switch is set to the parking or headlight position. Power flows through the fuse, is controlled by the Body Control Module or lighting switch depending on the model year, and reaches the bulbs through the wiring harness and connectors. A fault anywhere along this circuit can interrupt voltage and prevent one or more parking lights from illuminating.
If only one parking light is out, the problem is usually isolated to the bulb, socket, connector, or local wiring on that side of the vehicle. If both front or multiple parking lights fail simultaneously, the issue is more likely related to a shared fuse, BCM output, headlight switch, or a damaged wiring harness. Identifying whether the failure affects a single lamp or the entire circuit significantly reduces diagnostic time.
Ignoring a parking light failure can also hide a developing electrical issue. Moisture entering a socket may create corrosion, while damaged insulation can eventually produce intermittent lighting problems or blow the replacement fuse repeatedly. For this reason, the cause should be diagnosed instead of simply replacing the bulb and hoping the problem disappears.
What Causes a Dodge Dart Park Light to Stop Working?
Is the Parking Light Bulb Burned Out?
A burned-out bulb is the most common reason a single Dodge Dart parking light stops working. Halogen bulbs gradually wear out as the tungsten filament weakens from repeated heating and cooling cycles. Once the filament breaks, electricity can no longer complete the circuit, preventing the bulb from illuminating.
Several symptoms indicate a failed bulb. Only one parking light fails while all other exterior lights continue operating normally. The fuse remains intact, and no warning lights related to the lighting system appear on the dashboard. A visual inspection may reveal a broken filament, dark discoloration inside the glass, or signs of overheating.
Replacing the bulb is typically the first diagnostic step because it requires minimal tools and eliminates the most common failure point before more complex electrical testing begins.
Is the Parking Light Fuse Blown?
A blown fuse immediately cuts power to the parking light circuit to protect the vehicle from excessive current. Instead of allowing overheating or wiring damage, the fuse sacrifices itself when current exceeds its rated capacity.
A fuse may fail because of a temporary electrical surge, but repeated fuse failures usually indicate a deeper problem such as a short circuit, damaged insulation, water intrusion into a connector, or an internally shorted bulb socket. Installing a new fuse without correcting the underlying fault often results in another blown fuse within a short period.
Inspecting the parking light fuse should always be performed before testing expensive components such as the BCM because it is one of the quickest and least expensive diagnostic procedures.
Is the Light Socket Corroded or Damaged?
A corroded or damaged socket can interrupt electrical contact even when the bulb is in perfect condition. Moisture, road salt, dirt, and oxidation gradually attack the metal terminals inside the socket, increasing electrical resistance and reducing voltage delivered to the bulb.
Common symptoms include intermittent operation, flickering lights, discoloration around the socket, melted plastic housing, or green and white corrosion on the terminals. In severe cases, heat generated by poor electrical contact deforms the socket and prevents the bulb from seating correctly.
Cleaning light corrosion may restore normal operation, but sockets with burned terminals or melted housings should be replaced to ensure reliable electrical contact.
Is the Wiring Harness Broken?
Damaged wiring is another common cause of parking light failure, especially on older vehicles or cars exposed to harsh environmental conditions. The wiring harness carries electrical power between the fuse box, BCM, switches, and lighting assemblies. Any break in the conductor prevents voltage from reaching the bulb.
Wire damage may result from vibration, previous collision repairs, rodents chewing insulation, excessive heat, or repeated bending near connectors. In some cases, the copper conductor breaks internally while the outer insulation appears intact, making visual inspection alone insufficient.
Technicians typically confirm wiring integrity using a multimeter and wiring diagram to verify voltage continuity throughout the affected circuit.
Is the Ground Connection Loose?
A poor ground connection prevents the electrical circuit from completing, causing the parking light to remain off or operate intermittently. Every lighting circuit requires both a power supply and a reliable ground path. If corrosion, rust, or a loose fastener interrupts the ground, current cannot flow normally.
Ground-related problems often produce unusual symptoms such as dim lighting, flickering bulbs, or multiple exterior lights behaving unpredictably. Because several lighting circuits may share the same grounding location, one loose ground point can affect more than one lamp simultaneously.
Inspecting and cleaning the ground connection is a simple but essential step whenever voltage is present at the socket but the bulb still does not illuminate.
Is the Headlight Switch Faulty?
A defective headlight switch can prevent the parking light circuit from receiving the activation signal. As the switch ages, its internal electrical contacts wear down or accumulate carbon deposits, increasing resistance and reducing current flow.
A failing switch may produce inconsistent behavior, such as parking lights operating only in certain switch positions or working intermittently when the control is moved. Other exterior lighting functions controlled by the same switch may also begin malfunctioning.
Testing switch output voltage helps determine whether the switch is delivering power correctly before replacing more expensive electronic components.
Is the Body Control Module (BCM) Causing the Problem?
A malfunctioning Body Control Module can disable one or more parking lights even when every mechanical component is functioning correctly. The BCM manages many electrical systems, including exterior lighting, by monitoring inputs and controlling outputs electronically.
Although BCM failures are less common than burned bulbs or blown fuses, they become more likely after water intrusion, voltage spikes, software corruption, or internal electronic failure. In these situations, replacing bulbs or fuses will not restore operation because the module is no longer commanding the lighting circuit correctly.
Diagnosing a BCM issue typically requires an OBD-II scan tool capable of communicating with body control systems, checking diagnostic trouble codes, monitoring live data, and verifying module outputs before any replacement or reprogramming is performed.
How Do You Diagnose a Dodge Dart Park Light That Is Not Working?
A systematic diagnosis is the fastest way to identify why a Dodge Dart parking light is not working. Instead of replacing multiple parts at random, inspect each component in the order below. This approach eliminates the most common causes first and reduces unnecessary repair costs.
Inspect the Parking Light Bulb
Begin the diagnosis by inspecting the parking light bulb because it is the component that fails most frequently. Remove the bulb from the affected light assembly and examine the glass housing and filament. A broken filament, dark burn marks inside the bulb, or cloudy glass usually indicate the bulb has reached the end of its service life.
If the bulb appears normal, install it in the opposite side of the vehicle if both sides use the same bulb type. If the working side also fails to illuminate after the swap, the bulb is defective. If the bulb works normally in the opposite housing, continue diagnosing the electrical circuit because the fault is located elsewhere.
Check the Parking Light Fuse
Inspect the parking light fuse immediately after confirming the bulb is functional. Locate the appropriate fuse using the Dodge Dart fuse box diagram and remove it with a fuse puller. A broken metal strip inside the fuse indicates that the fuse has blown and interrupted power to the lighting circuit.
Replacing the fuse restores operation only when the original failure resulted from a temporary overload. If the replacement fuse blows again shortly after installation, the circuit likely contains a short to ground, damaged wiring, or another electrical fault that requires additional testing.
Never install a fuse with a higher amperage rating. Doing so defeats the circuit protection system and increases the risk of overheating or wiring damage.
Test for Voltage at the Socket
Verify that electrical power reaches the parking light socket before replacing additional components. Use a digital multimeter or a 12-volt test light while the parking lights are switched on. Connect the negative probe to a known good ground and touch the positive probe to the power terminal inside the socket.
A reading close to battery voltage confirms that the circuit is supplying power correctly. If no voltage is present, the fault exists upstream in the fuse, wiring harness, headlight switch, connector, or Body Control Module. Measuring voltage at the socket helps narrow the search area before disassembling other parts of the lighting system.
Inspect the Light Socket
Inspect the socket carefully if voltage reaches the connector but the bulb still does not illuminate. The metal contacts inside the socket should be clean, firmly positioned, and free from corrosion or heat damage.
Look for green oxidation, burned terminals, melted plastic, or loose contact springs that no longer press firmly against the bulb base. These conditions increase electrical resistance and prevent current from flowing efficiently through the circuit.
Minor corrosion can often be removed with an electrical contact cleaner and a soft brush. However, sockets showing signs of melting or severe corrosion should be replaced because cleaning cannot restore damaged electrical terminals.
Test the Ground Circuit
Confirm that the ground circuit provides a complete return path for electrical current. Even when battery voltage reaches the socket, the parking light cannot operate without a reliable ground connection.
Measure continuity between the socket ground terminal and a clean chassis ground. High resistance or an open circuit indicates corrosion, a loose fastener, or a broken ground wire. Ground failures often cause dim lighting, flickering, or intermittent operation instead of complete failure, making this test especially important when symptoms appear inconsistent.
Cleaning the grounding point and tightening the mounting hardware frequently restores normal operation if corrosion is the only issue.
Inspect the Wiring Harness
Examine the wiring harness after confirming that the bulb, fuse, socket, and ground are functioning correctly. Follow the wiring from the light assembly toward the fuse box and Body Control Module, checking for physical damage along the entire route.
Pay particular attention to areas where the harness passes through body panels, behind the front bumper, or near moving components. Chafed insulation, crushed wiring, rodent damage, or loose connectors can interrupt electrical continuity even if external damage appears minor.
Use a multimeter to perform continuity testing whenever visual inspection does not reveal an obvious fault. Electrical testing often identifies internal wire breaks that cannot be seen from the outside.
Scan the Body Control Module for Diagnostic Trouble Codes
Scan the Body Control Module if every mechanical and electrical component passes inspection but the parking light still does not operate. The BCM controls multiple exterior lighting functions and may disable a lighting circuit when it detects an internal fault or communication problem.
A professional-grade OBD-II scanner capable of accessing body control modules can retrieve Diagnostic Trouble Codes (DTCs), monitor live data, and verify whether the BCM is commanding the parking light output correctly. These tests help distinguish between a defective module, a software issue, and a wiring problem affecting module communication.
If the BCM fails to provide the correct output despite receiving proper inputs, further diagnosis or module replacement may be necessary. Because BCM replacement often requires programming and vehicle-specific calibration, this repair is generally performed by a dealership or a qualified automotive electrical technician.
How Do You Fix a Dodge Dart Park Light That Is Out?
The correct repair depends entirely on the component that caused the parking light to fail. Replacing the wrong part increases repair costs and does not resolve the underlying problem. After completing the diagnostic steps, repair only the confirmed faulty component before retesting the lighting system.
Replace the Parking Light Bulb
Replace the parking light bulb if the original bulb has a broken filament or fails a swap test. Always install a replacement bulb that matches the factory specifications for your Dodge Dart model year. Using an incorrect bulb can produce improper brightness, excessive heat, or compatibility issues with the vehicle’s lighting system.
Before installing the new bulb, inspect the socket for dirt or corrosion. Handle halogen bulbs by the base rather than the glass because oil from your fingers creates hot spots that shorten bulb life. Once installed, switch on the parking lights to verify that the replacement operates correctly before reinstalling any trim panels or covers.
If one bulb has failed after several years of service, replacing both left and right parking light bulbs at the same time is often recommended. Since both bulbs typically experience similar operating hours, replacing them as a pair reduces the likelihood of another failure shortly afterward.
Replace the Parking Light Fuse
Replace the fuse if inspection confirms it has blown. Use only a fuse with the same amperage rating specified by Dodge. Installing a higher-rated fuse can allow excessive current to flow through the circuit, increasing the risk of melted wiring or electrical damage.
After installing the replacement fuse, activate the parking lights and monitor the circuit. If the new fuse blows immediately or fails again within a short period, stop replacing fuses and investigate the circuit for a short to ground, damaged wiring, or a defective electrical component. Repeated fuse failures are symptoms of another problem rather than the root cause.
A fuse that continues to operate normally after replacement usually indicates that the original failure resulted from an isolated overload rather than a persistent electrical fault.
Clean or Replace the Light Socket
Repair or replace the socket if corrosion or heat damage prevents reliable electrical contact. Light corrosion can often be removed using electrical contact cleaner and a nylon brush. Cleaning restores conductivity by removing oxidation from the metal terminals.
Inspect the socket carefully after cleaning. Loose terminal springs, cracked housings, or melted plastic reduce contact pressure between the socket and bulb, causing intermittent lighting or excessive heat buildup. These conditions cannot be repaired effectively and require socket replacement.
When installing a new socket, ensure every connector locks securely into place and that the wiring insulation remains intact. Applying a small amount of dielectric grease to the terminals helps reduce future moisture intrusion and corrosion without affecting electrical conductivity at the contact points.
Repair Damaged Wiring
Repair damaged wiring whenever continuity testing identifies an open circuit or short circuit. Temporary fixes such as twisting wires together or wrapping exposed conductors with household tape rarely provide a reliable long-term solution.
Cut away the damaged section of wire and replace it with automotive-grade wire of the same gauge whenever possible. Use waterproof heat-shrink connectors or properly soldered joints to restore electrical continuity while protecting the repair from moisture and vibration.
After completing the repair, secure the wiring harness away from sharp edges, moving suspension components, and high-temperature engine parts. Proper routing prevents repeated damage and improves the long-term reliability of the lighting system.
Replace the Headlight Switch
Replace the headlight switch if testing confirms that it no longer supplies power to the parking light circuit. Internal switch contacts gradually wear from repeated use, eventually creating excessive electrical resistance or complete circuit failure.
Before installing a replacement switch, verify that battery voltage reaches the switch and that the related fuse and connectors remain in good condition. Confirming power at both the input and output terminals prevents unnecessary replacement when the actual problem exists elsewhere in the circuit.
After installation, cycle the switch through every lighting position to confirm normal operation of the parking lights, headlights, tail lights, and instrument panel illumination.
Repair or Reprogram the Body Control Module (BCM)
Repairing or replacing the Body Control Module is usually the final step after all other components have been eliminated as possible causes. Because the BCM electronically controls the parking light circuit, internal hardware failure or corrupted software can prevent the lights from operating even when the wiring and bulbs are fully functional.
Begin by checking for stored Diagnostic Trouble Codes and verifying that the BCM receives all required power supplies, ground connections, and communication signals. In some cases, a software update or module reset restores normal operation without replacing the unit.
If diagnostic testing confirms an internal BCM failure, replacement is typically followed by programming with manufacturer-specific software. The replacement module must be configured to match the vehicle’s VIN and factory options before the lighting system can function correctly. For this reason, BCM replacement is generally performed using dealership equipment or professional automotive diagnostic tools.
How Much Does It Cost to Fix a Dodge Dart Park Light?
The cost of repairing a Dodge Dart parking light ranges from less than $20 for a simple bulb replacement to several hundred dollars for electrical diagnostics or BCM replacement. The total expense depends on which component has failed and whether the repair is performed at home or by a professional technician.
Replacing a parking light bulb is usually the least expensive repair because the part itself is inexpensive and installation requires only basic hand tools. Replacing a blown fuse also costs very little unless an underlying short circuit causes repeated fuse failures.
Repairs involving sockets or damaged wiring typically require additional labor because technicians must locate the fault, remove trim panels, and repair or replace affected electrical components. The final cost increases with the amount of wiring that must be repaired and the accessibility of the damaged section.
Headlight switch replacement generally costs more than replacing bulbs or fuses because it involves both parts and labor. However, it remains significantly less expensive than replacing a Body Control Module.
A BCM repair or replacement is usually the most expensive solution because it combines diagnostic time, module replacement, software programming, and system calibration. Before approving this repair, technicians should verify that the fault does not originate from the fuse, wiring, connectors, or switch, as these issues can produce symptoms similar to a failed BCM.
Can You Drive a Dodge Dart with a Parking Light Out?
Yes, you can usually drive a Dodge Dart with one parking light out, but it is not recommended because the vehicle becomes less visible to other drivers during low-light conditions. Parking lights are designed to improve visibility at dawn, dusk, during rain, in fog, and while the vehicle is parked near traffic. A failed parking light reduces the vehicle’s visibility and may increase the risk of an accident, particularly from the front or rear corners.
If only one parking light has failed, the remaining exterior lights may continue functioning normally. However, a single failed lamp can still make it more difficult for other road users to judge the vehicle’s width, distance, and position. If multiple exterior lights stop working simultaneously, avoid driving until the electrical fault has been diagnosed because the problem may also affect headlights, tail lights, or turn signals.
A parking light failure should also be viewed as an early warning sign of a potential electrical issue. While many cases involve nothing more than a burned-out bulb, repeated failures or multiple inoperative lights often indicate wiring damage, poor grounding, or a Body Control Module problem that can spread to other lighting circuits if left unrepaired.
How Long Does a Dodge Dart Parking Light Bulb Last?
A Dodge Dart parking light bulb typically lasts between 1,000 and 5,000 operating hours, depending on the bulb type, driving conditions, and electrical system health. Standard halogen bulbs generally have a shorter service life than high-quality LED replacements, although factory-installed lighting specifications should always be followed.
Several factors influence bulb lifespan. Frequent nighttime driving increases operating hours, while excessive vibration from rough roads can shorten filament life. Moisture entering the light housing accelerates corrosion and increases electrical resistance, generating additional heat that reduces bulb durability. Voltage fluctuations caused by charging system problems or poor electrical connections can also cause bulbs to fail prematurely.
LED replacement bulbs generally last significantly longer than halogen bulbs because they generate less heat and do not rely on a fragile filament. However, compatibility is important. Low-quality aftermarket LEDs may trigger warning messages, create uneven light output, or fail to operate correctly if they are not designed for the Dodge Dart’s electrical system.
Replacing aging bulbs before they fail completely can help maintain consistent exterior lighting performance and reduce the likelihood of unexpected failures during nighttime driving.
How Can You Prevent Future Parking Light Problems?
Routine inspection and preventive maintenance significantly reduce the likelihood of future parking light failures. Most lighting problems develop gradually due to heat, vibration, moisture, or electrical wear rather than sudden component failure.
Inspect the parking light assemblies during regular vehicle maintenance. Look for cracked lenses, loose connectors, damaged wiring insulation, or signs of moisture inside the housing. Detecting these issues early prevents corrosion from spreading to sockets and electrical terminals.
Keep electrical connectors clean and protected. Dirt, road salt, and water gradually oxidize metal contacts, increasing electrical resistance. Applying dielectric grease to clean connector seals helps reduce moisture intrusion while protecting the terminals from corrosion.
Replace damaged wiring as soon as it is discovered. Exposed conductors can eventually create intermittent electrical faults or short circuits that damage additional components such as fuses, switches, or the Body Control Module. Proper automotive wiring repairs are considerably less expensive than replacing electronic control modules damaged by electrical faults.
Use high-quality replacement parts whenever repairs are necessary. OEM or reputable aftermarket bulbs, sockets, and connectors generally provide better fitment, more consistent electrical performance, and longer service life than inexpensive alternatives. Quality components also reduce the risk of repeated repairs caused by premature part failure.
Finally, investigate recurring lighting problems instead of repeatedly replacing bulbs or fuses. Repeated component failures usually indicate an unresolved electrical issue that requires proper diagnosis before additional parts are installed.
Frequently Asked Questions About Dodge Dart Park Lights
Why does only one parking light stop working?
A single failed parking light is usually caused by a burned-out bulb, a damaged socket, or localized wiring damage. Because each parking light has its own bulb and connector, failures affecting only one side rarely indicate a Body Control Module problem. Inspect the bulb first, then check the socket and wiring before diagnosing more complex electrical components.
Can a bad fuse affect only the parking lights?
Yes, a blown fuse can disable only the parking light circuit if that fuse is dedicated to those lights. Depending on the Dodge Dart model year and fuse configuration, one fuse may protect multiple parking lights or an entire lighting circuit. Always verify the correct fuse location using the factory fuse diagram before replacing it.
Does a bad BCM cause parking light failure?
Yes, a faulty Body Control Module can prevent the parking lights from operating even when the bulbs, fuse, wiring, and switches are functioning normally. BCM-related failures are less common than bulb or fuse failures and should only be considered after basic electrical testing confirms that the rest of the circuit is operating correctly.
Can I replace the parking light bulb myself?
Yes, most Dodge Dart owners can replace a parking light bulb using basic hand tools. The procedure typically involves accessing the rear of the light assembly, removing the old bulb, installing a compatible replacement, and confirming proper operation. If the new bulb does not illuminate, continue diagnosing the fuse, socket, wiring, and electrical controls instead of installing additional bulbs.
Should both parking light bulbs be replaced at the same time?
Replacing both parking light bulbs at the same time is recommended when both bulbs have similar operating hours. Since bulbs installed together usually age at the same rate, replacing them as a pair improves lighting consistency and reduces the likelihood of another bulb failing shortly after the first replacement. This approach also minimizes future maintenance and ensures both sides produce similar brightness and color.