Nissan cabin air filter replacement involves removing the old filter from the vehicle’s HVAC system and installing a compatible new one. The process typically requires accessing the filter housing behind or beneath the glove compartment, removing its cover, replacing the filter, and checking that the new filter is correctly positioned. The exact location and removal procedure depend on the Nissan model and model year.
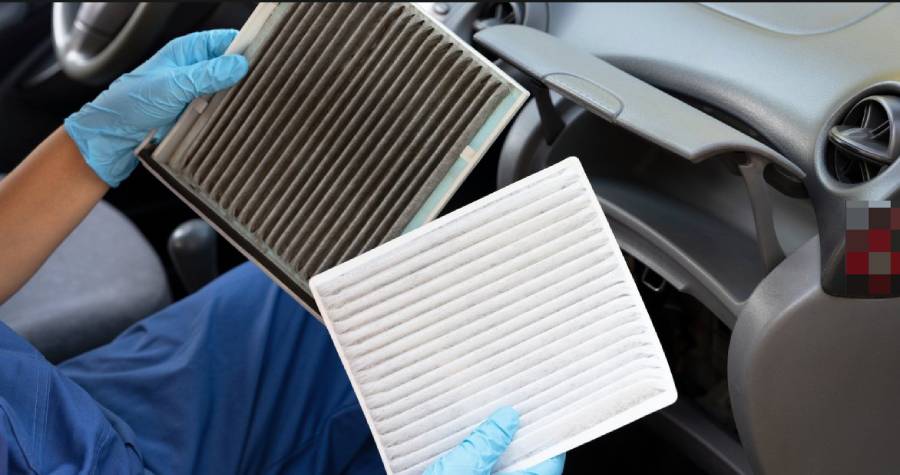
The cabin air filter traps dust, pollen, and other airborne particles before they enter the passenger compartment through the heating, ventilation, and air conditioning (HVAC) system. Over time, accumulated debris can restrict airflow and contribute to unpleasant odors from the vents. Replacing a clogged filter helps restore airflow through the filtration system and maintain cleaner cabin air.
Most Nissan cabin air filter replacements can be completed with basic tools, although certain models require additional access steps or the removal of interior trim panels. Choosing the correct replacement filter and following the airflow direction indicated on the filter housing or in the vehicle’s service instructions are essential for proper installation.
This guide explains where to find the cabin air filter in Nissan vehicles, which tools are required, how to replace the filter step by step, and how replacement procedures differ between models. It also covers replacement intervals, common installation mistakes, and typical maintenance costs.
Where Is the Cabin Air Filter Located in a Nissan?
The cabin air filter in most Nissan passenger vehicles is located behind or beneath the glove compartment on the passenger side of the dashboard. The filter sits inside the HVAC housing, where it captures airborne particles before air passes through the vehicle’s ventilation system. Its exact position and access method depend on the Nissan model and production year.
In the Nissan Altima, the cabin air filter is generally accessible from the passenger-side footwell, near the center console behind the lower dashboard. Many Altima model years allow access without removing the entire glove compartment, although the limited working space can make removing and installing the filter more difficult.
The Nissan Rogue and Sentra also commonly position their cabin air filters behind the passenger-side dashboard. Depending on the model year, accessing the housing may involve working beneath the glove compartment, removing a lower trim panel, or releasing an access cover. The Nissan Murano and Pathfinder use similar HVAC filtration arrangements, but their filter housing positions and access requirements vary between generations.
To locate the filter, inspect the passenger-side footwell and the area behind the glove compartment for a narrow rectangular housing cover. Check the owner’s manual or model-specific service instructions before removing dashboard components, particularly when the housing is not immediately visible. Identifying the correct access point prevents unnecessary trim removal and reduces the risk of damaging plastic retaining clips.
What Tools Do You Need to Replace a Nissan Cabin Air Filter?
Replacing a Nissan cabin air filter generally requires a compatible replacement filter and minimal hand tools. Many Nissan models use a filter housing cover secured by plastic clips, allowing the filter to be replaced without specialized automotive equipment. Other models require removing a trim panel or releasing fasteners before accessing the filter.
The following items are useful for the replacement:
- Compatible cabin air filter: Select a filter that matches the Nissan model, model year, and specified part number. An incorrectly sized filter may leave gaps around the housing or become compressed during installation.
- Flashlight: Illuminates the filter housing in the passenger-side footwell, where dashboard components can obstruct visibility.
- Plastic trim removal tool: Helps release removable interior panels without scratching surrounding dashboard surfaces.
- Screwdriver: Removes screws from access panels on Nissan models equipped with screw-secured trim or covers.
- Clean cloth or vacuum: Removes loose dust and debris around the filter opening before the new filter is installed.
Before beginning, switch off the engine and HVAC blower, move the passenger seat backward to create working space, and confirm that the replacement filter matches the vehicle’s specifications. Check the filter’s airflow direction markings and the vehicle’s installation instructions rather than assuming the arrow must always point downward.
How Do You Replace a Nissan Cabin Air Filter Step by Step?
To replace a Nissan cabin air filter, locate the filter housing, remove the old filter, insert a compatible replacement, secure the housing cover, and check the HVAC system. The procedure generally takes 10–30 minutes, depending on the vehicle model, model year, and accessibility of the filter compartment. Follow these five steps to complete the replacement correctly.
How Do You Access the Nissan Cabin Air Filter Housing?
To access the Nissan cabin air filter housing, switch off the engine and HVAC blower, then locate the filter compartment behind or beneath the passenger-side glove box. Move the passenger seat backward to provide enough working space and use a flashlight to identify the housing cover.
On Nissan models with a filter accessible from the passenger footwell, reach beneath the dashboard toward the center console. Other models require releasing the glove compartment or removing a lower dashboard panel. Check the vehicle’s service instructions before disconnecting any interior components.
Locate the rectangular filter access cover and identify its retaining mechanism. Most covers use plastic clips or tabs, while certain configurations include screws. Release the fasteners carefully to avoid breaking the cover or damaging the surrounding HVAC housing.
How Do You Remove the Old Nissan Cabin Air Filter?
To remove the old Nissan cabin air filter, open the housing cover and pull the filter straight out through the access opening. Grip the exposed edge of the filter and apply steady pressure rather than pulling sharply, especially when accumulated dust or limited clearance makes removal difficult.
Observe the filter’s installed orientation before removing it completely. Check for airflow direction markings on the filter and housing, and compare them with the vehicle’s service instructions. The correct airflow direction depends on the HVAC design and should not be determined solely by the position of the glove compartment.
Inspect the removed filter for accumulated dust, leaves, pollen, and other debris. Use a vacuum or clean cloth to remove loose material near the housing opening without pushing contaminants deeper into the ventilation system. Avoid inserting cleaning tools into the blower motor or other internal HVAC components.
How Do You Install the New Nissan Cabin Air Filter?
To install the new Nissan cabin air filter, confirm that its dimensions and part number match the vehicle’s specifications. Compare the replacement with the original filter to identify differences in width, height, thickness, and frame design before inserting it into the housing.
Align the new filter according to its airflow direction arrow and the manufacturer’s installation instructions. An airflow arrow indicates the direction air should travel through the filter, while an arrow labeled “UP” identifies the filter’s intended physical orientation. These markings serve different purposes and should not be treated as interchangeable.
Slide the replacement filter into the compartment without forcing or excessively compressing its frame. Some Nissan filter openings require the element to flex slightly during insertion, but the filter should return to its intended shape inside the housing. Make sure the filter sits fully within the compartment without exposed edges or significant gaps.
How Do You Secure the Cabin Air Filter Cover?
To secure the Nissan cabin air filter cover, align it with the housing opening and engage its retaining clips or fasteners. Confirm that the filter is fully seated before closing the compartment, as a protruding filter frame can prevent the cover from fitting correctly.
Press the cover into position until its retaining tabs engage. For covers secured with screws, reinstall the original fasteners without overtightening them. Excessive force can damage plastic mounting points and make future filter replacements more difficult.
Reinstall any glove compartment components or interior trim panels removed during access. Check that the glove compartment opens and closes normally and that no loose tools or fasteners remain inside the passenger footwell.
How Do You Check the New Cabin Air Filter Installation?
To check a newly installed Nissan cabin air filter, start the vehicle, activate the HVAC blower, and test airflow through the dashboard vents. Increase the fan speed gradually and listen for unusual rattling, whistling, or vibration near the filter housing.
Confirm that the housing cover remains securely attached and that the blower operates normally at different fan settings. Unusual airflow noise after replacement may indicate an improperly seated filter, an unsecured cover, or debris left near the blower.
Check the passenger-side dashboard area for loose trim panels and verify that all removed components have been reinstalled. A correctly fitted cabin air filter should remain securely positioned inside its housing while allowing air to pass through the filtration material without significant obstruction.
How Does Cabin Air Filter Replacement Differ Between Nissan Models?
Nissan cabin air filter replacement procedures differ between vehicle models because the filter housing location, access panel design, and available working space vary. While most Nissan passenger vehicles place the cabin air filter within the passenger-side dashboard area, some require additional trim removal or a different approach to accessing the filter compartment.
The Nissan Altima commonly provides access through the passenger-side footwell near the center console. The filter opening can be narrow, requiring careful positioning of the replacement element. In certain configurations, the filter must flex slightly to pass through the opening before expanding into its installed position.
The Nissan Rogue and Sentra also use passenger-side HVAC filter compartments, but their access arrangements vary by generation. Depending on the model year, replacement may involve removing a lower dashboard panel, accessing the housing beneath the glove compartment, or releasing the glove box assembly. The Nissan Murano and Pathfinder have their own access arrangements, making model-specific instructions essential before removing interior components.
The following table summarizes the main replacement considerations across popular Nissan models.
| Nissan Model | Common Filter Location | Replacement Consideration |
|---|---|---|
| Nissan Altima | Passenger footwell near center console | Limited access space |
| Nissan Rogue | Behind or beneath passenger-side dashboard | Access varies by generation |
| Nissan Sentra | Passenger-side HVAC housing | Cover and trim arrangement varies |
| Nissan Murano | Passenger-side dashboard area | Verify glove box access requirements |
| Nissan Pathfinder | Passenger-side HVAC housing | Access procedure depends on model year |
These locations are general references rather than universal instructions for every production year. Before replacing the filter, confirm the vehicle’s model year, filter part number, and housing access procedure using the owner’s manual or applicable service documentation.
What Mistakes Should You Avoid When Replacing a Nissan Cabin Air Filter?
The four main mistakes to avoid when replacing a Nissan cabin air filter are choosing an incompatible filter, installing it in the wrong orientation, damaging the filter during insertion, and failing to secure the housing cover. Each mistake can reduce filtration effectiveness, restrict airflow, or create unnecessary problems within the HVAC system.
1. Installing an incompatible cabin air filter. A filter with incorrect dimensions may not seal against the housing or may become compressed when the cover is closed. Gaps around the filter allow unfiltered air to bypass the filtration material. Prevent this problem by checking the replacement part number against the Nissan model, production year, and applicable vehicle specifications.
2. Installing the filter in the wrong direction. Cabin air filters with directional filtration media must be installed according to the manufacturer’s airflow markings. Reversing the intended airflow direction can affect filter performance or fit, depending on the filter design. Check whether the printed arrow indicates airflow direction or physical orientation before inserting the replacement element.
3. Forcing the filter into the housing. Excessive pressure can bend the filter frame, deform its pleats, or prevent it from sitting correctly inside the compartment. This is particularly relevant when the access opening is narrower than the filter’s installed dimensions. Follow the model-specific insertion procedure and avoid crushing the filter material to make it fit.
4. Leaving the filter housing cover unsecured. An improperly attached cover can allow air to bypass the filter or produce rattling and whistling sounds when the blower operates. Before reinstalling the surrounding trim, verify that the cover sits flush against the housing and that every retaining clip or fastener is engaged.
After completing the replacement, inspect the filter compartment and operate the HVAC blower to identify installation problems. Correcting these four mistakes helps maintain proper airflow, filtration performance, and secure installation.
How Often Should You Replace a Nissan Cabin Air Filter?
Nissan cabin air filter replacement intervals depend on the vehicle model, model year, and driving conditions. A commonly referenced maintenance interval is 15,000 miles (24,000 km) or 12 months, but Nissan’s official maintenance schedule for the specific vehicle should determine when replacement is due. Vehicles operated in dusty or heavily polluted environments may require more frequent filter inspections and replacement.
Cabin air filters gradually accumulate dust, pollen, road debris, and other airborne particles as outside air passes through the HVAC system. This buildup increases resistance to airflow, forcing the blower to work against a greater restriction. For example, a Nissan driven regularly on unpaved roads may accumulate filter debris faster than the same model operated primarily on clean, paved highways.
Driving conditions also influence filter service life. Heavy traffic, construction zones, high pollen concentrations, and frequent HVAC operation increase the amount of material captured by the filter. Inspect the filter before its scheduled replacement date when airflow decreases noticeably or persistent odors develop from the ventilation system.
Check the maintenance schedule in the Nissan owner’s manual for the correct replacement interval. Replace the filter when the scheduled service is due or when inspection reveals substantial contamination, physical damage, or restricted airflow.
What Are the Signs That a Nissan Cabin Air Filter Needs Replacement?
The four common signs that a Nissan cabin air filter needs replacement are reduced ventilation airflow, unpleasant odors from the vents, visible filter contamination, and increased blower noise associated with restricted airflow. These symptoms indicate that the filter should be inspected, although other HVAC problems can produce similar effects.
1. Reduced airflow from the vents. A clogged cabin air filter restricts the volume of air passing through the HVAC system. Drivers may notice weaker airflow even when the blower is set to a high speed. Dust and debris trapped between the filter pleats create resistance that limits air movement through the ventilation system.
2. Unpleasant odors from the HVAC system. A contaminated filter can retain moisture, dust, and organic debris, contributing to musty smells when the ventilation system operates. Persistent odors may also originate from microbial growth on the evaporator or other HVAC components, so replacing the filter does not guarantee odor removal.
3. Visible dirt and debris on the filter. Heavy accumulations of dust, leaves, pollen, or other particles indicate that the filter has captured contaminants during normal operation. A filter with visibly blocked pleats, damaged material, or substantial debris buildup should be replaced rather than reinstalled.
4. Increased blower noise or unusual airflow sounds. A severely restricted filter can change airflow characteristics and contribute to noticeable ventilation noise. However, rattling, squealing, or grinding sounds may indicate a separate blower motor or fan problem that requires inspection.
Inspect the cabin air filter when these symptoms appear, especially if its replacement history is unknown. Replacing a contaminated filter restores an unobstructed filtration path, but persistent airflow or odor problems require further examination of the Nissan HVAC system.
How Much Does Nissan Cabin Air Filter Replacement Cost?
Nissan cabin air filter replacement typically costs approximately $15–$40 for a DIY replacement and $40–$120 when performed by a professional service provider in the United States. The total expense depends on the Nissan model, replacement filter type, labor rates, and whether the service is performed at an independent repair shop or Nissan dealership. These figures are general estimates rather than verified local quotes.
The replacement filter accounts for the entire cost of a DIY installation when no additional tools are required. Standard aftermarket particulate filters generally cost less than premium activated carbon filters or certain OEM Nissan replacement parts. Filter prices also vary according to vehicle compatibility, filtration media, and manufacturer.
Professional replacement includes both the filter price and labor charges. The following table provides approximate cost ranges for common service options.
| Replacement Method | Estimated Total Cost |
|---|---|
| DIY replacement | $15–$40 |
| Independent repair shop | $40–$80 |
| Nissan dealership | $60–$120 |
Labor charges depend on how easily the technician can access the filter housing. Vehicles requiring additional glove compartment or dashboard trim removal may involve more work than models with a directly accessible filter cover. Request an itemized quote to compare filter prices and labor charges before scheduling professional replacement.
Read more: Mevotech Wheel Bearing Reviews: Are They Any Good?
Can You Replace a Nissan Cabin Air Filter Yourself?
Yes, most Nissan owners can replace their cabin air filter themselves using a compatible replacement filter and basic hand tools. The procedure generally involves accessing the passenger-side HVAC housing, removing the old filter, installing the new element, and securing the access cover. It does not normally require specialized mechanical training or modifications to the vehicle.
A typical DIY replacement takes approximately 10–30 minutes, although the time varies with filter accessibility and the driver’s familiarity with interior trim components. Nissan models with accessible filter covers are relatively straightforward, while configurations with restricted footwell space or removable dashboard panels require additional care.
DIY replacement is appropriate when the filter housing can be accessed safely and the correct installation procedure is available. Follow the vehicle’s service instructions, use suitable tools, and avoid forcing plastic clips or filter components. Incorrect removal techniques can damage retaining tabs, interior panels, or the filter housing.
Professional replacement is preferable when the filter compartment cannot be located, access requires unfamiliar disassembly, or damaged housing components prevent proper installation. A technician should also inspect the HVAC system when weak airflow, unusual blower noises, or persistent odors remain after installing a clean filter.
For Nissan owners comfortable with basic vehicle maintenance, replacing the cabin air filter at home eliminates labor charges and provides an opportunity to inspect the removed filter for accumulated debris. Correct filter compatibility and installation remain more important than whether the work is performed at home or in a repair shop.
What Type of Cabin Air Filter Should You Use for a Nissan?
The best cabin air filter for a Nissan is one that matches the vehicle’s model, model year, and HVAC housing specifications. Nissan owners can choose between OEM and compatible aftermarket filters, with particulate and activated carbon filtration being the two main options. Correct fitment, filtration efficiency, and airflow compatibility are the primary selection criteria.
OEM Nissan cabin air filters are designed to meet the specifications of the Nissan vehicles for which they are listed. They provide a straightforward replacement option when selected using the correct Nissan part number. However, OEM filters generally cost more than standard aftermarket alternatives, and compatibility must still be verified against the vehicle’s production year and configuration.
Aftermarket cabin air filters are manufactured by independent automotive parts suppliers and offer different filtration materials and price points. Quality aftermarket filters can provide suitable replacements when their dimensions, sealing design, and vehicle applications match the original filter specifications. Check the manufacturer’s compatibility catalog rather than relying on visual similarity alone.
Particulate cabin air filters capture airborne contaminants such as dust, pollen, and road debris. Activated carbon filters combine particle filtration with an adsorbent carbon layer designed to reduce certain odors and gaseous contaminants entering the passenger compartment. Their effectiveness depends on the filter’s construction, carbon capacity, and operating conditions.
Before purchasing a replacement, confirm the Nissan model, model year, and applicable filter part number using the owner’s manual, Nissan parts catalog, or a reliable manufacturer fitment guide. Select a filter with the correct dimensions and installation markings to maintain proper airflow and filtration performance.