Opening the hood of a Ford Escape is a simple task once you know where the hood release lever and secondary safety latch are located. Every Ford Escape uses a two-step hood release system designed to prevent the hood from opening accidentally while driving. First, you release the primary latch from inside the cabin. Then, you unlock the secondary latch beneath the front edge of the hood before lifting it completely. Understanding this process allows you to access the engine compartment safely for routine maintenance and inspections.
Whether you need to check the engine oil, refill windshield washer fluid, inspect the coolant level, or replace the battery, opening the hood is the first step in many maintenance tasks. Although the basic procedure remains similar across most Ford Escape model years, the location of the hood release lever and the design of the safety latch may vary slightly depending on the generation. Knowing these differences can save time and prevent unnecessary force that could damage the hood latch mechanism.
This guide explains exactly how to open the hood of a Ford Escape step by step. It also covers where to find the hood release lever, how to unlock the secondary latch correctly, what to do if the hood will not open, and how to maintain the hood release system to keep it working reliably. By following these instructions, you can open the hood confidently while avoiding the most common mistakes that lead to stuck or damaged hood latches.
How Do You Open the Hood of a Ford Escape?
To open the hood of a Ford Escape, pull the hood release lever inside the driver’s compartment. Then unlock the secondary safety latch beneath the front edge of the hood. Finally, lift the hood and secure it before working inside the engine compartment. The entire process usually takes less than one minute.
Start by parking the vehicle on a flat surface and shifting the transmission into Park. Turn off the engine before opening the hood. If you have been driving recently, allow the engine to cool for several minutes. This step helps reduce the risk of burns while working near hot engine components.
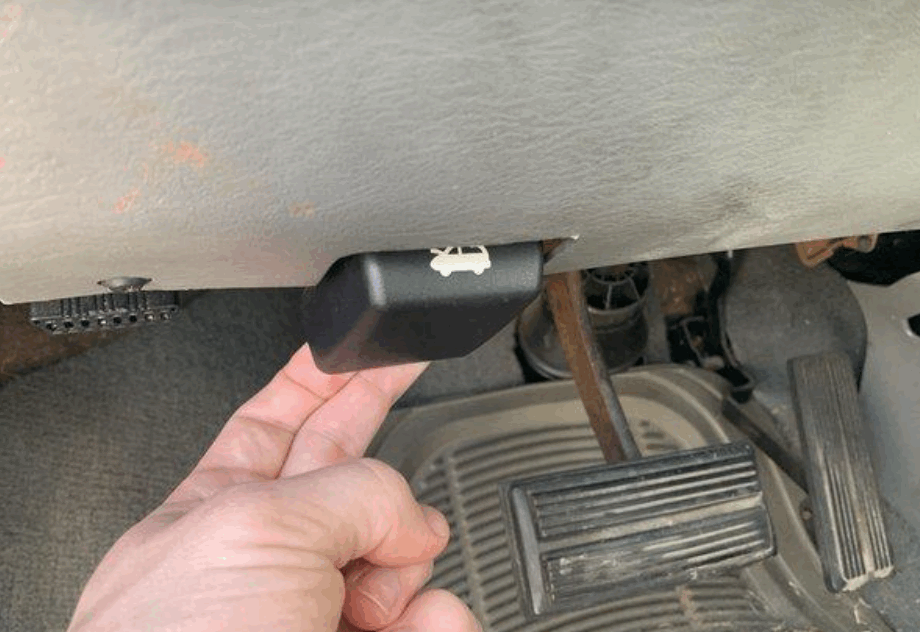
Open the driver’s door and look beneath the dashboard on the left side. You will find the hood release lever near the driver’s footwell. Pull the lever firmly until you hear a click. That sound confirms the primary hood latch has been released. The hood should lift slightly, leaving a small gap at the front.
Walk to the front of the vehicle and slide your fingers under the center of the hood. Locate the secondary safety latch and move it in the correct direction. The exact position may vary slightly between Ford Escape model years. Once the latch releases, raise the hood slowly with both hands. Avoid forcing the hood upward because doing so may damage the latch mechanism.
Secure the hood before beginning any inspection or maintenance. Older Ford Escape models use a hood prop rod that must be locked into place manually. Many newer models are equipped with hydraulic hood struts that support the hood automatically. Check that the hood is stable before reaching into the engine bay. A properly secured hood creates a safer working environment and prevents accidental closure.
Where Is the Hood Release Lever on a Ford Escape?
The hood release lever on a Ford Escape is usually located beneath the dashboard on the driver’s side. You can find it near the driver’s footwell, close to the kick panel. Most models display a hood icon on the lever, making it easy to identify. Once you locate the lever, pull it firmly until you hear the hood latch release.
The exact position of the lever may vary slightly between model years. On older Ford Escape models, the lever is often mounted lower on the side panel beside the driver’s left foot. Newer generations place it slightly higher beneath the dashboard trim. Despite these small differences, Ford keeps the control within easy reach of the driver’s seat. You should not need to leave the seat to access it.
If you cannot find the lever immediately, adjust the driver’s seat backward to create more space. Use a flashlight if the footwell is dark or the interior trim blocks your view. Look for a black plastic handle with a white hood symbol. Avoid pulling nearby handles or trim pieces because they serve different functions and will not release the hood.
After pulling the hood release lever, check the front edge of the hood. A small gap should appear between the hood and the front grille. This gap confirms that the primary latch has disengaged correctly. If the hood remains completely closed, pull the lever once more using steady pressure instead of repeated force. If there is still no movement, inspect the hood release cable or latch mechanism before attempting to force the hood open. Taking a careful approach helps prevent damage to the release system and makes the next step much easier.
Why Won’t the Hood of a Ford Escape Open?
A Ford Escape hood may not open because the latch is stuck, the release cable is damaged, or the hood is under pressure. Dirt, rust, and poor maintenance can also prevent the locking mechanism from working correctly. Identifying the cause is the fastest way to open the hood safely without damaging the latch or the body panels.
A stuck hood latch is one of the most common problems. Road dust, moisture, and old grease can build up inside the latch over time. This debris restricts the moving parts and prevents the latch from releasing completely. Applying a penetrating lubricant and operating the release lever again often restores normal movement. Regular cleaning also helps prevent the same issue from returning.
A stretched or broken hood release cable can create similar symptoms. When the cable becomes loose, pulling the interior lever may not generate enough force to release the primary latch. In more severe cases, the cable can snap completely, leaving the latch locked in place. You may notice that the release lever feels unusually loose or offers very little resistance. These signs usually indicate that the cable should be inspected or replaced.
Pressure on the hood can also keep the latch from releasing. This often happens after a minor front-end impact or when the hood is slightly misaligned. Ask another person to press down gently on the front edge of the hood while you pull the release lever. This simple technique reduces tension on the latch and allows it to disengage more easily.
Cold weather can create another challenge. Ice may form around the latch or locking components during freezing conditions. Instead of forcing the hood open, allow the vehicle to warm up naturally or melt the ice with warm air. Excessive force can bend the latch or damage the hood, resulting in a more expensive repair.
How Can You Open a Ford Escape Hood If It Is Stuck?
You can open a stuck Ford Escape hood by reducing pressure on the latch, inspecting the release mechanism, and using the correct technique. Most stuck hoods result from a seized latch, a stretched cable, or a hood that is slightly out of alignment. Avoid forcing the hood open because excessive pressure can damage the latch, bend the hood, or break the release cable.
Start by asking another person to press down gently on the front edge of the hood while you pull the interior release lever. This method reduces tension on the primary latch and often allows it to disengage. If you are working alone, press down with one hand and pull the release lever with the other. Once the hood pops up slightly, move to the front of the vehicle and operate the secondary safety latch as usual.
If the hood still does not open, inspect the latch through the gap between the hood and the grille. Dirt, corrosion, or dried grease may prevent the latch from moving freely. Apply a penetrating lubricant to the visible parts of the latch and allow it to soak for several minutes. Pull the release lever again after the lubricant has worked into the mechanism. In many cases, this simple step restores normal operation.
A damaged hood release cable requires a different approach. If the cable has stretched, another person may be able to pull the interior lever while you operate the latch from the front. If the cable has broken completely, you may need to access the latch from beneath the vehicle or behind the front grille. This procedure varies by model year and often requires basic hand tools. If you cannot reach the latch safely, professional assistance is the safest option.
Once the hood opens, inspect the entire release system before closing it again. Check the latch for rust, loose fasteners, and worn components. Lubricate all moving parts and confirm that the cable moves smoothly. Fixing the root cause helps prevent the hood from becoming stuck again and keeps the release system working reliably.
How Do You Maintain the Hood Latch and Release System?
Maintaining the hood latch and release system helps your Ford Escape hood open smoothly and close securely. A clean and properly lubricated latch reduces wear and lowers the risk of the hood becoming stuck. Regular maintenance also extends the life of the release cable and other moving components. Most drivers can complete this inspection in less than 15 minutes.
Begin by inspecting the hood latch for dirt, rust, or old grease. These contaminants can restrict movement and make the latch difficult to release. Wipe the latch with a clean cloth before applying a suitable automotive lubricant. Operate the hood several times after lubrication to spread the product evenly across the moving parts. This simple routine helps the mechanism move freely.
Next, inspect the hood release cable and the interior release lever. Pull the lever and confirm that it moves smoothly without excessive resistance or looseness. A loose lever may indicate that the cable has stretched over time. A stiff lever can suggest corrosion or damage inside the cable housing. Addressing these issues early helps prevent unexpected failures.
Check the hood alignment each time you close the hood. The hood should sit evenly on both sides and lock with a single, firm push. If it appears uneven or requires excessive force, inspect the latch and striker for signs of wear or misalignment. Correct alignment reduces stress on the locking mechanism and improves long-term reliability.
Include the hood latch in your regular vehicle maintenance routine. Inspect and lubricate the mechanism every six to twelve months or more often if you frequently drive on dusty, muddy, or salted roads. A few minutes of preventive maintenance can prevent costly repairs and ensure that the hood opens safely whenever you need access to the engine compartment.
What Mistakes Should You Avoid When Opening a Ford Escape Hood?
Avoiding common mistakes helps protect the hood latch, release cable, and surrounding body panels. Most problems occur because drivers use excessive force or skip important safety steps. Following the correct procedure reduces the risk of damage and makes future maintenance much easier.
One common mistake is pulling the interior hood release lever repeatedly when the hood does not open. Repeated force rarely solves the problem and can stretch or damage the release cable. Instead, pull the lever once with steady pressure and check whether the hood has lifted slightly. If it remains closed, inspect the latch before trying again.
Another mistake is forcing the hood upward without releasing the secondary safety latch. Every Ford Escape uses this latch to prevent the hood from opening while the vehicle is moving. Lifting the hood before releasing the safety latch can bend the mechanism or damage the hood itself. Always slide the latch into the release position before raising the hood.
Many drivers also forget to secure the hood after opening it. Older Ford Escape models require the hood prop rod to support the hood manually. If the prop rod is not installed correctly, the hood can fall unexpectedly. Newer models with hydraulic struts should also be checked to confirm that the hood remains fully supported before working inside the engine compartment.
Opening the hood immediately after driving is another avoidable mistake. Engine components, the radiator, and nearby metal surfaces can remain extremely hot for several minutes. Allow the engine to cool before performing any inspection or maintenance. Wearing protective gloves provides additional protection when working around hot or sharp components.
Finally, never ignore signs of a worn hood latch or release cable. A loose interior lever, a sticky latch, or difficulty closing the hood usually indicates that maintenance is needed. Cleaning and lubricating the mechanism at the first sign of trouble helps prevent unexpected failures and keeps the hood release system operating safely.
Conclusion
Opening the hood of a Ford Escape is straightforward once you understand the two-step release system. The process begins with the interior hood release lever and ends with the secondary safety latch beneath the front edge of the hood. Following the correct sequence allows you to access the engine compartment safely while protecting the hood latch and release cable from unnecessary wear.
Knowing where the hood release lever is located also saves time during routine maintenance. Whether you need to check the engine oil, inspect the coolant level, refill windshield washer fluid, or replace the battery, opening the hood correctly is the first step. If the hood does not open, identifying the cause before applying force helps prevent damage and often leads to a faster solution.
Regular inspection and lubrication of the hood latch, release cable, and related components keep the system operating smoothly throughout the life of the vehicle. By using the proper opening technique and avoiding common mistakes, you can maintain reliable access to the engine compartment and reduce the likelihood of expensive repairs in the future.