Many Honda owners do not think about their key fob until it suddenly stops working as expected. One day, you may notice that the doors no longer unlock from a distance, the remote responds slowly, or a warning about a low key battery appears on the dashboard. Although these signs can be frustrating, they usually point to one simple issue. The battery inside the key fob is reaching the end of its lifespan.
Learning how to change Honda key battery is one of the easiest maintenance tasks you can perform at home. The process takes only a few minutes, requires minimal tools, and costs far less than visiting a dealership. More importantly, replacing the battery at the right time helps prevent unexpected situations, such as being unable to unlock your vehicle remotely or experiencing unreliable keyless entry.
However, not every Honda key uses the same battery or follows the same replacement procedure. The battery type, key fob design, and opening method can vary depending on the vehicle model and model year. Installing the wrong battery or opening the remote incorrectly may damage the housing, weaken the internal clips, or cause the key fob to malfunction.
This comprehensive guide explains how to change Honda key battery safely and correctly for every major Honda model. You will learn how to identify your key type, choose the correct battery, replace it step by step, avoid common mistakes, troubleshoot common problems, and keep your Honda key fob working reliably for years to come.
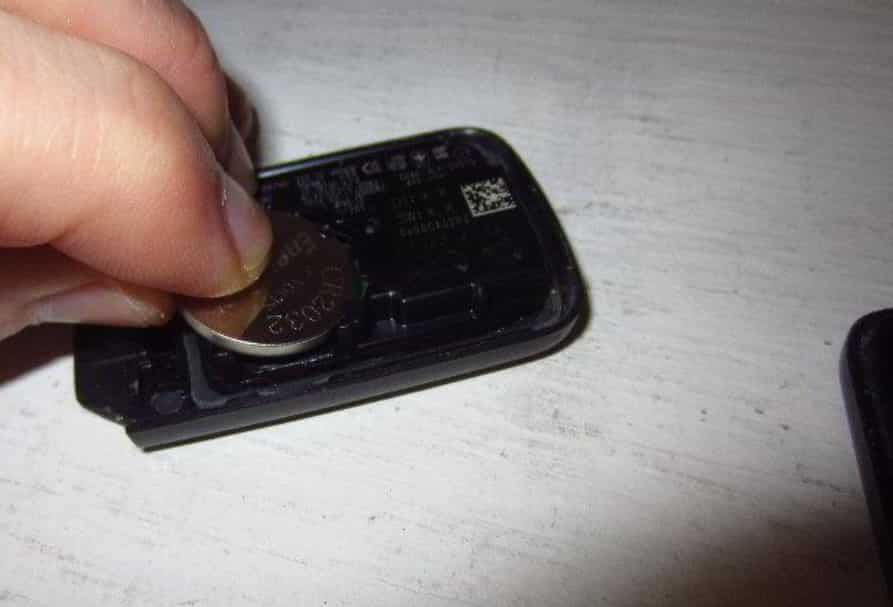
How to Change Honda Key Battery in 7 Simple Steps
Replacing a Honda key battery is a simple task when you know the correct procedure. Most Honda key fobs can be opened in just a few minutes without special equipment. The most important part is using the correct battery and handling the internal components carefully to avoid accidental damage.
Follow these seven steps to replace your Honda key battery safely.
Step 1: Identify Your Honda Key Type
Before opening the key fob, determine which type of Honda key you have. Honda has used several key designs over the years, and each one may have a slightly different opening mechanism.
Older Honda vehicles often use a traditional remote key with physical buttons and a separate metal key. Many newer models feature a flip key that folds into the remote housing. Recent Honda vehicles typically include a smart key with keyless entry and push button start.
Knowing your key type makes it easier to identify the correct battery and prevents unnecessary force when opening the case. If you are unsure, compare your key with the illustrations in your owner’s manual or inspect the overall design carefully.
Step 2: Choose the Correct Battery
The next step is selecting the correct replacement battery. Although many Honda key fobs use a lithium coin battery, the exact battery size depends on the key design and model year.
Remove the old battery first and read the battery code printed on its surface. Common battery types include CR2032, CR2025, and CR1616. Always replace the old battery with the same model unless your owner’s manual specifies an approved alternative.
Using the wrong battery can reduce battery life, prevent the battery cover from closing properly, or cause unreliable communication between the key fob and the vehicle.
If the battery code is no longer visible, consult your owner’s manual or verify the correct specification before purchasing a replacement.
Step 3: Prepare the Necessary Tools
One advantage of replacing a Honda key battery is that you only need a few basic tools.
Prepare a new replacement battery, a small flat head screwdriver or a plastic pry tool, and a clean microfiber cloth. The cloth helps protect the plastic housing from scratches while opening the key fob.
Work on a clean table with good lighting. This reduces the chance of losing small internal components or installing the battery incorrectly.
Step 4: Remove the Emergency Key
Most Honda smart keys include a hidden emergency key inside the remote.
Locate the small release button on the side or back of the key fob. Press the release while gently pulling the emergency key out of the housing.
Set the emergency key aside in a safe place. You will use the opening left by the emergency key to separate the two halves of the remote without damaging the outer shell.
Removing the emergency key also gives you better access to the internal locking clips.
Step 5: Open the Key Fob Carefully
Insert the tip of a flat head screwdriver or a plastic pry tool into the small opening where the emergency key was removed.
Turn the tool gently until the two halves of the key fob begin to separate. Avoid applying excessive force because the internal plastic clips can break if they are bent too far.
Continue working around the edge of the housing until the cover opens completely. Take your time during this step because a damaged key fob case can be much more expensive to replace than the battery itself.
Once the housing is open, place both halves on a clean surface to prevent dust or debris from entering the electronic components.
Step 6: Replace the Old Battery
Locate the coin battery inside the key fob and note its orientation before removing it.
Use a plastic tool or your fingernail to lift the old battery gently. Avoid bending the metal battery contacts because they help maintain a stable electrical connection.
Insert the new battery in the same direction as the original one. Make sure it sits flat inside the battery compartment and fits securely against the contacts.
Avoid touching both battery surfaces unnecessarily. Keeping the battery clean helps maintain reliable performance over time.
Before closing the key fob, inspect the rubber seal if your remote includes one. A properly positioned seal helps protect the internal electronics from moisture and dust.
Step 7: Reassemble and Test the Key Fob
Align both halves of the key fob carefully and press them together until each locking clip snaps into place.
Reinsert the emergency key into its original slot until it locks securely.
Stand a short distance from your vehicle and test every button on the remote. Confirm that the lock button, unlock button, trunk release, panic button, and remote start function correctly if your Honda is equipped with these features.
Finally, verify that the vehicle recognizes the smart key during keyless entry and push button start. If every function operates normally, your Honda key battery replacement is complete.
Replacing the battery correctly takes only a few minutes, but doing each step carefully helps extend the life of your key fob and reduces the risk of unnecessary repairs.
What Battery Does a Honda Key Fob Use?
Choosing the correct battery is an important part of learning how to change Honda key battery. Many Honda owners assume that every key fob uses the same battery, but this is not always true. The required battery depends on the key fob design, the vehicle model, and the model year. Using the wrong battery can reduce performance, shorten battery life, or even prevent the key fob from working properly.
Most Honda key fobs use a lithium coin battery, with CR2032, CR2025, and CR1616 being the most common options. While these batteries may look similar, they are not always interchangeable. For example, the CR2032 and CR2025 have the same diameter, but the CR2032 is thicker and offers a higher capacity. Installing a battery with the wrong thickness may result in poor electrical contact or make it difficult to close the key fob securely.
The easiest way to identify the correct battery is to open the key fob and check the code printed on the old battery. If the marking is difficult to read, consult your Honda owner’s manual or verify the battery specification for your exact key fob design and model year. Avoid guessing based only on the vehicle model because Honda has introduced different key fob designs over the years.
Purchasing a high quality replacement battery from a trusted brand helps ensure reliable performance and longer service life. Taking a few extra minutes to confirm the correct battery before installation can prevent unnecessary problems and keep your Honda key fob operating smoothly.
How to Change a Honda Civic Key Battery
Replacing the battery in a Honda Civic key fob is a simple maintenance task that helps ensure reliable remote operation. Although the procedure is straightforward, the battery type and key fob design may vary depending on the model year. For this reason, always verify the battery code before purchasing a replacement.
Begin by removing the emergency key from the smart key or opening the traditional remote if your Civic uses an older key design. Insert a small flat head screwdriver or a plastic pry tool into the opening and gently separate the two halves of the key fob. Work slowly around the edges to avoid damaging the plastic clips that hold the housing together.
Once the key fob is open, locate the coin battery and note its position before removing it. Carefully lift the old battery from the compartment without bending the metal contacts. Insert the new battery in the same orientation, making sure it sits securely inside the holder. A properly installed battery provides stable power and helps maintain consistent communication between the key fob and your vehicle.
After replacing the battery, align both halves of the key fob and press them together until each clip locks into place. Reinsert the emergency key and test every function, including the lock button, unlock button, trunk release, and remote start if equipped. If the key fob does not respond after replacing the battery, reopen the housing to confirm the battery is installed correctly and that the contacts remain clean and properly aligned.
How to Change a Honda Accord Key Battery
Replacing a Honda Accord key battery is a quick and affordable way to restore the full functionality of your key fob. A weak battery can reduce the operating range, delay button response, or trigger a low battery warning on the dashboard. Replacing it as soon as these symptoms appear helps prevent unexpected issues during daily driving.
Start by removing the emergency key from the key fob. Locate the release switch, slide it gently, and pull the emergency key out of the housing. Next, insert a small flat head screwdriver or a plastic pry tool into the opening where the emergency key was stored. Twist the tool carefully until the two halves of the key fob begin to separate. Apply only light pressure to avoid cracking the plastic case or damaging the internal clips.
After opening the key fob, identify the battery and observe its orientation before removing it. Lift the battery out carefully and install the new one in exactly the same position. Ensure the battery sits flat inside the compartment and makes firm contact with the terminals. Even a slight misalignment can prevent the remote from functioning correctly.
Once the new battery is in place, reconnect both halves of the key fob by pressing around the edges until every clip snaps securely into position. Reinsert the emergency key and test all available functions. Check the lock and unlock buttons, trunk release, panic alarm, and remote start if your Accord includes this feature. If the key fob still does not respond, inspect the battery orientation, confirm you installed the correct battery type, and verify that the metal contacts are clean and undamaged.
How to Change a Honda CR V Key Battery
Changing the battery in a Honda CR V key fob is a simple task that usually takes only a few minutes. Whether you drive an older CR V with a traditional remote or a newer model with a smart key, replacing the battery at the right time helps maintain dependable keyless entry and reliable engine starting.
Begin by removing the emergency key from the key fob if your vehicle is equipped with a smart key system. Place the key fob on a clean surface and insert a plastic pry tool or a small flat head screwdriver into the designated opening. Carefully separate the housing without forcing it apart. Opening the case slowly reduces the risk of damaging the retaining clips or scratching the outer shell.
Once the housing is open, remove the old battery while paying close attention to its orientation. Compare the replacement battery with the original to ensure they share the same battery code. Insert the new battery into the compartment and confirm it fits securely against the metal contacts. A proper fit helps provide stable power and reliable communication with the vehicle.
Reassemble the key fob by aligning both halves and pressing them together until they lock firmly into place. Slide the emergency key back into its slot and test the remote from several distances. Verify that the lock, unlock, tailgate release, and remote start functions operate normally if available. If the operating range remains limited after replacing the battery, double check the installation and confirm that you selected the correct battery for your specific CR V model year.
How to Change a Honda HR V Key Battery
Replacing the battery in a Honda HR V key fob is a straightforward task that can restore reliable remote operation in just a few minutes. If you notice that the buttons respond slowly or you need to stand closer to the vehicle before the remote works, the battery is likely running low. Replacing it early helps avoid unexpected inconvenience and keeps the keyless entry system functioning properly.
Begin by removing the emergency key from the key fob. Press the release button and slide the key out of the housing. Next, insert a plastic pry tool or a small flat head screwdriver into the opening near the emergency key slot. Twist the tool gently until the case begins to separate. Continue working around the edge with light pressure until the two halves come apart completely.
Locate the battery inside the key fob and observe its position before taking it out. Remove the old battery carefully to avoid bending the metal contacts. Install the new battery in the same orientation and make sure it sits securely inside the battery compartment. Proper alignment ensures consistent electrical contact and dependable communication with the vehicle.
After installing the new battery, reconnect the two halves of the key fob and press around the edges until every clip locks into place. Reinsert the emergency key and test all available functions. Confirm that the lock, unlock, panic, and remote start features operate correctly if your Honda HR V includes them. If the remote still does not perform as expected, verify the battery type and inspect the contacts for dirt or damage.
How to Change a Honda Pilot Key Battery
A weak key fob battery can affect the convenience features of your Honda Pilot, especially if you rely on keyless entry and push button start every day. Fortunately, replacing the battery is an easy maintenance task that requires only a few basic tools and a compatible replacement battery.
Start by removing the emergency key from the smart key. Once the key is removed, place the key fob on a clean surface and use a plastic pry tool or a flat head screwdriver to separate the housing. Work carefully around the edges instead of forcing the case open in one motion. This method helps protect the plastic clips and keeps the housing in good condition.
With the key fob open, locate the battery and note the direction it is installed. Remove the old battery gently and insert the replacement in the same position. Check that the battery sits evenly inside the compartment and maintains firm contact with the terminals. An incorrectly positioned battery may cause the remote to work intermittently or fail to communicate with the vehicle.
Reassemble the key fob by aligning both halves and pressing them together until every clip snaps securely into place. Reinstall the emergency key and test the remote functions from different distances. Verify that the doors lock and unlock correctly, the tailgate release responds immediately, and the vehicle recognizes the smart key when starting the engine. If any function fails, reopen the key fob and confirm that the battery has been installed correctly.
How to Change a Honda Odyssey Key Battery
Replacing the battery in a Honda Odyssey key fob helps ensure your family vehicle remains convenient and dependable during everyday use. A fresh battery supports reliable remote locking, sliding door operation, and other keyless functions that many owners use multiple times each day.
Remove the emergency key by pressing the release button and pulling it from the key fob. Insert a plastic pry tool or a small flat head screwdriver into the opening left by the emergency key. Carefully separate the housing by working around the edges until the case opens completely. Avoid using excessive force because the plastic clips are designed to release gradually.
Once the housing is open, remove the old battery while noting its orientation. Compare the replacement battery with the original to ensure the battery code matches exactly. Place the new battery into the compartment and confirm that it fits securely against the battery contacts. A correct installation helps maintain stable power and dependable remote performance.
Close the key fob by aligning both halves and pressing them together until every retaining clip locks firmly. Insert the emergency key back into its slot and test all available functions. Check the lock and unlock buttons, power sliding door controls, rear hatch release, panic alarm, and remote start if equipped. If the key fob still responds inconsistently, inspect the battery contacts, verify the battery orientation, and make sure the housing is fully closed before assuming the remote requires professional service.
How to Change a Honda Passport Key Battery
Replacing the battery in a Honda Passport key fob is a simple task that helps maintain dependable access to your vehicle. If the remote operates only at a short distance or responds inconsistently, the battery is likely nearing the end of its service life. Installing a fresh battery restores reliable performance and reduces the chance of being locked out unexpectedly.
Begin by removing the emergency key from the key fob. Insert a plastic pry tool or a small flat head screwdriver into the slot where the emergency key was stored. Twist the tool gently until the housing separates into two sections. Open the case carefully to avoid damaging the retaining clips or internal components.
Locate the battery and note the position of the positive side before removing it. Lift the old battery from the compartment and insert the replacement in the same orientation. Make sure the battery sits securely against the metal contacts without forcing it into place. Correct installation helps the key fob communicate consistently with your Honda Passport.
Reassemble the key fob by pressing both halves together until every clip locks securely. Reinsert the emergency key and test all functions, including the lock and unlock buttons, tailgate release, panic alarm, and remote start if available. If the key fob still does not function correctly, inspect the battery contacts for dirt or corrosion and confirm that the replacement battery matches the original specification.
How to Change a Honda Ridgeline Key Battery
The Honda Ridgeline combines everyday practicality with advanced convenience features, making a properly functioning key fob an important part of daily use. Replacing the battery at the first sign of reduced performance helps ensure dependable remote access and push button start.
Remove the emergency key by pressing the release button on the side of the key fob. Place the remote on a flat surface and use a plastic pry tool or a small flat head screwdriver to separate the housing. Work slowly around the edge until the case opens completely. This approach helps prevent scratches and protects the internal clips.
After opening the key fob, remove the old battery carefully and observe its orientation. Install the new battery in the same position and verify that it rests evenly inside the compartment. A secure connection allows the remote to send a consistent signal to the vehicle and improves overall reliability.
Snap the two halves of the housing back together and reinstall the emergency key. Test the remote from several distances to confirm that the lock, unlock, tailgate release, and panic functions respond normally. If your Ridgeline includes remote start, verify that this feature also works correctly. Should any issue remain, reopen the key fob to confirm the battery is seated properly and the contacts are free from damage.
How to Change a Honda Fit Key Battery
Changing the battery in a Honda Fit key fob is an easy maintenance job that can be completed in only a few minutes. Whether your vehicle uses a traditional remote key or a smart key, replacing a weak battery helps maintain reliable access and prevents unexpected interruptions.
Start by opening the key fob according to its design. For smart keys, remove the emergency key before separating the housing with a plastic pry tool. For older remote keys, carefully open the case along the seam using a small flat head screwdriver. Work gently to avoid damaging the plastic clips.
Once the key fob is open, remove the old battery and note its orientation. Install the replacement battery with the positive side facing the same direction as the original. Confirm that the battery sits securely inside the compartment and maintains proper contact with the terminals. Even a slight misalignment can affect the performance of the remote.
After replacing the battery, close the housing until every clip locks into place. Test each button to verify normal operation, including locking, unlocking, and opening the rear hatch if applicable. If the key fob still responds slowly or inconsistently, double check the battery specification and ensure the housing is completely sealed.
How to Change a Honda Insight Key Battery
Replacing the battery in a Honda Insight key fob helps ensure that the vehicle’s smart access features continue to operate smoothly. Since many Insight models include push button start and keyless entry, a healthy key fob battery is essential for convenient daily driving.
Begin by removing the emergency key and placing the key fob on a clean surface. Insert a plastic pry tool or a small flat head screwdriver into the opening near the emergency key slot. Carefully separate the housing while applying gentle pressure around the edges. Opening the case slowly helps protect both the housing and the electronic components inside.
Remove the old battery and compare it with the new one before installation. Verify that the battery code matches exactly and install the replacement in the same orientation. Ensure the battery sits flat inside the compartment and maintains firm contact with the terminals. Proper installation provides a stable power supply and helps the key fob perform consistently.
Close the housing by pressing both halves together until every clip is fully engaged. Reinsert the emergency key and test the lock, unlock, panic, and remote start functions if equipped. Finally, confirm that the vehicle recognizes the smart key when starting the engine. If any issue persists after replacing the battery, inspect the battery contacts and verify that the correct battery type was installed.
Signs Your Honda Key Battery Needs Replacement
A Honda key fob battery usually lasts between two and four years, depending on how often the remote is used and the surrounding environment. As the battery loses power, the key fob may continue to work, but its performance gradually becomes less reliable. Recognizing the warning signs early allows you to replace the battery before it fails completely.
One of the first symptoms is a shorter operating range. You may notice that you need to stand much closer to your Honda before the lock or unlock buttons respond. If the remote worked from across a parking lot in the past but now only functions a few feet away, the battery is likely becoming weak.
Another common sign is delayed or inconsistent button response. You may have to press the lock or unlock button several times before the doors react. In some cases, only certain buttons stop working while others continue to function. This inconsistent behavior often indicates that the battery can no longer provide stable power.
Many newer Honda models also display a Key Battery Low message on the instrument panel. This warning is designed to remind drivers that the battery should be replaced soon. Although the key fob may continue to operate for a short period, replacing the battery as soon as possible helps prevent unexpected failure.
If your Honda has a push button start system, a weak battery may also make it more difficult for the vehicle to detect the smart key. You might need to hold the key fob closer to the start button before the engine recognizes it. Replacing the battery usually restores normal operation immediately.
Ignoring these warning signs can eventually leave you with a key fob that no longer locks, unlocks, or starts the vehicle remotely. Replacing the battery at the first sign of reduced performance is a simple and inexpensive way to keep your Honda key fob working reliably.
Common Mistakes to Avoid When Replacing a Honda Key Battery
Replacing a Honda key battery is a simple task, but small mistakes can lead to unnecessary problems. Taking a little extra care during the replacement process helps protect the key fob and ensures reliable operation.
One of the most common mistakes is purchasing the wrong battery. Batteries such as CR2032 and CR2025 may appear almost identical, but they differ in thickness and capacity. Always confirm the battery code before installing a replacement.
Another mistake is inserting the battery in the wrong direction. The positive side must face the same direction as the original battery. Installing it incorrectly prevents the key fob from receiving power even if the battery is brand new.
Many people also touch both sides of the new battery with their fingers. Dirt, moisture, or skin oils can reduce electrical contact over time. Holding the battery by its edges is a simple way to keep the surfaces clean.
Using excessive force while opening the key fob is another common issue. The plastic housing and retaining clips are designed to separate with gentle pressure. Forcing the case open can crack the housing or damage the internal components.
Finally, avoid throwing the old battery into household waste. Lithium coin batteries should be recycled through an approved collection point whenever possible. Proper disposal helps protect the environment and prevents potential safety hazards.
By avoiding these simple mistakes, you can replace your Honda key battery safely and restore full key fob performance without unnecessary repairs.
Frequently Asked Questions
How often should I replace my Honda key battery?
Most Honda key fob batteries last between two and four years. Battery life depends on usage, climate, and the quality of the battery. If you notice reduced operating range or slower response, it is a good time to install a new battery.
Can I replace a Honda key battery myself?
Yes. Replacing a Honda key battery is a simple task that most owners can complete in less than ten minutes. You only need a compatible replacement battery and a small flat head screwdriver or a plastic pry tool.
Do I need to reprogram my Honda key fob after replacing the battery?
No. In most cases, replacing the battery does not erase the programming stored inside the key fob. Once the new battery is installed correctly, the remote should continue to work normally without additional programming.
What happens if my Honda key battery dies completely?
If the battery is completely discharged, the remote buttons may stop working. However, most Honda smart keys include an emergency key that allows you to unlock the driver’s door manually. You can also start many Honda models by holding the key fob close to the start button, following the instructions in your owner’s manual.
Can I use any brand of battery?
Yes, provided the battery has the correct specification. Choosing a well known brand often provides better reliability, more consistent performance, and a longer service life than low quality alternatives.
Why is my Honda key fob still not working after replacing the battery?
Several issues may prevent the key fob from working properly. The battery may be installed in the wrong direction, the battery type may be incorrect, the metal contacts may be dirty, or the key fob could have internal damage. Double check the installation before seeking professional assistance.
Is it safe to touch the battery with my fingers?
It is better to handle the battery by its edges whenever possible. Keeping the battery surfaces clean helps maintain reliable electrical contact and consistent performance.
Where can I buy a replacement Honda key battery?
Replacement batteries are available from automotive parts stores, electronics retailers, hardware stores, and authorized Honda dealerships. Always verify the battery code before making a purchase to ensure compatibility with your specific key fob.
Conclusion
Learning how to change Honda key battery is a simple skill that can save both time and money. With the correct battery, a few basic tools, and careful installation, most Honda owners can replace a key fob battery in just a few minutes without visiting a dealership. Regular battery replacement also helps maintain reliable keyless entry, remote locking, and push button start.
Throughout this guide, you have learned how to identify the correct battery, replace it safely, troubleshoot common problems, and understand the differences between popular Honda models. Following these steps reduces the risk of installation mistakes and helps extend the life of your key fob.
If your key fob still does not function after installing a new battery, inspect the battery orientation, verify the battery specification, and check the internal contacts for damage. In rare cases, the key fob itself may require professional repair or replacement.
Keeping a spare battery at home is a smart way to prepare for unexpected battery failure. A small investment today can prevent unnecessary inconvenience tomorrow and ensure your Honda key fob continues to operate smoothly whenever you need it.
Whether you drive a Civic, Accord, CR V, HR V, Pilot, Odyssey, Passport, Ridgeline, Fit, or Insight, following the correct battery replacement procedure will help keep your key fob reliable for years to come.