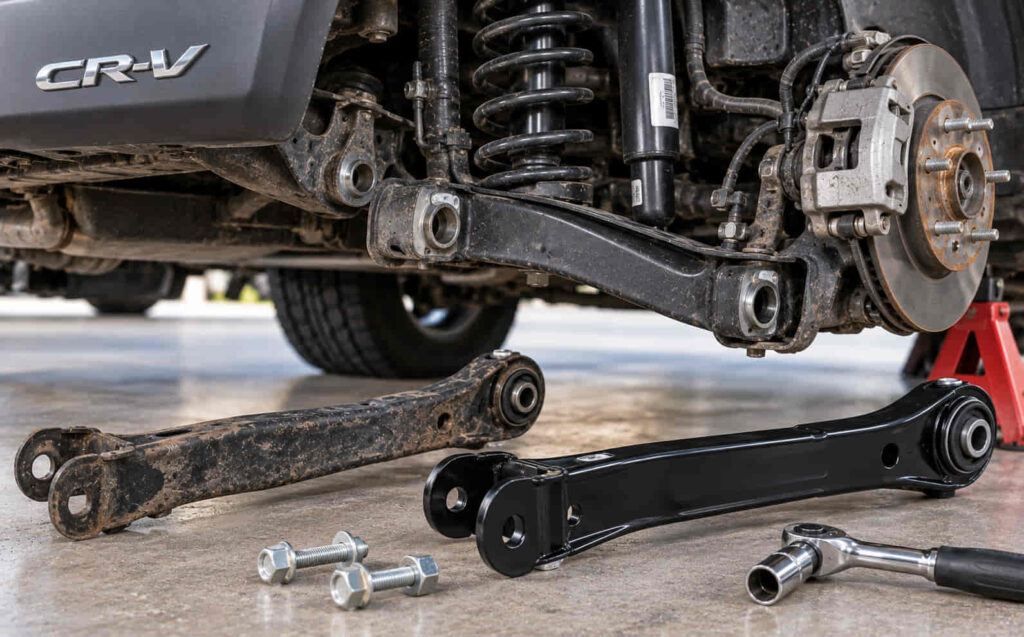
Honda CR-V Trailing Arm Replacement: Symptoms, Cost, and Process
Honda CR-V trailing arm replacement is necessary when the trailing arm has structural damage, severe corrosion, damaged mounting points, or wear that prevents the rear suspension from maintaining proper wheel position. A failing trailing arm or its bushing can cause clunking from the rear suspension, unstable handling, abnormal rear-wheel movement, and uneven tire wear. Because these symptoms can also originate from other suspension components, the trailing arm should be inspected before replacement parts are purchased.
Replacing a complete trailing arm is different from replacing a trailing arm bushing. A worn or cracked bushing does not automatically mean the entire arm needs replacement. If the arm remains structurally sound, replacing the bushing may address the fault. A bent, heavily corroded, cracked, or otherwise damaged arm can require replacement of the complete assembly. The correct repair also depends on the Honda CR-V model year and rear suspension configuration.
This guide explains how to identify a bad Honda CR-V trailing arm, distinguish arm damage from bushing failure, determine when replacement is required, understand the replacement process, estimate repair cost and time, and identify the alignment and suspension checks needed after the repair.
What Is a Trailing Arm on a Honda CR-V?
A trailing arm is a suspension component that connects the wheel assembly to the vehicle structure while controlling the wheel’s movement as the suspension travels up and down. On a Honda CR-V equipped with a rear suspension design that uses trailing-arm components, the arm helps maintain the intended position of the rear wheel relative to the body. This function makes the condition of the arm, its bushings, and its mounting points relevant to both suspension movement and vehicle stability.
The trailing arm does not work independently. It operates as part of a suspension system that includes components such as bushings, links or control arms, the wheel hub and knuckle, springs, dampers, and mounting hardware, with the exact arrangement depending on the CR-V generation and model year. Loads generated by acceleration, braking, cornering, road impacts, and suspension movement pass through these interconnected components. The trailing arm and its mounting points therefore need to control wheel movement without excessive play or structural deformation.
The bushing is particularly important because it creates a compliant connection between the arm and its mounting point. The rubber can absorb vibration and permit the controlled movement required by the suspension while limiting unwanted movement. As the bushing deteriorates, cracks, separates, or develops excessive play, the wheel can move differently under load even when the metal arm itself remains structurally usable. This distinction is why a diagnosis of a “bad trailing arm” does not automatically mean the complete Honda CR-V trailing arm assembly needs replacement.
What Are the Symptoms of a Bad Honda CR-V Trailing Arm?
The main symptoms associated with a damaged Honda CR-V trailing arm or worn trailing arm bushing are rear suspension noise, excessive wheel movement, changes in handling, and abnormal tire wear. These symptoms occur when the arm, bushing, or mounting connection can no longer control the rear wheel as intended. None of these signs alone confirms trailing arm failure because wheel bearings, control arms, suspension links, dampers, tires, and other components can produce overlapping symptoms.
Clunking or knocking from the rear suspension can develop when excessive clearance allows a worn bushing or mounting connection to move under changing loads. The sound may become noticeable when the CR-V travels over uneven pavement, changes direction, accelerates, or brakes because these conditions alter the forces acting through the suspension. The location and condition of the bushing and mounting hardware must be inspected before attributing the noise to the trailing arm.
Changes in handling can occur when excessive movement at the trailing arm allows the rear wheel to shift from its intended position under load. The driver may notice that the rear of the vehicle feels less controlled during braking, cornering, or transitions between acceleration and deceleration. The mechanism is mechanical rather than simply the presence of a worn rubber component: unwanted movement changes how the wheel is positioned relative to the vehicle while driving.
Abnormal or uneven tire wear can also provide evidence that the rear suspension requires inspection. A damaged arm, deteriorated bushing, or related suspension fault can affect wheel position or prevent alignment geometry from remaining stable under load. The tire then contacts the road differently across its tread surface, accelerating wear in specific areas. Because incorrect wheel alignment and other suspension problems can produce the same pattern, tire wear should be treated as a diagnostic clue rather than proof that the trailing arm itself has failed.
A physical inspection provides stronger evidence than symptoms alone. Visible cracking or separation of a trailing arm bushing, excessive movement at a mounting point, significant corrosion, deformation, or structural damage to the arm can narrow the diagnosis. The next step is to determine whether the problem is limited to the bushing or whether the complete Honda CR-V trailing arm requires replacement.
Read more: Honda CRV Window Deflector
How Can You Tell Whether the Honda CR-V Trailing Arm or Bushing Is Bad?
You can distinguish a bad Honda CR-V trailing arm from a bad trailing arm bushing by inspecting the metal arm, rubber bushing, mounting points, and the amount of movement at each connection. Bushing failure primarily affects the flexible connection between the arm and vehicle structure, while trailing arm failure involves damage to the structural component itself. Identifying which part has failed prevents replacement of a complete arm when the repair only requires a bushing and prevents reuse of an arm that is no longer structurally serviceable.
A worn trailing arm bushing can show visible cracking, splitting, deformation, or separation between the rubber and its surrounding sleeve. Rubber bushings deteriorate because they repeatedly flex as suspension loads change. Once deterioration creates excessive clearance, the arm can move farther than intended at its mounting point. This movement can contribute to clunking, changes in rear-wheel position, unstable suspension behavior, or abnormal tire wear even though the metal trailing arm remains intact.
The metal trailing arm requires a different inspection. Check the arm for bending, cracks, impact damage, severe corrosion, and deterioration around its mounting locations. Surface corrosion and structural corrosion should not be treated as the same condition. Structural deterioration becomes relevant when corrosion has significantly affected the material or mounting area rather than simply changing the appearance of the exposed metal. An arm that has been deformed by an impact can also alter suspension geometry even when its bushing appears usable.
Movement at the mounting points provides another diagnostic clue. Excessive movement can indicate a deteriorated bushing, loose or damaged hardware, or damage around the mounting location. The source of the movement needs to be identified instead of assuming that the arm itself is defective. Other rear suspension components should also be checked because wear in a control arm, suspension link, wheel bearing, or related connection can create noise and handling symptoms similar to trailing arm problems.
The inspection should ultimately answer one specific question: is the defect confined to a replaceable bushing, or has the trailing arm assembly itself become damaged? That distinction determines the appropriate repair scope and directly affects parts, labor, and the replacement procedure.
Should You Replace the Honda CR-V Trailing Arm or Just the Bushing?
Replace only the trailing arm bushing when the bushing has failed but the arm remains structurally serviceable; replace the complete trailing arm when the arm itself is bent, cracked, severely corroded, damaged at a mounting point, or otherwise unsuitable for continued use. The correct choice depends on the location of the failure and the serviceability of the individual components rather than on suspension noise alone.
Bushing replacement preserves the existing metal arm and renews the flexible connection at its mounting point. This repair makes sense when inspection confirms that deterioration is limited to the bushing and the arm has no structural defect. However, replacing a bushing can require removal of the arm and equipment or procedures for removing the old bushing and installing the new one without damaging the arm. A lower individual part price therefore does not automatically make bushing replacement the simpler repair.
Complete trailing arm replacement changes the repair scope because the old arm assembly is removed and another assembly is installed in its place. This approach becomes necessary when the metal structure cannot safely remain in service. It can also change the installation process when a replacement assembly includes bushings or other components that would otherwise need to be serviced separately.
The Honda CR-V model year must be identified before ordering either repair option. Suspension designs, component configurations, part numbers, fasteners, and service procedures can differ between CR-V generations. A trailing arm or bushing should therefore be selected by vehicle application rather than by the Honda CR-V name alone.
The same principle applies to installation specifications. Torque values, tightening sequences, bushing installation procedures, and other model-specific specifications should come from service information for the exact Honda CR-V being repaired. Applying a specification from another generation simply because both vehicles use the CR-V name can produce an incorrect repair.
A correct replacement decision therefore starts with component-level diagnosis. Confirm bushing deterioration when considering bushing replacement and confirm structural arm damage when considering complete trailing arm replacement. This keeps the repair aligned with the actual failure instead of replacing suspension components based only on symptoms.
What Parts and Tools Are Needed to Replace a Honda CR-V Trailing Arm?
Honda CR-V trailing arm replacement requires a compatible trailing arm or bushing, the required mounting hardware, safe vehicle-support equipment, standard suspension tools, and a torque wrench. The exact parts and tools depend on the model year, suspension configuration, and whether the repair involves the complete trailing arm or only its bushing. Confirming the vehicle application before disassembly reduces the risk of ordering an incompatible component or beginning a repair without the equipment required to complete it.
The replacement component should match the specific Honda CR-V being repaired. A complete trailing arm assembly may include a preinstalled bushing depending on the replacement part, while a bushing-only repair requires a bushing designed for the existing arm. Related fasteners should also be inspected during disassembly. Bolts, nuts, washers, or other hardware that are damaged, severely corroded, or specified for replacement by the applicable service procedure should not automatically be reused.
The basic tool set needs to support both vehicle safety and controlled suspension disassembly. A suitable jack raises the vehicle, while properly positioned jack stands support it during the repair. Hand tools are required to remove the wheel and suspension fasteners, and a torque wrench is necessary when tightening fasteners to their specified values. Rusted or seized hardware can increase the amount of equipment and labor required because corrosion can prevent fasteners from releasing normally.
Bushing-only replacement can require additional equipment because the old bushing must be removed from the arm and the replacement installed in the correct position. Depending on the component design, this operation can require pressing or other service procedures rather than simply unbolting one part and installing another. The condition of the existing arm should be confirmed before investing labor in bushing replacement.
Torque specifications should be obtained for the exact Honda CR-V model year and suspension configuration. Suspension fasteners operate under repeated dynamic loads, so tightening them by approximation is not an appropriate substitute for the specified procedure. The same requirement applies to any model-specific instructions concerning bushing orientation, fastener replacement, or the suspension position at final tightening.
How Do You Replace a Trailing Arm on a Honda CR-V?
To replace a Honda CR-V trailing arm, safely support the vehicle, remove the wheel, disconnect the components that prevent removal of the arm, unfasten the trailing arm from its mounting points, install the replacement assembly, tighten the connections according to the model-specific procedure, and inspect the suspension before returning the vehicle to service. The exact removal sequence varies by CR-V generation, so the service procedure for the specific model year should determine which connections are removed and in what order.
Replacement begins with securing the CR-V on a stable work surface and supporting it at the specified lifting and support locations. The wheel on the repair side is removed to provide access to the suspension. The technician then identifies the trailing arm, its mounting points, and the components connected to or routed around the assembly. This inspection is important because brake components, wiring, suspension links, or other nearby parts must not be stretched, crushed, or damaged while the arm is being removed.
The suspension should be supported as required before fasteners that control its position are released. Removing a suspension arm changes how connected components are supported and can allow parts of the assembly to move once a mounting bolt is removed. Controlled support prevents this movement from placing unnecessary loads on adjacent components and gives the technician greater control during removal.
The old trailing arm can then be disconnected according to the applicable service procedure. Mounting fasteners and any components that obstruct removal are released in the required sequence, after which the arm is separated from its mounting locations. Fasteners that resist removal should be evaluated for corrosion or seizure rather than forced without considering the surrounding mounting structure. Severe corrosion can turn an otherwise straightforward trailing arm replacement into a more extensive suspension repair.
Once the old arm is removed, the exposed mounting areas should be inspected before the replacement is installed. Damage, corrosion, distorted mounting surfaces, or deterioration in adjacent suspension components can affect the quality of the repair. Installing a new trailing arm without addressing a compromised mounting point does not correct the underlying structural problem.
The replacement trailing arm is positioned at the original mounting locations and the required connections are reinstalled. Fasteners should initially be installed in a controlled manner so the assembly can be positioned correctly before final tightening. Where the service procedure specifies a particular suspension position for tightening a rubber-bushed joint, that procedure should be followed. Rubber bushings are designed to operate through a defined range of movement, and incorrect installation position can place unintended preload on the bushing.
Final tightening must follow the torque specifications and procedures for the exact Honda CR-V. After tightening, each disturbed connection should be checked for correct installation. Nearby brake components, hoses, wiring, suspension links, and other parts should also be inspected to confirm that nothing was left disconnected, twisted, trapped, or incorrectly routed during the repair.
The wheel is reinstalled after the suspension work has been checked, and the vehicle is lowered according to normal safe workshop procedure. The repair is not complete solely because the new trailing arm is physically installed. Suspension behavior, wheel position, unusual noise, and alignment should be evaluated after replacement because trailing arm work can affect the relationship between the rear wheel and the rest of the suspension.
How Much Does Honda CR-V Trailing Arm Replacement Cost?
Honda CR-V trailing arm replacement cost is determined by four main components: the replacement part, labor, wheel alignment, and any additional suspension repairs discovered during inspection. The final amount varies by CR-V model year, whether the complete arm or only the bushing is replaced, the type of replacement part used, local labor rates, and the condition of the existing suspension hardware. For this reason, a single replacement price does not accurately represent every Honda CR-V.
The replacement part establishes one portion of the repair cost. A complete trailing arm assembly and an individual trailing arm bushing are different repair parts with different installation requirements. OEM and aftermarket components can also differ in price and in what is included with the assembly. A complete arm may include a bushing or related hardware, while another replacement component may require these items to be transferred or purchased separately. Part compatibility should therefore be confirmed by model year and vehicle application before comparing prices.
Labor cost depends on the amount of disassembly required to remove and reinstall the trailing arm. A vehicle with accessible, serviceable fasteners can require less labor than a CR-V with heavily corroded or seized suspension hardware. Corrosion can increase repair time because a fastener may require additional removal work, and damage around a mounting location can require attention before the replacement arm can be installed correctly.
Replacing only the trailing arm bushing does not automatically produce a lower total repair bill. The bushing itself can cost less than a complete arm assembly, but bushing replacement may require removal of the arm plus additional labor and equipment to remove the old bushing and install the new one. Complete arm replacement can eliminate that separate bushing operation when the replacement assembly already contains the required bushing. The correct cost comparison is therefore based on total parts and labor rather than the purchase price of one component.
Wheel alignment or alignment verification can add another cost after trailing arm replacement. Suspension work that changes or disturbs wheel-positioning components can affect alignment geometry, and abnormal geometry can contribute to handling problems and uneven tire wear. The post-repair requirements for the specific Honda CR-V should be included when estimating the complete job rather than treating installation of the new arm as the final expense.
Additional suspension damage can increase the total beyond the original estimate. Inspection may identify worn bushings, damaged mounting hardware, corrosion, or another rear suspension component that requires attention. These findings should be separated from the base trailing arm replacement cost so the vehicle owner can distinguish the original repair from additional work discovered during disassembly.
How Long Does Honda CR-V Trailing Arm Replacement Take?
Honda CR-V trailing arm replacement time depends primarily on the suspension design, repair scope, fastener condition, corrosion level, and whether additional bushing or suspension work is required. A complete arm replacement and a bushing-only repair should not be assigned the same universal labor time because the operations involved can differ substantially.
A complete trailing arm replacement generally involves raising and supporting the vehicle, removing the wheel, supporting the suspension, disconnecting the required components, removing the existing arm, inspecting the mounting locations, installing the replacement, tightening the connections correctly, and performing post-installation checks. Each additional component that must be disconnected increases the amount of work involved. The specific Honda CR-V generation determines the exact sequence.
Bushing replacement can add a separate removal and installation operation. After gaining access to the arm, the old bushing must be removed and the replacement positioned correctly without damaging the serviceable arm. The equipment available to perform this operation affects how efficiently the work can be completed. This is one reason professional repair time and DIY elapsed time should not be treated as equivalent.
Corrosion is one of the factors that can extend the job beyond the normal replacement procedure. Suspension fasteners are exposed to road contaminants, water, and environmental conditions over years of vehicle use. A seized fastener cannot always be removed at the same rate as serviceable hardware, and severe corrosion around the arm or mounting point may reveal a problem that requires additional repair rather than simply additional removal time.
DIY replacement can take longer because vehicle setup, unfamiliar fasteners, limited working space, tool availability, and bushing work can add time outside the basic installation procedure. Professional technicians can have access to lifts, specialized equipment, service information, and experience with suspension repairs that reduce these delays.
A reliable labor estimate should therefore be based on the exact Honda CR-V model year and the repair being performed. Identifying whether the job involves a complete trailing arm, an individual bushing, seized hardware, or additional suspension damage provides a more useful estimate than assigning one replacement time to every Honda CR-V.
Does a Honda CR-V Need an Alignment After Trailing Arm Replacement?
A Honda CR-V should have its wheel alignment checked after trailing arm replacement when the repair disturbs components or mounting points that influence rear-wheel position and suspension geometry. Replacing a suspension component that controls wheel movement can change the relationship between the wheel, suspension, and vehicle body. An alignment check confirms that the rear wheels remain within the specifications established for the specific CR-V model.
The trailing arm contributes to controlling the position and movement of the wheel as suspension loads change. Removing and reinstalling the arm requires disturbing its mounting connections, and replacing a damaged component can alter the wheel position compared with its pre-repair condition. This is especially relevant when the old arm was bent, its bushing allowed excessive movement, or another suspension component was loosened during the replacement process.
Incorrect alignment can affect both tire life and vehicle behavior. A rear wheel that operates outside its intended alignment geometry can place uneven loads across the tire tread instead of distributing contact as designed. Over time, this can create abnormal tire wear and shorten tire service life. Alignment problems can also affect how the rear of the vehicle responds during straight-line driving and cornering.
Alignment becomes particularly important when uneven tire wear was one of the original symptoms. Installing a new trailing arm can remove the damaged component, but it does not establish that every alignment angle is automatically correct afterward. Measuring the vehicle on alignment equipment provides objective information about wheel geometry and allows adjustable angles to be corrected where the CR-V suspension design permits adjustment.
The post-repair inspection should also extend beyond alignment measurements. The technician should verify the fasteners and connections disturbed during replacement, inspect the position of nearby suspension and brake components, and check for abnormal movement or noise. If the vehicle still displays handling problems or unusual tire positioning after the repair, the remaining rear suspension components require further diagnosis rather than assuming the new trailing arm is defective.
Can You Drive a Honda CR-V With a Bad Trailing Arm?
Driving a Honda CR-V with a structurally damaged trailing arm or excessive movement at its mounting points can compromise suspension control and should not be treated as a condition for normal continued driving. The trailing arm helps control wheel position, so structural damage or excessive play can allow the rear wheel to move outside its intended path when the vehicle accelerates, brakes, corners, or travels over uneven pavement.
The severity of the defect determines the mechanical risk. Early deterioration of a rubber bushing is different from a bent, cracked, severely corroded, or insecure trailing arm. A deteriorating bushing can progressively create more movement and noise as its rubber separates or loses its ability to control the joint. Structural damage to the arm or mounting area presents a different problem because the component responsible for locating the wheel has itself lost integrity.
Changes in handling are a reason to inspect the vehicle promptly. Rear-end movement, clunking accompanied by excessive suspension play, or a visible change in wheel position indicates that the problem involves more than an isolated noise. Continuing to place braking, cornering, and impact loads through a damaged suspension connection can increase movement and can place additional loads on related components.
Uneven tire wear is another reason not to postpone diagnosis. Tire wear does not prove that the trailing arm is defective, but it can indicate that wheel geometry or suspension control is no longer correct. Replacing tires without diagnosing the suspension fault can result in the same wear pattern developing on the replacement tires.
There is no reliable universal mileage limit for how far a Honda CR-V can be driven with a bad trailing arm. The term “bad trailing arm” can describe conditions ranging from bushing deterioration to serious structural damage, and those conditions do not carry the same level of risk. The appropriate decision comes from inspecting the arm, bushing, mounting points, and related suspension components and determining the severity of the actual defect.
A Honda CR-V with visible structural damage, substantial suspension movement, or significant handling changes should be repaired before returning to normal use. When the diagnosis identifies only bushing deterioration, the required repair can be planned according to the measured condition of the component, but the defect should still be addressed before wear progresses and affects wheel control or related suspension parts.
What Causes a Honda CR-V Trailing Arm to Fail?
Honda CR-V trailing arm problems can develop from bushing deterioration, corrosion, impact damage, repeated suspension loads, or damage around the arm’s mounting points. These failure mechanisms affect different parts of the assembly, so identifying the cause helps determine whether the correct repair is bushing replacement, complete trailing arm replacement, or repair of another suspension component.
Trailing arm bushings deteriorate as the rubber repeatedly flexes while the suspension moves and the vehicle accelerates, brakes, and corners. The bushing must permit controlled movement while preventing excessive displacement of the arm. As the rubber cracks, separates, deforms, or loses its ability to control the joint, clearance at the connection can increase. The resulting movement can produce suspension noise and allow the rear wheel to shift more than intended under load.
Corrosion affects the metal portion of the trailing arm and its mounting areas rather than the rubber bushing itself. Water, road contaminants, and environmental exposure can progressively attack unprotected metal surfaces. Light surface corrosion does not represent the same condition as significant material loss, but advanced corrosion can weaken the arm or the areas surrounding its mounting points. Structural corrosion therefore requires evaluation of the affected metal rather than a repair decision based only on appearance.
Impact damage can bend or otherwise deform a trailing arm. A severe pothole strike, collision, curb impact, or other force transmitted through the wheel and suspension can place loads on components responsible for maintaining wheel position. A deformed arm can change the relationship between the wheel and suspension even when the bushing remains attached. In this situation, replacing the bushing alone does not correct structural deformation of the arm.
Repeated suspension loading can also contribute to wear over the service life of the vehicle. Every acceleration, braking event, corner, road irregularity, and suspension cycle transfers force through suspension connections. The components are designed to withstand these loads, but rubber bushings and other wear-related parts do not remain in their original condition indefinitely. Vehicle operating conditions and environmental exposure influence how quickly deterioration develops, which is why there is no single failure mileage that applies to every Honda CR-V trailing arm or bushing.
Damage at a mounting point requires separate attention because installing a new trailing arm does not repair a compromised vehicle-side connection. Excessive corrosion, deformation, damaged hardware, or deterioration around a mounting location can prevent the replacement arm from being secured and positioned as intended. The mounting structure should therefore be inspected whenever trailing arm damage is found.
How Can You Reduce Honda CR-V Trailing Arm and Bushing Wear?
You can reduce the consequences of Honda CR-V trailing arm and bushing wear by inspecting suspension problems early, correcting alignment-related issues, addressing corrosion, and repairing damaged components before excessive movement affects related parts. A trailing arm is a mechanical suspension component exposed to repeated loads, so maintenance focuses primarily on identifying deterioration before it progresses rather than preventing all wear indefinitely.
Rear suspension noises should be investigated instead of being treated as a normal consequence of vehicle age. A clunk or knock does not automatically identify a trailing arm problem, but locating its source can reveal deteriorated bushings, loose connections, or another worn suspension component before movement becomes more severe. Early diagnosis also makes it easier to distinguish an isolated bushing problem from damage involving the complete arm.
Tire condition provides another useful indication of suspension health. Uneven rear tire wear can result from alignment problems or worn suspension components that affect wheel position. Inspecting the suspension when abnormal wear first appears can identify the mechanical cause rather than repeatedly replacing tires while leaving the underlying fault unresolved. Alignment should also be checked when suspension repairs or vehicle behavior indicate that wheel geometry may have changed.
Corrosion should be evaluated during routine underbody and suspension inspection, particularly when the vehicle operates in conditions that expose its underside to moisture or corrosive road contaminants. The important distinction is between superficial surface corrosion and deterioration that affects structural material or mounting integrity. Identifying progressing corrosion before substantial material loss occurs provides more information for repair planning.
Impacts should also trigger inspection when they are severe enough to change handling, wheel position, steering behavior, or tire wear. Suspension damage is not always immediately visible from outside the vehicle. A wheel can transmit impact force into the trailing arm, bushings, links, mounting points, and other suspension components, making component-level inspection more reliable than assuming no damage occurred because the vehicle remains drivable.
Maintaining the Honda CR-V rear suspension therefore depends on observing how its components work together. The trailing arm, bushing, mounting points, tires, alignment, and related suspension components form a connected mechanical system. Finding excessive movement, structural damage, or abnormal wheel geometry early allows the defective component to be repaired before it contributes to additional suspension or tire wear.