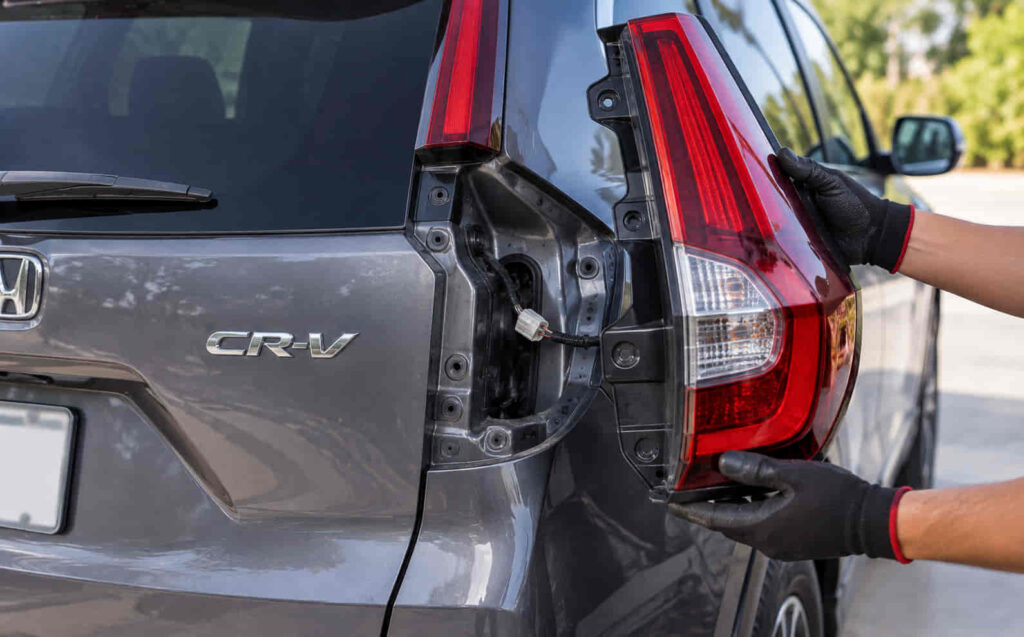
A Honda CR-V tail light assembly is the complete rear lighting unit designed for a specific CR-V model year, mounting position, and vehicle configuration. Choosing the correct assembly requires more than matching the shape of the existing light. The model year determines the housing design, mounting points, electrical connections, and lighting configuration, while the installation position determines whether you need a left, right, inner, or outer assembly. A part that looks similar can still be incompatible with your vehicle.
Replacing the complete tail light assembly is generally necessary when the housing or lens is cracked, mounting points are broken, water intrusion damages the unit, or an integrated lighting component fails and cannot be replaced separately. A failed rear light does not automatically mean the entire assembly needs replacement because the actual problem may be a bulb, socket, connector, fuse, or wiring component.
This guide explains how to identify the correct Honda CR-V tail light assembly, verify fitment by model year and position, compare OEM and aftermarket replacements, recognize when the complete unit needs replacement, estimate replacement costs, and understand the installation process. It also covers the essential compatibility checks to make before purchasing a replacement tail light assembly.
What Is a Honda CR-V Tail Light Assembly?
A Honda CR-V tail light assembly is the complete rear lamp unit that combines the lens, housing, mounting structure, and applicable lighting components into one vehicle-specific assembly. It is installed at the rear of the Honda CR-V and provides the physical structure for one or more rear lighting functions. The exact construction varies by model year and lamp position, so the term “tail light assembly” refers to the complete unit rather than a single replaceable bulb.
A tail light assembly is different from a tail light bulb. The bulb is an individual light source that can be removed and replaced on configurations that use serviceable bulbs, while the assembly contains the structure surrounding and supporting those lighting components. Replacing a failed bulb therefore does not require replacing the complete assembly when the housing, lens, socket, and other components remain functional.
The tail light lens is also only one part of the assembly. It forms the visible exterior surface and helps protect the internal components from water, dirt, and physical contact. Damage that extends beyond the lens can affect the housing, mounting tabs, seals, sockets, connectors, or integrated lighting components. In these cases, replacing the complete Honda CR-V tail light assembly can restore the unit as a complete component rather than repairing individual damaged sections.
The distinction becomes especially important with integrated lighting designs. A conventional assembly may use separately replaceable bulbs, while another configuration can incorporate LED lighting into the lamp unit. An integrated component failure can therefore require a different repair approach than a burned-out replaceable bulb. Identifying what has failed should come before ordering an entire replacement assembly.
Which Tail Light Assembly Fits Your Honda CR-V?
The correct Honda CR-V tail light assembly must match the vehicle’s model year, installation side, lamp position, and lighting configuration. Matching only the appearance of the existing lamp is not sufficient because assemblies with similar exterior shapes can differ in their mounting points, connectors, internal lighting design, or other fitment specifications.
Model year is the first fitment attribute to verify. Honda can change rear lamp designs between CR-V generations and during updates within a generation. These changes can affect the shape of the housing and lens as well as the mounting arrangement and electrical configuration. A tail light advertised for a Honda CR-V should therefore specify the model years it is designed to fit rather than relying only on the vehicle name.
The installation side is the second major fitment attribute. A left-side tail light assembly and a right-side tail light assembly are shaped and mounted for opposite sides of the vehicle. When a seller describes a product as driver side or passenger side, that description should be checked against the vehicle and market configuration. Using explicit left and right positioning together with the product fitment information reduces ambiguity when selecting a replacement.
Lamp position creates another distinction on Honda CR-V configurations that divide the rear lighting into separate sections. An outer assembly is mounted toward the exterior side of the vehicle body, while an inner assembly can be associated with the liftgate or an inward section of the rear lamp design. An inner assembly cannot be assumed to replace an outer assembly simply because both belong to the same model year and side. The mounting location must match as well.
The lighting configuration must then be verified. A replacement assembly needs to correspond with the applicable bulb or LED arrangement, electrical connection, housing design, and mounting points. This is why visual comparison should be treated as a secondary check rather than the primary fitment method. Two assemblies can appear nearly identical in a product image while using different connections or internal components.
The OEM or interchange part number provides an additional way to verify Honda CR-V tail light compatibility. Compare the reference number from the existing assembly or vehicle-specific parts information with the replacement product, then confirm the model year, side, position, and lighting configuration. A matching number is particularly useful when several visually similar assemblies are available for the same vehicle family.
The most reliable selection process therefore moves from the vehicle to the component: identify the Honda CR-V model year first, determine the required left or right side and inner or outer position, verify the lighting configuration, and then compare the relevant part or interchange number. This sequence reduces the risk of purchasing a tail light assembly that looks correct but cannot be installed correctly on the vehicle.
Read more: Honda CRV VIN Decoder
What Is the Difference Between OEM and Aftermarket Honda CR-V Tail Light Assemblies?
OEM and aftermarket Honda CR-V tail light assemblies differ primarily in their manufacturer, replacement specifications, price, and warranty terms. An OEM assembly corresponds to the original-equipment application for the vehicle, while an aftermarket assembly is produced as a replacement by a manufacturer outside that original supply channel. Either option still needs to match the CR-V model year, installation side, lamp position, and lighting configuration before it can be considered a suitable replacement.
An OEM Honda CR-V tail light assembly is selected according to the vehicle’s original parts application. Its main advantage is that the part identification is tied directly to the intended vehicle configuration. This can simplify replacement when the original Honda part number is known. The relevant OEM number should still be checked against the specific model year and lamp position because a CR-V can use different rear lamp assemblies across years and locations on the vehicle.
An aftermarket Honda CR-V tail light assembly is designed to replace the corresponding original assembly without being sold as the original Honda component. Aftermarket products can provide another replacement option when the correct vehicle application is available, but compatibility should be verified from fitment specifications rather than exterior appearance. The replacement should correspond with the required housing shape, mounting locations, electrical connection, side, and lighting configuration.
Price is another distinction between OEM and aftermarket replacements, but price alone does not establish whether an assembly fits correctly. The useful comparison is between equivalent parts designed for the same vehicle application. Buyers should compare what each assembly includes, its fitment specifications, construction, warranty or return terms, and whether bulbs, sockets, wiring components, or other required parts must be transferred from the existing unit.
The better replacement choice is determined by verified fitment and the requirements of the repair rather than the OEM or aftermarket label alone. An inexpensive assembly provides little value if its mounting points or electrical configuration do not correspond with the vehicle. Likewise, purchasing an OEM assembly does not eliminate the need to verify the exact application. Model year, side, position, and part identification remain the primary selection criteria for both categories.
How Do You Know When a Honda CR-V Tail Light Assembly Needs Replacement?
A Honda CR-V tail light assembly needs replacement when damage or component failure affects the complete lamp unit and cannot be corrected by replacing a serviceable component such as a bulb, socket, or related electrical part. A cracked housing or lens, broken mounting point, persistent water intrusion, collision damage, or failure of a non-serviceable integrated lighting component can make complete assembly replacement necessary.
Physical damage is one of the clearest reasons to inspect the complete unit. A cracked lens can allow moisture and contaminants to reach the internal components, while a damaged housing can prevent the lamp from remaining securely mounted or properly sealed. Broken mounting tabs can also allow the assembly to move even when the lighting functions continue to operate. The extent and location of the damage determine whether an individual component can be serviced or whether the assembly needs replacement.
Moisture inside the tail light requires diagnosis rather than an automatic decision to replace the unit. A small amount of temporary condensation and persistent water accumulation are not necessarily the same condition. Water that repeatedly enters the housing can indicate a sealing, housing, or ventilation problem and can expose sockets, connectors, and electrical components to moisture. Replacement becomes relevant when the source of the intrusion is part of the damaged assembly and cannot be corrected through an appropriate service procedure.
A tail light that stops illuminating also does not automatically indicate a failed assembly. The fault can originate from a replaceable bulb, bulb socket, connector, wiring, fuse, or another part of the electrical circuit. Replacing the complete Honda CR-V tail light assembly before identifying the failed component can therefore result in an unnecessary repair. The lighting function should first be checked to determine whether the fault is inside the assembly or elsewhere in the circuit.
Integrated lighting components require particular attention because their serviceability depends on the design of the assembly. When the failed light source is integrated into the lamp and is not designed as an independently replaceable component, replacing the complete assembly may be the appropriate repair. A conventional assembly with a serviceable burned-out bulb, by contrast, generally requires bulb replacement rather than replacement of an otherwise undamaged housing.
The decision should therefore follow the failure itself: identify whether the problem is physical damage, moisture intrusion, a serviceable lighting component, an electrical fault, or a non-serviceable part of the assembly. Replace the complete tail light assembly when the failure belongs to the assembly itself; repair or replace the individual component when the assembly remains functional and serviceable. This distinction prevents unnecessary replacement while ensuring structural, sealing, mounting, and lighting problems are addressed at their actual source.
How Much Does a Honda CR-V Tail Light Assembly Cost?
The cost of a Honda CR-V tail light assembly depends primarily on the model year, assembly position, lighting configuration, and whether the replacement is OEM or aftermarket. There is no single price that accurately represents every Honda CR-V tail light because different vehicle applications use different housings, internal lighting components, and mounting configurations. Installation labor and additional damaged components can also increase the total replacement cost beyond the price of the assembly itself.
Model year is one of the main pricing variables because a tail light assembly must correspond with a specific vehicle application. Changes to the rear lamp design can alter the housing, lens, mounting arrangement, electrical connection, and internal lighting technology. A replacement for one CR-V generation should therefore not be used as a pricing reference for another generation without confirming that the assemblies have comparable specifications.
The position of the assembly also affects which part must be purchased. Left and right assemblies are separate vehicle-specific components, while CR-V configurations with separate inner and outer rear lamps create additional part distinctions. A price comparison is meaningful only when the products represent the same side and mounting position. Comparing an outer driver-side assembly with an inner passenger-side assembly, for example, does not provide a useful measure of replacement cost.
Lighting configuration can create another price difference. A lamp using serviceable bulbs does not have the same component structure as an assembly containing integrated lighting elements. Buyers should also determine what is included with the replacement. The housing and lens may be supplied while certain bulbs, sockets, wiring components, or related hardware need to be transferred from the original unit or purchased separately. The product description should identify these inclusions before the final replacement cost is calculated.
OEM and aftermarket parts can also be priced differently because they come through different manufacturing and distribution channels. The comparison should remain application-specific: an OEM and aftermarket assembly should correspond with the same CR-V year, side, position, and lighting configuration before their prices are compared. A lower purchase price does not compensate for incorrect fitment.
The total Honda CR-V tail light replacement cost consists of the required assembly, any additional components, and installation labor when professional installation is used. Collision damage can add further repair costs if the mounting area, wiring, connector, or surrounding body structure has also been damaged. For this reason, the assembly price should not automatically be treated as the complete repair price.
How Do You Replace a Honda CR-V Tail Light Assembly?
To replace a Honda CR-V tail light assembly, access the lamp mounting area, disconnect the electrical connection, remove the retaining hardware and old assembly, install the compatible replacement, reconnect the electrical components, and test every affected lighting function. The exact access points, fasteners, connections, and removal procedure depend on the Honda CR-V model year and the position of the assembly, so vehicle-specific service information should take precedence over a universal procedure.
Replacement starts by confirming the new assembly before removing the existing lamp. The model year, left or right side, inner or outer position where applicable, connector arrangement, and mounting points should correspond with the vehicle. Comparing these attributes before installation prevents a partially disassembled vehicle from revealing that the replacement part is incompatible.
Access to the assembly is then established from the appropriate rear body or liftgate area according to its mounting position. Interior trim, access covers, fasteners, or other components may need to be moved depending on the vehicle configuration. The assembly should not be forced away from the body while a hidden fastener or electrical connection remains attached because doing so can damage mounting points or surrounding components.
The electrical connection and retaining hardware are removed after the assembly is accessible. Serviceable bulb sockets or other components may need to be disconnected or transferred when they are not included with the replacement assembly. Their condition should be inspected during this process. A damaged or corroded connector, socket, or section of wiring should be addressed as a separate fault rather than concealed by installing a new housing over the existing problem.
The replacement assembly is positioned using its designed mounting points and secured without forcing the housing into place. A component that does not align correctly can indicate incorrect fitment, an installation problem, or collision damage around the mounting area. Forcing the assembly into an incompatible position can damage the replacement and compromise its alignment or sealing.
Electrical connections and applicable lighting components are reconnected after the assembly is secured. The affected rear lighting functions should then be tested before the installation is considered complete. The lamp should illuminate correctly, remain securely mounted, and sit properly against the surrounding body surfaces. Any abnormal gap, movement, or electrical failure requires inspection before normal vehicle use.
Honda CR-V tail light assembly replacement can be a direct component replacement when the correct part is installed on an undamaged mounting area, but the procedure is not identical across every CR-V model year. Vehicle-specific instructions are necessary when the installation requires removal of additional trim, uses an unfamiliar electrical configuration, or involves integrated lighting components. Professional diagnosis is more appropriate when the failure includes damaged wiring, connectors, body mounting points, or unresolved electrical problems.
Can You Replace a Honda CR-V Tail Light Assembly Yourself?
You can replace a Honda CR-V tail light assembly yourself when the correct replacement part is available, the mounting area and wiring are undamaged, and the assembly can be removed through the normal vehicle-specific service procedure. The job primarily involves accessing the assembly, disconnecting its electrical components, removing its mounting hardware, installing the replacement, and verifying that the rear lighting functions operate correctly. The exact procedure still depends on the CR-V model year and assembly location.
A straightforward replacement differs from electrical diagnosis or collision repair. Replacing an intact but damaged lamp housing can involve a direct exchange of components, while a tail light that does not illuminate may require diagnosis of the bulb, socket, connector, wiring, fuse, or integrated lighting components before a new assembly is installed. Identifying the source of the failure prevents an unnecessary assembly replacement.
The mounting area should also be inspected before treating the repair as a direct DIY installation. Collision damage can distort the surrounding body structure or damage the points used to secure the lamp. A correctly specified replacement assembly should align with its intended mounting locations without excessive force. Poor alignment after an impact can indicate damage outside the assembly itself rather than a defective replacement part.
Electrical damage creates a similar distinction. A damaged connector, corroded socket, exposed wiring, or unresolved circuit fault is not repaired simply by installing a new tail light housing. These conditions require electrical inspection and appropriate repair. Professional service is more appropriate when the replacement involves wiring diagnosis, damaged body mounting points, unresolved water intrusion, or a procedure beyond the installer’s ability to complete correctly.
The installation should end with a functional and physical inspection. The replacement assembly should remain securely mounted and properly aligned with the surrounding body panels. Every affected lighting function should operate as intended after the electrical connections are restored. A lamp that remains loose, sits incorrectly, or does not operate after installation requires further diagnosis rather than assuming the replacement is complete.
What Should You Check Before Buying a Honda CR-V Tail Light Assembly?
Check the Honda CR-V model year, installation side, lamp position, lighting configuration, part reference, mounting compatibility, included components, and seller terms before buying a tail light assembly. These attributes determine whether the replacement corresponds with the vehicle and whether additional components will be required during installation. Product appearance alone does not establish compatibility.
Start with the exact model year because “Honda CR-V tail light assembly” describes a family of replacement parts rather than one universal component. Rear lamp designs change across vehicle applications, and those changes can involve more than exterior styling. Housing dimensions, mounting locations, electrical connections, and internal lighting arrangements can differ even when two lamps have a broadly similar appearance.
Next, identify the required side and mounting position. A left assembly is designed for the left side of the vehicle, while a right assembly is designed for the opposite side. CR-V applications that separate the rear lamp into inner and outer units require another level of identification. In that configuration, knowing that a vehicle needs a left-side lamp is insufficient; the buyer must also determine whether the damaged component is the inner or outer assembly.
The lighting configuration should then be matched with the existing vehicle. Determine whether the relevant functions use serviceable bulbs, integrated lighting components, or another application-specific arrangement. Compare the electrical connection and the components supplied with the replacement. A product may provide the housing and lens while requiring existing sockets, bulbs, wiring components, or hardware to be transferred. Knowing what is included prevents missing parts from being discovered during installation.
Part identification provides another compatibility check. Compare the OEM or interchange reference associated with the existing application against the replacement listing when that information is available. The reference should support the vehicle fitment information rather than replace it. Model year, side, position, and configuration should still correspond with the vehicle because selecting a replacement is a multi-attribute fitment decision.
Mounting points deserve a physical comparison before installation. Their number, location, and shape should correspond with the existing assembly and undamaged vehicle mounting area. An assembly that requires modification or force to reach its mounting points should not be assumed to fit simply because its exterior lens resembles the original lamp.
The final check concerns the complete purchase rather than the physical part alone. Determine which components are supplied, whether additional parts are required, and what warranty or return conditions apply to the product. This is especially important when comparing OEM and aftermarket Honda CR-V tail light assemblies because two products for the same application may differ in what is included.
The safest buying sequence is to identify the vehicle first and the replacement part second. Confirm the model year, determine the exact side and lamp position, match the lighting and electrical configuration, verify the applicable part reference and mounting points, and then review included components and seller terms. This sequence keeps fitment at the center of the purchase decision and reduces the risk of selecting an assembly based only on name, price, or appearance.
How Can You Prevent Damage to a Honda CR-V Tail Light Assembly?
You can reduce damage to a Honda CR-V tail light assembly by protecting the housing and lens from impact, monitoring moisture intrusion, keeping the exterior surface clean, and inspecting the lamp after rear-body damage. Preventive care cannot eliminate failures caused by collisions or internal electrical problems, but it can help identify physical and sealing problems before they affect additional components inside the assembly.
Impact damage is one of the most direct threats to the assembly because the lens, housing, and mounting points form a single installed structure. Contact with another vehicle, an object, or surrounding body components can crack the lens or housing and break mounting tabs. Even when the lamp continues to illuminate after an impact, inspect its alignment and mounting points. A displaced assembly can leave gaps around the housing or place additional stress on its mounting structure.
Moisture inside the assembly should also be monitored because persistent water intrusion can affect more than the appearance of the lens. Water reaching sockets, connectors, or internal electrical components can create additional lighting problems. The source should be identified when moisture repeatedly accumulates inside the housing rather than repeatedly removing the visible moisture without addressing the entry point.
Cleaning protects visibility through the exterior lens and provides an opportunity to inspect its condition. Use a cleaning method that does not damage or aggressively abrade the lens surface. During cleaning, check for cracks, damaged edges, loose mounting, or other physical changes that could indicate deterioration of the assembly.
Inspection is particularly important after rear-end or side-rear contact. Damage around the lamp can affect both the assembly and the vehicle mounting area. Check whether the housing remains securely positioned and whether the surrounding body panels have shifted. Replacing the lamp alone will not correct a damaged mounting structure that prevents a new assembly from aligning properly.
Preventive maintenance should therefore focus on the complete installed condition of the lamp rather than only whether it illuminates. A Honda CR-V tail light assembly should remain securely mounted, physically intact, properly aligned, and protected against persistent water intrusion. Detecting a problem at one of these points can prevent a damaged housing or mounting area from developing into a larger replacement issue.
What Other Honda CR-V Rear Lighting Parts May Need Replacement?
Other Honda CR-V rear lighting components can include serviceable bulbs, bulb sockets, electrical connectors, wiring components, reverse-light components, turn-signal components, rear reflectors, and the high-mounted brake light, depending on the model year and lighting configuration. These components should be distinguished from the complete tail light assembly because a rear lighting problem does not always require replacement of the entire lamp unit.
A serviceable bulb is one of the first components to inspect when a single lighting function stops working on a configuration that uses replaceable bulbs. The bulb produces the light, while the assembly provides the housing and related structure around it. A burned-out bulb can therefore be replaced independently when the assembly remains intact and the vehicle design permits bulb servicing.
Bulb sockets and electrical connectors form the connection between applicable lighting components and the vehicle electrical system. Damage, corrosion, poor contact, or another connection problem can interrupt a lighting function even when the lens and housing remain undamaged. Installing a complete replacement assembly does not necessarily correct a fault located in the vehicle-side connector or wiring.
Rear lighting functions should also be identified individually rather than treating every lamp at the rear of the CR-V as the same component. Depending on the model year and configuration, brake, tail, turn-signal, and reverse-light functions can use different light sources or locations. The high-mounted brake light is also a separate rear lighting component rather than part of the primary left or right tail light assembly.
Rear reflectors have a different function because they provide passive visibility rather than producing light through a bulb or LED. A damaged reflector therefore requires identification as its own component instead of automatically being classified as a failed Honda CR-V tail light assembly.
Diagnosing the specific rear lighting component before ordering a replacement prevents unnecessary parts replacement. Determine which lighting function has failed, inspect the corresponding bulb or integrated light source, check applicable sockets and electrical connections, and inspect the physical assembly for damage. Replace the complete tail light assembly when the fault belongs to the assembly itself rather than a separately serviceable rear lighting component.