A failing CV joint can quickly turn a smooth and reliable Honda Civic into a noisy vehicle. Many drivers first notice a clicking sound while making a sharp turn. Unfortunately, they often ignore this warning until the damage becomes severe. Over time, the vehicle may vibrate during acceleration or leak grease around the wheel. Steering can also feel less stable. These problems affect driving comfort and may damage the wheel hub, transmission, or suspension if you do not fix them quickly.
This Honda Civic CV Joint Replacement guide explains everything you need to know before starting the repair. First, you will learn how the CV joint works and why it plays a vital role in the drivetrain. Next, you will discover the most common symptoms and the leading causes of failure. The guide also explains replacement costs, required tools, and each repair step in detail. In addition, it compares OEM and aftermarket parts to help you choose the right option. Whether you plan to replace the CV joint yourself or hire a mechanic, this guide will help you make informed decisions and avoid costly mistakes.
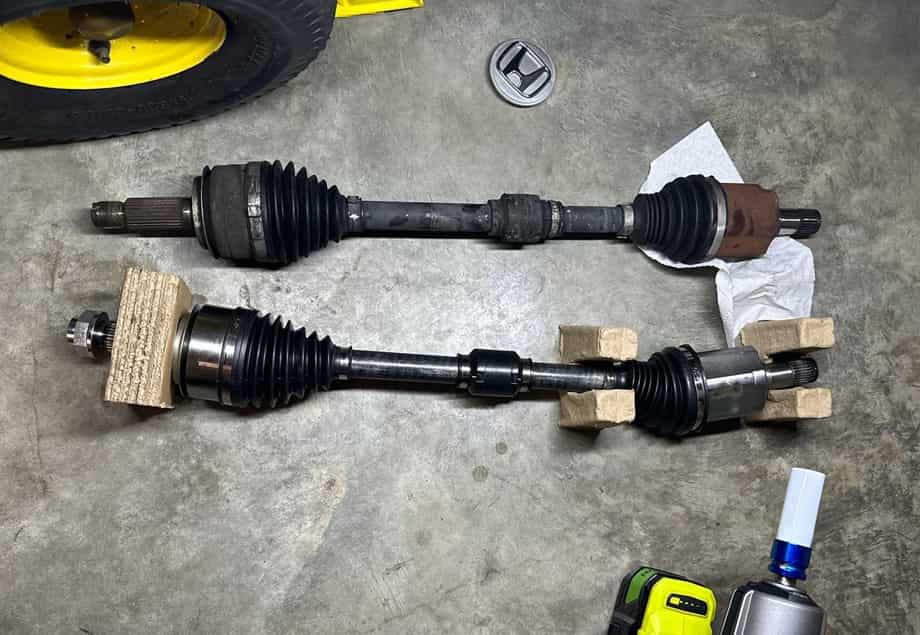
What Is a CV Joint and Why Is It Important?
A constant velocity joint, often called a CV joint, is a key part of your Honda Civic drivetrain. It transfers engine power from the transmission to the drive wheels while allowing the suspension and steering system to move freely. Unlike a traditional universal joint, a CV joint delivers smooth power at different steering angles. This design helps your Civic accelerate smoothly, maintain traction, and provide stable handling on both straight roads and sharp corners.
Many drivers confuse the CV joint with the CV axle, but they are not the same component. The CV axle is the complete shaft that connects the transmission to the wheel hub. Each end of the axle contains a CV joint that allows flexible movement while the wheels turn and travel over uneven surfaces. Because the joints and axle work together as one assembly, repair shops often replace the complete CV axle instead of changing only the damaged joint. This approach reduces labor time, improves reliability, and lowers the chance of future drivetrain problems.
Every CV joint contains precision machined parts protected by a flexible rubber boot filled with special grease. The grease reduces friction and keeps the internal bearings lubricated. The boot also prevents dirt, water, and road debris from entering the joint. When the boot cracks or tears, grease escapes and contaminants enter the assembly. As a result, the internal components wear much faster. If you ignore the damage, the joint can eventually fail and leave your Honda Civic unable to transfer power to the wheels.
Common Symptoms of a Bad Honda Civic CV Joint
A worn CV joint rarely fails without warning. In most cases, it produces several symptoms before the damage becomes severe. Recognizing these signs early can help you avoid expensive repairs and reduce the risk of unexpected breakdowns. Paying attention to unusual noises, vibrations, and visible damage allows you to replace the faulty component before it affects other drivetrain parts.
The most common symptom is a clicking noise that appears while turning the steering wheel. You may hear the sound during slow turns in a parking lot or while making a tight corner. The noise often becomes louder as the joint continues to wear. In many Honda Civic models, this symptom points to a worn outer CV joint that no longer moves smoothly under load.
Vibration during acceleration is another warning sign that deserves immediate attention. The steering wheel, floor, or seat may shake as the vehicle gains speed. The vibration often becomes more noticeable during hard acceleration but decreases when you release the throttle. In many cases, a damaged inner CV joint or a worn CV axle causes this problem.
A torn CV boot also signals that the joint needs inspection. You may notice grease around the inside of the wheel, the suspension, or nearby brake components. Once the protective grease escapes, dirt and moisture enter the joint. This contamination increases friction and speeds up internal wear. Replacing a damaged boot early may save the joint and prevent a more expensive repair.
Some drivers also notice clunking sounds when shifting between acceleration and deceleration. Others experience loose steering or reduced driving stability, especially on uneven roads. Although these symptoms can result from other suspension problems, you should inspect the CV joint as soon as they appear. A timely diagnosis can prevent additional damage and restore your Honda Civic to smooth and reliable performance.
What Causes CV Joint Failure?
Several factors can shorten the lifespan of a Honda Civic CV joint. Although these components are built to last for many years, they still wear out over time. Driving conditions, maintenance habits, and the quality of replacement parts all affect their durability. Understanding the most common causes of failure helps you prevent unnecessary repairs and extend the life of your drivetrain.
A torn CV boot is the leading cause of CV joint failure. The rubber boot seals the joint and keeps the grease inside. It also blocks water, dirt, and road debris from entering the assembly. When the boot cracks or tears, grease leaks out and contaminants enter the joint. The internal bearings and races then wear much faster because they no longer receive proper lubrication.
High mileage also contributes to normal wear. Every time you accelerate, brake, or turn the steering wheel, the CV joint moves under heavy load. After thousands of miles, the internal components gradually lose their smooth contact surfaces. This wear eventually creates excessive play, vibration, and the familiar clicking noise during turns.
Road conditions can also damage the CV joint. Deep potholes, rough pavement, and accidental curb impacts place extra stress on the axle assembly. These sudden impacts may damage the boot, bend the axle, or increase the load on the joint. Drivers who frequently travel on rough roads often experience faster component wear.
Improper installation can create problems as well. An incorrectly seated axle, damaged transmission seal, or loose axle nut may reduce the lifespan of the new assembly. In addition, some low quality aftermarket CV axles use weaker materials and less durable boots. These parts may cost less at first, but they often wear out sooner than premium aftermarket or genuine Honda components.
Regular inspections remain the best way to prevent unexpected CV joint failure. Checking the CV boots during routine maintenance allows you to identify small cracks or grease leaks before they develop into major drivetrain repairs. Early action usually costs much less than replacing a completely damaged CV axle.
Can You Drive with a Bad CV Joint?
Many Honda Civic owners wonder whether they can continue driving after noticing signs of a failing CV joint. The answer depends on the severity of the damage. In the early stages, the vehicle may still operate normally except for a clicking noise or a slight vibration. However, these symptoms indicate that the joint has already started to wear. Ignoring them allows the damage to spread and increases the risk of a complete failure.
A worn CV joint does not repair itself. Instead, the internal components continue to wear every time the wheels rotate. As the damage becomes worse, the clicking noise grows louder and vibrations become more noticeable. You may also feel a clunk when accelerating or changing direction. These warning signs show that the joint can no longer transfer power as smoothly as it should.
Driving with a severely damaged CV joint creates several safety risks. The joint may fail to deliver power efficiently, causing poor acceleration and unstable handling. In extreme cases, the joint or axle can separate from the drivetrain. If this happens, your Honda Civic may lose the ability to move under its own power. The failure can also damage nearby components, including the transmission seal, wheel hub, and suspension parts. Repair costs often increase once these additional parts require replacement.
You should stop driving and inspect the vehicle immediately if you hear loud clunking noises, experience strong vibrations, or notice excessive movement around the axle. Grease leaking from a torn CV boot also deserves prompt attention, even if the vehicle still feels normal. Replacing a damaged boot or CV axle early is usually far less expensive than repairing a complete drivetrain failure.
If you are unsure about the condition of the CV joint, arrange a professional inspection as soon as possible. A mechanic can identify the source of the problem before it affects other components. Early diagnosis improves safety, reduces repair costs, and helps keep your Honda Civic running smoothly for years to come.
Honda Civic CV Joint Replacement Cost
The cost of a Honda Civic CV joint replacement depends on several factors, including the model year, the type of replacement parts, and local labor rates. Most repair shops replace the complete CV axle instead of rebuilding the damaged joint because the process is faster and often more cost effective. Although the total price varies from one vehicle to another, understanding the main cost factors will help you plan your repair budget and avoid unexpected expenses.
Replacement parts account for a large portion of the total cost. Budget aftermarket CV axles usually offer the lowest purchase price, while premium aftermarket brands provide better materials and longer service life. Genuine Honda CV axles cost more, but they deliver excellent fit, smooth operation, and reliable long term performance. Choosing a quality replacement part may reduce the risk of vibration, premature wear, and repeated repairs.
Labor charges also vary depending on your location and the complexity of the repair. An experienced technician can often replace a front CV axle within a few hours. However, rusted fasteners, seized suspension components, or damaged transmission seals may increase labor time. Repair costs can also be higher for certain Honda Civic model years because some designs require additional disassembly.
Many owners choose the DIY approach to save money. If you already own the necessary tools, replacing a CV axle yourself can significantly reduce the overall expense. However, you should also consider the cost of new axle nuts, transmission fluid, replacement seals, and any specialty tools required for the job. Purchasing quality parts and following the correct installation procedure remain more important than simply reducing the initial cost.
The table below provides a general estimate of replacement costs. Actual prices may vary depending on your location, your Honda Civic model, and the quality of the parts you choose.
| Replacement Option | Estimated Cost |
|---|---|
| Budget Aftermarket CV Axle | $60 to $120 |
| Premium Aftermarket CV Axle | $120 to $250 |
| Genuine Honda CV Axle | $250 to $500 |
| Professional Labor | $150 to $350 |
| Typical Total Repair Cost | $250 to $800 |
While the lowest priced option may seem attractive, it does not always provide the best value. A high quality CV axle often lasts longer, fits correctly, and delivers smoother performance. Investing in durable parts can reduce future maintenance costs and improve the overall reliability of your Honda Civic.
Should You Replace the CV Joint, CV Boot, or Complete CV Axle?
Choosing the right repair depends on the condition of the damaged components. Many Honda Civic owners assume they always need a complete CV axle replacement, but that is not true in every situation. The best solution depends on how long the problem has existed, how much damage the joint has suffered, and whether contamination has reached the internal components.
Replacing only the CV boot is the most affordable option when you discover the damage early. If the boot has a small tear but the joint remains quiet and operates smoothly, installing a new boot and fresh grease may restore proper protection. This repair prevents dirt and moisture from entering the joint while preserving the original factory components. However, the repair becomes much less effective once grease has leaked for an extended period.
Replacing only the CV joint is possible, but it is less common. This repair requires disassembling the axle, cleaning the internal parts, and installing a new joint. The process takes more time and demands greater precision than replacing the complete assembly. Because labor costs often increase, many repair shops do not recommend this option unless the remaining axle is still in excellent condition.
In most cases, replacing the complete CV axle offers the best balance of cost, reliability, and long term value. The new assembly includes both CV joints, fresh grease, protective boots, and new clamps. Installation is usually faster, and the risk of future problems becomes much lower. For this reason, professional technicians choose complete axle replacement for most Honda Civic repairs.
Before making a final decision, inspect the condition of the CV boot, listen for unusual noises, and check for grease leaks or excessive vibration. If the joint produces clicking sounds during turns or shows clear signs of internal wear, replacing the complete CV axle is usually the most practical solution. Although the initial cost may be higher than replacing a single component, the repair often saves time, improves reliability, and reduces the chance of another drivetrain repair in the near future.
Tools and Parts Needed
Preparing the right tools before you begin makes the replacement process safer and more efficient. Stopping in the middle of the repair because of a missing tool wastes time and increases the chance of damaging important components. A well organized workspace also helps you complete each step with greater confidence and accuracy.
Most Honda Civic CV joint replacement jobs require a standard set of hand tools. A socket and ratchet set, breaker bar, torque wrench, pry bar, hammer, and pliers handle most of the work. You also need a floor jack, sturdy jack stands, and wheel chocks to support the vehicle safely. Never rely on a hydraulic jack alone while working underneath the car because it can lose pressure without warning.
Some repairs require additional specialty tools. An axle nut socket allows you to remove the large axle nut without damaging it. A ball joint separator or tie rod removal tool makes it easier to disconnect suspension components without causing unnecessary wear. If the axle is seized inside the wheel hub, a slide hammer or axle puller may help remove it safely. Keeping penetrating oil nearby can also save time when working with rusted fasteners.
Choosing the correct replacement parts is just as important as using the proper tools. Always confirm the model year, engine size, transmission type, and axle position before ordering a replacement CV axle. Many technicians also install a new axle nut because it helps maintain the correct clamping force after reassembly. If the transmission seal shows signs of wear or leakage, replacing it during the repair can prevent future fluid leaks and reduce additional labor later.
Before starting the installation, inspect all replacement parts for shipping damage and compare them with the original components. Check the spline count, overall length, ABS tone ring, and mounting points to ensure everything matches your Honda Civic. Taking a few extra minutes to verify compatibility can prevent installation problems and help the new CV axle deliver reliable performance for many years.
How to Replace a Honda Civic CV Joint
Replacing a Honda Civic CV joint requires careful preparation and attention to detail. Although many experienced DIY enthusiasts can complete the repair at home, every step must follow the correct procedure. Always work on a level surface, use proper safety equipment, and consult the service manual for your specific Honda Civic model if necessary.
Step 1: Prepare the Vehicle
Park the vehicle on a flat surface and engage the parking brake. Place wheel chocks behind the rear wheels to prevent movement. Loosen the front wheel lug nuts and the axle nut before lifting the vehicle. This step makes removal easier because the wheel remains firmly on the ground while you apply force.
Step 2: Raise and Secure the Vehicle
Lift the front of the Honda Civic with a floor jack and support it with heavy duty jack stands. Make sure the vehicle sits securely before removing the front wheel. Never work underneath a vehicle that relies only on a hydraulic jack.
Step 3: Remove the Suspension Components
Remove the axle nut completely after taking off the wheel. Disconnect the lower ball joint, tie rod end, or other suspension components as required for your Honda Civic model. Move the steering knuckle outward carefully to create enough space for the axle to slide out of the wheel hub. Avoid placing excessive force on the brake hose or ABS sensor wire during this step.
Step 4: Remove the Old CV Axle
Push the outer end of the axle through the wheel hub. Next, use a pry bar to release the inner end from the transmission. Apply steady pressure until the retaining clip releases. Keep a drain pan underneath the transmission because a small amount of transmission fluid may escape during removal.
Step 5: Inspect Related Components
Take a few minutes to inspect nearby parts before installing the new axle. Check the transmission seal for leaks or damage. Inspect the wheel bearing, ball joints, tie rod ends, and suspension bushings for excessive wear. Replacing worn components now can save significant labor in the future.
Step 6: Install the New CV Axle
Carefully align the splines and slide the inner end of the new axle into the transmission. Push the axle firmly until the retaining clip locks into place. Then guide the outer end through the wheel hub. Confirm that both ends sit correctly before reinstalling the suspension components.
Step 7: Reassemble the Suspension
Reconnect every component in the reverse order of removal. Install a new axle nut if the manufacturer recommends replacement. Tighten all fasteners according to the factory torque specifications for your Honda Civic. Proper torque helps protect the wheel bearing and ensures safe operation.
Step 8: Perform a Final Inspection
Reinstall the wheel and lower the vehicle to the ground. Tighten the lug nuts with a torque wrench and check the transmission fluid level if any fluid leaked during the repair. Start the engine and inspect the axle area for leaks or unusual movement. Finish the job with a short test drive while listening for clicking noises, vibrations, or other abnormal sounds. If everything operates smoothly, the replacement has been completed successfully.
Common Mistakes to Avoid
Even a high quality replacement CV axle can fail prematurely if the installation is not performed correctly. Many problems that appear after a repair result from simple mistakes rather than defective parts. Paying close attention to the installation process helps ensure reliable performance and reduces the chance of repeating the repair.
One common mistake is reusing an old axle nut when the manufacturer recommends installing a new one. The axle nut plays an important role in maintaining the correct clamping force on the wheel bearing. A worn or damaged nut may not hold the required torque, which can shorten the life of the bearing and affect driving stability.
Another frequent error is tightening fasteners without using a torque wrench. Overtightening can damage threads or place excessive stress on suspension components. Undertightening creates the opposite problem by allowing parts to loosen during normal driving. Always follow the factory torque specifications for your Honda Civic to ensure every component is secured correctly.
Some DIY mechanics overlook the transmission seal during the replacement process. If the seal shows signs of wear, replacing it while the axle is removed is usually the best decision. Ignoring a leaking seal can result in transmission fluid loss and lead to more expensive repairs later.
Installing the wrong replacement axle can also create serious problems. Differences in overall length, spline count, or ABS tone ring design may cause vibration, warning lights, or improper drivetrain operation. Before installation, compare the new axle with the original part to confirm that every important dimension matches.
A final mistake is skipping the test drive after completing the repair. A short drive allows you to confirm that the steering feels normal, the suspension operates smoothly, and no unusual noises or vibrations remain. After the test drive, inspect the axle area one more time to verify that there are no fluid leaks and that all fasteners remain secure. Spending a few extra minutes on these final checks can prevent costly problems and provide confidence that the repair has been completed correctly.
OEM vs Aftermarket CV Axles
Selecting the right replacement CV axle is just as important as performing the installation correctly. Honda Civic owners often choose between a genuine Honda part and an aftermarket alternative. Each option offers distinct advantages, and the best choice depends on your budget, driving habits, and long term ownership plans.
OEM CV axles are manufactured to meet Honda’s original specifications. They provide precise fitment, smooth operation, and consistent quality. Because these parts are designed specifically for your Honda Civic, installation is usually straightforward and the risk of compatibility issues is minimal. Many owners who plan to keep their vehicle for many years prefer OEM components because of their proven durability and dependable performance.
Aftermarket CV axles are available from many manufacturers and cover a wide range of price and quality levels. Premium aftermarket brands often deliver performance that closely matches original equipment while offering a lower purchase price. Budget products may reduce repair costs, but the quality of materials, grease, and protective boots can vary significantly. Choosing a reputable manufacturer is more important than selecting the lowest priced option.
Warranty coverage is another factor worth considering. Many aftermarket manufacturers provide limited lifetime warranties, while genuine Honda parts typically include warranty protection through authorized dealers. A strong warranty can add value, but it should never be the only reason for choosing a replacement part. Overall build quality, manufacturing standards, and real world reliability remain the most important considerations.
The following comparison highlights the key differences between the two options.
| Feature | OEM CV Axle | Premium Aftermarket CV Axle |
|---|---|---|
| Fit and Compatibility | Excellent | Very Good to Excellent |
| Build Quality | Excellent | Good to Excellent |
| Purchase Price | Higher | Moderate |
| Long Term Reliability | Excellent | Good to Excellent |
| Warranty | Manufacturer Warranty | Varies by Brand |
| Best For | Long term ownership | Value and performance |
There is no single answer that fits every Honda Civic owner. If maximum reliability and factory fit are your highest priorities, an OEM CV axle is usually the best investment. If you want to balance cost and performance, a premium aftermarket axle from a trusted manufacturer can provide excellent results. Regardless of which option you choose, proper installation and regular inspections play the greatest role in achieving a long service life.
Tips to Extend CV Joint Life
A CV joint can last well over 100,000 miles when it receives proper care and operates under normal driving conditions. Although normal wear cannot be avoided completely, good maintenance habits can significantly extend the life of the drivetrain and reduce the likelihood of unexpected repairs.
Inspect the CV boots during every routine service or tire rotation. Small cracks, loose clamps, or grease leaks often appear long before the joint begins making noise. Finding these problems early gives you the opportunity to replace a damaged boot before dirt and moisture damage the internal components.
Drive carefully over potholes, speed bumps, and uneven road surfaces whenever possible. Hard impacts place extra stress on the CV axle, wheel bearing, suspension, and steering components. Slowing down before reaching rough sections of road helps reduce unnecessary shock loads throughout the drivetrain.
Avoid aggressive acceleration while the steering wheel is turned fully to one side. This driving condition places the greatest load on the outer CV joint and increases internal wear. Smooth acceleration and gradual steering inputs help reduce stress on the moving components and improve their service life.
Keep the suspension and steering system in good condition. Worn ball joints, damaged control arm bushings, and loose tie rod ends can change the operating angle of the CV axle. Excessive movement increases the load on the joints and may shorten their lifespan even when the axle itself remains in good condition.
Choose high quality replacement parts whenever repairs become necessary. A well manufactured CV axle with durable boots and premium grease usually provides better long term reliability than a low cost alternative. Combining quality parts with correct installation procedures offers the best chance of achieving years of trouble free performance.
Finally, pay attention to unusual sounds or vibrations during everyday driving. A faint clicking noise or a small grease leak may seem insignificant at first, but early diagnosis often prevents a simple repair from becoming an expensive drivetrain replacement. Regular inspections and prompt maintenance remain the most effective ways to keep your Honda Civic operating safely and reliably.
Frequently Asked Questions
How long does a Honda Civic CV joint last?
A Honda Civic CV joint can often last more than 100,000 miles under normal driving conditions. Its lifespan depends on driving habits, road conditions, and regular maintenance. Inspecting the CV boots periodically and repairing small tears before grease leaks develop can significantly extend the life of the joint.
What does a bad CV joint sound like?
The most common symptom is a repeated clicking noise while turning, especially during slow and sharp corners. As the damage becomes more severe, you may also hear clunking sounds during acceleration or when changing direction. These noises usually indicate that the internal components of the CV joint have worn beyond normal limits.
Can I replace only the CV boot instead of the entire CV axle?
Yes, but only if the damage is discovered early. If the CV boot has torn recently and the joint remains quiet with no signs of internal wear, replacing the boot and adding fresh grease may be sufficient. Once dirt enters the joint or clicking noises begin, replacing the complete CV axle is usually the more reliable solution.
How long does it take to replace a Honda Civic CV axle?
An experienced technician can usually complete the replacement within one to three hours, depending on the model year and the condition of the suspension components. Rusted fasteners or seized parts may increase the repair time.
Is it safe to drive with a clicking CV joint?
Driving short distances may still be possible during the early stages of wear, but it is not recommended. A damaged CV joint continues to deteriorate with every mile. If it fails completely, your Honda Civic may lose the ability to transfer power to the drive wheels, which can leave you stranded and increase repair costs.
Does replacing a CV axle require a wheel alignment?
A wheel alignment is not always required after replacing a CV axle. However, if suspension or steering components are removed or adjusted during the repair, checking the wheel alignment is a good idea. Proper alignment helps improve tire wear, steering performance, and overall vehicle stability.
Conclusion
Understanding the signs of a failing CV joint allows you to prevent expensive repairs and maintain the safe operation of your vehicle. A clicking noise during turns, vibration while accelerating, or grease leaking from a damaged CV boot should never be ignored. Identifying these problems early often means the difference between a simple repair and a complete CV axle replacement.
This Honda Civic CV Joint Replacement guide has covered every stage of the repair process, from identifying common symptoms and understanding the causes of failure to comparing replacement options, estimating repair costs, gathering the correct tools, and completing the installation safely. Whether you choose to perform the repair yourself or hire a professional technician, making informed decisions helps protect your drivetrain and improve the long term reliability of your Honda Civic.
Routine inspections and preventive maintenance remain the most effective ways to maximize the lifespan of your CV joints. Checking the CV boots regularly, using high quality replacement parts, and addressing minor problems before they become major failures can save both time and money. Investing in proper maintenance also helps preserve driving comfort, steering performance, and overall vehicle safety.
If you found this guide helpful, consider bookmarking it for future reference or sharing it with other Honda Civic owners who may be facing the same repair. Staying informed and following recommended maintenance practices will help keep your Honda Civic performing smoothly for many miles to come.