Honda Civic cabin filter replacement is one of the easiest maintenance tasks you can perform, yet it delivers noticeable improvements in cabin comfort and driving experience. If your air conditioner no longer blows fresh air, unpleasant odors linger inside the cabin, or dust seems to collect on every surface shortly after cleaning, the cabin air filter is often the first component worth inspecting. Many owners spend money on unnecessary HVAC services without realizing that a clogged filter can restrict airflow and reduce the efficiency of the entire ventilation system.
Fortunately, replacing the cabin filter does not require advanced mechanical knowledge or expensive tools. On most Honda Civic models, the filter is located behind the glove box, allowing owners to complete the job within a short amount of time. A clean cabin filter helps trap dust, pollen, road debris, and other airborne particles before they enter the passenger compartment. As a result, the HVAC system operates more efficiently while passengers enjoy cleaner air and improved comfort throughout every journey.
This complete guide explains everything you need to know about Honda Civic cabin filter replacement. You will learn how the filter works, when it should be replaced, how to choose the correct replacement, and how installation may differ across model years. In addition, you will discover common mistakes to avoid, practical maintenance tips, and ways to improve long term HVAC performance. While the replacement procedure is similar for many Honda Civic models, always verify the specifications for your exact model year, trim level, and regional market before beginning the installation.
What Is a Honda Civic Cabin Air Filter?
The Honda Civic cabin air filter is an important part of the heating, ventilation, and air conditioning system. Its job is to clean the air before it enters the passenger compartment. As outside air passes through the filter, dust, pollen, road debris, soot, and other airborne particles become trapped in the filter media. Consequently, fewer contaminants reach the cabin, creating a cleaner and more comfortable environment for everyone inside.
A clean cabin air filter also helps the HVAC system operate efficiently. It allows air to flow freely through the ventilation ducts and across the evaporator. However, the filter gradually collects dirt during normal driving. As more debris builds up, airflow becomes restricted. The blower motor must work harder to move air through the system. As a result, you may notice weaker airflow, longer cooling times, unpleasant odors, or slower windshield defogging.
Many owners mistake the cabin air filter for the engine air filter. Although both filters clean incoming air, they protect different parts of the vehicle. The engine air filter prevents contaminants from entering the engine. In contrast, the cabin air filter protects passengers by filtering the air supplied through the HVAC system. Replacing one filter does not eliminate the need to maintain the other. Both components should be inspected during routine maintenance.
Most modern Honda Civic models place the cabin air filter behind the glove box. This location makes replacement quick and convenient for many owners. Depending on the filter type, additional media such as activated carbon can also reduce traffic odors, smoke, and certain airborne gases. Choosing the correct filter size is equally important. Proper installation and the correct airflow direction help maintain consistent filtration and smooth HVAC performance.
Understanding how this component works makes Honda Civic cabin filter replacement much easier. It also helps you recognize early warning signs before airflow and cabin comfort begin to decline.
Signs Your Honda Civic Cabin Filter Needs Replacement
A dirty cabin air filter can reduce comfort long before it causes noticeable HVAC problems. Because the filter collects dust, pollen, leaves, and other airborne particles every time you drive, its performance gradually declines over time. Many Honda Civic owners mistake the symptoms for a failing air conditioner, even though the real issue is simply restricted airflow. Knowing the early warning signs can help you replace the filter before it affects air quality or places additional strain on the ventilation system.
The first sign is weak airflow from the vents. Even if the blower fan is running at a higher speed, less air reaches the cabin because debris blocks the filter media. You may also notice unpleasant odors when the air conditioner or heater is operating. Dust, moisture, and organic material trapped inside the filter can create stale or musty smells that continue to circulate through the cabin.
Another common symptom is excessive dust inside the vehicle. If the dashboard becomes dirty soon after cleaning, the cabin air filter may no longer capture airborne particles effectively. Drivers with allergies may also experience more irritation because pollen and fine dust enter the cabin more easily. In addition, a clogged filter can make the blower motor sound louder as it works harder to maintain airflow. Windshield defogging may also become slower, especially during humid or cold weather.
The easiest way to confirm the problem is to inspect the filter itself. If you find heavy dirt, leaves, insects, dark discoloration, or damaged filter material, it is time for a Honda Civic cabin filter replacement. Replacing the filter early helps restore airflow, improves cabin air quality, and supports efficient HVAC performance.
How Often Should You Replace a Honda Civic Cabin Air Filter?
There is no single replacement interval that applies to every Honda Civic. The ideal schedule depends on your driving habits, local environment, and the condition of the filter itself. While many owners replace the cabin air filter during routine maintenance, regular inspections are often more effective than following mileage alone. Checking the filter periodically allows you to replace it before restricted airflow begins to affect cabin comfort.
Driving conditions play a major role in filter life. Vehicles operated in heavy city traffic, dusty rural areas, construction zones, or regions with high pollen levels usually require more frequent replacement. Smoke from wildfires and industrial pollution can also shorten the filter’s lifespan because fine particles accumulate quickly inside the filter media. In contrast, vehicles driven mainly on clean highways may keep a usable filter for a longer period.
Climate is another important factor. Humid environments allow moisture to collect inside the filter, creating conditions that can lead to unpleasant odors and mold growth. Even a Honda Civic with relatively low mileage may need a new cabin filter if it has been exposed to excessive moisture or long periods of environmental contamination. Therefore, both mileage and filter condition should be considered before deciding when to replace it.
A quick visual inspection is often the best guide. If the filter appears heavily clogged, discolored, or damaged, replacing it is usually the right decision regardless of the mileage. Performing a timely Honda Civic cabin filter replacement helps maintain strong airflow, cleaner cabin air, and efficient HVAC performance throughout the year.
Which Honda Civic Model Years Have a Cabin Air Filter?
Most Honda Civic models include a cabin air filter, but the design can vary between generations. Model year, trim level, body style, and market specification all affect filter compatibility. For that reason, you should always verify the correct replacement before making a purchase. Choosing the right filter ensures a proper fit and helps maintain efficient HVAC performance.
Older Honda Civic models require extra attention because not every vehicle came with a cabin air filter from the factory. Some early versions support a retrofit kit, while others use a different HVAC design. If you own an older Civic, inspect the area behind the glove box or consult the owner’s manual before ordering a replacement. Taking a few minutes to confirm compatibility can save both time and money.
Most Honda Civic models built from the early 2000s onward place the cabin air filter behind the glove box. This design allows owners to complete the replacement with basic hand tools and very little mechanical experience. Although the overall procedure remains similar across generations, small differences in the glove box, filter cover, and housing may exist. These variations rarely make the job more difficult, but they can change the removal or installation steps.
Before starting a Honda Civic cabin filter replacement, identify your vehicle’s exact model year and trim level. Then verify the correct filter part number using the owner’s manual or a trusted parts catalog. Spending a few extra minutes on this step helps prevent fitment problems and ensures the new filter seals correctly, restores proper airflow, and delivers the best possible filtration for your Honda Civic.
How to Choose the Correct Cabin Filter
Choosing the correct cabin air filter is just as important as replacing it. A filter that does not match your Honda Civic may leave gaps around the housing, reduce airflow, or fail to trap airborne contaminants effectively. Before purchasing a replacement, confirm your vehicle’s model year, trim level, body style, and engine configuration. These details help ensure you select a filter that fits properly and performs as intended.
Honda Civic owners can choose between OEM and aftermarket cabin air filters. OEM filters provide factory fitment and reliable performance, making them a popular choice for routine maintenance. Aftermarket filters often cost less and offer a wider range of options. Some include activated carbon to reduce traffic odors, smoke, and harmful gases, while others focus on capturing finer particles for improved air quality. Selecting a high quality filter from a trusted manufacturer usually provides the best balance between filtration, airflow, and durability.
Before installing the new filter, compare it with the old one. Check the overall dimensions, frame shape, and filter media to confirm both filters match. Pay close attention to the airflow arrow or orientation markings printed on the side of the filter. Installing the filter in the correct direction allows the HVAC system to maintain proper airflow and filtration efficiency.
Although price is an important consideration, it should not be the only factor. A poorly made filter may not seal correctly or may restrict airflow more than expected. Investing in the correct filter helps protect the HVAC system, improves cabin air quality, and makes every Honda Civic cabin filter replacement more effective.
Tools and Supplies Needed
Replacing the cabin air filter on a Honda Civic does not require specialized equipment. Most owners can complete the job with a few basic tools that are already available at home. Preparing everything before you begin makes the process smoother and helps prevent unnecessary interruptions during installation.
The most important item is the correct replacement cabin air filter. Always verify that it matches your Honda Civic’s model year, trim level, and body style before opening the package. A microfiber cloth is also useful for wiping away loose dust inside the filter housing, while a small vacuum helps remove leaves, dirt, and other debris without pushing them deeper into the HVAC system. A flashlight makes it easier to inspect the filter compartment, especially if dirt has accumulated around the housing.
Some Honda Civic models may require a small screwdriver to remove trim pieces or release the glove box more easily. However, many models allow you to access the cabin filter without using any tools. Keeping the owner’s manual nearby can also help if you need to verify the filter location or confirm the correct installation procedure for your specific vehicle.
Before starting the replacement, park the vehicle on a level surface and switch off the engine. Empty the glove box to prevent items from falling during removal. Finally, compare the new filter with the old one to confirm the size, shape, and airflow markings match. Spending a few minutes on preparation helps ensure a faster Honda Civic cabin filter replacement and reduces the chance of installation mistakes.
Honda Civic Cabin Filter Replacement Step by Step
Replacing the cabin air filter is one of the simplest maintenance jobs you can perform on a Honda Civic. Most owners can complete the process in less than thirty minutes without professional assistance. Working carefully helps protect the glove box components and ensures the new filter fits correctly.
Start by parking the vehicle on a level surface and turning off the engine. Open the glove box and remove all personal items. This prevents anything from falling into the passenger footwell while you work. Next, press the sides of the glove box inward to release the retaining stops. Slowly lower the glove box until you can access the cabin filter housing. Some Honda Civic models include a glove box damper on one side. If your vehicle has one, disconnect it gently before lowering the glove box completely.
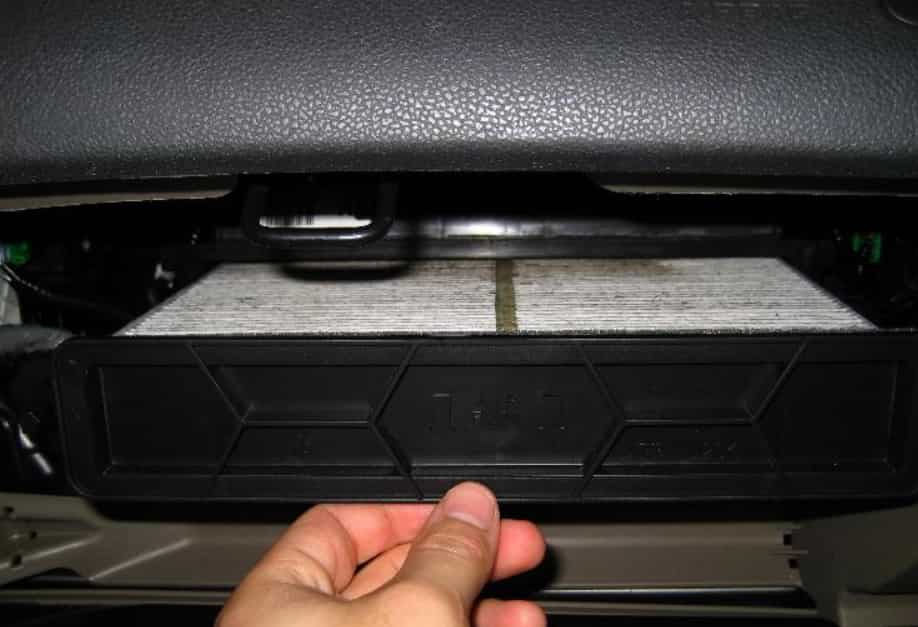
Locate the rectangular filter cover behind the glove box. Press the locking tabs and remove the cover carefully. Before pulling out the old filter, note the airflow arrow or take a quick photo with your phone. This simple step makes it much easier to install the new filter in the correct direction. Slide the old filter out slowly to prevent dust, leaves, or other debris from falling into the HVAC housing.
Inspect the old filter before discarding it. Heavy dirt, insects, leaves, or dark discoloration indicate that replacement is overdue. Use a small vacuum or a clean microfiber cloth to remove loose debris from the filter compartment. Avoid spraying cleaners or compressed air directly into the housing because they can push contaminants deeper into the ventilation system.
Compare the new cabin filter with the old one before installation. Confirm that the dimensions, frame, and airflow markings match. Insert the new filter in the same orientation as the original. Make sure it sits flat inside the housing without bending the filter media. Then reinstall the filter cover until the locking tabs click securely into place.
Reconnect the glove box damper if your Honda Civic uses one. Lift the glove box back into position and press the sides inward so the retaining stops slide into place. Close the glove box and start the vehicle. Turn on the climate control system and test every fan speed. Air should flow smoothly through the vents without unusual noise or vibration. If everything operates normally, your Honda Civic cabin filter replacement is complete, and your HVAC system is ready to deliver cleaner air and improved airflow once again.
Common Honda Civic Cabin Filter Replacement Mistakes
Replacing the cabin air filter is a simple task, but small mistakes can reduce its effectiveness or create unnecessary problems. Taking a few extra minutes to inspect the filter and follow the correct installation procedure helps ensure the HVAC system performs as expected.
One of the most common mistakes is installing the filter in the wrong direction. Most cabin filters include an airflow arrow or an orientation mark on the frame. Ignoring these markings can reduce filtration efficiency and restrict airflow through the ventilation system. Always compare the new filter with the original before installation and follow the manufacturer’s instructions.
Another frequent mistake is purchasing the wrong filter. Although many Honda Civic models use a similar replacement procedure, filter dimensions may vary by model year, trim level, or market. Installing an incorrect filter can leave gaps around the housing or prevent the cover from closing properly. Verifying compatibility before purchase helps avoid these issues.
Many owners also overlook the filter housing during replacement. Dirt, leaves, and small debris often collect inside the compartment over time. Installing a new filter without cleaning the housing allows contaminants to remain inside the HVAC system. A small vacuum or microfiber cloth usually removes loose debris quickly and safely.
Forcing the glove box is another avoidable error. Plastic clips, retaining tabs, and dampers become more fragile as the vehicle ages. Applying excessive force may break these components and create additional repair costs. Lower the glove box carefully and avoid pulling on parts that do not move easily.
Finally, remember that a new cabin air filter cannot solve every air conditioning problem. If weak airflow, unusual odors, or poor cooling continue after a Honda Civic cabin filter replacement, inspect other HVAC components or seek professional diagnosis. Addressing the correct cause early helps maintain reliable climate control and prevents more expensive repairs later.
Honda Civic Cabin Filter Replacement Cost
The cost of a Honda Civic cabin filter replacement depends on the type of filter you choose and whether you complete the job yourself or hire a professional. Fortunately, this is one of the most affordable maintenance tasks for a Honda Civic. Since the replacement requires only basic tools, many owners prefer the DIY approach to save money.
A standard aftermarket cabin air filter is usually the most budget friendly option, while activated carbon and high efficiency filters often cost more because they provide additional odor control and improved particle filtration. OEM filters typically fall in the middle to upper price range, offering factory fitment and consistent performance. Although premium filters cost more upfront, they may provide better filtration and last longer under normal driving conditions.
Professional replacement adds labor costs to the price of the filter. Independent repair shops often charge less than dealerships, making them a practical choice for owners who prefer professional service. Honda dealerships may charge more, but they also use manufacturer approved parts and follow factory service procedures. The total cost varies by location, labor rates, and the specific filter installed.
For most owners, replacing the cabin air filter at home offers excellent value. The procedure is straightforward, requires very little time, and can help reduce future HVAC maintenance costs. More importantly, regular filter replacement improves airflow, keeps the cabin cleaner, and helps the heating and air conditioning system operate efficiently. Whether you choose a standard or premium filter, replacing it at the recommended time is a small investment that can improve driving comfort throughout the year.
Does Replacing the Cabin Filter Improve AC Performance?
Replacing a dirty cabin air filter can improve HVAC performance, but it is important to understand what this maintenance task can and cannot do. A new filter restores proper airflow through the ventilation system, allowing the blower motor to move air more efficiently. As a result, the cabin may cool down faster, airflow from the vents may feel stronger, and unpleasant odors caused by a clogged filter may disappear.
Improved airflow also helps the air conditioning system distribute cool air more evenly throughout the cabin. In addition, the defroster often works more effectively because unrestricted airflow reaches the windshield more quickly. Passengers may also notice cleaner cabin air, especially if the old filter contained large amounts of dust, pollen, or road debris.
However, replacing the cabin air filter will not solve every air conditioning problem. If the air coming from the vents still feels warm, the issue may involve low refrigerant, a failing compressor, a faulty blower motor, or another HVAC component. Similarly, persistent musty odors can indicate mold inside the evaporator or moisture trapped elsewhere in the ventilation system. These problems require additional inspection and repair.
If airflow remains weak after a Honda Civic cabin filter replacement, inspect the HVAC system for other possible causes. Unusual noises, water leaking into the passenger compartment, or inconsistent cooling often point to issues beyond the cabin filter. Addressing these problems early helps prevent further damage and keeps the heating and air conditioning system operating reliably throughout the year.
How to Make the New Cabin Filter Last Longer
A new cabin air filter can provide clean airflow for a long time when you follow a few simple maintenance habits. Although every filter eventually reaches the end of its service life, proper care helps slow the buildup of dust and debris. As a result, the HVAC system maintains stronger airflow and continues to deliver cleaner air inside the cabin.
One of the easiest ways to extend filter life is to keep the area below the windshield clean. Leaves, dirt, and small debris often collect near the fresh air intake. If these materials remain in place, they can enter the ventilation system and clog the filter more quickly. Regularly removing debris from this area helps reduce unnecessary contamination.
Driving conditions also affect how quickly the filter becomes dirty. Vehicles that operate in heavy traffic, dusty environments, or areas with high pollen levels usually need more frequent inspections. After driving through construction zones, wildfire smoke, or severe dust storms, check the filter even if it has not reached its normal replacement interval. A quick inspection can prevent restricted airflow before it becomes noticeable.
Keeping the vehicle interior clean also helps protect the cabin filter. Vacuuming the carpets, cleaning the floor mats, and reducing dust inside the cabin decrease the amount of airborne particles that circulate through the HVAC system. In addition, repair water leaks promptly because excess moisture can create unpleasant odors and shorten filter life.
Finally, record the date and mileage whenever you complete a Honda Civic cabin filter replacement. This simple habit makes future maintenance easier and helps you monitor the filter’s condition over time. Instead of waiting until airflow becomes weak, inspect the filter during routine vehicle maintenance and replace it whenever it shows significant dirt or wear.
Frequently Asked Questions
Where is the cabin air filter located in a Honda Civic?
Most Honda Civic models place the cabin air filter behind the glove box. You can usually access it by lowering the glove box and removing the filter cover. However, the exact location may vary slightly depending on the model year and trim level. Checking the owner’s manual is the easiest way to confirm the correct location for your vehicle.
Can I replace the cabin air filter myself?
Yes. Most Honda Civic owners can complete the replacement without professional assistance. The job requires only basic tools and takes little mechanical experience. If you follow the correct installation procedure and use the proper replacement filter, the process is straightforward and beginner friendly.
How long does a cabin filter replacement take?
For most vehicles, the replacement takes about 15 to 30 minutes. First time DIY owners may need a little longer because they spend extra time locating the filter housing and checking the airflow direction. After completing the procedure once, future replacements usually take much less time.
Which direction should the cabin filter face?
Always follow the airflow arrow or orientation markings printed on the filter. Some filters display an airflow arrow, while others use an “UP” marking. Compare the new filter with the original before installation to ensure the correct orientation.
Can I drive without a cabin air filter?
Yes, but it is not recommended. Driving without a cabin filter allows dust, pollen, leaves, and other debris to enter the HVAC system. Over time, these contaminants can reduce air quality and increase the amount of dirt inside the ventilation system.
Can I clean and reuse the old cabin air filter?
Most standard cabin air filters are disposable and should be replaced rather than cleaned. Blowing compressed air through the filter or washing the filter media may damage its structure and reduce filtration performance. Replacing the filter is usually the safest and most effective solution.
Why does my Honda Civic still smell after replacing the cabin filter?
A new cabin filter removes many airborne contaminants, but it cannot eliminate every source of odor. Persistent smells may come from mold on the evaporator, a blocked drain tube, moisture inside the HVAC system, or debris trapped elsewhere in the ventilation ducts. If the odor continues, inspect the system further or seek professional service.
Should I replace the cabin air filter and engine air filter at the same time?
Not necessarily. These filters perform different functions and wear at different rates. However, inspecting both filters during routine maintenance is a good habit. If both filters show significant dirt or have reached their recommended service interval, replacing them together can save time and help keep your Honda Civic running efficiently.
Conclusion
A Honda Civic cabin filter replacement is one of the simplest maintenance tasks you can perform, yet it provides noticeable benefits for both comfort and HVAC performance. Replacing a clogged filter restores stronger airflow, improves cabin air quality, and helps reduce dust, pollen, and unpleasant odors inside the vehicle. It also allows the heating and air conditioning system to operate more efficiently throughout the year.
Before installing a new filter, always verify the correct part number for your model year, trim level, and body style. Taking a few extra minutes to confirm compatibility helps prevent installation problems and ensures the filter seals properly inside the housing. Regular inspections also make it easier to identify a dirty filter before restricted airflow affects your driving experience.
Although replacing the cabin filter can solve many common airflow issues, it will not repair mechanical problems within the HVAC system. If poor cooling or unusual noises continue after the replacement, additional diagnosis may be necessary. By following the maintenance tips in this guide and performing a timely Honda Civic cabin filter replacement, you can keep your Honda Civic comfortable, improve interior air quality, and support reliable climate control for years to come.