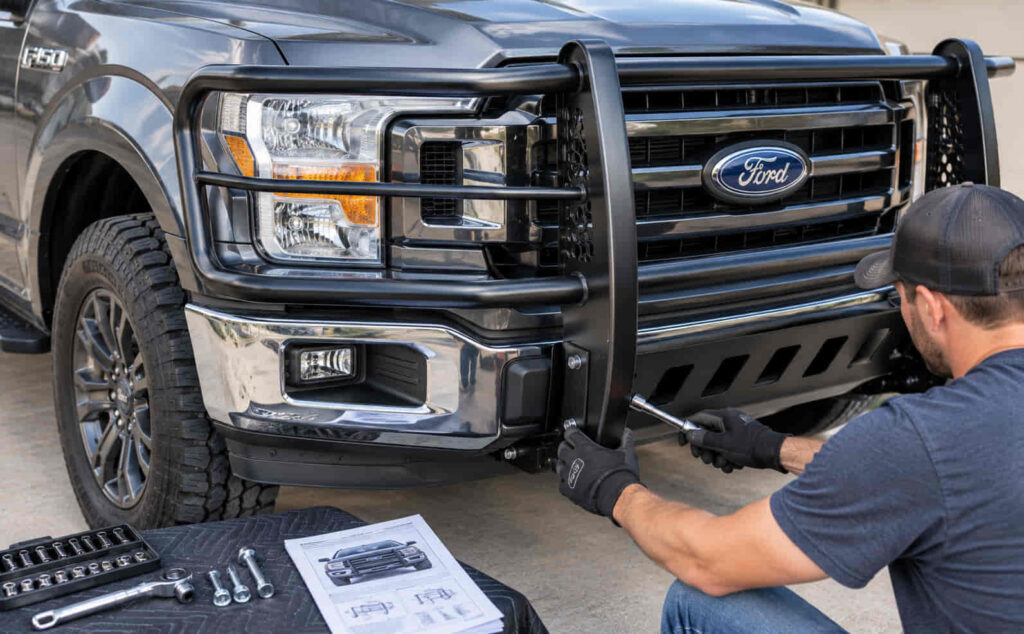
Installing a brush guard on a Ford F-150 involves securing the guard to designated mounting points at the front of the truck with vehicle-specific brackets and mounting hardware. The basic installation sequence is to verify fitment, prepare the mounting locations, attach the brackets, position the brush guard, align it with the truck, tighten the hardware, and perform a final inspection. The exact procedure depends on the F-150 model year, brush guard design, and mounting kit.
Many Ford F-150 brush guards use bolt-on mounting systems that connect to existing frame or tow-hook mounting locations, reducing or eliminating the need to drill new holes. Other designs may require the removal of factory components, temporary removal of the air dam, trimming for bracket clearance, or additional installation steps. For this reason, the instructions and hardware specifications supplied with the specific brush guard take priority over universal installation instructions.
This guide explains how to install a brush guard on a Ford F-150 from initial preparation through final alignment and inspection. It also covers mounting brackets, tow hooks, air dam clearance, drilling requirements, fitment, sensors, installation problems, and the checks required before driving the truck.
How Do You Install a Brush Guard on a Ford F-150?
To install a brush guard on a Ford F-150, verify that the guard and mounting brackets fit the truck, prepare the factory mounting locations, install the brackets, attach the guard, center it, and tighten the mounting hardware. Complete these steps in this order because the brackets establish the position of the brush guard relative to the frame, bumper, and grille. Tightening the hardware before the guard is properly aligned can leave it uneven or make the remaining mounting holes difficult to align.
Start by confirming that the brush guard and mounting kit are designed for the model year and configuration of your Ford F-150. Brush guards are not universally interchangeable across every F-150 because mounting locations, front bumper designs, tow-hook arrangements, and nearby components can differ between configurations. Compare the part number and fitment information with your truck before removing factory hardware. Lay out the brackets, bolts, washers, nuts, spacers, and other supplied components so that each piece can be matched with its specified mounting location.
Park the F-150 on a flat surface, engage the parking brake, and allow enough working space around the front of the truck. Inspect the area behind and below the front bumper to identify where the mounting brackets connect. Depending on the brush guard design, these brackets may use existing mounting locations around the frame or tow-hook area. Factory components should only be removed when the instructions for the vehicle-specific mounting kit require their removal. This prevents unnecessary changes to the bumper, air dam, tow hooks, or surrounding components.
Install the mounting brackets before positioning the brush guard. Place each bracket at its specified mounting point and install the required bolts, washers, spacers, and nuts in the orientation shown by the brush guard manufacturer. Keep the hardware partially tightened at this stage. A bracket that can still move slightly provides enough adjustment to align the brush guard after it is attached. Fully tightening one bracket before the opposite side is positioned can shift the mounting geometry and make the guard difficult to center.
Position the brush guard against the installed brackets and align its mounting holes with the bracket holes. A second person is useful when the guard is too large or heavy to hold securely while inserting hardware. Support the guard instead of allowing its weight to hang from one partially installed bolt. Insert the mounting bolts on both sides and hand-tighten the corresponding washers and nuts until the guard supports itself while still allowing adjustment.
Center the brush guard relative to the front of the F-150 before final tightening. Check the horizontal position of the guard against the grille and bumper, then compare the clearance on the driver and passenger sides. The guard should not contact the grille, bumper, headlights, or other front-end components. Open the hood carefully when the brush guard design extends near its path and verify that sufficient clearance remains throughout the hood’s movement.
Tighten the mounting hardware only after the brush guard is centered and all mounting points are correctly engaged. Work between the left and right mounting points rather than completely tightening one side first. This tightening sequence helps preserve the alignment established during positioning. Use the torque specifications provided by the brush guard or mounting-kit manufacturer when specifications are available; a universal torque value should not be applied to every F-150 brush guard because bolt diameter, grade, mounting hardware, and bracket design differ between products.
Finish the installation by applying controlled pressure to different areas of the brush guard and checking for unwanted movement. Inspect every mounting point for missing washers, loose fasteners, incorrect bracket positions, or contact between the guard and the truck body. Verify the operation of front-facing equipment that could be affected by the installation, including parking sensors, cameras, or driver-assistance components when the F-150 is equipped with them. Recheck the mounting hardware according to the brush guard manufacturer’s instructions after installation, especially when the manufacturer specifies an inspection after initial driving.
Read more: ford f150 tremor specs
What Tools Do You Need to Install a Brush Guard on a Ford F-150?
The main tools needed to install a Ford F-150 brush guard are a socket and ratchet set, combination wrenches, a torque wrench, and basic safety or support equipment. The exact socket and wrench sizes depend on the mounting hardware supplied with the brush guard, so verify the hardware before beginning instead of assuming that every F-150 brush guard uses the same fastener sizes.
A socket and ratchet handle most mounting bolts because the brush guard brackets are typically secured at mounting points behind or below the front bumper. Combination wrenches are useful when a nut must be held from the opposite side while a bolt is tightened. Extensions can improve access when the bumper, air dam, or other components limit the working space around a mounting point. Use tools that fit the fasteners correctly because an oversized or poorly seated socket can damage the bolt head and make later adjustment or removal more difficult.
A torque wrench is required when the brush guard manufacturer specifies final torque values for the mounting hardware. Correct torque keeps the fastener tight enough to secure the bracket without relying on excessive tightening. Use the torque specification supplied for the specific brush guard or mounting kit rather than applying one value to every installation, because fastener dimensions, grades, bracket designs, and mounting locations vary between products.
Support equipment is equally important when positioning a large brush guard. A second person can hold and center the guard while the mounting bolts are inserted, reducing the chance of dropping the assembly against the bumper or grille. Protective gloves and eye protection are appropriate when working underneath the front bumper or removing factory hardware. Prepare all required tools before mounting the brackets so the guard does not have to remain partially supported while additional equipment is located.
Do You Have to Remove the Tow Hooks to Install an F-150 Brush Guard?
You only need to remove the Ford F-150 tow hooks when the brush guard mounting system requires access to their mounting locations or uses hardware in the same area. Tow-hook removal is therefore determined by the specific bracket design rather than being a universal step for every F-150 brush guard installation.
Some mounting systems position the brush guard brackets around existing frame or tow-hook mounting locations. In this configuration, factory bolts may need to be loosened or removed so the new brackets can be positioned against the required mounting surface. Other brush guard systems are designed around the existing tow hooks and allow them to remain installed. The correct configuration is determined by the mounting kit supplied for the specific F-150 application.
Inspect the mounting brackets before removing the tow hooks. Their shape and bolt-hole positions indicate where they connect to the truck, while the manufacturer’s installation instructions establish whether the factory hooks or hardware must be removed, reused, or replaced. Removing components unnecessarily adds work and can create an incorrect mounting arrangement if the brackets were designed to coexist with the original tow hooks.
Do not assume that a procedure used on one F-150 model year applies unchanged to another. A brush guard must match the mounting architecture for the intended vehicle. Confirming the model year, product part number, and mounting-kit instructions before removing factory hardware prevents a fitment problem from being mistaken for an installation problem.
Do You Have to Remove or Cut the Air Dam to Install an F-150 Brush Guard?
An F-150 air dam only needs to be removed or modified when it blocks the mounting brackets or prevents them from reaching their specified mounting points. Some brush guard installations require no air-dam modification, while others require temporary removal or manufacturer-specified trimming to create bracket clearance.
The air dam occupies the lower front area where some brush guard brackets pass from the frame toward the exterior of the bumper. If the bracket path intersects this component, the installation design determines how the interference is handled. Temporary removal provides access in some applications, while another mounting kit may require a defined opening around the bracket. The air dam should not be cut simply because a bracket initially appears difficult to position.
Installers should first confirm that the correct left and right brackets are being used and that each bracket has the correct orientation. An incorrectly positioned bracket can appear to require air-dam cutting even when the mounting system was designed to fit without that modification. Fitment should therefore be verified before making any permanent change to a factory component.
When trimming is explicitly required, follow the dimensions and locations specified for that mounting kit. Remove only the material necessary for bracket clearance and check the position of the guard before expanding an opening. This preserves more of the factory component and reduces the risk of creating unnecessary gaps around the mounting brackets.
Does Installing a Ford F-150 Brush Guard Require Drilling?
A Ford F-150 brush guard does not require drilling when it uses a bolt-on mounting system designed for existing vehicle mounting points, but some brush guard systems may require additional holes. The mounting design, rather than the brush guard category itself, determines whether drilling is part of the installation.
A no-drill brush guard uses existing attachment locations on the F-150, such as compatible frame or factory hardware locations. Vehicle-specific brackets connect these points to the guard, allowing the installation to be completed without creating new mounting holes. This arrangement also makes fitment particularly important because the bracket geometry must correspond with the mounting points already present on the truck.
Never drill the truck simply because mounting holes do not initially align. Misalignment can result from reversed brackets, incorrect bracket orientation, premature tightening, an incompatible mounting kit, or a brush guard intended for a different F-150 application. Check these conditions first. Drilling cannot correct an incompatible bracket geometry and may create permanent modifications without solving the original fitment problem.
Drill new mounting holes only when the installation instructions for the exact brush guard and F-150 application explicitly require them. Confirm the specified hole location, diameter, nearby components, and required hardware before drilling. If the product is advertised as a no-drill or bolt-on system but its brackets cannot reach the existing mounting locations, stop the installation and verify the part number and vehicle fitment before modifying the truck.
How Do You Know if a Brush Guard Will Fit Your Ford F-150?
A brush guard fits a Ford F-150 when the guard and its mounting kit are designed for the truck’s specific model year and front-end configuration. Fitment should be verified before installation because a brush guard can have the correct general dimensions while using mounting brackets that do not correspond with the attachment points on a particular F-150.
Start with the model year listed by the brush guard manufacturer. Ford F-150 front-end designs and mounting arrangements change across generations and model years, so visual similarity between two trucks does not establish compatibility. The product part number and stated vehicle application provide a more reliable fitment reference than the appearance or overall width of the guard.
The mounting kit must also match the brush guard and vehicle. Brackets determine where the guard sits in relation to the frame, bumper, grille, and other front-end components. An incorrect mounting kit can produce bolt-hole misalignment, uneven guard positioning, inadequate bumper clearance, or mounting points that cannot be reached. For this reason, verify both the brush guard part number and bracket kit instead of checking the guard alone.
Existing equipment at the front of the F-150 also affects installation compatibility. Tow hooks, bumper configurations, air dams, front cameras, parking sensors, and other factory or aftermarket components can occupy areas used by a brush guard or its brackets. A guard that physically attaches to the truck is not necessarily fully compatible if it obstructs equipment that must remain operational.
Perform a physical fitment check before permanently modifying any factory component. Position the brackets at their intended mounting points without fully tightening them and confirm that the hardware locations correspond correctly. If the holes, bracket angles, or clearances differ substantially from the installation instructions, verify the application before drilling, cutting, or forcing components into position.
Can a Brush Guard Interfere With Ford F-150 Sensors or Cameras?
A brush guard can interfere with Ford F-150 cameras, parking sensors, or driver-assistance hardware when the guard or its mounting components obstruct the operating area of that equipment. The actual risk depends on the equipment installed on the specific truck and the design and position of the brush guard.
Physical obstruction is one compatibility issue. A vertical or horizontal section of the guard positioned in front of a camera can reduce its field of view, while components located directly in front of a parking sensor can affect the area the sensor is intended to monitor. Moving the guard farther away from the bumper does not automatically solve the problem because its structure can remain within the operating path of the equipment.
Compatibility should therefore be checked at the product-selection stage rather than after installation. Identify the front-facing equipment fitted to the F-150 and compare it with the brush guard manufacturer’s fitment information. When a manufacturer excludes particular vehicle configurations or requires a sensor-compatible version, that specification should be treated as part of vehicle fitment rather than as an optional installation consideration.
Test applicable systems after the brush guard is secured and aligned. Confirm that cameras provide the expected view and check the operation of parking or driver-assistance systems fitted to the truck. A successful mechanical installation means the guard is mounted securely; it does not by itself establish that every electronic system remains unaffected.
Do not relocate, cover, or modify a sensor simply to make an incompatible brush guard fit unless the product or vehicle manufacturer provides an approved procedure for that configuration. The safer installation approach is to select a guard and mounting system designed to coexist with the equipment already installed on the F-150.
How Long Does It Take to Install a Brush Guard on a Ford F-150?
Ford F-150 brush guard installation time depends on the mounting system, required front-end disassembly, installer experience, and whether factory components need modification. A straightforward bolt-on installation takes fewer steps than an installation requiring tow-hook removal, air-dam trimming, drilling, or adjustment around existing accessories, so one installation time cannot accurately describe every F-150 brush guard.
The mounting design has the largest direct effect on the amount of work involved. A vehicle-specific bolt-on system uses predetermined attachment locations, allowing the installer to move from bracket installation to guard positioning with limited modification. Installation becomes longer when access to those locations requires removing factory hardware or other components.
Installer experience also changes the process. Someone familiar with F-150 front-end mounting locations can identify brackets, hardware, and attachment points faster than a first-time installer. However, installation speed should not take priority over bracket orientation, guard alignment, hardware tightening, or clearance checks. Correcting an incorrectly installed bracket can take longer than verifying its orientation before tightening the first bolt.
Working with a second person can reduce the difficulty of the positioning stage. Brush guards are large enough that simultaneously holding the assembly, aligning both mounting points, and inserting hardware can be awkward for one installer. A second person can support the opposite side while the first installer starts the bolts, helping maintain alignment without allowing the guard to contact the bumper or grille.
Use the installation time published by the manufacturer for the specific brush guard as the primary estimate when one is provided. Before starting, also account for preparation, unpacking and identifying hardware, removal of required factory components, final alignment, torque checks, and post-installation inspection. These steps are part of a complete Ford F-150 brush guard installation rather than optional work performed after the guard has been attached.
What Are the Most Common Ford F-150 Brush Guard Installation Problems?
The most common Ford F-150 brush guard installation problems are mounting holes that do not align, an uneven guard position, insufficient clearance, and movement after installation. These problems usually originate at the fitment, bracket-positioning, alignment, or hardware stages. Correct the underlying mounting issue instead of forcing bolts into place or modifying the truck before confirming that the brush guard and mounting kit are correct.
Mounting holes that do not line up should first be treated as an alignment or fitment problem. Check that the driver-side and passenger-side brackets are installed in their correct positions and orientations. Next, confirm that the mounting hardware has not already been fully tightened. Brackets need limited movement during initial assembly so the holes in the brush guard can align with the bracket holes. Loosening partially tightened hardware and repositioning both brackets can restore the adjustment needed to start the mounting bolts correctly.
A substantial mismatch between mounting holes requires a different response. Verify the brush guard part number, mounting-kit part number, and specified Ford F-150 application when normal bracket adjustment cannot bring the holes together. Do not use excessive force to pull incompatible components into alignment. Forcing a bolt through an incorrectly positioned hole can place unnecessary stress on the bracket and does not correct an incompatible mounting geometry.
An uneven brush guard usually indicates that final tightening occurred before the assembly was centered. Loosen the mounting hardware enough to restore adjustment, reposition the guard relative to the grille and bumper, and compare the clearance on both sides. Check its position from directly in front of the truck rather than relying on the appearance from one corner. Tighten the left and right mounting points progressively after the guard is centered so one side does not pull the assembly away from its aligned position.
Insufficient clearance should also be corrected before final tightening. The brush guard should not rest against the grille, bumper, headlights, or other body components. Contact between two components can produce noise or surface damage as the truck vibrates and moves during driving. When clearance cannot be achieved through the adjustment allowed by the brackets, recheck bracket orientation and product fitment instead of assuming that contact is normal.
Movement or vibration after installation requires inspection of every attachment point. Check for loose fasteners, missing washers or spacers, incorrectly seated brackets, and hardware that was installed in the wrong position. A brush guard that moves independently of its intended mounting structure should not be treated as fully installed. Correct the mounting issue and tighten the applicable hardware according to the product instructions before relying on the installation.
How Do You Check a Ford F-150 Brush Guard After Installation?
Check a newly installed Ford F-150 brush guard by verifying its alignment, mounting hardware, component clearance, structural stability, and compatibility with front-facing vehicle equipment. This inspection confirms that the guard is not merely attached to the truck but is positioned and secured according to the intended mounting arrangement.
Begin with alignment. Stand directly in front of the F-150 and compare the position of the brush guard with the grille, bumper, and centerline of the truck. Examine the spacing on both sides and look for visible leaning or rotation. Then inspect the guard from the side to confirm that its position provides adequate clearance from surrounding body components. Open and close the hood carefully when any part of the guard sits near its path.
Inspect each mounting point next. Confirm that the required bolts, nuts, washers, spacers, and other mounting components are present in the positions specified for the kit. Hardware should be correctly seated rather than tightened against a misaligned bracket. Apply the manufacturer-specified torque values where they are provided. The final torque requirement comes from the specific fastener and mounting system, so it should not be replaced with a generic torque specification.
Test structural stability by applying controlled pressure to the brush guard at multiple points. The assembly should remain secure at its mounting locations without obvious looseness caused by improperly installed hardware. If movement is detected, identify its source at the brackets or fasteners instead of simply tightening every bolt further. Excessive tightening does not correct an incorrectly positioned bracket, missing spacer, incompatible component, or other assembly error.
Check the clearance around the bumper, grille, headlights, air dam, and other nearby components after the hardware is tightened. Alignment can shift during final tightening, so clearance established earlier in the installation should be verified again. Any new contact indicates that the guard or mounting brackets moved and require adjustment.
Test the relevant front-facing electronic equipment when the F-150 is equipped with it. Verify the expected operation of parking sensors, cameras, and applicable driver-assistance systems that could be affected by the physical position of the brush guard. A warning, obstructed camera view, or abnormal system behavior after installation requires further investigation rather than an assumption that the accessory has no effect.
Complete the installation with a second hardware inspection after the vehicle has been driven, if the brush guard manufacturer specifies a post-installation recheck. Follow the manufacturer’s stated inspection interval rather than applying an arbitrary mileage to every product. Rechecking the mounting points allows the installer to identify loosened hardware or movement that was not apparent during the stationary inspection and completes the Ford F-150 brush guard installation process.