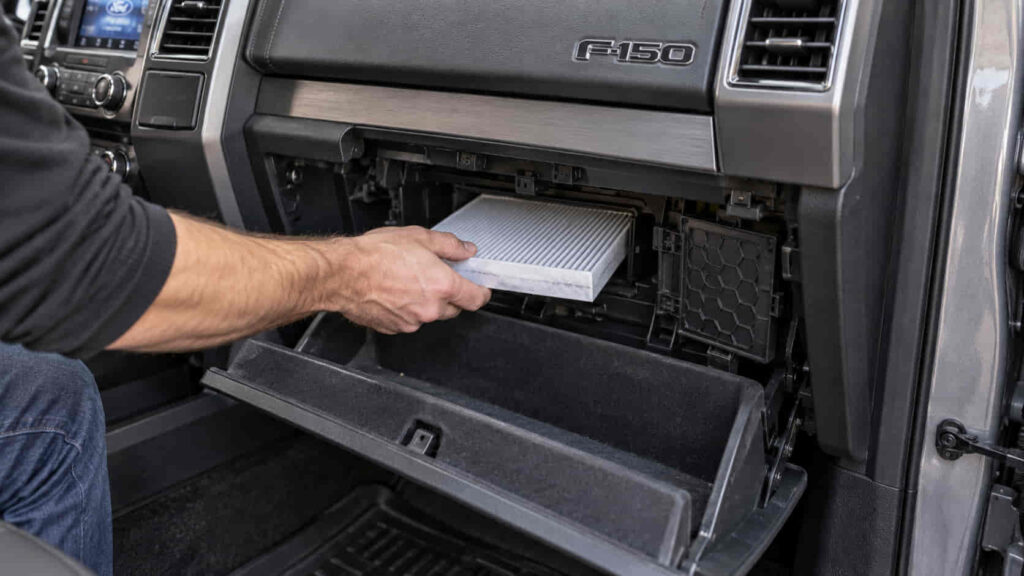
Replacing the cabin air filter in a Ford F-150 involves locating the filter housing, gaining access to the filter, removing the old filter, installing the replacement in the correct orientation, and checking HVAC airflow after reassembly. The exact access procedure depends on the F-150 model year and cabin air filter configuration, so identifying the vehicle and confirming that it uses a serviceable cabin filter should come before removing interior components.
The cabin air filter is part of the F-150’s HVAC air path. Air passing through the system carries contaminants such as dust, pollen, leaves, and other airborne debris, while the filter traps these particles before the conditioned air enters the passenger compartment. As debris accumulates in the filter media, airflow through the filter can become more restricted, making filter condition relevant to routine HVAC maintenance.
A correct replacement requires more than removing one filter and inserting another. The replacement filter must fit the specific F-150 application, sit correctly inside its housing, and follow the required airflow orientation. This guide explains how to determine whether an F-150 has a cabin air filter, find its location, access and replace it, verify the airflow direction, and check the installation before returning the HVAC system to normal use.
Does Your Ford F-150 Have a Cabin Air Filter?
Not every Ford F-150 has a factory cabin air filter, so the model year and HVAC configuration should be confirmed before beginning the replacement. Cabin air filter availability has changed across F-150 generations, which means a replacement procedure that applies to a newer truck should not automatically be applied to an older F-150.
This distinction matters because a cabin air filter requires a serviceable location within the HVAC air path. On an F-150 equipped with this filter arrangement, outside or recirculated air passes through the filter media before conditioned air is distributed through the cabin vents. The filter captures airborne material such as dust, pollen, leaves, and other debris that would otherwise continue farther into the HVAC system or passenger compartment.
An F-150 without the corresponding factory filter provision cannot be treated as if a replacement filter is simply missing. Searching behind the glove box and finding no removable filter element does not establish that the previous owner failed to install one. The truck’s model year and HVAC configuration determine whether the applicable system was designed with a serviceable cabin air filter.
The correct replacement process therefore begins with vehicle identification. Match the replacement filter to the exact F-150 model year and applicable configuration rather than choosing a filter only because the packaging states that it is intended for an F-150. Confirming fitment before disassembly prevents two common problems: purchasing a filter that does not fit the housing and following instructions intended for a different F-150 generation.
The vehicle owner’s manual and application information supplied by the replacement filter manufacturer can be used to confirm compatibility. This verification becomes especially important when working on an older F-150 or when an online guide covers several model years at once. Once the truck is confirmed to have a serviceable cabin air filter, the next requirement is locating its access point.
Where Is the Cabin Air Filter Located in a Ford F-150?
On Ford F-150 models equipped with a serviceable cabin air filter, the filter is associated with the passenger-side HVAC housing and is commonly accessed from the glove-box area. The exact access arrangement depends on the model year, so the glove-box and filter-cover procedure should be matched to the specific truck rather than assumed to be identical across every F-150.
The location follows the function of the filter. A cabin air filter must sit within the HVAC air path so incoming air can pass through its filter media before being delivered through the heating and air-conditioning system. Locating the filter near the passenger-side HVAC assembly allows the filter to intercept dust, pollen, leaves, and similar debris while still providing a service point inside the cabin.
Finding the filter therefore involves identifying the HVAC filter housing rather than searching for an exposed filter element. The cabin filter normally sits inside a dedicated compartment and is concealed by an access cover or surrounding interior components. Depending on the F-150 configuration, gaining sufficient access can require moving or removing components around the glove-box area before the filter cover becomes accessible.
The filter housing should be identified before any filter is pulled out. Removing unrelated trim or forcing a panel because it resembles a filter cover can damage clips, hinges, or interior components without providing access to the HVAC filter. Vehicle-specific access instructions are particularly important here because dashboard and glove-box designs change between F-150 generations.
The position of the old filter inside the housing also provides useful installation information. Before removing it completely, observe how the filter sits in the compartment and note any airflow or directional markings. That reference helps establish how the replacement filter must be positioned later and reduces the risk of installing the new element in the wrong orientation.
For this reason, locating the cabin air filter is not a separate maintenance task from replacing it. It establishes the access path, identifies the filter housing, and provides the orientation reference required for correct installation. Once the housing and filter position are confirmed for the specific F-150, the replacement can proceed without unnecessary disassembly.
What Do You Need to Replace an F-150 Cabin Air Filter?
To replace an F-150 cabin air filter correctly, you need a replacement filter that matches the truck’s model year and HVAC configuration, along with any basic hand tools required to access the filter housing. Filter compatibility is the first requirement because the dimensions, frame design, and fitment must correspond to the available space inside the HVAC housing. A filter that is too large, too small, or designed for another application cannot be installed correctly simply by compressing or modifying it.
Check the replacement filter before opening the HVAC housing. The filter should match the specified F-150 application and should not have damaged pleats, a distorted frame, or other defects that prevent it from sitting evenly in the housing. Directional markings on the filter also need to be identified before installation because they can determine how the filter is positioned relative to the HVAC airflow.
The tools required depend on how the filter compartment is accessed on the specific F-150. Some access components may be released by hand, while another configuration can use fasteners or retaining features that require a suitable hand tool. Using the correct tool matters because forcing glove-box components, trim pieces, retaining tabs, or the filter access cover can damage parts that are designed to be removed or released in a particular direction.
The work area should also remain clean while the old filter is removed. Cabin filters can accumulate dust, leaves, pollen, and other debris during service, and some of this material can become loose when the filter is pulled from its housing. Removing the old filter carefully reduces the amount of debris that falls farther into the HVAC compartment. Once the correct filter and required access tools are ready, the replacement can proceed without leaving the housing open while another part or tool is located.
How Do You Replace the Cabin Air Filter in a Ford F-150?
To replace the cabin air filter in a Ford F-150, access the passenger-side filter housing, open the filter compartment, note the existing filter orientation, remove the old filter, inspect the housing, insert the correctly oriented replacement filter, and restore the access components. The exact method used to reach the housing depends on the model year, but the replacement sequence remains centered on preserving the correct filter fit and airflow path.
Begin by gaining access to the cabin filter compartment around the passenger-side glove-box area on an F-150 equipped with a serviceable filter. Move or release only the components required by the vehicle-specific access procedure. Interior retaining features can be damaged when they are forced beyond their intended range, so the objective is to expose the HVAC filter cover without unnecessarily removing surrounding dashboard components.
Identify the filter access cover after the HVAC housing becomes visible. Release the cover using its intended retaining mechanism and move it aside without damaging the tabs or attachment points. The cover is important after installation because it closes the filter compartment and helps maintain the designed HVAC air path. A cover that is not properly secured can leave the housing incorrectly assembled even when the new filter itself has been positioned correctly.
Observe the old filter before pulling it completely out of the housing. Its position, frame orientation, and directional markings provide useful references for the replacement. Remove the filter steadily so accumulated leaves, dust, and other debris remain on the filter media instead of being shaken into the housing. A heavily contaminated filter can contain enough loose material for careless removal to leave debris behind near the HVAC airflow path.
Inspect the accessible filter compartment after the old element has been removed. Visible loose debris should not be left where it can interfere with the replacement filter or travel farther into the system. At the same time, avoid pushing debris deeper into areas that cannot be safely reached. The objective is to provide a clear seating area for the new filter rather than perform unrelated HVAC disassembly.
Compare the old and replacement filters before installation. Their overall dimensions and intended fit should correspond, and the new filter should enter the housing without being crushed or excessively deformed. A replacement that requires substantial force to fit can indicate incorrect application, incorrect orientation, or misalignment with the housing. Correcting the cause is preferable to forcing the filter into place because distorted filter media can compromise the intended airflow path.
Position the new cabin air filter according to the required directional marking and slide it evenly into the housing. Keep the filter frame aligned with the compartment so the media does not fold, buckle, or catch on the housing edges. Proper seating matters because cabin air is intended to pass through the filter media rather than around a filter that is crooked or incompletely inserted.
Reinstall the filter access cover after confirming that the new element is fully seated. The cover should return to its normal position and engage its retaining points without excessive force. Restore the glove-box area and any other access components in the reverse relationship to their removal, checking that hinges, stops, tabs, and fasteners operate normally after reassembly.
Finish the replacement by operating the F-150’s HVAC system and checking airflow through the cabin vents. Normal airflow without an unusual noise from the filter area provides a basic functional check that the housing has been reassembled and the filter is not obviously obstructing the system. If airflow becomes unexpectedly restricted or a new noise appears immediately after replacement, recheck the filter fit, orientation, and access cover before assuming that another HVAC component has failed.
Read more: auto lsd toyota
Which Way Should the Airflow Arrow Point on an F-150 Cabin Filter?
The airflow arrow on an F-150 cabin air filter should point in the direction that air moves through the HVAC filter housing. The arrow identifies airflow direction rather than simply indicating which side of the filter should face upward or downward, so the correct orientation should be determined from the filter marking and the airflow path of the specific F-150 application.
This distinction matters because replacement filters do not always use identical markings. A filter marked with an airflow arrow is describing the direction in which air should pass through the filter media. A directional marking supplied for another purpose should be interpreted according to the filter manufacturer’s instructions rather than automatically treated as an airflow arrow. Reading the label before inserting the filter prevents an orientation assumption from becoming an installation error.
The old cabin filter can provide an additional reference when its installation is known to be correct. Before removing it, observe the direction of its airflow marking and how the filter sits inside the housing. The replacement filter can then be compared with that orientation. This reference is useful when the filter compartment is positioned in a way that makes the HVAC airflow path difficult to determine visually.
Do not rely only on whether the printed arrow appears to point up or down when installing the new filter. The relevant relationship is air source → filter media → downstream HVAC components → cabin vents. Correct orientation follows this airflow path. Because the technical materials supplied for this article do not establish one universal arrow direction for every F-150 model year and filter design, a single up-or-down instruction should not be presented as applicable to all F-150 trucks.
Correct orientation also helps the replacement filter operate as it was designed. Filter media, support structures, and directional features can be constructed around a specified airflow path. Installing a directional filter incorrectly can therefore prevent the filter from operating according to its intended configuration even if its dimensions allow it to fit inside the housing.
When there is uncertainty, confirm the airflow marking on the replacement filter and the instructions for the exact F-150 model year before closing the housing. This takes less time than reopening the glove-box area after the HVAC system has already been reassembled and eliminates one of the most preventable errors during cabin air filter replacement.
How Do You Check an F-150 Cabin Air Filter After Installation?
Check an F-150 cabin air filter after installation by confirming that the filter is fully seated, the housing cover is secured, the access components are correctly reassembled, and HVAC airflow operates normally. This verification closes the replacement procedure because installing the filter itself does not confirm that the entire air path and access area have been restored correctly.
Start with the filter housing before completing the surrounding reassembly. The replacement filter should sit evenly inside its compartment without a crushed frame, folded filter media, or an exposed section that indicates incomplete insertion. The access cover should then fit into its normal position and engage its retaining points. If the cover requires abnormal force, recheck the filter position rather than forcing the housing closed.
The glove-box area and other components moved during access should also operate as they did before the replacement. A glove box that does not open or close normally can indicate that a stop, hinge, retaining feature, or nearby component was not returned to its correct position. Correcting this immediately prevents an otherwise successful filter replacement from leaving an interior fitment problem.
Operate the HVAC system after the physical installation has been completed. Air should flow through the cabin vents without a new restriction that appeared immediately after replacement. A new airflow problem following installation is a reason to recheck the filter before diagnosing unrelated HVAC components because incorrect fitment, filter deformation, or a problem at the access cover can coincide directly with the maintenance work just performed.
Listen for new sounds from the passenger-side HVAC area while the blower operates at different settings. A noise that begins immediately after cabin filter replacement can indicate that the filter is not seated correctly or that loose debris remained in an accessible part of the housing. The timing of the symptom is important: a condition that appears directly after the filter was changed makes the recently disturbed components logical items to inspect first.
The final check should confirm that the replacement has restored the system without introducing a new problem. Normal filter seating, a secured housing, correctly reassembled access components, and normal HVAC operation together provide a stronger verification than simply confirming that a new filter is physically inside the truck. If airflow or noise remains abnormal after the installation has been rechecked, the cause may extend beyond the cabin air filter and require separate HVAC diagnosis.
How Often Should You Replace the Cabin Air Filter in a Ford F-150?
The cabin air filter in a Ford F-150 should be replaced according to the maintenance guidance for the specific model year and earlier when inspection shows that contamination is restricting the filter’s condition or airflow. A single replacement interval should not be applied automatically to every F-150 because service requirements can vary by vehicle specification and operating environment.
Cabin air filter life is determined partly by the amount of material the filter collects. Air passing through the HVAC system can carry dust, pollen, leaves, and other airborne debris into the filter media. As this material accumulates, the open area available for airflow can decrease. A truck operated regularly in a dusty environment can therefore contaminate its cabin filter faster than an equivalent F-150 driven primarily where airborne debris levels are lower.
Operating conditions are important because mileage alone does not describe how much contaminated air has passed through the filter. Frequent driving on unpaved roads, exposure to heavy dust, seasonal pollen, or environments containing substantial airborne debris can increase filter loading. Inspection can therefore provide useful condition-based information when the vehicle operates in an environment that places greater demand on the filtration system.
Replacement should not be delayed solely because the truck has not reached a generalized mileage recommendation found in a guide for another vehicle. Conversely, replacing a clean filter unnecessarily provides little maintenance value simply because an unrelated F-150 reached a particular mileage. The maintenance schedule for the exact vehicle establishes the service reference, while actual filter condition and operating environment provide additional context.
This approach also prevents an arbitrary service interval from being presented as a universal Ford specification. The technical source material supplied for this article does not establish one verified cabin filter replacement interval for every F-150 model year. A model-specific mileage or time recommendation should therefore be confirmed against the appropriate Ford maintenance information before being treated as a fixed specification.
How Can You Tell When an F-150 Cabin Air Filter Needs Replacement?
An F-150 cabin air filter needs replacement when inspection shows that its filter media is heavily contaminated, damaged, or sufficiently obstructed that it can no longer perform its intended filtration function correctly. Visible filter condition provides more direct evidence than assuming that every HVAC symptom is caused by the cabin filter.
A contaminated filter can contain accumulated dust, pollen, leaves, and other debris captured from air moving through the HVAC system. When this material occupies enough of the filter media, resistance to airflow can increase. The blower must still move air through the HVAC path, so an excessively restricted filter can contribute to weaker airflow reaching the cabin vents.
Visible contamination is especially useful during inspection because it establishes a direct relationship between the filter and the maintenance decision. A filter with extensive debris embedded between its pleats provides stronger evidence for replacement than an unexplained change in cabin airflow alone. Damaged filter media, a distorted frame, or deterioration that prevents the filter from fitting correctly can also justify replacement even when the media is not completely loaded with debris.
Reduced vent airflow should be interpreted with more care. A restricted cabin filter can contribute to reduced airflow, but the cabin filter is only one component within the HVAC system. Blower operation, ducts, doors, evaporator-related conditions, and other HVAC components can also affect the volume of air delivered through the vents. Replacing the cabin filter without inspecting it first can therefore fail to correct an airflow problem caused elsewhere.
The timing of the symptom provides additional diagnostic context. If airflow has gradually declined while the filter has accumulated visible contamination, filter restriction is a reasonable component to address. If airflow remains poor after a correctly fitted new filter has been installed, continuing to replace filters will not identify another HVAC fault. The next diagnostic step should move beyond the cabin filter rather than assuming that all ventilation problems originate from the filter media.
What Happens If You Install an F-150 Cabin Air Filter Incorrectly?
Installing an F-150 cabin air filter incorrectly can interfere with the intended HVAC airflow path, prevent the filter from seating properly, or leave the filter housing incorrectly assembled. The most relevant installation errors involve incorrect orientation, improper fitment, filter deformation, and incomplete closure of the access cover.
Incorrect orientation is a preventable problem when the replacement filter has a defined airflow direction. The filter is designed to operate in relation to air moving through the HVAC housing, so its directional marking should correspond with that airflow path. Guessing the orientation from the physical appearance of the filter or assuming that every F-150 requires the same arrow direction can result in an installation that does not follow the filter’s intended configuration.
Improper fitment creates a different problem. A filter that does not match the F-150 application may be too large, too small, or shaped incorrectly for the housing. Forcing an oversized filter into the compartment can bend its frame or crush its pleats, while an undersized or incorrectly seated filter may fail to occupy the housing as intended. The correct response to abnormal fit is to verify the part application and orientation rather than modify or force the replacement filter.
Filter deformation can also occur even when the correct replacement part is used. Pushing the filter into the housing at an incorrect angle can fold the media or catch the frame against an internal edge. A deformed filter no longer occupies the compartment in its intended shape and can create unnecessary restriction or an incomplete fit. Sliding the filter evenly into its designed position avoids this problem.
An incorrectly secured access cover can leave the replacement incomplete even when the filter itself is installed correctly. The cover forms part of the filter compartment and should return to its intended position after the new element is seated. If the cover does not close normally, the filter position, filter dimensions, and retaining features should be checked before additional force is applied.
Installation errors are easiest to identify immediately after replacement. If the HVAC system develops a new airflow restriction or unusual sound directly after the filter was changed, inspect the components that were just disturbed first. Confirming filter orientation, seating, housing closure, and reassembly provides a direct diagnostic sequence before unrelated HVAC parts are considered.
Can You Clean an F-150 Cabin Air Filter Instead of Replacing It?
You should replace a disposable F-150 cabin air filter rather than clean and reinstall it, while a reusable filter should only be cleaned when its manufacturer specifically designs and instructs it for repeated use. The correct maintenance method therefore depends on the construction and service instructions of the filter installed in the truck, not simply on whether visible debris can be removed from its surface.
A disposable cabin air filter relies on its filter media to capture dust, pollen, and other airborne contaminants as HVAC air passes through it. Some contamination remains within the media rather than sitting loosely on the surface. Removing visible leaves or shaking dust from the filter does not restore the filter media to its original condition and should not automatically be treated as equivalent to installing a new filter.
Aggressive cleaning can also affect filter condition. Washing, blowing, brushing, or otherwise manipulating a filter that was not designed for cleaning can deform the media or damage its structure. A filter may appear visually cleaner afterward while no longer matching the condition intended by its manufacturer. Reinstalling a damaged element provides little value compared with fitting the correct replacement.
Reusable cabin filters are a separate case. If a filter manufacturer identifies the product as washable or reusable, its specified cleaning and drying procedure determines how the filter should be serviced. The filter should be completely prepared according to those instructions before it is returned to the F-150 HVAC housing. A maintenance method intended for a reusable product should not be transferred to a disposable filter simply because both components fit the same vehicle.
Filter condition should therefore determine the immediate maintenance decision alongside the product’s service instructions. Remove loose debris from the accessible housing when appropriate, but replace a contaminated disposable filter with the correct F-150 application rather than attempting to extend its service life through an unsupported cleaning method.
How Long Does It Take to Replace an F-150 Cabin Air Filter?
Replacing an F-150 cabin air filter is generally a short maintenance procedure once the correct filter has been obtained and the filter housing can be accessed, but the exact replacement time depends on the model year, access design, and the person performing the work. A universal completion time would be misleading because gaining access to the filter can require different actions across F-150 configurations.
The filter exchange itself represents only part of the total job. The complete procedure includes identifying the correct access point, moving the required glove-box or surrounding components, opening the filter housing, observing the old filter orientation, removing accumulated debris where appropriate, installing the new filter, closing the housing, restoring the interior components, and checking HVAC operation. Familiarity with the access design can make these actions considerably faster than performing them for the first time.
Model-year differences can affect the amount of work required before the filter becomes accessible. A straightforward access arrangement reduces the time spent reaching the housing, while additional retaining features or interior components increase it. This is another reason to use instructions that correspond to the exact F-150 rather than begin disassembly using a procedure written for a different generation.
Problems discovered during replacement can also extend the job. An incorrect replacement filter, damaged access clip, debris inside the accessible housing, or uncertainty about filter orientation should be resolved before reassembly. Completing the procedure quickly has little value if the filter is forced into the wrong position or the housing must be reopened afterward.
The most useful measure of a successful F-150 cabin filter replacement is therefore correct installation rather than a fixed completion time. The job is complete when the proper filter is seated in the correct orientation, the housing and access components are secured, and the HVAC system operates normally after reassembly.