The 5.7 Hemi coolant temperature sensor is typically threaded into the engine’s coolant passage near the thermostat housing at the front of the engine. On most 5.7L HEMI V8 engines used in Dodge, Ram, Jeep, and Chrysler vehicles, the sensor sits where it can accurately measure coolant temperature before transmitting data to the Powertrain Control Module (PCM). Although the sensor serves the same function across all applications, its exact accessibility can vary depending on the vehicle model, production year, intake manifold design, and surrounding engine components.
Locating the correct sensor is essential before diagnosing overheating, replacing a faulty coolant temperature sensor, or troubleshooting diagnostic trouble codes such as P0117 and P0118. Mistaking the coolant temperature sensor for another engine sensor can lead to unnecessary repairs, inaccurate temperature readings, or continued Check Engine Light warnings.
This guide explains the exact location of the 5.7 HEMI coolant temperature sensor, how to identify it on different vehicle models, and what components may obstruct access. You’ll also learn how to distinguish the sensor from nearby cooling system components, recognize common failure symptoms, test the sensor before replacement, and replace it correctly to restore accurate engine temperature monitoring.
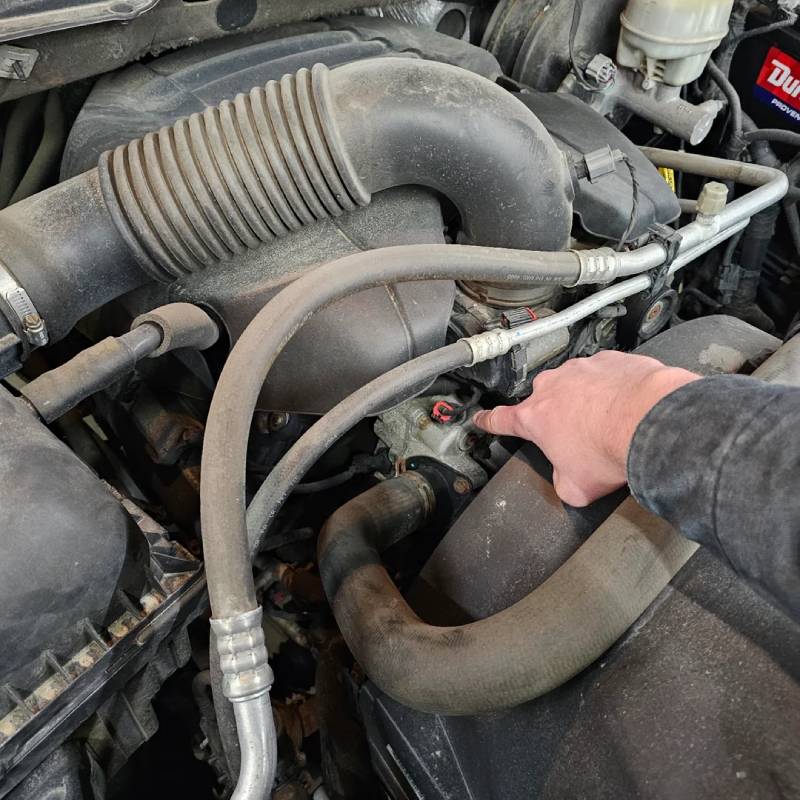
Where Is the 5.7 Hemi Coolant Temperature Sensor Located?
The 5.7 HEMI coolant temperature sensor is threaded into a coolant passage near the thermostat housing at the front of the engine. On most Gen III and Gen IV 5.7L HEMI engines, the sensor is positioned close to the water outlet where coolant leaves the engine and flows toward the radiator. This location allows the sensor to measure engine coolant temperature accurately before transmitting data to the Powertrain Control Module (PCM).
From the front of the vehicle, the sensor is generally found on the front section of the engine, beneath or adjacent to the upper radiator hose connection. It features a small brass or metal body with a two-wire electrical connector attached to its top. The wiring harness leading to the connector makes the sensor easier to identify among nearby cooling system components.
Although the sensor performs the same function across all 5.7 HEMI applications, its accessibility differs by vehicle. On models such as the Ram 1500, the engine bay provides more working space, allowing the sensor to be reached with basic hand tools. On vehicles like the Dodge Charger, Dodge Challenger, Chrysler 300, and Jeep Grand Cherokee, surrounding components such as the intake duct, engine cover, or accessory brackets may partially block access, requiring additional disassembly before the sensor becomes visible.
If you cannot locate the sensor immediately, begin by identifying the thermostat housing where the upper radiator hose connects to the engine. The coolant temperature sensor is typically installed directly beside this housing or in the adjacent coolant crossover passage. Following the upper radiator hose to its engine connection is usually the quickest method for locating the sensor without removing unnecessary components.
Because Chrysler used several revisions of the 5.7 HEMI engine over the years, the exact mounting point can vary slightly depending on the model year and vehicle platform. However, the sensor consistently remains within the engine’s cooling circuit near the thermostat housing, where it can monitor coolant temperature as it circulates through the engine.
How Can You Identify the Coolant Temperature Sensor on a 5.7 Hemi Engine?
What Does the Coolant Temperature Sensor Look Like?
The 5.7 HEMI coolant temperature sensor is a small threaded sensor with a brass body and a plastic electrical connector. Most OEM sensors use a hex-shaped metal base that accepts a deep socket for removal, while the upper portion is molded from black plastic and contains a two-pin connector. Once installed, only the plastic connector is typically visible because the threaded portion is screwed into the engine’s coolant passage.
The sensor is considerably smaller than nearby cooling system components such as the thermostat housing or upper radiator hose. In most applications, the exposed portion measures approximately 1 to 2 inches in length, making it easy to overlook if you are unfamiliar with the engine layout. Looking for a compact sensor threaded directly into an aluminum coolant passage is usually more effective than searching by wire color alone, as wiring harness colors may vary between model years.
Which Electrical Connector Plugs Into the Sensor?
A two-pin electrical connector plugs directly into the coolant temperature sensor. One wire supplies a reference voltage from the Powertrain Control Module (PCM), while the second wire returns the temperature signal. As coolant temperature changes, the sensor’s internal thermistor changes resistance, allowing the PCM to calculate the engine’s operating temperature.
The connector is secured with a locking tab that must be released before unplugging the sensor. Dirt, coolant residue, and heat exposure can make the connector difficult to remove, so it should be disconnected carefully to avoid damaging the locking mechanism or pulling on the wiring harness. Before replacing the sensor, inspect the connector for corrosion, bent terminals, broken retaining clips, or coolant contamination, as wiring issues can produce the same symptoms as a failed sensor.
How Is the Coolant Temperature Sensor Different From Nearby Cooling System Sensors?
The coolant temperature sensor is the only threaded sensor in this area that measures engine coolant temperature for the PCM. However, it is often confused with other electrical components located around the front of the engine.
The coolant temperature sensor should not be mistaken for the coolant temperature sending unit found on some older engines, as modern 5.7 HEMI engines typically rely on a single Engine Coolant Temperature (ECT) sensor to provide temperature data for both the PCM and the dashboard temperature gauge. It is also different from the radiator fan control components, oil pressure sensor, manifold absolute pressure (MAP) sensor, and knock sensors, which are installed in different locations and serve unrelated engine management functions.
A simple way to confirm that you have found the correct component is to trace the upper radiator hose to the thermostat housing. The coolant temperature sensor will normally be threaded into the coolant passage immediately beside or just behind this housing, whereas other engine sensors are mounted on the intake manifold, engine block, cylinder heads, or oil galleries.
Does the Sensor Location Change Between Dodge, Ram, Jeep, and Chrysler Models?
The coolant temperature sensor remains in the same general area across all 5.7L HEMI engines, but its exact mounting position and accessibility vary by vehicle model and production year. Chrysler engineered the sensor to measure coolant temperature as it leaves the engine, so it stays near the thermostat housing or coolant crossover passage regardless of the platform. However, differences in engine bay layout, intake system design, and accessory placement affect how easily the sensor can be reached.
Ram 1500
The 5.7 HEMI coolant temperature sensor on the Ram 1500 is typically the easiest to access. The truck’s larger engine compartment provides more clearance around the front of the engine, allowing most owners to locate the sensor without removing major components. After removing the decorative engine cover, the sensor is usually visible near the thermostat housing where the upper radiator hose connects to the engine.
Depending on the model year, you may only need to disconnect the electrical connector and use a deep socket to remove the sensor. On some newer Ram models equipped with additional emissions or intake components, moving the air intake tube may provide extra working space, but complete intake manifold removal is generally unnecessary.
Dodge Charger
The coolant temperature sensor is installed in the same cooling circuit on the Dodge Charger, but access is more restricted because of the tighter engine bay. The front-mounted radiator support, intake ducting, and accessory brackets can partially obstruct the sensor, especially on performance-oriented trims.
Most owners can reach the sensor after removing the plastic engine cover and loosening the intake tube. Using a socket extension and swivel adapter often makes the job easier because there is less room between the front of the engine and the radiator.
Dodge Challenger
The Dodge Challenger uses nearly the same 5.7 HEMI engine configuration as the Charger, so the coolant temperature sensor is located in a similar position. The sensor remains threaded into the coolant passage near the thermostat housing, although surrounding intake components may reduce direct visibility.
Removing the engine cover and creating additional clearance around the intake assembly usually provides enough access for replacement. Before beginning the repair, ensure the engine has cooled completely because the sensor is installed directly in the pressurized cooling system.
Jeep Grand Cherokee
The 5.7 HEMI coolant temperature sensor on the Jeep Grand Cherokee is positioned near the thermostat housing but may be partially hidden by nearby hoses, intake components, or engine accessories. The SUV’s engine compartment is more compact than the Ram’s, making visual identification slightly more difficult.
Tracing the upper radiator hose to its connection at the engine remains the fastest method for locating the sensor. In some model years, temporarily moving a coolant hose or intake resonator improves access without requiring extensive disassembly.
Chrysler 300
The Chrysler 300 shares much of its engine architecture with the Dodge Charger, resulting in an almost identical coolant temperature sensor location. The sensor is mounted at the front of the engine near the thermostat housing and uses the same two-wire electrical connector found on other 5.7 HEMI applications.
Although the mounting location is nearly identical, access depends on the model year and engine package. Removing the engine cover and intake duct generally provides sufficient room to disconnect the connector, remove the old sensor, and install the replacement without disturbing other cooling system components.
Across all Dodge, Ram, Jeep, and Chrysler vehicles equipped with the 5.7L HEMI V8, the most reliable way to locate the coolant temperature sensor is to follow the upper radiator hose to the thermostat housing. While surrounding components may differ between platforms, the sensor consistently remains installed within the engine’s primary coolant passage to provide accurate temperature data to the PCM.
How Do You Access the Coolant Temperature Sensor?
Accessing the coolant temperature sensor on a 5.7 HEMI engine is a straightforward job when the engine is completely cool and the correct tools are available. Since the sensor is threaded directly into the cooling system, proper preparation helps prevent coolant loss, damaged connectors, and accidental burns from hot pressurized coolant.
What Tools Do You Need?
Most coolant temperature sensor replacements require only basic hand tools. Preparing everything before opening the cooling system makes the repair faster and reduces the chance of contamination.
Recommended tools include:
- Deep socket (typically 19 mm or 3/4-inch, depending on the sensor design)
- Ratchet and extension
- Torque wrench
- Flat-head screwdriver or trim tool
- Needle-nose pliers (if needed for hose clips)
- Drain pan
- Shop towels
- Replacement coolant (if coolant loss occurs)
- New coolant temperature sensor with a new sealing washer or thread sealant if specified by the manufacturer
An OBD-II scanner is also recommended. It allows you to clear diagnostic trouble codes after installation and verify that the new sensor reports accurate coolant temperature once the engine reaches operating temperature.
What Safety Precautions Should You Take Before Removing the Sensor?
Never remove the coolant temperature sensor while the engine is hot. The cooling system operates under pressure, and removing the sensor before the engine cools can release hot coolant suddenly, causing serious burns.
Park the vehicle on a level surface and allow the engine to cool completely. Slowly loosen the radiator cap or coolant reservoir cap only after the engine has cooled to relieve any remaining pressure. If the cooling system is still warm, wait longer before proceeding.
Disconnecting the negative battery terminal is another recommended precaution. Although the sensor carries only a low-voltage signal, disconnecting the battery eliminates the possibility of electrical shorts while disconnecting the wiring harness.
Position a drain pan beneath the engine before removing the sensor. Even if the cooling system is not fully drained, a small amount of coolant will usually escape when the sensor is removed.
Which Components May Need to Be Removed?
The amount of disassembly depends on the vehicle model. On many Ram 1500 models, removing the plastic engine cover provides sufficient access to the sensor. Passenger cars such as the Dodge Charger, Challenger, and Chrysler 300 often require additional clearance around the intake duct or air filter housing because these components partially cover the front of the engine.
On some Jeep Grand Cherokee models, coolant hoses or intake resonators may also restrict access. These components generally do not need to be completely removed but can often be repositioned temporarily to create enough working space for a socket and extension.
Avoid disconnecting unnecessary coolant hoses or removing major engine components unless they directly obstruct access to the sensor. The repair is intended to be relatively simple, and excessive disassembly increases both repair time and the likelihood of introducing air into the cooling system.
How Long Does It Take to Access the Sensor?
For an experienced DIY mechanic, locating and accessing the coolant temperature sensor usually takes 15 to 30 minutes. Replacing the sensor and checking for leaks typically requires another 15 to 30 minutes, making the entire repair achievable in about one hour under normal conditions.
First-time DIY owners should allow additional time to identify the correct sensor, remove surrounding components carefully, and verify the routing of the electrical connector before beginning the replacement. Working methodically is more important than completing the repair quickly, as forcing the connector or cross-threading the new sensor can create more expensive repairs.
How Do You Replace the 5.7 Hemi Coolant Temperature Sensor?
Replacing the coolant temperature sensor on a 5.7 HEMI engine is a relatively simple repair that can usually be completed with basic hand tools. The key is to work on a completely cooled engine, prevent excessive coolant loss, and install the new sensor correctly to avoid leaks or inaccurate temperature readings.
What Should You Do Before Removing the Sensor?
Before removing the old sensor, confirm that the engine has cooled completely and that pressure has been released from the cooling system. Remove the engine cover and any intake components necessary to gain clear access to the sensor. Place a drain pan underneath the engine because a small amount of coolant will escape once the sensor is removed.
Locate the electrical connector and press the locking tab before pulling the connector straight off the sensor. Never pull on the wiring harness itself, as this can damage the terminals or loosen the wires inside the connector.
After disconnecting the wiring, use the appropriate deep socket and ratchet to loosen the sensor by turning it counterclockwise. Once the threads are free, remove the sensor quickly to minimize coolant loss. Compare the old sensor with the replacement to verify that the thread size, connector design, and sensor length are identical before installation.
How Do You Install the New Sensor?
Inspect the threaded port before installing the replacement sensor. Remove any dirt, corrosion, or remnants of old thread sealant that could prevent the new sensor from sealing properly. If the replacement sensor is supplied with factory-applied thread sealant, install it as received. If the manufacturer specifies thread sealant separately, apply only a thin, even layer that is compatible with engine coolant systems. Avoid excessive sealant, as it can interfere with proper grounding or contaminate the cooling system.
Thread the new sensor into the engine by hand first. Hand-threading helps prevent cross-threading, which can permanently damage the aluminum housing. Once the sensor seats properly, tighten it using a torque wrench according to the vehicle manufacturer’s specification. Overtightening should be avoided because the sensor threads into aluminum, which is more susceptible to stripping than steel.
Reconnect the electrical connector until the locking tab clicks securely into place. Gently pull on the connector to confirm that it is fully engaged and cannot disconnect during engine operation.
Should You Refill or Bleed the Cooling System Afterward?
Even when coolant loss is minimal, the coolant level should always be checked after replacing the sensor. Refill the radiator or coolant reservoir with the manufacturer-recommended coolant if the level has dropped below the specified mark.
Start the engine and allow it to reach normal operating temperature while monitoring the repair area for leaks. As the thermostat opens, trapped air may move through the cooling system and cause the coolant level to decrease slightly. Shut the engine off, allow it to cool again, and recheck the coolant level before adding additional coolant if necessary.
Some 5.7 HEMI applications bleed air from the cooling system automatically during normal operation, while others may include a dedicated bleed screw. Consult the factory service procedure for the specific vehicle if air becomes trapped or if the engine continues to exhibit unstable temperature readings after the repair.
Finally, connect an OBD-II scanner and verify that the Engine Coolant Temperature (ECT) reading increases smoothly as the engine warms up. Clear any stored diagnostic trouble codes, including P0117 or P0118, and perform a short road test to confirm that the Check Engine Light does not return and that the temperature gauge operates normally.
What Are the Most Common Mistakes During Replacement?
Several common mistakes can shorten the life of the new sensor or create additional cooling system problems. The most frequent error is replacing the sensor without confirming that the electrical connector is in good condition. A corroded or damaged connector can produce inaccurate temperature readings even when a brand-new sensor is installed.
Another common mistake is overtightening the sensor. Because the mounting port is made from aluminum, excessive torque can strip the threads or crack the housing, leading to coolant leaks and expensive repairs. Installing the sensor with contaminated threads or excessive thread sealant can also prevent proper sealing and affect sensor performance.
Some owners also forget to inspect the coolant level after the repair or fail to remove trapped air from the cooling system. Low coolant or air pockets may cause erratic temperature readings, poor heater performance, intermittent overheating, or false diagnostic trouble codes. Performing a final inspection for leaks and confirming live coolant temperature data with an OBD-II scanner helps ensure the repair has been completed successfully.
What Are the Symptoms of a Bad 5.7 Hemi Coolant Temperature Sensor?
A faulty coolant temperature sensor can affect far more than the engine’s temperature gauge. Because the Engine Coolant Temperature (ECT) sensor continuously sends temperature data to the Powertrain Control Module (PCM), incorrect readings can alter fuel delivery, ignition timing, cooling fan operation, idle speed, and emissions control. Recognizing the symptoms early helps prevent unnecessary repairs and reduces the risk of engine overheating or poor drivability.
Check Engine Light Illuminates
The Check Engine Light is one of the earliest indicators of a failing coolant temperature sensor. When the PCM detects a coolant temperature signal that falls outside its expected operating range or conflicts with data from other engine sensors, it stores a diagnostic trouble code and turns on the warning light.
The most common codes associated with a defective ECT sensor include P0117 (Engine Coolant Temperature Circuit Low Input) and P0118 (Engine Coolant Temperature Circuit High Input). Depending on the fault, additional cooling system or thermostat-related codes may also be stored. Scanning the vehicle with an OBD-II scanner is the fastest way to confirm whether the coolant temperature sensor or its electrical circuit requires further inspection.
Incorrect Temperature Gauge Readings
A defective coolant temperature sensor can cause the dashboard temperature gauge to display inaccurate engine temperatures. The gauge may remain at the cold position even after the engine reaches operating temperature, climb suddenly toward the hot zone without an actual overheating condition, or fluctuate unpredictably while driving.
These irregular readings occur because the PCM receives incorrect temperature data from the sensor. Before replacing the sensor, compare the live coolant temperature shown by an OBD-II scanner with the dashboard gauge. If the scanner displays unrealistic values or readings that change abruptly, the sensor or its wiring is likely malfunctioning.
Hard Starting When the Engine Is Cold
An inaccurate coolant temperature signal can make the engine difficult to start, particularly after it has been parked overnight. During a cold start, the PCM depends on coolant temperature data to determine how much fuel should be injected. If the sensor falsely reports that the engine is already warm, the PCM may command a lean air-fuel mixture that makes starting more difficult.
Conversely, if the sensor incorrectly reports an extremely cold engine, the PCM may inject excessive fuel. This overly rich mixture can increase cranking time, produce rough idle immediately after startup, and leave an odor of unburned fuel from the exhaust.
Poor Fuel Economy
Reduced fuel efficiency is another common symptom of a failing coolant temperature sensor. When the PCM receives incorrect temperature information, it cannot accurately adjust fuel delivery during warm-up or normal driving conditions.
A sensor that constantly reports a cold engine often keeps the engine operating in an enriched fuel mode for longer than necessary. As a result, fuel consumption increases, carbon deposits accumulate more quickly, and emissions rise. Drivers may notice that fuel economy gradually declines even though no obvious drivability problems are present.
Cooling Fan Runs Continuously or Fails to Operate
Abnormal radiator fan operation frequently points to an incorrect coolant temperature signal. If the PCM believes the engine is overheating because of faulty sensor data, it may command the electric cooling fan to run continuously, even immediately after a cold start.
The opposite condition is equally problematic. If the sensor reports a temperature lower than the actual coolant temperature, the PCM may delay fan activation. Without sufficient airflow through the radiator, coolant temperature can rise beyond its normal operating range, increasing the risk of overheating during traffic or low-speed driving.
Rough Idle and Poor Engine Performance
A malfunctioning coolant temperature sensor can negatively affect overall engine performance. Incorrect temperature readings influence fuel injection, ignition timing, idle speed control, and transmission shift strategy. The engine may idle roughly, hesitate during acceleration, or respond sluggishly to throttle input because the PCM is calculating operating conditions using inaccurate data.
These symptoms are often most noticeable during the first few minutes after startup but can persist after the engine reaches operating temperature if the sensor continues to transmit incorrect information.
Engine Overheating or False Overheating Warnings
A failed coolant temperature sensor can contribute to overheating, although it is not always the direct cause. If the sensor prevents the PCM from activating the electric cooling fan at the proper temperature, engine coolant temperature may continue rising until the engine overheats.
In other cases, the sensor itself is inaccurate while the cooling system functions normally. This can trigger false overheating warnings, illuminate warning messages, or display unusually high temperature readings even though the engine remains within its normal operating range. Confirming actual coolant temperature with an OBD-II scanner helps distinguish a faulty sensor from genuine cooling system problems.
Reduced Engine Performance and Limp Mode
Some modern 5.7 HEMI vehicles may enter a protective operating mode when coolant temperature data becomes unreliable. If the PCM determines that the temperature signal is implausible or detects a severe sensor circuit fault, it may limit engine performance to protect critical components.
Drivers may experience reduced throttle response, limited engine power, restricted acceleration, or modified transmission shift behavior. Although the vehicle may remain drivable for a short distance, continued operation without diagnosing the underlying fault increases the likelihood of additional engine or cooling system damage.
Which OBD-II Trouble Codes Are Related to the Coolant Temperature Sensor?
A failing coolant temperature sensor does not always trigger the same diagnostic trouble code. The Powertrain Control Module (PCM) continuously compares coolant temperature readings with expected operating values and data from other engine sensors. When the temperature signal falls outside the acceptable range or behaves abnormally, the PCM stores one or more OBD-II diagnostic trouble codes to help identify the source of the problem.
Although other cooling system components can contribute to these faults, the following OBD-II codes are the ones most commonly associated with the 5.7 HEMI coolant temperature sensor.
P0117 — Engine Coolant Temperature Circuit Low Input
Diagnostic trouble code P0117 indicates that the PCM has detected an unusually low voltage signal from the Engine Coolant Temperature (ECT) sensor. In most cases, this means the sensor is reporting an extremely high coolant temperature that is not consistent with actual engine operating conditions.
Several issues can trigger this code, including an internally shorted sensor, damaged wiring, corrosion inside the electrical connector, or a short circuit to ground. Less commonly, coolant contamination inside the connector or damage to the engine wiring harness may also cause the PCM to interpret the signal incorrectly.
Common symptoms of P0117 include:
- Check Engine Light illuminated
- Cooling fan running continuously
- Incorrect temperature gauge readings
- Poor fuel economy
- Hard starting after the engine cools
- Reduced engine performance
Before replacing the sensor, inspect the connector for moisture, corrosion, loose terminals, or damaged insulation. Measuring sensor resistance and comparing live coolant temperature data with ambient temperature using an OBD-II scanner can help determine whether the fault lies in the sensor or the wiring.
P0118 — Engine Coolant Temperature Circuit High Input
Diagnostic trouble code P0118 indicates that the PCM is receiving an unusually high voltage signal from the coolant temperature sensor. This condition generally causes the PCM to interpret the engine as being much colder than it actually is.
An open circuit inside the sensor, a disconnected electrical connector, broken wiring, or excessive resistance in the signal circuit are the most common causes of this code. Because the PCM believes the engine is still cold, it may continue enriching the air-fuel mixture long after the engine has reached normal operating temperature.
Drivers may notice several symptoms, including:
- Extended cold-start enrichment
- Increased fuel consumption
- Rough idle
- Black exhaust smoke caused by a rich fuel mixture
- Elevated exhaust emissions
- Check Engine Light illumination
A visual inspection should always be performed before replacing parts. A connector that has not fully locked into place after previous repairs can generate the same code as a failed sensor.
P0128 — Coolant Thermostat (Coolant Temperature Below Thermostat Regulating Temperature)
P0128 does not necessarily indicate a failed coolant temperature sensor, but the sensor plays a critical role in triggering this diagnostic code. The PCM compares coolant temperature with engine run time, intake air temperature, vehicle speed, and other operating conditions. If the engine takes longer than expected to reach normal operating temperature, the PCM stores P0128.
A thermostat that is stuck open remains the most common cause of this code. However, inaccurate coolant temperature readings from a failing ECT sensor, low coolant level, trapped air inside the cooling system, or poor electrical connections can also contribute to the diagnosis.
When diagnosing P0128, technicians should avoid replacing the thermostat immediately without verifying that the coolant temperature sensor is reporting accurate data. Comparing live coolant temperature values with the actual engine temperature helps identify whether the thermostat or the sensor is responsible for the fault.
Other Cooling System Trouble Codes
Although P0117, P0118, and P0128 are the codes most frequently associated with the coolant temperature sensor, other cooling system faults may appear if the PCM detects abnormal operating conditions.
Codes such as P0116 (Engine Coolant Temperature Circuit Range/Performance) and P0119 (Engine Coolant Temperature Circuit Intermittent) often indicate inconsistent or unstable temperature signals. These faults may result from intermittent wiring problems, loose electrical connectors, damaged sensor terminals, or an Engine Coolant Temperature sensor that is beginning to fail.
Cooling fan performance codes may also appear when incorrect temperature data prevents the PCM from activating the electric radiator fan at the proper time. In these situations, diagnosing the complete cooling system—including coolant level, thermostat operation, wiring integrity, radiator fan function, and live sensor data—is essential before replacing any components.
The most efficient diagnostic approach is to combine OBD-II scan data with a physical inspection of the sensor and its electrical connector. Verifying real-time coolant temperature during both a cold start and normal operating conditions allows technicians to distinguish a defective sensor from wiring faults, thermostat failures, or other cooling system problems, reducing unnecessary parts replacement and improving repair accuracy.
What Causes the Coolant Temperature Sensor to Fail?
The coolant temperature sensor is designed to operate reliably for many years, but it is constantly exposed to heat, pressure, engine vibration, and coolant. Over time, these conditions can degrade the sensor or its electrical connection, resulting in inaccurate temperature readings and poor engine performance. Identifying the root cause of the failure is just as important as replacing the sensor because the same problem can damage the new component if left unresolved.
Repeated Heat Cycles
Continuous exposure to high engine temperatures is the most common cause of coolant temperature sensor failure. Every time the engine warms up and cools down, the sensor expands and contracts along with the surrounding metal components. After thousands of heating and cooling cycles, the internal thermistor and electronic circuitry gradually deteriorate.
As the sensor ages, its electrical resistance may no longer correspond accurately to the actual coolant temperature. Initially, the error may be small enough to go unnoticed. Over time, however, the inaccurate readings can trigger Check Engine Light warnings, affect fuel delivery, and interfere with radiator fan operation.
Vehicles that are driven frequently in heavy traffic, tow trailers, or operate in extremely hot climates typically expose the sensor to higher thermal stress, which can accelerate wear.
Coolant Contamination
Contaminated coolant can shorten the lifespan of the coolant temperature sensor. Engine coolant contains corrosion inhibitors and additives that protect aluminum components, seals, and sensors. As coolant ages, these additives gradually break down, allowing rust, mineral deposits, and debris to circulate through the cooling system.
Deposits can accumulate around the sensing tip, reducing its ability to respond quickly to changes in coolant temperature. In severe cases, corrosion inside the cooling passages may also affect the sensor threads or sealing surface, increasing the likelihood of coolant leaks during replacement.
Following the manufacturer’s recommended coolant replacement interval helps maintain proper chemical protection and reduces contamination that can affect both the sensor and the entire cooling system.
Electrical Connector Corrosion
Corrosion inside the electrical connector is one of the most overlooked causes of coolant temperature sensor problems. Moisture, coolant leaks, road salt, and engine bay humidity can gradually oxidize the connector terminals. Even a thin layer of corrosion increases electrical resistance and alters the voltage signal transmitted to the PCM.
A corroded connector can produce symptoms identical to those of a failed sensor, including erratic temperature readings, intermittent Check Engine Light illumination, cooling fan problems, and diagnostic trouble codes such as P0117 or P0118.
Whenever the sensor is replaced, the connector should also be inspected carefully. Green or white corrosion, loose terminals, broken locking tabs, or signs of coolant intrusion indicate that the connector may require cleaning or replacement before installing a new sensor.
Wiring Harness Damage
A damaged wiring harness can interrupt communication between the coolant temperature sensor and the PCM. The sensor wiring is exposed to engine vibration, heat, and occasional contact with nearby brackets or hoses. Over time, insulation may wear through, allowing wires to short against the engine or break internally.
Rodent damage is another common cause of wiring failures, particularly in vehicles that remain parked for extended periods. Chewed insulation or partially severed wires can create intermittent faults that are difficult to diagnose because the sensor itself may still function correctly.
Before replacing the coolant temperature sensor, inspect the wiring for cracked insulation, pinched sections, exposed conductors, or previous repair splices. Repairing the harness may resolve the problem without replacing the sensor.
Coolant Leaks Around the Sensor
External coolant leaks can eventually damage both the sensor and its electrical connector. A leaking sensor seal or damaged thread can allow coolant to escape gradually. As coolant reaches the electrical connector, it may contaminate the terminals and promote corrosion, resulting in unstable voltage signals.
Small leaks often leave visible white, pink, orange, or green residue around the sensor, depending on the type of coolant used. Detecting these deposits early allows the leak to be repaired before it causes additional electrical problems or significant coolant loss.
Replacing a leaking sensor without addressing damaged threads or an improperly sealed mounting surface may result in the same leak returning shortly after the repair.
Physical Damage During Maintenance
Improper handling during engine repairs can damage the coolant temperature sensor or its connector. Pulling on the wiring harness instead of releasing the locking tab, striking the sensor with tools, or overtightening the sensor during installation can shorten its service life.
Cross-threading is another common mistake. Because the sensor threads into an aluminum housing, forcing it into place at the wrong angle can damage both the sensor and the mounting port. Once the threads are damaged, coolant leaks become more likely, and repairing the housing may require significantly more labor than replacing the sensor itself.
Always thread the replacement sensor by hand before tightening it with a torque wrench, and avoid using excessive force when reconnecting the electrical connector.
Poor Cooling System Maintenance
Neglecting routine cooling system maintenance increases the likelihood of coolant temperature sensor failure. Low coolant levels, chronic overheating, air trapped inside the cooling system, or repeated operation with an overheating engine place additional stress on the sensor.
For example, a thermostat stuck closed can expose the sensor to temperatures well above its normal operating range, while a leaking water pump may reduce coolant circulation and create localized hot spots around the sensor. These conditions accelerate sensor wear even if the sensor itself is functioning correctly.
Maintaining the entire cooling system—including the radiator, thermostat, water pump, hoses, coolant, and pressure cap—helps protect the coolant temperature sensor and ensures accurate engine temperature monitoring throughout its service life.
How Much Does It Cost to Replace a 5.7 Hemi Coolant Temperature Sensor?
Replacing a coolant temperature sensor on a 5.7 HEMI is one of the more affordable engine repairs. The total cost depends on whether you choose an Original Equipment Manufacturer (OEM) sensor or an aftermarket replacement, whether additional cooling system repairs are required, and whether you perform the work yourself or hire a professional mechanic.
How Much Does a New Coolant Temperature Sensor Cost?
A replacement coolant temperature sensor for a 5.7 HEMI typically costs between $20 and $80 for the part alone. OEM sensors generally fall toward the higher end of the price range because they are manufactured to Chrysler specifications and offer guaranteed compatibility with the vehicle’s engine management system.
High-quality aftermarket sensors are often available at a lower price and can provide comparable performance when purchased from reputable manufacturers. Extremely inexpensive sensors may appear attractive, but lower manufacturing quality can result in inaccurate temperature readings, premature failure, or recurring diagnostic trouble codes shortly after installation.
When purchasing a replacement sensor, verify that it matches your vehicle’s model year, engine configuration, and VIN. Chrysler introduced several updates to the 5.7L HEMI over the years, and connector designs or thread specifications may differ between generations.
How Much Does Professional Labor Cost?
Professional labor for replacing a coolant temperature sensor usually ranges from $80 to $200. Labor charges vary depending on local hourly rates, vehicle accessibility, and whether additional components must be removed to reach the sensor.
On vehicles such as the Ram 1500, where access to the sensor is relatively straightforward, labor costs generally remain at the lower end of the range. Models with tighter engine compartments, including the Dodge Charger, Dodge Challenger, Jeep Grand Cherokee, and Chrysler 300, may require additional time to remove intake components or reposition surrounding parts, increasing the total labor charge.
If corrosion, damaged wiring, or coolant leaks are discovered during the repair, labor costs may increase because additional diagnostic work and component replacement are necessary.
What Is the Total Replacement Cost?
Most owners can expect to spend between $100 and $280 for a complete coolant temperature sensor replacement at a repair shop. This estimate typically includes the new sensor, labor, and a small amount of replacement coolant if needed.
The final invoice may be higher if the repair shop recommends replacing damaged electrical connectors, repairing the wiring harness, or addressing other cooling system issues identified during the inspection. For example, replacing a faulty thermostat or repairing a coolant leak at the same time will increase the overall repair cost but may prevent future cooling system failures.
How Much Can You Save by Replacing the Sensor Yourself?
DIY replacement can reduce the total repair cost by more than half. Owners who already have basic hand tools generally only need to purchase the replacement sensor and, if necessary, a small quantity of compatible engine coolant.
In most cases, a DIY repair costs approximately $20 to $80, assuming no additional components require replacement. Even after purchasing a deep socket or torque wrench, many owners still spend significantly less than the average repair shop charge.
However, DIY replacement is recommended only for individuals who are comfortable working around the engine cooling system. Incorrect installation, stripped threads, or failure to remove trapped air from the cooling system can lead to coolant leaks, inaccurate temperature readings, or engine overheating that ultimately costs more to repair.
Is It Worth Replacing the Sensor Immediately?
Replacing a faulty coolant temperature sensor as soon as symptoms appear is usually the most cost-effective decision. Although the sensor itself is relatively inexpensive, delaying the repair can lead to excessive fuel consumption, poor engine performance, overheating, and additional stress on other cooling system components.
Driving for an extended period with inaccurate coolant temperature data may also damage the catalytic converters because an incorrect air-fuel mixture increases exhaust emissions and causes incomplete combustion. If overheating occurs due to improper cooling fan operation, much more expensive repairs—such as replacing a head gasket, warped cylinder head, or damaged engine components—may become necessary.
For this reason, diagnosing and replacing a failed coolant temperature sensor promptly is a low-cost repair that helps protect the long-term reliability of the 5.7 HEMI engine while avoiding significantly higher repair expenses in the future.
Can You Drive With a Faulty Coolant Temperature Sensor?
Driving with a faulty coolant temperature sensor is possible in some situations, but it is not recommended. The severity of the problem depends on whether the sensor is providing inaccurate data, has failed completely, or is causing the engine to overheat. Even if the vehicle appears to drive normally, incorrect coolant temperature readings can affect engine performance, fuel economy, and long-term reliability.
Is It Safe to Continue Driving?
A vehicle with a failing coolant temperature sensor may remain drivable for a short period, but continued operation increases the risk of engine damage. The Powertrain Control Module (PCM) relies on coolant temperature data to calculate fuel injection, ignition timing, cooling fan operation, idle speed, and emissions control. When this information becomes inaccurate, the engine management system cannot make the correct adjustments.
If the sensor reports a colder-than-actual engine, the PCM may command a rich air-fuel mixture that increases fuel consumption and carbon buildup. If the sensor reports an excessively hot engine or fails to activate the electric cooling fan at the appropriate temperature, the engine may overheat, particularly during slow traffic, towing, or hot weather conditions.
What Problems Can Occur If You Ignore the Fault?
Ignoring a defective coolant temperature sensor can lead to more expensive repairs than replacing the sensor itself. Although the sensor is inexpensive, prolonged operation with incorrect temperature data can place unnecessary stress on multiple engine systems.
Potential consequences include:
- Engine overheating
- Reduced fuel economy
- Poor acceleration and throttle response
- Rough idle
- Increased exhaust emissions
- Premature catalytic converter damage
- Hard starting
- Persistent Check Engine Light
- Cooling fan operating continuously or failing to activate
If overheating occurs repeatedly, excessive engine temperature may damage the cylinder head gasket, warp aluminum cylinder heads, or accelerate wear of internal engine components. These repairs are significantly more expensive than replacing a faulty coolant temperature sensor.
Will the Vehicle Enter Limp Mode?
Some 5.7 HEMI applications may activate a protective operating strategy when coolant temperature data becomes unreliable. Depending on the vehicle’s calibration, the PCM may reduce engine power, limit throttle response, modify transmission shifting, or disable certain performance features to protect the engine.
Limp mode does not necessarily occur every time the coolant temperature sensor fails. However, when combined with severe overheating or multiple cooling system faults, protective operating modes become more likely. If reduced engine performance is accompanied by warning lights or overheating symptoms, the vehicle should be inspected as soon as possible rather than driven until the problem worsens.
When Should You Stop Driving Immediately?
Stop driving immediately if the engine shows signs of actual overheating. A rising temperature gauge, steam from the engine compartment, coolant leaking onto the ground, or an overheating warning message indicates that continuing to drive could cause severe engine damage.
Pull over safely, switch off the engine, and allow it to cool completely before opening the cooling system. Never remove the radiator cap while the engine is hot because pressurized coolant can cause serious burns.
If the temperature gauge remains within the normal operating range and the vehicle exhibits only a Check Engine Light with no drivability issues, it is generally safe to drive a short distance to a repair facility. Even in this situation, the fault should be diagnosed promptly to prevent secondary damage and restore proper engine management.
What Maintenance Helps Extend Coolant Temperature Sensor Life?
The coolant temperature sensor requires very little direct maintenance, but its lifespan depends heavily on the overall condition of the engine cooling system. Routine maintenance reduces thermal stress, prevents corrosion, and ensures that the sensor continues providing accurate temperature data throughout its service life.
Replace Engine Coolant at the Recommended Interval
Regular coolant replacement is the most effective way to protect the coolant temperature sensor. Modern engine coolant contains corrosion inhibitors and lubricating additives that prevent rust, mineral deposits, and electrochemical corrosion inside the cooling system. As these additives deteriorate over time, contamination increases and can affect both the sensor and surrounding cooling components.
Following the manufacturer’s recommended coolant replacement schedule helps maintain stable coolant chemistry and reduces the buildup of deposits on the sensor tip, allowing it to respond accurately to temperature changes.
Inspect the Cooling System for Leaks
Small coolant leaks should be repaired before they create larger cooling system problems. Leaking coolant can contaminate the electrical connector, promote corrosion, and gradually reduce coolant level, leading to overheating and inaccurate temperature readings.
During routine maintenance, inspect the thermostat housing, radiator hoses, water pump, radiator, coolant reservoir, and the area surrounding the coolant temperature sensor for signs of leakage or dried coolant residue. Addressing minor leaks early helps protect the sensor and prevents unnecessary coolant loss.
Keep the Electrical Connector Clean
The electrical connector should remain clean, dry, and securely attached. Dirt, oil residue, moisture, and road salt can gradually corrode the connector terminals, increasing electrical resistance and causing intermittent sensor signals.
Whenever the cooling system is serviced, disconnect the connector and inspect it for corrosion, damaged locking tabs, loose terminals, or coolant intrusion. Cleaning minor corrosion with an approved electrical contact cleaner can improve signal reliability and reduce the likelihood of future diagnostic trouble codes.
Prevent Engine Overheating
Avoiding repeated overheating significantly extends the life of the coolant temperature sensor. Excessive engine temperature accelerates the aging of the sensor’s internal thermistor while placing additional stress on nearby electrical components.
If the engine begins running hotter than normal, diagnose the underlying cause immediately. Common contributors include a failing thermostat, clogged radiator, worn water pump, low coolant level, malfunctioning cooling fan, or trapped air in the cooling system. Correcting these issues promptly prevents unnecessary thermal stress on the sensor.
Inspect the Sensor During Routine Service
The coolant temperature sensor should be inspected whenever major cooling system maintenance is performed. Although the sensor does not require scheduled replacement, a quick visual inspection can identify developing problems before they cause drivability issues.
Check for coolant seepage around the sensor threads, damaged wiring insulation, cracked plastic housings, or loose electrical connectors. If the sensor shows signs of corrosion or leakage during related repairs such as thermostat or water pump replacement, replacing it proactively may prevent future failures while access is already available.
Use High-Quality Replacement Parts
Installing a high-quality replacement sensor improves long-term reliability. OEM components and reputable aftermarket brands are manufactured to meet precise resistance and calibration specifications required by the PCM. Inferior sensors may produce inaccurate temperature readings even when new, resulting in repeated Check Engine Light warnings or poor engine performance.
Matching the replacement sensor to the vehicle’s VIN, engine generation, and production year also helps avoid compatibility problems caused by connector or thread design differences among various 5.7 HEMI applications.
By combining regular coolant maintenance, prompt leak repairs, routine connector inspections, and high-quality replacement parts, most 5.7 HEMI owners can expect the coolant temperature sensor to provide many years of reliable service while supporting accurate engine temperature monitoring and efficient engine operation.