Have you started hearing a clicking noise when turning your Subaru Outback, noticed vibrations during acceleration, or spotted grease around the inside of a wheel? These warning signs often indicate a failing CV axle, a critical drivetrain component responsible for transferring power from the transmission to the wheels while allowing the suspension and steering system to move freely.
Ignoring CV axle problems can lead to more than just annoying noises. A damaged axle can affect vehicle handling, increase wear on other drivetrain components, and eventually fail completely, potentially leaving you stranded and facing costly repairs. For Subaru Outback owners, this issue is especially important because the vehicle’s all wheel drive system relies on properly functioning axles to deliver power efficiently to all four wheels.
The good news is that a Subaru Outback CV axle replacement is a job many DIY enthusiasts can tackle with the right tools, preparation, and attention to detail. Completing the repair yourself can save hundreds of dollars in labor costs while giving you a better understanding of your vehicle’s drivetrain system.
In this comprehensive guide, you will learn how to diagnose a bad CV axle, gather the necessary tools and parts, safely remove the old axle, install a new one, and avoid common mistakes that could lead to premature failure or additional repairs.
Contents
- What Is a CV Axle and Why Is It Important?
- Symptoms of a Bad Subaru Outback CV Axle
- Tools and Parts Needed for Subaru Outback CV Axle Replacement
- Preparing Your Subaru Outback for CV Axle Replacement
- Step by Step Subaru Outback CV Axle Replacement Guide
- Final Inspection and Road Test
- Subaru Outback CV Axle Replacement Cost
- OEM vs Aftermarket CV Axles for Subaru Outback
- Common Mistakes to Avoid During CV Axle Replacement
- Frequently Asked Questions
- Conclusion
What Is a CV Axle and Why Is It Important?
A Constant Velocity axle, commonly known as a CV axle, is a vital component of your Subaru Outback’s drivetrain. Its primary function is to transfer power from the transmission to the wheels while allowing the suspension to move up and down and the wheels to turn left and right. Without a properly functioning CV axle, the engine’s power cannot be delivered efficiently to the wheels, resulting in poor vehicle performance and potential drivetrain damage.
One reason CV axles are especially important in the Subaru Outback is the vehicle’s symmetrical all wheel drive system. Unlike many front wheel drive vehicles, the Outback continuously distributes power to all four wheels. This means each axle plays a significant role in maintaining traction, stability, and overall driving performance. Even a minor issue with one axle can affect the entire AWD system.
Each CV axle contains inner and outer CV joints protected by rubber boots filled with grease. These joints allow smooth power transfer at varying angles as the suspension moves and the wheels steer. Over time, the boots can crack or tear, allowing grease to escape and contaminants such as water, dirt, and road debris to enter. Once contamination occurs, the joints begin to wear rapidly.
Driving with a damaged CV axle can lead to vibrations, unusual noises, reduced handling performance, and eventually complete axle failure. In severe cases, a broken axle can leave the vehicle unable to move, creating both safety concerns and expensive repair bills. Understanding the role of the CV axle helps Subaru owners recognize why early diagnosis and replacement are so important.
Symptoms of a Bad Subaru Outback CV Axle
Recognizing the warning signs of a failing CV axle can save you from more extensive and costly repairs later. One of the most common symptoms is a clicking or popping noise when turning. This sound is typically caused by wear in the outer CV joint and often becomes more noticeable during sharp turns or parking maneuvers.
Another common indicator is vibration during acceleration. If the inner CV joint begins to wear, you may feel vibrations through the steering wheel, floor, or seat while accelerating. These vibrations often increase with vehicle speed and can be mistaken for tire or wheel issues.
Grease leaking around the wheel area is another warning sign that should never be ignored. A torn CV boot allows grease to escape, leaving visible splatter inside the wheel well or on suspension components. Once the protective grease is lost, the CV joint quickly deteriorates due to friction and contamination.
Some drivers may also experience clunking noises when shifting between drive and reverse or during sudden acceleration. Excessive play inside the CV joint can create these sounds as drivetrain components move under load.
As damage progresses, steering and handling characteristics may change. You might notice reduced responsiveness, unusual wheel vibrations, or instability during cornering. These symptoms indicate that the axle may no longer be transferring power smoothly.
Addressing these warning signs as soon as they appear can prevent additional damage to wheel bearings, transmission seals, and other drivetrain components. Early replacement is almost always less expensive than waiting for complete axle failure.
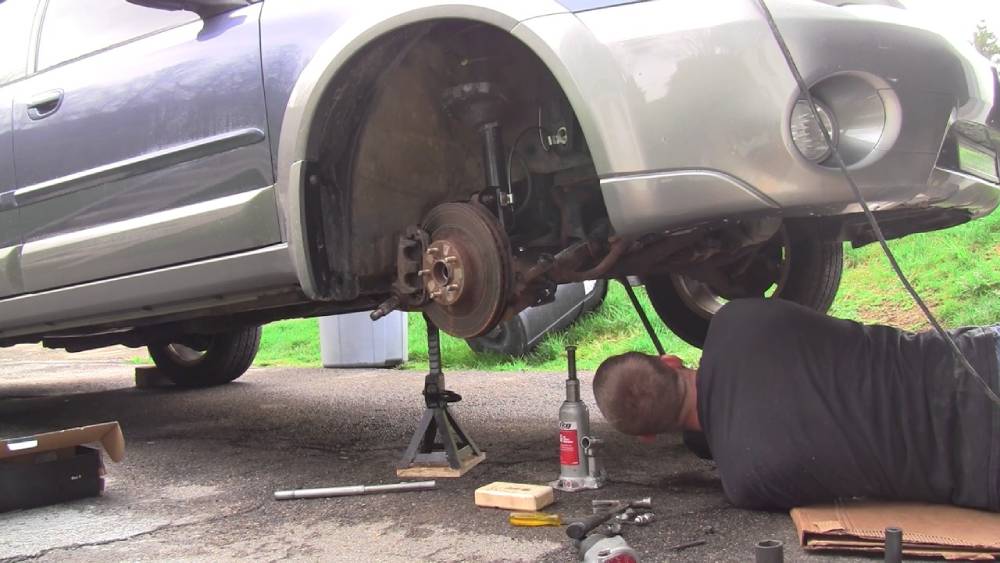
Tools and Parts Needed for Subaru Outback CV Axle Replacement
Before beginning a Subaru Outback CV axle replacement, it is important to gather all necessary tools and replacement parts. Having everything prepared in advance will make the job safer, faster, and more efficient.
Essential tools include a hydraulic floor jack, a pair of quality jack stands, a lug wrench, a breaker bar, and a torque wrench. These tools are necessary for safely lifting the vehicle, removing the wheel, loosening the axle nut, and tightening components to manufacturer specifications during reassembly.
A pry bar is often needed to remove the old axle from the transmission. Depending on the model year, a ball joint separator or pickle fork may also be required to disconnect suspension components and create enough clearance for axle removal. A hammer and punch can be useful when dealing with stubborn axle splines or retaining pins.
Many DIY mechanics find that an impact wrench significantly reduces the effort required to remove the axle nut, especially on older vehicles where corrosion may be present. Penetrating oil can also help loosen rusted fasteners and prevent broken bolts.
In addition to tools, you will need a replacement CV axle that matches your Subaru Outback’s year, engine, and drivetrain configuration. It is recommended to install a new axle nut rather than reusing the old one. Replacement cotter pins and transmission seals may also be necessary if wear or damage is discovered during the repair.
Safety should always be a priority. Protective gloves, safety glasses, and wheel chocks help reduce the risk of injury while working underneath the vehicle. Investing in proper safety equipment is a small cost compared to the potential consequences of an accident.
Preparing Your Subaru Outback for CV Axle Replacement
Proper preparation is one of the most important steps in a successful Subaru Outback CV axle replacement. Taking the time to set up your workspace correctly can improve safety, reduce frustration, and help prevent mistakes during the repair process.
Start by parking the vehicle on a flat, stable surface. A level working area minimizes the risk of the vehicle shifting while it is raised. Engage the parking brake and place wheel chocks behind the rear wheels to provide additional security.
Before lifting the vehicle, loosen the lug nuts on the wheel where the axle will be replaced. It is also a good idea to loosen the axle nut while the vehicle is still on the ground. Axle nuts are typically tightened to a very high torque specification, making them difficult to remove once the wheel is suspended in the air.
Position a hydraulic floor jack under the manufacturer’s recommended lifting point and carefully raise the vehicle. Once elevated, support it securely with jack stands placed at approved support locations. Never rely solely on a hydraulic jack to hold the vehicle while working underneath it.
Remove the wheel and set it aside. At this stage, inspect the surrounding suspension and steering components for signs of wear or damage. Checking ball joints, tie rod ends, brake hoses, and wheel bearings while access is available can help identify other maintenance needs before reassembly.
A clean work area is equally important. Organize removed fasteners and components in the order they are taken off the vehicle. This simple habit can save significant time during reinstallation and reduce the likelihood of missing hardware.
With the vehicle properly secured and the work area organized, you are ready to begin the axle removal process.
Step by Step Subaru Outback CV Axle Replacement Guide
The first step is removing the axle nut. Depending on your Subaru Outback model year, the axle nut may be staked into a groove on the axle shaft. Use a punch to release the staked portion before attempting removal. A breaker bar or impact wrench is usually required because of the high torque specification.
Once the axle nut has been removed, disconnect the lower ball joint from the steering knuckle or control arm. This creates the clearance necessary to move the steering assembly outward and free the axle from the wheel hub. Some models may require removal of additional suspension components depending on available space.
Carefully push the axle inward through the wheel hub. If corrosion has caused the splines to seize, apply penetrating oil and gently tap the axle with a soft faced hammer. Avoid striking the threads directly, as this can damage the axle and make reassembly difficult.
After the outer end of the axle is free from the hub, move to the transmission side. Most Subaru Outback axles are secured with a snap ring inside the transmission or differential. Insert a pry bar between the transmission housing and the inner CV joint housing, then apply a quick, firm motion to release the axle. Once disengaged, carefully remove the axle from the vehicle.
Before installing the new axle, compare it with the original component. Verify overall length, spline count, mounting points, and any ABS tone rings. Even small differences can cause installation issues or drivetrain problems later.
Insert the new axle into the transmission first. Apply steady pressure until the snap ring engages fully. A properly seated axle should not pull out by hand. Once confirmed, guide the outer splines through the wheel hub and reposition the steering knuckle.
Reconnect all suspension components according to factory specifications. Install the new axle nut and tighten all fasteners using a calibrated torque wrench. Proper torque is essential for both safety and long term reliability.
After reassembly is complete, reinstall the wheel and lower the vehicle to the ground. Perform a final torque check on the axle nut and wheel lug nuts before proceeding to the inspection stage.
Final Inspection and Road Test
Before considering the job complete, conduct a thorough inspection of all components that were removed or adjusted during the repair. Verify that the axle is fully seated in the transmission and that all suspension fasteners have been tightened to specification.
Inspect the CV boots to ensure they are not twisted or pinched. A damaged boot can quickly lead to grease loss and premature joint wear, even on a brand new axle. Also check nearby brake lines, ABS sensor wiring, and steering components to confirm nothing was accidentally disturbed during installation.
Rotate the wheel by hand while the vehicle remains elevated, if possible. Listen for unusual noises and verify smooth movement without binding or excessive resistance. This simple check can reveal installation problems before the vehicle returns to the road.
Once the inspection is complete, start the engine and slowly move the vehicle forward and backward. Pay attention to any abnormal sounds, vibrations, or warning lights. If everything appears normal, proceed with a short road test in a safe area.
During the road test, accelerate gradually and perform several gentle turns in both directions. Listen for clicking, clunking, or grinding noises that may indicate improper installation. Monitor steering feel and vehicle stability throughout the drive.
After returning home, perform one final visual inspection. Look for fluid leaks around the transmission seal and confirm that all fasteners remain secure. A successful Subaru Outback CV axle replacement should eliminate previous symptoms while restoring smooth and reliable power delivery through the all wheel drive system.
Subaru Outback CV Axle Replacement Cost
One of the biggest reasons Subaru owners choose to perform a CV axle replacement themselves is the potential cost savings. While the exact expense varies depending on the model year, axle brand, and local labor rates, understanding the typical costs can help you decide whether a DIY repair is the right option.
For most Subaru Outback models, a replacement CV axle typically costs between $80 and $400. Budget aftermarket axles are generally the least expensive option, while premium aftermarket and OEM axles can cost significantly more. The price difference often reflects variations in material quality, manufacturing standards, and expected service life.
If you choose the DIY route, the total repair cost usually includes the axle, a new axle nut, replacement cotter pins, and any additional supplies such as penetrating oil or grease. For owners who already have the necessary tools, the overall cost may remain well under $500.
Professional replacement services are considerably more expensive due to labor charges. Depending on your location and the complexity of the job, labor costs alone can range from $200 to $600 or more. When parts and labor are combined, a professional Subaru Outback CV axle replacement can easily cost between $400 and $1,000.
Dealership repairs tend to be the most expensive because they often use OEM components and higher hourly labor rates. Independent repair shops may offer more competitive pricing while still providing quality workmanship.
Although saving money is important, choosing the lowest priced axle is not always the best decision. A poorly manufactured axle can create vibrations, premature wear, and repeated repair costs. Balancing price, quality, and warranty coverage often leads to the best long term value.
OEM vs Aftermarket CV Axles for Subaru Outback
When shopping for a replacement CV axle, Subaru owners are often faced with a common question: should they choose an OEM axle or an aftermarket alternative? Each option offers distinct advantages and disadvantages that should be considered before making a purchase.
OEM, or Original Equipment Manufacturer, axles are produced to meet Subaru’s factory specifications. These components are designed to provide the same fit, performance, and durability as the axle originally installed in the vehicle. Because they are built specifically for Subaru applications, OEM axles typically offer excellent compatibility and minimal installation issues.
Many owners appreciate the reliability and predictable performance of OEM parts. In vehicles equipped with Subaru’s all wheel drive system, maintaining factory level drivetrain balance can be particularly important. However, this quality often comes with a higher purchase price.
Aftermarket CV axles are produced by third party manufacturers and are available in a wide range of quality levels. Some premium aftermarket brands offer performance and durability comparable to OEM products, often at a lower price point. These options can provide excellent value for owners seeking cost effective repairs.
On the other hand, lower quality aftermarket axles may use inferior materials or less precise manufacturing processes. This can lead to vibration issues, poor fitment, shorter service life, or premature joint wear. Reading customer reviews, researching manufacturer reputation, and reviewing warranty coverage can help identify trustworthy options.
For daily driven Subaru Outbacks that see regular commuting and highway use, either a high quality aftermarket axle or an OEM replacement can be a suitable choice. Owners who prioritize maximum reliability or frequently drive in demanding conditions may prefer OEM components despite the higher initial cost.
Ultimately, the best choice depends on your budget, driving habits, and long term ownership plans.
Common Mistakes to Avoid During CV Axle Replacement
Even experienced DIY mechanics can make mistakes during a Subaru Outback CV axle replacement. Avoiding these common errors can save time, prevent damage, and ensure the repair delivers long lasting results.
One of the most frequent mistakes is damaging the transmission seal during axle removal or installation. The seal is located where the axle enters the transmission and can be easily nicked or torn if excessive force is used. A damaged seal can lead to fluid leaks and additional repair expenses.
Another common error is reusing the old axle nut. Many manufacturers recommend replacing the axle nut whenever it is removed because it is designed for a specific clamping force. Reusing a worn nut may compromise safety and lead to loosening over time.
Incorrect torque application is another major issue. Tightening fasteners too much can damage threads or components, while insufficient torque can allow movement that leads to premature wear. Always consult the factory service specifications and use a quality torque wrench.
Some installers fail to fully seat the new axle into the transmission. If the retaining snap ring does not engage correctly, the axle may partially disengage during operation. This can cause leaks, drivetrain problems, or complete loss of power transfer.
Selecting the wrong replacement axle is another avoidable mistake. Differences in length, spline count, or ABS tone ring design can create serious compatibility issues. Always verify part numbers and compare the new axle with the original before installation.
Finally, many vehicle owners overlook related suspension and steering components while performing the repair. Since these parts are already accessible, it is wise to inspect ball joints, tie rod ends, wheel bearings, and bushings for wear. Addressing multiple issues at the same time can reduce future labor and improve overall vehicle reliability.
Frequently Asked Questions
How Long Does a Subaru Outback CV Axle Last?
The lifespan of a Subaru Outback CV axle depends on driving conditions, maintenance habits, and overall vehicle usage. In many cases, a factory installed CV axle can last well over 100,000 miles. Some owners may never need to replace an axle during the lifetime of the vehicle. However, damaged CV boots, exposure to road salt, off road driving, and harsh weather conditions can significantly reduce service life. Regular inspections of the CV boots can help identify problems before major joint damage occurs.
Can I Drive With a Clicking CV Axle?
A clicking CV axle may allow the vehicle to remain drivable for a short period, but continued operation is not recommended. The clicking sound usually indicates wear within the CV joint, and the condition will typically worsen over time. Ignoring the problem can result in complete axle failure, loss of power delivery, and additional damage to nearby drivetrain components. Replacing the axle as soon as symptoms appear is usually the safest and most cost effective solution.
Is CV Axle Replacement Difficult for Beginners?
Subaru Outback CV axle replacement is considered a moderate difficulty repair. Individuals with basic mechanical knowledge, proper tools, and a safe workspace can often complete the job successfully. However, seized fasteners, rusted components, and limited access around suspension parts may increase the challenge. Beginners should carefully follow a repair guide and allow extra time for the project.
Do I Need a Wheel Alignment After Replacing a CV Axle?
In many cases, a wheel alignment is not required if only the CV axle is replaced and no suspension geometry adjustments are made. However, if components such as control arms, tie rods, or strut assemblies are loosened or replaced during the repair, an alignment inspection is recommended. Proper alignment helps ensure even tire wear, stable handling, and optimal vehicle performance.
How Long Does a Subaru Outback CV Axle Replacement Take?
For an experienced technician, replacing a CV axle may take one to two hours. DIY mechanics should expect the process to take between two and five hours depending on experience level, tool availability, and the condition of the vehicle. Rusted hardware and unexpected complications can increase repair time, especially on older Subaru Outback models.
Should I Replace Both CV Axles at the Same Time?
Replacing both axles is not always necessary. If only one axle is showing signs of wear or damage, replacing the affected side is typically sufficient. However, if both axles have similar mileage and show comparable wear, replacing them together may reduce future labor costs and help maintain balanced drivetrain performance.
Conclusion
A Subaru Outback CV axle replacement may seem intimidating at first, but with proper preparation, the right tools, and a clear understanding of the procedure, it is a repair that many vehicle owners can successfully complete at home. Addressing CV axle problems early can prevent more serious drivetrain damage, improve vehicle reliability, and eliminate symptoms such as clicking noises, vibrations, and poor handling.
Throughout this guide, we explored the function of the CV axle, common warning signs of failure, the tools required for the repair, and the complete step by step replacement process. We also examined typical replacement costs, compared OEM and aftermarket options, and highlighted common mistakes that can affect the success of the repair.
For Subaru Outback owners, maintaining a healthy all wheel drive system is essential for long term performance and safety. A properly installed CV axle ensures smooth power delivery, predictable handling, and dependable operation in a variety of driving conditions.
Whether you choose a premium OEM replacement or a high quality aftermarket axle, investing in the repair at the first sign of trouble can save significant time and money in the future. Regular inspections of CV boots and drivetrain components will help extend the life of your Subaru Outback and keep it performing at its best for years to come.
Have you recently completed a Subaru Outback CV axle replacement or are you planning one soon? Share your experience, challenges, and tips in the comments to help fellow Subaru owners tackle this repair with confidence.