If your Subaru Forester has started making clicking noises while turning, vibrating during acceleration, or showing signs of grease leaking around the wheels, a failing CV axle may be the culprit. While many drivers immediately assume this repair requires an expensive visit to a dealership, the reality is that a Subaru Forester CV axle replacement is a project that many DIY enthusiasts can successfully complete at home with the right tools and guidance.
The CV axle, short for Constant Velocity axle, plays a critical role in transferring power from the transmission to the wheels while allowing the suspension and steering systems to move freely. When a CV joint begins to wear out or a protective boot becomes damaged, performance and safety can quickly deteriorate. Ignoring the problem may lead to more extensive drivetrain damage and significantly higher repair costs.
One of the biggest concerns for Subaru owners is balancing repair expenses with reliability. Dealership repairs can often cost hundreds or even thousands of dollars, leaving many drivers searching for a more affordable solution. Fortunately, replacing a CV axle yourself can save a substantial amount of money while giving you a better understanding of your vehicle’s drivetrain system.
In this complete DIY guide, you will learn how to identify CV axle problems, gather the necessary tools, remove the old axle, install a new one, and avoid common mistakes that can turn a straightforward repair into a frustrating experience.
Contents
- What Is a CV Axle and Why Is It Important?
- Signs Your Subaru Forester Needs a CV Axle Replacement
- Tools and Parts Needed for Subaru Forester CV Axle Replacement
- Safety Precautions Before Starting
- Subaru Forester CV Axle Replacement Step by Step
- Subaru Forester CV Axle Replacement Cost
- Common Mistakes During CV Axle Replacement
- Tips to Extend CV Axle Life
- Frequently Asked Questions
- Conclusion
What Is a CV Axle and Why Is It Important?
Before beginning a Subaru Forester CV axle replacement, it is important to understand the function of this critical drivetrain component. A CV axle, or Constant Velocity axle, connects the transmission to the wheel hubs and delivers engine power to the wheels. Unlike a traditional driveshaft, a CV axle can operate efficiently while the suspension moves up and down and the wheels turn left and right.
Subaru Forester models are known for their Symmetrical All Wheel Drive system, which relies heavily on properly functioning CV axles. Each axle contains inner and outer CV joints that allow smooth power transfer regardless of road conditions or steering angle.
The outer CV joint is responsible for maintaining power delivery while the wheels are turning. The inner CV joint compensates for suspension travel and drivetrain movement. Together, these joints ensure a smooth driving experience whether you are navigating city streets or tackling rough terrain.
When a CV axle begins to fail, the consequences can range from annoying noises to severe drivetrain issues. A damaged axle can reduce vehicle stability, create excessive vibration, and eventually leave the vehicle unable to transfer power to the wheels. Addressing the issue early can prevent more expensive repairs and keep your Subaru Forester operating safely and efficiently.
Signs Your Subaru Forester Needs a CV Axle Replacement
Recognizing the symptoms of a failing CV axle can help you avoid unexpected breakdowns and costly repairs. Fortunately, most worn CV axles provide warning signs long before complete failure occurs.
One of the most common symptoms is a clicking or popping sound when turning. This noise is usually caused by wear inside the outer CV joint. The sound often becomes more noticeable during tight turns, especially when accelerating from a stop.
Another warning sign is vibration during acceleration. If your Subaru Forester shakes or vibrates while gaining speed, a worn inner CV joint may be creating an imbalance in the drivetrain. Unlike tire-related vibrations, CV axle vibrations typically become more noticeable under load.
Grease leaking near the wheels is another indication that the CV axle requires attention. The rubber CV boot protects the joint from dirt, moisture, and debris while retaining lubrication. Once the boot cracks or tears, grease escapes and contaminants enter the joint, accelerating wear.
Drivers may also notice clunking sounds when shifting from drive to reverse or during sudden acceleration. In advanced cases, excessive play can develop within the axle assembly, resulting in poor handling and reduced drivetrain performance.
Performing a visual inspection during routine maintenance can often reveal these problems before they become severe.
Tools and Parts Needed for Subaru Forester CV Axle Replacement
Having the correct tools before starting the job can make the difference between a smooth repair and a frustrating afternoon in the garage. Fortunately, most of the required equipment is commonly found in a well-equipped home workshop.
Essential tools include a floor jack, sturdy jack stands, wheel chocks, a breaker bar, a torque wrench, a complete socket set, a pry bar, a hammer, needle nose pliers, and a punch tool. Penetrating oil is also highly recommended, especially for older Subaru Forester models where suspension components may be corroded or seized.
Safety equipment should never be overlooked. Mechanic gloves, eye protection, and a stable work surface are crucial when working underneath any vehicle.
Choosing the correct replacement axle is equally important. Subaru owners generally have two options. OEM axles provide factory-level fitment and durability, making them the preferred choice for long-term reliability. However, they are typically more expensive than aftermarket alternatives.
High-quality aftermarket axles can offer excellent value and substantial savings. When selecting an aftermarket unit, pay close attention to spline count, axle length, ABS ring compatibility, and manufacturer reputation. Purchasing the cheapest available option may lead to vibration issues, premature wear, or installation difficulties.
Before beginning the replacement process, compare the new axle with the old one to ensure all dimensions and connection points match correctly. Taking a few minutes to verify compatibility can prevent significant delays during installation.
Safety Precautions Before Starting
Safety should always be your first priority when performing a Subaru Forester CV axle replacement. Although the procedure is relatively straightforward, working underneath a vehicle and handling suspension components can be dangerous if proper precautions are not followed.
Begin by parking the vehicle on a flat, solid surface. Engage the parking brake and place wheel chocks behind the wheels that will remain on the ground. This prevents any unexpected movement while the vehicle is elevated.
Before lifting the Forester, loosen the axle nut and wheel lug nuts slightly while the tire is still in contact with the ground. Attempting to remove a tightly torqued axle nut after the vehicle is raised can cause instability and increase the risk of accidents.
Use a quality floor jack and support the vehicle with properly rated jack stands positioned at the manufacturer’s recommended lift points. Never rely solely on a hydraulic jack to support the vehicle while you work underneath it.
Safety glasses are highly recommended because rust particles, dirt, and grease can easily fall into your eyes during disassembly. Mechanic gloves can also help protect your hands from sharp edges and hot components.
If your Subaru has recently been driven, allow sufficient time for the brakes, exhaust system, and surrounding components to cool before beginning work. Taking a few extra minutes to prepare safely can prevent injuries and ensure a smoother repair process.
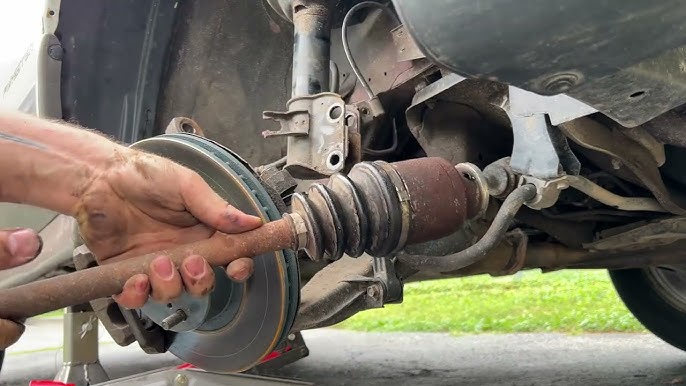
Subaru Forester CV Axle Replacement Step by Step
Replacing a CV axle on a Subaru Forester requires patience and attention to detail, but the process is manageable for most DIY mechanics.
Start by removing the center cap and loosening the axle nut. Because this nut is often tightened to a very high torque specification, a breaker bar may be necessary. Once the axle nut is loose, raise the vehicle and secure it on jack stands before removing the wheel.
With the wheel removed, locate the suspension components that restrict axle removal. Depending on the model year, you may choose to disconnect the lower ball joint or remove the lower strut bolts. Many DIY mechanics prefer disconnecting the ball joint because it typically requires less effort and preserves wheel alignment settings.
After freeing the steering knuckle, carefully push the outer axle splines out of the wheel hub. Corrosion can sometimes cause the axle to seize within the hub. Applying penetrating oil and using gentle hammer taps can help loosen stubborn components without damaging the wheel bearing.
Next, remove the inner CV joint from the transmission. Insert a pry bar between the inner joint housing and the transmission case, then apply firm pressure to release the retaining clip. Once released, the axle should slide out smoothly.
Before installing the replacement axle, compare it with the original unit. Verify overall length, spline count, ABS tone ring design, and joint configuration. Installing an incorrect axle can lead to fitment issues and drivability problems.
Insert the new axle into the transmission until the retaining clip locks securely into place. A gentle pull should confirm that the axle is fully seated. Guide the outer splines into the wheel hub and reassemble the suspension components in reverse order.
Reinstall the axle nut, wheel, and all removed hardware. Tighten every fastener according to the factory torque specifications for your specific Subaru Forester model year. Proper torque is essential for maintaining wheel bearing life and drivetrain reliability.
After lowering the vehicle, perform a short test drive. Listen for unusual noises and verify that steering, acceleration, and braking feel normal.
Subaru Forester CV Axle Replacement Cost
One of the primary reasons many owners choose a DIY Subaru Forester CV axle replacement is the opportunity to save money. The total cost can vary significantly depending on whether you perform the repair yourself or hire a professional technician.
For DIY repairs, a replacement CV axle typically costs between $60 and $350 depending on brand, quality, and whether you choose an OEM or aftermarket component. Additional supplies such as penetrating oil, shop towels, anti seize compound, and replacement hardware may add another $10 to $30 to the project.
If you already own basic automotive tools, your out of pocket expense may be limited to the cost of the axle itself. However, first time DIY mechanics may need to purchase a torque wrench, breaker bar, or jack stands, which can increase the initial investment.
Professional repair costs are considerably higher. Independent repair shops generally charge between $300 and $700 for parts and labor. Subaru dealerships often charge between $500 and $1,200 depending on local labor rates and the specific Forester model.
Although a DIY repair requires several hours of work, many Subaru owners find the savings worthwhile. Completing the job yourself can potentially reduce repair costs by hundreds of dollars while providing valuable hands on experience with your vehicle’s drivetrain system.
When comparing costs, remember that choosing a high quality replacement axle often provides better long term value than selecting the cheapest available option. A reliable component can help prevent premature wear, repeat repairs, and additional labor expenses in the future.
Common Mistakes During CV Axle Replacement
Even experienced DIY mechanics can make mistakes during a Subaru Forester CV axle replacement. Understanding the most common errors can help ensure a successful repair and prevent unnecessary expenses.
One of the most frequent mistakes is damaging the transmission seal during axle removal or installation. The seal is designed to keep transmission fluid contained while allowing the axle to rotate freely. Using excessive force or improper tools can tear the seal, resulting in fluid leaks that require additional repairs.
Another common issue occurs when the new axle is not fully seated in the transmission. The retaining clip must lock securely into place. If the axle is only partially installed, it may disconnect while driving or cause drivetrain vibrations. Always verify engagement by gently pulling on the axle after installation.
Many DIY mechanics also underestimate the importance of proper torque specifications. Over tightening or under tightening the axle nut can damage wheel bearings, reduce component lifespan, and create safety concerns. A quality torque wrench should always be used during final assembly.
Reusing a damaged axle nut is another avoidable mistake. Many manufacturers recommend replacing the axle nut because it is designed for a specific clamping force. Installing a new nut is inexpensive insurance against future problems.
Some vehicle owners focus solely on the axle and overlook surrounding components. Worn ball joints, tie rod ends, wheel bearings, or suspension bushings can create symptoms similar to a failing CV axle. Inspecting these components while everything is disassembled can save time and prevent future repairs.
Tips to Extend CV Axle Life
Although CV axles eventually wear out, proper maintenance can significantly extend their service life and reduce the likelihood of premature failure.
Regular inspection of the CV boots is one of the most effective preventive measures. The rubber boots protect the joints from dirt, water, and road debris while keeping grease inside. A small crack or tear can quickly lead to contamination and accelerated wear. Catching boot damage early may allow for a simple repair instead of a complete axle replacement.
Avoid aggressive driving habits whenever possible. Hard launches, sudden acceleration, and sharp turns under heavy throttle place additional stress on CV joints and drivetrain components. Smooth driving can help reduce wear over time.
Routine suspension maintenance also plays an important role. Worn shocks, struts, and bushings can alter suspension geometry and increase stress on the CV axles. Keeping the suspension system in good condition helps maintain proper axle angles and operating conditions.
If you frequently drive on rough roads or off road trails, inspect the underside of your Subaru Forester more often. Rocks, debris, and harsh impacts can damage CV boots and accelerate component wear.
Addressing unusual noises, vibrations, or grease leaks as soon as they appear can prevent minor issues from becoming major repairs. Early intervention is often the key to maximizing axle lifespan.
Frequently Asked Questions
Can I drive with a bad CV axle?
While a vehicle may remain drivable for a short period, continuing to drive with a failing CV axle is not recommended. The problem will typically worsen over time and may eventually result in complete axle failure, leaving the vehicle unable to transfer power effectively.
How long does a Subaru Forester CV axle replacement take?
For experienced DIY mechanics, the replacement process generally takes between one and three hours per axle. First time installers may need additional time to deal with seized components or learn the procedure.
Should I replace both CV axles at the same time?
Not necessarily. If only one axle is showing signs of wear, replacing the failed component is usually sufficient. However, if both axles have similar mileage and wear levels, replacing them together may reduce future labor costs.
Are aftermarket CV axles reliable?
Many aftermarket axles provide excellent performance when purchased from reputable manufacturers. Premium aftermarket options often offer a balance between affordability and durability. Researching product reviews and selecting trusted brands can help ensure long term reliability.
Why is my Subaru Forester still vibrating after replacing the CV axle?
Persistent vibration may indicate another underlying issue such as wheel imbalance, worn wheel bearings, damaged suspension components, incorrect axle installation, or drivetrain problems unrelated to the CV axle itself. A thorough inspection may be required to identify the root cause.
Conclusion
A Subaru Forester CV axle replacement may seem intimidating at first, but it is a repair that many vehicle owners can successfully complete with the right tools, preparation, and attention to detail. Understanding the warning signs of a failing CV axle, following proper installation procedures, and avoiding common mistakes can save both time and money.
Replacing a worn axle promptly not only restores smooth power delivery but also helps protect other drivetrain components from unnecessary stress and damage. Whether you are addressing clicking noises during turns, vibrations while accelerating, or visible CV boot damage, taking action early can prevent more costly repairs in the future.
For many Subaru owners, performing this repair at home offers significant savings compared to dealership labor rates. Beyond the financial benefits, completing a Subaru Forester CV axle replacement yourself provides valuable mechanical knowledge and a greater understanding of how your vehicle operates.
If you have noticed symptoms of CV axle wear, now is the perfect time to inspect your vehicle and plan your repair. With patience and the guidance provided in this article, you can confidently tackle the job and keep your Subaru Forester performing at its best for years to come.