Have you noticed weak airflow coming from your Subaru’s vents, unpleasant odors inside the cabin, or increased dust accumulation on interior surfaces? These common issues are often caused by a dirty or clogged cabin air filter. While many Subaru owners stay on top of oil changes and tire maintenance, cabin air filter replacement is a simple yet essential service that is frequently overlooked.
The cabin air filter plays a critical role in maintaining clean air inside your vehicle. It traps dust, pollen, dirt, road debris, and other airborne contaminants before they enter the passenger compartment through the heating and air conditioning system. Over time, the filter becomes clogged, reducing airflow, forcing the HVAC system to work harder, and negatively affecting cabin comfort.
Fortunately, a Subaru cabin air filter replacement is one of the easiest maintenance tasks you can perform yourself. In most Subaru models, the entire process takes less than 15 minutes and requires little to no special tools. By replacing the filter regularly, you can improve air quality, enhance HVAC performance, reduce unpleasant odors, and save money on dealership service fees.
In this complete DIY guide, you’ll learn when to replace your Subaru cabin air filter, how to identify warning signs, and the exact steps needed to install a new filter correctly.
Contents
- What Is a Subaru Cabin Air Filter?
- Signs Your Subaru Cabin Air Filter Needs Replacement
- How Often Should You Replace a Subaru Cabin Air Filter?
- Tools and Materials Needed
- Subaru Cabin Air Filter Replacement Step by Step
- Common Mistakes to Avoid
- OEM vs Aftermarket Subaru Cabin Air Filters
- Subaru Cabin Air Filter Replacement Cost
- Frequently Asked Questions
- Conclusion
What Is a Subaru Cabin Air Filter?
A cabin air filter is an essential component of your Subaru’s ventilation system. Its primary purpose is to prevent airborne contaminants from entering the passenger compartment through the heating, ventilation, and air conditioning system. As outside air flows through the vehicle, the filter captures dust, pollen, mold spores, smoke particles, and other pollutants before they reach the cabin.
Most modern Subaru models, including the Outback, Forester, Crosstrek, Impreza, Legacy, and Ascent, are equipped with a cabin air filter located behind the glove box. Although relatively small and inexpensive, this filter has a significant impact on driving comfort and overall air quality inside the vehicle.
When the filter becomes clogged with dirt and debris, airflow through the HVAC system decreases. This can lead to poor heating and cooling performance, unpleasant odors, and increased strain on the blower motor. Replacing the cabin air filter at recommended intervals helps maintain fresh cabin air, improves HVAC efficiency, and creates a more comfortable environment for both drivers and passengers.
For Subaru owners who frequently drive in urban areas, dusty environments, or regions with heavy pollen, regular cabin air filter replacement is especially important. A clean filter helps ensure that the air you breathe inside your vehicle remains as clean and healthy as possible.
Signs Your Subaru Cabin Air Filter Needs Replacement
Many Subaru owners do not realize their cabin air filter is clogged until noticeable symptoms begin affecting comfort and HVAC performance. Recognizing these warning signs can help you replace the filter before it causes more serious issues.
One of the most common signs is reduced airflow from the vents. Even when the fan is set to a high speed, the air coming through the dashboard vents may feel weak. This occurs because dirt and debris restrict airflow through the filter material.
Unpleasant odors inside the cabin are another indication that replacement may be necessary. Over time, moisture, dust, and organic matter can accumulate within the filter, creating musty smells whenever the heating or air conditioning system is running.
A dirty cabin air filter may also contribute to excessive dust buildup inside the vehicle. If you find yourself cleaning interior surfaces more frequently than usual, the filter may no longer be effectively trapping airborne particles.
Drivers who suffer from allergies may notice increased sneezing, itchy eyes, or respiratory discomfort while driving. A clogged filter cannot efficiently capture pollen and other allergens, allowing them to circulate throughout the cabin.
In some cases, you may also hear increased fan noise. As airflow becomes restricted, the blower motor must work harder to push air through the clogged filter, resulting in louder operation and additional wear on HVAC components.
How Often Should You Replace a Subaru Cabin Air Filter?
The ideal replacement interval depends on driving conditions, climate, and vehicle usage. However, Subaru generally recommends replacing the cabin air filter approximately every 12,000 to 15,000 miles or at least once every year.
While this guideline works well for many drivers, some situations may require more frequent replacement. Vehicles driven on dirt roads or in areas with high levels of dust and pollution often accumulate contaminants much faster. Likewise, regions with heavy seasonal pollen can quickly clog a filter, especially during spring and early summer.
Pet owners may also need to replace the filter more often. Pet hair, dander, and additional debris can reduce filter efficiency and contribute to odors within the cabin. Drivers who frequently use their air conditioning or heating systems throughout the year may benefit from more regular inspections as well.
A practical approach is to inspect the cabin air filter during every major service interval. If the filter appears dark, clogged, or covered in debris, replacement is recommended regardless of mileage.
Many Subaru owners choose to install a fresh cabin air filter before summer or winter begins. This ensures maximum airflow during periods when the HVAC system is used most frequently. Regular replacement not only improves comfort but can also help extend the life of expensive HVAC components by reducing unnecessary strain on the system.
Tools and Materials Needed
One of the biggest advantages of performing a Subaru cabin air filter replacement yourself is that the job requires very few tools and can typically be completed in less than 15 minutes. Even first time DIYers can handle the process with minimal mechanical experience.
For most Subaru models, no tools are required at all. The glove box can usually be lowered by hand, allowing direct access to the cabin air filter housing. In some cases, a small flathead screwdriver may be helpful for releasing clips or gently removing trim pieces, but this is rarely necessary.
The most important item you will need is a replacement cabin air filter. Subaru owners generally have two options: OEM filters and aftermarket filters. OEM filters are manufactured to Subaru specifications and provide a guaranteed fit. They are often preferred by owners who want factory quality components. Aftermarket filters, on the other hand, are widely available and may offer enhanced filtration features such as activated carbon layers that help reduce odors and harmful pollutants.
Before purchasing a replacement filter, verify compatibility with your specific Subaru model and model year. Although many Subaru vehicles use similar filter designs, dimensions and specifications can vary.
The total cost of a DIY replacement is usually quite affordable. Depending on the filter brand and filtration technology, most owners can expect to spend significantly less than they would for a dealership service visit. This simple maintenance task provides an excellent opportunity to save money while keeping your vehicle in top condition.
Subaru Cabin Air Filter Replacement Step by Step
Replacing the cabin air filter in most Subaru models is a straightforward process. The exact design may vary slightly between vehicles, but the overall procedure remains largely the same.
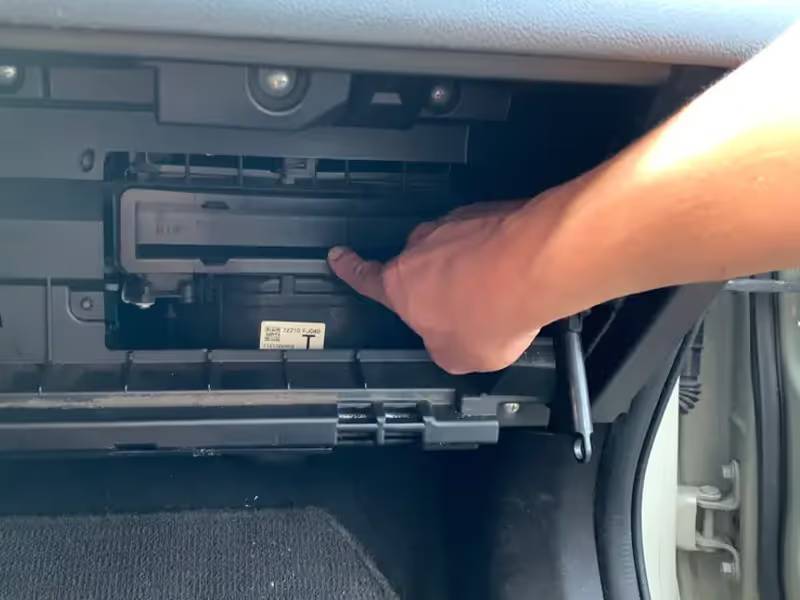
Begin by parking the vehicle on a level surface and turning off the engine. Open the passenger side door and fully empty the glove box so you can work without obstruction.
Next, locate the glove box retaining stops on both sides. Gently press the sides of the glove box inward to release the stops and allow the compartment to swing downward. Some models may also have a damper arm attached to the side of the glove box. If present, carefully disconnect it according to the manufacturer’s design.
With the glove box lowered, you will see the cabin air filter housing positioned behind it. Locate the access cover and release the retaining clips. Remove the cover and carefully slide out the old filter.
Before discarding the filter, inspect its condition. Many old filters contain dust, leaves, insects, pollen, and other debris that can significantly restrict airflow. Pay close attention to the airflow direction arrow printed on the side of the filter. This will help ensure correct installation of the new filter.
Insert the replacement filter into the housing, making sure the airflow arrow points in the proper direction. A filter installed incorrectly may reduce efficiency and airflow performance.
Once the new filter is seated properly, reinstall the housing cover and confirm that all clips are securely fastened. Raise the glove box back into position and reconnect any damper arm if applicable. Finally, restore the glove box stops and close the compartment.
Start the vehicle and turn on the HVAC system. Check for strong airflow, smooth blower operation, and the absence of unusual odors. The entire process is typically completed in less than 15 minutes.
Common Mistakes to Avoid
Although replacing a Subaru cabin air filter is a simple maintenance task, several common mistakes can affect performance and reduce the effectiveness of the new filter.
One of the most frequent errors is installing the filter in the wrong orientation. Most filters include an airflow arrow that indicates the correct direction of air movement through the HVAC system. Ignoring this arrow can restrict airflow and decrease filtration efficiency.
Another common mistake is purchasing the wrong filter size. Subaru vehicles may use different filter dimensions depending on the model and production year. Always verify compatibility before installation to avoid fitment issues.
Many owners also overlook the importance of cleaning the filter housing. Leaves, dust, and debris often accumulate inside the compartment over time. Installing a new filter without removing these contaminants can limit airflow and introduce unwanted odors into the cabin.
Applying excessive force while lowering or reinstalling the glove box can damage clips, hinges, or retaining stops. Taking a few extra moments to work carefully helps prevent unnecessary repairs.
Perhaps the most costly mistake is delaying replacement for too long. A severely clogged cabin air filter forces the blower motor to work harder, which can increase wear on HVAC components and lead to reduced heating and cooling performance.
By avoiding these simple mistakes, Subaru owners can maximize filter lifespan, maintain optimal airflow, and enjoy cleaner air throughout the year.
OEM vs Aftermarket Subaru Cabin Air Filters
When it is time to replace your Subaru cabin air filter, one of the most common questions is whether to choose an OEM filter or an aftermarket alternative. Both options can provide effective filtration, but each comes with its own advantages and considerations.
OEM, or Original Equipment Manufacturer, filters are designed specifically for Subaru vehicles and are built to meet factory specifications. Because they are engineered for a precise fit, installation is typically straightforward and performance is predictable. Many Subaru owners prefer OEM filters because they provide peace of mind and maintain the same filtration standards that came with the vehicle when it was new.
Aftermarket filters are produced by third party manufacturers and are often available at a lower price point. In addition to standard filtration options, many aftermarket brands offer premium features such as activated carbon layers, enhanced particulate filtration, and odor reduction technology. These features can be particularly beneficial for drivers who frequently travel in congested urban environments or areas with high levels of airborne pollutants.
The best choice depends on your priorities. If you value factory specifications and guaranteed compatibility, an OEM filter may be the ideal solution. If you are looking for improved filtration performance or greater value for money, a reputable aftermarket filter can be an excellent alternative.
Regardless of which option you choose, selecting a high quality filter and replacing it at regular intervals will have a much greater impact on air quality and HVAC performance than the brand name alone.
Subaru Cabin Air Filter Replacement Cost
One of the primary reasons many Subaru owners choose to replace the cabin air filter themselves is the significant cost savings. Since the procedure is simple and requires minimal tools, the majority of the expense comes from the replacement filter itself.
For a DIY replacement, costs are generally limited to the purchase price of the filter. Standard aftermarket filters are often the most budget friendly option, while premium activated carbon filters and OEM replacements may cost slightly more. Even with a higher quality filter, the total expense remains relatively low compared to professional service.
Independent repair shops typically charge both parts and labor. Although labor costs for this service are usually modest due to the short installation time, the final bill can still be several times higher than the cost of performing the replacement yourself.
Dealership service departments generally charge the highest rates. While dealership technicians have model specific expertise and use factory approved components, many owners find it difficult to justify the additional expense for a maintenance task that can often be completed at home in less than 15 minutes.
Over the life of a vehicle, replacing the cabin air filter yourself can result in meaningful savings. More importantly, the simplicity of the task encourages more frequent maintenance, helping to preserve HVAC performance and improve cabin air quality throughout the year.
Frequently Asked Questions
Can I drive with a dirty cabin air filter?
Yes, the vehicle will continue to operate with a dirty cabin air filter. However, airflow may become restricted, air quality may decline, and the HVAC system may need to work harder to maintain comfortable temperatures. Replacing the filter promptly is recommended to avoid unnecessary strain on the system.
Does a cabin air filter affect air conditioning performance?
Yes. A clogged filter restricts airflow through the ventilation system, making it more difficult for conditioned air to reach the cabin. This can reduce the effectiveness of both the air conditioner and the heater.
Are Subaru cabin air filters model specific?
In many cases, yes. Different Subaru models and production years may use different filter sizes and designs. Always verify compatibility before purchasing a replacement filter.
Can I clean and reuse a cabin air filter?
Most standard cabin air filters are designed for single use and should be replaced when dirty. Attempting to clean them often fails to restore full filtration efficiency and may damage the filter material.
What happens if I never replace the cabin air filter?
Neglecting replacement can lead to poor airflow, unpleasant odors, increased dust inside the cabin, reduced HVAC performance, and additional wear on blower motor components. Over time, these issues can negatively affect comfort and potentially increase maintenance costs.
Is an activated carbon cabin air filter worth it?
For many drivers, the answer is yes. Activated carbon filters can help reduce odors, vehicle exhaust fumes, and certain airborne pollutants. They are especially beneficial in heavily populated areas with high traffic levels or poor air quality.
Conclusion
A Subaru cabin air filter replacement may seem like a minor maintenance task, but its impact on driving comfort and HVAC performance is significant. A clean cabin air filter helps maintain healthy air quality inside the vehicle, improves airflow through the heating and air conditioning system, and reduces the amount of dust, pollen, and other airborne contaminants that enter the passenger compartment.
Fortunately, replacing the cabin air filter is one of the simplest DIY maintenance procedures Subaru owners can perform. In most cases, the job requires little to no specialized tools and can be completed in less than 15 minutes. By following the steps outlined in this guide, you can save money on labor costs while ensuring your HVAC system continues to operate efficiently.
Regular replacement is especially important for drivers who frequently encounter heavy traffic, dusty roads, seasonal pollen, or urban air pollution. Ignoring a clogged filter can lead to reduced airflow, unpleasant odors, and unnecessary strain on HVAC components. A small investment in routine maintenance today can help prevent larger expenses in the future.
Whether you choose an OEM replacement or a high quality aftermarket option, keeping your cabin air filter fresh is one of the easiest ways to enhance your Subaru ownership experience. Make cabin air filter inspections part of your regular maintenance schedule, and enjoy cleaner air, improved comfort, and better HVAC performance every time you get behind the wheel.
Have you recently completed a Subaru cabin air filter replacement? Share your experience, maintenance tips, or favorite filter brand in the comments below.