Seeing the Honda CRV Check Fuel Cap warning can be frustrating, especially when you are confident that the fuel cap is already tightened properly. Many drivers assume the cap itself is defective, but that is not always the case. This warning often indicates that the vehicle has detected a problem within the evaporative emissions system, also known as the EVAP system. Even a small vapor leak can trigger the message and eventually illuminate the check engine light.
Fortunately, the issue is usually easier to diagnose than many people expect. In some cases, cleaning and reinstalling the fuel cap correctly is enough to solve the problem. However, a worn seal, a damaged filler neck, or a faulty EVAP component can produce the same warning. Understanding the real cause helps you avoid replacing unnecessary parts and spending more money than needed.
This guide explains everything you need to know about the Honda CRV Check Fuel Cap warning. You will learn what the message means, why it appears, how to inspect your vehicle, and how to reset the warning correctly. In addition, we will cover the most common diagnostic trouble codes, estimated repair costs, and practical maintenance tips that can help prevent the problem from returning. By the end of this article, you will know exactly which steps to take before deciding whether professional diagnosis is necessary.
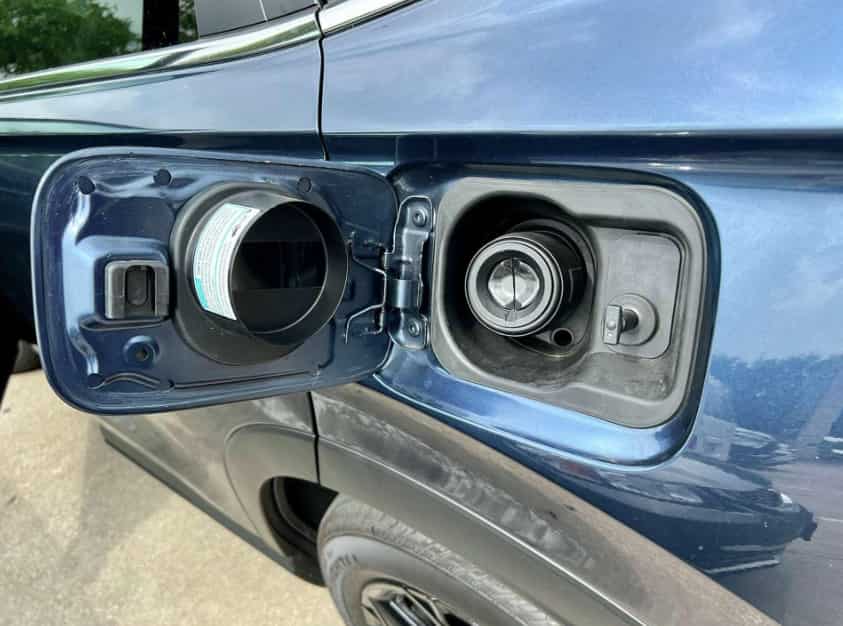
What Does the Honda CRV Check Fuel Cap Message Mean?
The Honda CRV Check Fuel Cap message tells you that the vehicle has detected a possible leak in the fuel vapor system. Although the warning mentions the fuel cap, the cap is not always the source of the problem. In many cases, another component within the EVAP system causes the warning.
The EVAP system prevents gasoline vapors from escaping into the atmosphere. Instead, it captures the vapors inside a charcoal canister. The engine later burns those vapors during normal operation. This process reduces emissions and helps the vehicle meet environmental standards.
A loose fuel cap is one of the most common reasons for the warning. However, it is not the only one. A worn fuel cap seal, a cracked EVAP hose, a damaged filler neck, or a faulty purge valve can also trigger the same message. Therefore, replacing the fuel cap without checking the rest of the system may waste both time and money.
The powertrain control module constantly monitors pressure inside the EVAP system. When it detects an unexpected pressure change, it stores a fault and displays the Honda CRV Check Fuel Cap warning. If the problem continues, the check engine light may also turn on after several drive cycles.
Many drivers expect the warning to disappear immediately after tightening the fuel cap. However, that rarely happens. The vehicle must complete its self diagnostic tests before it clears the message. As a result, you may need to drive normally for several trips before the system confirms that the leak no longer exists.
Understanding the meaning of the Honda CRV Check Fuel Cap warning helps you troubleshoot the problem correctly. Start by inspecting the fuel cap, but do not stop there. Check the entire EVAP system if the warning returns. A careful inspection often prevents unnecessary repairs and reduces long term maintenance costs.
Can You Drive With the Honda CRV Check Fuel Cap Warning?
Yes, you can usually continue driving after the Honda CRV Check Fuel Cap warning appears. In most cases, the message does not indicate a serious engine problem. Instead, it points to a possible leak in the EVAP system. If the vehicle drives normally and no other warning lights appear, you can safely drive to your destination.
However, you should not ignore the warning for a long time. A small vapor leak can become a larger problem if left unchecked. In addition, an unresolved EVAP issue may trigger the check engine light and cause the vehicle to fail an emissions inspection. Fixing the problem early often saves both time and repair costs.
Pay close attention to how your Honda CR V behaves after the warning appears. If you notice a strong fuel smell, inspect the vehicle as soon as possible. Fuel odors may indicate a leak that requires immediate attention. You should also stop driving if you see fuel leaking from the vehicle or if the engine begins to run poorly.
Some symptoms require professional diagnosis without delay. These include hard starting after refueling, rough idling, poor engine performance, or a flashing check engine light. While these issues may not always relate to the fuel cap, they can indicate a more serious fault within the fuel or emissions system.
The first step is always simple. Park the vehicle safely and inspect the fuel cap. Make sure it is clean, properly aligned, and fully tightened. If the warning remains after several normal trips, scan the vehicle for diagnostic trouble codes. This step helps identify the real cause instead of replacing parts based on guesswork.
In short, the Honda CRV Check Fuel Cap warning rarely means you must stop driving immediately. Even so, you should investigate the cause as soon as possible. Early diagnosis helps protect the EVAP system, prevents unnecessary repairs, and keeps your Honda CR V running efficiently.
8 Common Causes of the Honda CRV Check Fuel Cap Warning
The Honda CRV Check Fuel Cap warning can appear for several reasons. Although a loose fuel cap is the most common cause, it is not the only possibility. The EVAP system includes multiple components that work together to keep fuel vapors sealed inside the vehicle. If one part fails, the system may detect a leak and display the warning message.
Understanding the most common causes helps you diagnose the problem faster. It also reduces the chance of replacing parts that still work properly.
Loose or Improperly Installed Fuel Cap
A loose fuel cap is the easiest problem to fix. After refueling, the cap may not seal correctly if it is not tightened all the way. Dirt around the filler opening can also prevent the cap from closing completely.
Remove the fuel cap and inspect both the cap and the filler neck. Clean away any dust or debris with a soft cloth. Then install the cap again and tighten it until it locks securely. After that, drive the vehicle for several trips and check whether the warning disappears.
Damaged Fuel Cap Seal
The rubber gasket inside the fuel cap creates an airtight seal. Over time, heat, age, and constant exposure to fuel vapors can damage the rubber. The seal may crack, flatten, or become hard enough to leak.
Inspect the gasket carefully under good lighting. Replace the fuel cap if you notice cracks, missing sections, or excessive wear. Installing a new cap is often less expensive than diagnosing a recurring EVAP leak.
Incorrect Replacement Fuel Cap
Many aftermarket fuel caps look identical to the original part. However, some do not meet Honda’s sealing specifications. A poor quality replacement cap may fit the filler neck but still allow small vapor leaks.
Always verify that the replacement matches your Honda CR V model year. Choosing a high quality OEM or equivalent replacement improves sealing performance and reduces the chance of repeated warning messages.
Dirt or Damage Around the Fuel Filler Neck
The fuel cap cannot create a proper seal if the filler neck is dirty or damaged. Dust, rust, and corrosion often build up around the sealing surface over time. Even a small amount of debris may allow fuel vapors to escape.
Clean the filler neck with a soft cloth before reinstalling the cap. If you notice heavy corrosion or visible damage, inspect the area more closely. In some cases, the filler neck itself requires repair or replacement.
Leaking EVAP Hose
The EVAP system uses several hoses to move fuel vapors between different components. These hoses operate in a hot environment and can become brittle as they age. Road debris or previous repairs may also damage them.
Even a tiny crack can trigger the Honda CRV Check Fuel Cap warning. Because small leaks are difficult to see, many repair shops use a smoke test to locate the exact source of the problem.
Faulty EVAP Purge Valve
The purge valve controls when stored fuel vapors enter the engine for combustion. If the valve sticks open or remains closed, the EVAP system cannot maintain the correct pressure. As a result, the vehicle may display the warning message.
A faulty purge valve can also cause rough idling, hard starting after refueling, and poor fuel economy. If these symptoms appear together, inspect the valve before replacing other EVAP components.
Failed EVAP Vent Valve or Charcoal Canister
The vent valve allows fresh air to enter the EVAP system during normal operation. At the same time, the charcoal canister stores fuel vapors until the engine burns them. Both components play an important role in controlling emissions.
Moisture, dirt, or internal damage can prevent either component from working correctly. Drivers who repeatedly overfill the fuel tank may also shorten the life of the charcoal canister. When either part fails, the warning may continue even after replacing the fuel cap.
Faulty Fuel Tank Pressure Sensor
The fuel tank pressure sensor measures pressure changes inside the EVAP system. The powertrain control module uses this information to detect leaks. If the sensor sends incorrect readings, the system may report a problem even when no leak exists.
Electrical issues can create similar symptoms. Corroded connectors, damaged wiring, or poor electrical connections may interrupt sensor signals. Professional testing with a scan tool usually confirms whether the sensor or another EVAP component has failed.
How to Fix the Honda CRV Check Fuel Cap Warning
Fixing the Honda CRV Check Fuel Cap warning starts with a careful inspection. In many cases, you can solve the problem without replacing expensive parts. Begin with the simplest checks before moving on to more advanced diagnostics. This approach saves time and reduces unnecessary repair costs.
Step 1. Park the Vehicle Safely
Park your Honda CR V on a flat surface and turn off the engine. Allow the vehicle to cool if you have been driving for a long time. Choose a well ventilated area and keep the vehicle away from open flames or sparks. Never inspect the fuel system while smoking or using equipment that may create a spark.
Step 2. Inspect the Fuel Cap
Remove the fuel cap and examine it carefully. Look for cracks, damaged threads, or signs of excessive wear. Pay close attention to the rubber gasket because it creates the seal that keeps fuel vapors inside the system.
If the gasket looks dry, cracked, or flattened, replace the fuel cap with a compatible part. A damaged seal often causes the Honda CRV Check Fuel Cap warning to return.
Step 3. Clean the Fuel Cap and Filler Neck
Dirt and dust can prevent the fuel cap from sealing correctly. Wipe the cap and the filler neck with a clean, soft cloth. Remove any debris that may interfere with the sealing surface.
Avoid using sharp tools or abrasive materials. They can scratch the filler neck and create a permanent leak.
Step 4. Reinstall the Fuel Cap Correctly
Place the fuel cap straight onto the filler neck. Turn it until it locks securely in place. Make sure the cap sits evenly against the sealing surface before closing the fuel door.
An improperly installed cap is one of the most common reasons the warning appears after refueling. Taking a few extra seconds to install it correctly can prevent future problems.
Step 5. Drive the Vehicle Normally
Start the engine and drive as you normally would. The onboard computer needs time to perform its EVAP self tests. Therefore, the warning may remain on for several trips even after you correct the problem.
Continue monitoring the dashboard during the next few days. If the warning disappears, the issue was likely related to the fuel cap or its seal.
Step 6. Replace the Fuel Cap if Necessary
Replace the fuel cap if cleaning and reinstalling it does not solve the problem. Always choose a replacement designed for your Honda CR V model year. A high quality cap provides a better seal and improves long term reliability.
Cheap universal fuel caps may fit the opening, but they do not always maintain the correct pressure. As a result, the warning can return shortly after installation.
Step 7. Scan for Diagnostic Trouble Codes
If the warning remains, connect an OBD II scanner to the vehicle. Record any stored diagnostic trouble codes before clearing them. These codes provide valuable information about the source of the problem.
Common EVAP related codes include P0442, P0455, P0456, and P0457. Each code points to a different type of leak or system fault. Reading the codes before replacing parts makes the repair process much more accurate.
Step 8. Inspect the EVAP System
If the fuel cap is not the problem, inspect the remaining EVAP components. Check the hoses for cracks, loose connections, or visible damage. Also inspect the purge valve, vent valve, charcoal canister, and fuel tank pressure sensor.
Small leaks are often difficult to find with a visual inspection alone. In that situation, a professional smoke test can locate the exact source of the leak without unnecessary parts replacement.
Step 9. Visit a Qualified Mechanic if the Warning Returns
Do not ignore a warning that keeps coming back. A recurring Honda CRV Check Fuel Cap message often indicates a deeper EVAP system problem. Professional diagnostic equipment can identify issues that are impossible to detect during a basic inspection.
Repairing the actual cause early helps prevent larger emissions system problems. It also reduces the risk of failing an emissions inspection and avoids replacing parts that still function correctly.
How to Reset the Honda CRV Check Fuel Cap Warning
Many drivers expect the warning to disappear as soon as they tighten the fuel cap. However, the system does not reset immediately. The vehicle must verify that the leak no longer exists before it removes the message from the dashboard.
Follow these steps to reset the Honda CRV Check Fuel Cap warning correctly.
Step 1. Turn Off the Engine
Park the vehicle in a safe location and switch off the engine. Wait a few moments before opening the fuel door. This allows the fuel system pressure to stabilize.
Step 2. Remove the Fuel Cap
Unscrew the fuel cap and inspect it carefully. Check the rubber gasket for cracks, flattening, or other signs of wear. Also inspect the threads to ensure they are clean and undamaged.
Step 3. Inspect the Filler Neck
Look inside the fuel filler neck for dirt, rust, or other debris. Even a small amount of contamination can prevent the fuel cap from creating a proper seal.
Wipe the sealing surface with a clean microfiber cloth. Make sure the area is completely clean before reinstalling the cap.
Step 4. Reinstall the Fuel Cap
Place the fuel cap onto the filler neck and tighten it completely. Confirm that it locks securely in place. A properly installed cap creates the airtight seal that the EVAP system requires.
Close the fuel door after securing the cap.
Step 5. Restart the Vehicle
Start the engine and check the instrument panel. The warning may still appear at this point. This is completely normal because the onboard computer has not completed its self diagnostic tests.
Step 6. Drive Normally
Drive your Honda CR V under normal conditions for several trips. The EVAP monitor usually runs only after specific operating conditions are met. These conditions often include normal engine temperature, steady driving speeds, and an appropriate fuel level.
Once the system confirms that no leak exists, it automatically clears the Honda CRV Check Fuel Cap warning.
What if the Warning Does Not Reset?
If the message remains after several drive cycles, inspect the fuel cap again. Replace it if the gasket shows signs of wear or damage. If the warning still returns, connect an OBD II scanner and check for stored diagnostic trouble codes.
Codes such as P0442, P0455, P0456, or P0457 often indicate an EVAP system leak. In that situation, the problem may involve a purge valve, vent valve, charcoal canister, pressure sensor, or one of the EVAP hoses.
Should You Disconnect the Battery?
Many drivers disconnect the battery to erase dashboard warnings. However, this method does not repair the underlying problem. The warning usually returns after the vehicle completes another EVAP self test.
Disconnecting the battery can also erase stored diagnostic information. As a result, diagnosing the real problem may become more difficult. For this reason, use an OBD II scanner only after identifying and repairing the actual fault.
Key Takeaway
Resetting the Honda CRV Check Fuel Cap warning is simple when the fuel cap causes the problem. However, the warning will continue to return if another EVAP component has failed. Always diagnose the root cause before clearing fault codes. This approach saves money and prevents unnecessary repairs.
Why Does the Warning Stay On After Tightening the Fuel Cap?
Many Honda owners tighten the fuel cap and expect the warning to disappear right away. Unfortunately, that does not always happen. The Honda CRV Check Fuel Cap message can remain on even after you secure the cap correctly.
The most common reason is that the EVAP system has not completed its self diagnostic test. The onboard computer checks the fuel system only under specific driving conditions. Until those conditions are met, the warning may remain on the dashboard.
Another possibility is a damaged fuel cap. The cap may look normal from the outside, but the rubber gasket can become hard, cracked, or worn over time. A damaged gasket cannot create a complete seal, so the system continues to detect a vapor leak.
A dirty or damaged filler neck can produce the same result. Dirt, corrosion, or small dents may prevent the fuel cap from sealing properly. Even a tiny gap can allow fuel vapors to escape and trigger the warning again.
The problem may also come from another EVAP component. A leaking hose, a faulty purge valve, a defective vent valve, or a failing charcoal canister can all create symptoms that resemble a loose fuel cap. In these situations, replacing the cap alone will not solve the issue.
A faulty fuel tank pressure sensor is another possible cause. The sensor measures pressure changes inside the EVAP system. If it sends incorrect data, the vehicle may report a leak even when the system is sealed correctly.
In some cases, the warning remains because the fault code has not cleared yet. After you fix the problem, the vehicle may need several normal drive cycles before the computer confirms that the repair was successful. The message often disappears automatically once the EVAP monitor completes its tests.
If the Honda CRV Check Fuel Cap warning stays on for more than a few days, connect an OBD II scanner and read the stored diagnostic trouble codes. The codes provide valuable clues and help you identify the real source of the problem. This approach is faster, more accurate, and less expensive than replacing parts one by one.
Common OBD II Trouble Codes for the Honda CRV Check Fuel Cap Warning
The Honda CRV Check Fuel Cap warning often appears with an OBD II trouble code. These codes help identify the source of the problem and make diagnosis much easier. Instead of replacing parts at random, scan the vehicle first and record every stored code.
P0457 is the most common code. It usually means the fuel cap is loose, missing, or unable to create a proper seal. Start by inspecting the cap, the rubber gasket, and the filler neck before checking other EVAP components.
P0455 indicates a large EVAP system leak. Although a loose fuel cap can trigger this code, damaged hoses, a faulty vent valve, or a leaking charcoal canister are also possible causes.
P0442 and P0456 both point to small EVAP leaks. These leaks are often difficult to find because they rarely produce visible symptoms. A professional smoke test is usually the fastest way to locate the leak.
P0440 is a general EVAP system fault. It does not identify a specific component, so additional testing is necessary. The problem may involve the purge valve, pressure sensor, electrical wiring, or another part of the EVAP system.
Some Honda CR V models also display P1456, which commonly indicates a leak near the fuel tank or fuel filler area. Inspect the fuel cap first, then check nearby hoses and connections.
After reading the codes, repair the actual fault before clearing them. Finally, drive the vehicle through several normal drive cycles. If the repair is successful, the Honda CRV Check Fuel Cap warning should disappear automatically.
Honda CRV Check Fuel Cap Repair Costs
The repair cost for a Honda CRV Check Fuel Cap warning depends on the actual cause. Some problems require only a new fuel cap, while others involve replacing EVAP system components. Diagnosing the issue early can prevent unnecessary repairs and reduce overall expenses.
A replacement fuel cap is usually the least expensive fix. Most owners can install it within a few minutes without special tools. If the warning disappears after several drive cycles, no additional repairs are necessary.
When the problem involves the EVAP system, repair costs increase. Replacing a purge valve or vent valve is generally affordable, but a damaged charcoal canister or fuel tank pressure sensor may cost more. Labor charges also vary depending on the vehicle model year and local repair rates.
If technicians cannot locate the leak during a visual inspection, they often perform a smoke test. This diagnostic procedure fills the EVAP system with harmless smoke to reveal even the smallest leaks. Although it adds to the repair bill, the test helps prevent unnecessary parts replacement.
The table below shows typical repair costs. Actual prices vary by location, labor rates, and parts quality.
| Repair | Estimated Cost |
|---|---|
| Fuel cap replacement | $20 to $60 |
| EVAP purge valve replacement | $100 to $250 |
| EVAP vent valve replacement | $120 to $300 |
| Charcoal canister replacement | $250 to $600 |
| Fuel tank pressure sensor replacement | $150 to $400 |
| EVAP smoke test | $80 to $200 |
The Honda CRV Check Fuel Cap warning is often inexpensive to fix when you address it early. Begin with the fuel cap and inspect the EVAP system only if the warning returns. This step by step approach saves money, shortens repair time, and helps you avoid replacing parts that still work properly.
Frequently Asked Questions
Can I drive with the Honda CRV Check Fuel Cap warning on?
Yes. In most cases, you can continue driving if the vehicle runs normally and no other warning lights appear. The message usually indicates a small EVAP system leak rather than a serious engine problem. However, you should inspect the fuel cap and diagnose the issue as soon as possible to prevent further problems.
Can a loose fuel cap trigger the check engine light?
Yes. A loose or damaged fuel cap can allow fuel vapors to escape from the EVAP system. After the vehicle completes its self diagnostic tests, it may illuminate the check engine light and store an EVAP related trouble code.
How long does it take for the warning to disappear?
The warning does not disappear immediately after you tighten or replace the fuel cap. The vehicle must complete several normal drive cycles before the onboard computer confirms that the leak has been repaired. Depending on driving conditions, this process may take a few trips.
Will replacing the fuel cap always fix the problem?
No. Although the fuel cap is a common cause, other EVAP components can also trigger the Honda CRV Check Fuel Cap warning. Faulty hoses, a purge valve, a vent valve, a charcoal canister, or a pressure sensor may produce the same message.
Can I reset the warning by disconnecting the battery?
Disconnecting the battery may temporarily clear the warning, but it does not repair the underlying fault. If the leak still exists, the message will return after the EVAP system completes another self test. It is always better to diagnose and repair the actual problem before clearing any fault codes.
Do I need an OBD II scanner?
An OBD II scanner is not required to inspect the fuel cap. However, it becomes very useful if the warning remains after several drive cycles. Reading the stored trouble codes helps identify the source of the problem and reduces unnecessary parts replacement.
What is the first thing I should check?
Always inspect the fuel cap first. Make sure it is clean, properly installed, and free from cracks or damage. If the warning continues, inspect the filler neck and the remaining EVAP system components before replacing any parts.
Conclusion
The Honda CRV Check Fuel Cap warning may seem minor, but it should never be ignored. While a loose or damaged fuel cap is the most common cause, the warning can also point to leaks or faults within the EVAP system. Taking a few minutes to inspect the fuel cap, the filler neck, and related components can often save you from unnecessary repairs and higher maintenance costs.
Throughout this guide, you have learned what the warning means, why it appears, how to diagnose the most common causes, and how to fix or reset it correctly. You also discovered the most common OBD II trouble codes and gained a better understanding of typical repair costs. By following a step by step diagnostic process, you can identify the real problem instead of replacing parts based on guesswork.
If the Honda CRV Check Fuel Cap warning remains after several drive cycles, use an OBD II scanner to read the stored trouble codes or have the EVAP system inspected by a qualified technician. Early diagnosis not only reduces repair expenses but also helps your Honda CR V maintain reliable performance and meet emissions standards.
Have you experienced the Honda CRV Check Fuel Cap warning on your vehicle? Share your experience, repair solution, or questions in the comments below. Your insights may help other Honda owners diagnose the same problem more quickly and confidently.