With a Camry cigarette lighter not working, you won’t be able to charge your devices while driving.
This is an inconvenience, especially if your phone’s battery has run out, and you rely on it for navigation. Or, you may need your cigarette lighter to charge your laptop’s battery while on the road. And there are a few other devices that you may want to charge using your auxiliary power outlet.
So, if it is not working as it should, you may be concerned about it. Why does this happen, anyway?
Let’s have a look at the things that may go wrong with a Camry cigarette lighter not working, what you can do about it, and some important tips you would not want to miss.

Contents
Camry Cigarette Lighter Not Working
Nothing can be frustrating when little – or more serious – things just seem to go wrong with your vehicle. One of these situations is a faulty cigarette lighter. You rely on it to charge your portable devices while out and about on the road.
This outlet comes with a 12-volt DC output. There are many names used for it such as automotive power socket, auxiliary power output, or simply a cigarette lighter.
Whatever the name may be, there are some cases when it may fail. This is why you should do some troubleshooting to make sure it works again as it should.
So, let’s have a look at the common techniques for troubleshooting a malfunctioning cigarette later that may fix the problem once and for all.
1. Turn everything on in your car.
In the case of an older vehicle, this would mean removing your cigarette lighter before accessing the socket. You won’t need to turn the car on since you are still able to receive power even with a vehicle that’s turned off.
Yet, with modern vehicles, these are basically highly dependent on electric power. With many computerized settings, there are electronic functions that need to get the battery engaged first for these to work.
With this in mind, you may need to turn your car on first to make sure everything – including the cigarette lighter – is working. But then again, if the fan is blowing and the car radio is playing, yet there is zero power on the cigarette lighter, you will need to perform the next step.
2. Inspect all electric outlets in your vehicle
Many modern vehicles are nearly completely electric or electronic. Thus, electric outlets have other functions that need to be activated first to get them to work.
If you have a cigarette lighter that is not working, make sure it is indeed faulty by plugging the cords into another socket. Check if there is power. In case there is power that fellows in your other extra sockets, it is highly likely that your cigarette lighter has a blown fuse.
On the other hand, if the other sockets do not have power supply, as well, then it is a bit more of a complex thing to deal with. Further inspection is required and it is also possible that all of your sockets have blown fuses.
3. Check other charging cords
Sometimes, the issue may not be with the cigarette lighter but your charging cord. This is why it is good to check first which one really is the problem. For instance, you may try using another charging cord and see if there is power. When you observe that your device is charging when used with a different charging cord, then there’s your culprit.
However, if there is still no power being received, then the cigarette lighter is indeed the issue. The fuse may be blown, so there is no other option except to replace your fuse.
Repairing A Camry Cigarette Lighter That’s Not Working
When your cigarette lighter is not functioning because of a blown fuse, then you have no choice except to replace it. Thankfully, it is an easy task to do, and it is all about knowing how it is done to make sure you get it right without causing the other fuses to be destroyed. Moreover, you would not want to have further problems with your car by messing up the fuse replacement task.
To make sure you get it done right the first time, here are some things you can do in replacing your cigarette lighter fuse.
1. Find out where the fuse is
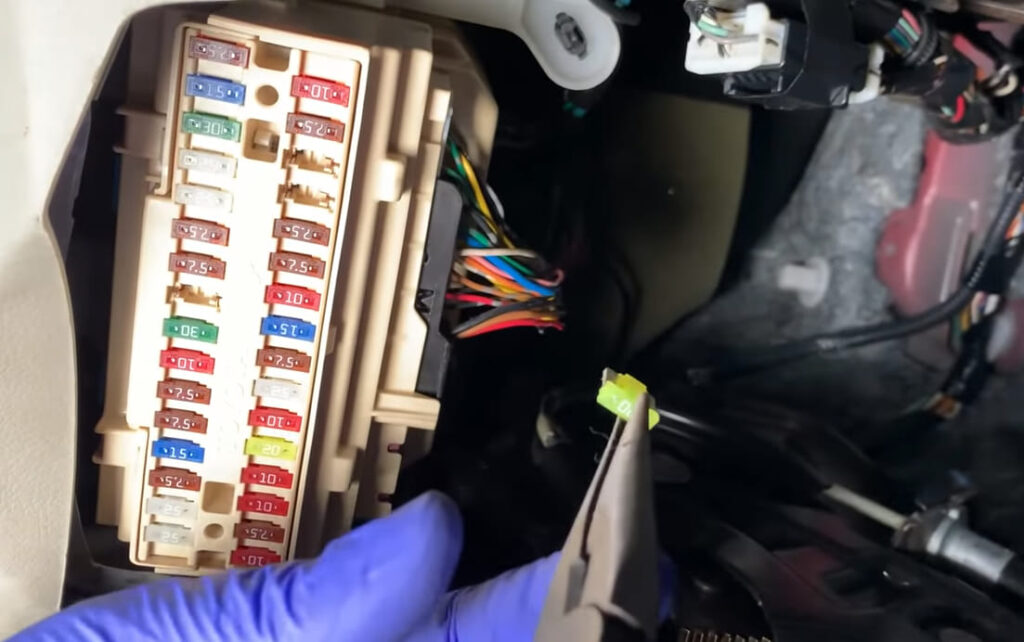
Naturally, you want to find where the fuse box is to also locate your fuse that needs to be replaced. In a Toyota Camry, the fuse box is located underneath your instrument panel, which is on the driver’s side, and under the cover. You can find a latch that allows you to hook your fingers to open it.
You can also refer to your owner’s manual for the accurate location of your fuse box, in case you are unsure where it is. Once you have found it, then you will need to take the lid off and look for a bay of the spare fuses.
2. Get your tools ready
There are a few things you will need to replace the cigarette lighter fuse such as the following:
- Needle nose pliers – since your fuse is very fragile and delicate, fine pliers are perfect for doing the job carefully and correctly.
- Multimeter – You will need this to measure how much voltage and current are obtained at a given point. When you attach your fuse to a multimeter, you can determine if there is current flow present or none
- Flashlight – since you will be locating the fuse under your front dashboard, it helps to use a flashlight in finding it, especially if it is a bit dim in that area.
- Replacement fuse – There are times when spare fuses are available from your fuse box. But if there is none, then you can simply go to the nearest auto shop to purchase the specific type of fuse required.
3. Take the blown fuse out
Once you have located the fuse box and the fuse, take the latter out. You need to be sure that you have taken the right fuse out since it can get confusing with many other fuses around. Look for one with a “CIG” label and also cross-check carefully with the legend to know for sure it is the one.
Once you have located the fuse, connect it to your multimeter to check if it has a power supply. Otherwise, it is blown and really needs to be replaced.
Use a tool for pulling the fuse out, which allows you to have a good grip of the fuse’s lip to make it more convenient to remove it. You can use your needle nose pliers for a more convenient experience in gripping and removing the fuse with caution.
4. Check the blown fuse
Cross examine the fuse once more to really confirm that it is blown or burnt. There are many signs of a blown fuse such as a cracked or a broken wire, burnt marks, and some sign of breakage found on the hump.
5. Place the replacement fuse
Make sure that the replacement fuse is capable of handling the right amount of current, which is 20 amps. This way, it will not get damaged again once you have inserted it in the right place. Cross-check your values and it must be the right one you need to avoid another damage in the future. Use a multimeter, as well, to be sure the new fuse works and there is current flow present.
6. Test everything
Once you have the fuse replaced, you can now test your electric outlet and see if there is power after connecting to a portable device. But sometimes, a problem may still be present, which is why you should proceed to the next step.
7. Receptacle check
If your fuse appears to be okay but there is still no current flow, then the receptacle may be the culprit. With debris and dirt accumulated to it, this may prevent a proper connection to your cord. So, inspect the receptacle and use a cloth to clean your ports and free them from debris that may be interfering with your connections.
But if cleaning does not do the trick, it may be completely dead and will need a replacement. You can check by using a multimeter to be certain if a replacement is really required.
Read More: Toyota Camry Trunk Release Not Working? Pro Tips You Can Try!
Bottom Line
With a Camry cigarette lighter not working, it can get quite tricky not being able to charge devices while on the road. Hence, you may need to inspect the fuse to make sure it is not the issue, as well as the receptacle. Once you have done a thorough inspection, you can perform the steps we have shared with you to determine the right course of action to take. We hope this has been helpful for you!