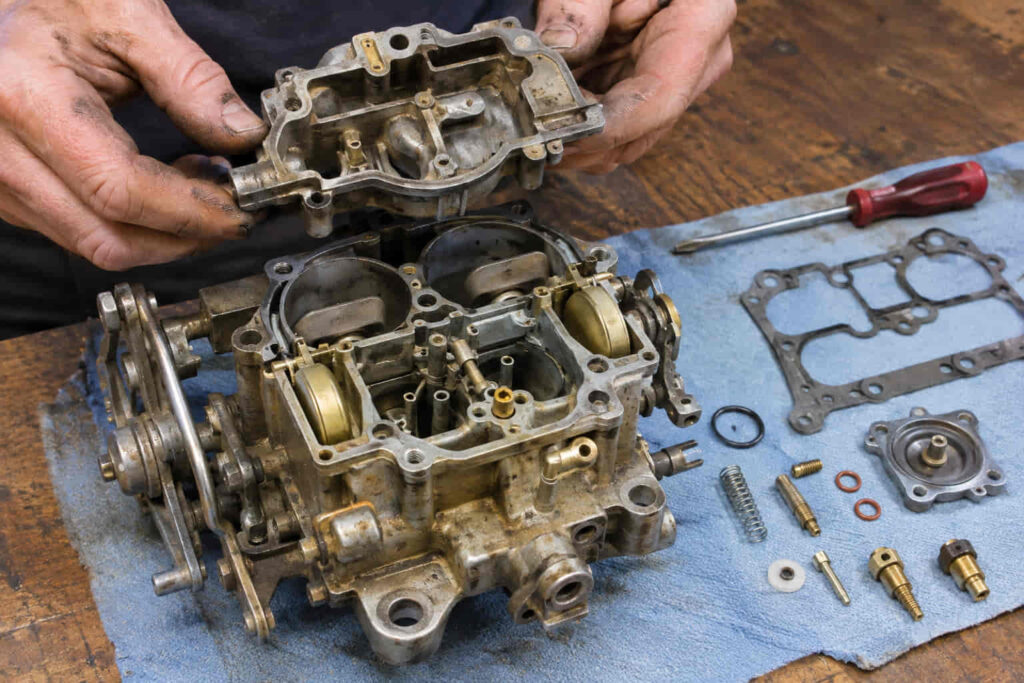
A Quadrajet carburetor rebuild involves disassembling the Rochester Quadrajet, cleaning its fuel and air passages, inspecting internal components, replacing worn parts, and reassembling the carburetor according to its original specifications. A properly executed rebuild can restore fuel metering, improve idle stability, eliminate certain fuel leaks, and correct acceleration hesitation caused by deteriorated gaskets, a faulty accelerator pump, or a malfunctioning float system. However, successful results depend on identifying the exact carburetor model before selecting replacement parts or making adjustments.
The Rochester Quadrajet is a four-barrel, spread-bore carburetor with small primary throttle bores and larger secondary bores. Its fuel delivery system uses metering rods, jets, a power piston, an accelerator pump, and a float-controlled needle valve to regulate the air-fuel mixture under different engine operating conditions. Wear, fuel deposits, damaged seals, and incorrect adjustments can disrupt these systems, resulting in hard starting, rough idle, flooding, or poor throttle response.
This guide explains how to rebuild a Quadrajet carburetor, from identifying its model number and choosing the correct rebuild kit to disassembly, cleaning, float adjustment, reassembly, and post-rebuild tuning. It also covers common rebuilding mistakes, troubleshooting procedures, and the conditions that determine whether rebuilding or replacing the carburetor is the better option.
How Do You Rebuild a Quadrajet Carburetor Step by Step?
A Quadrajet carburetor rebuild follows nine essential stages: identification, preparation, removal, disassembly, cleaning, inspection, component replacement, reassembly, and final adjustment. Each stage restores a specific part of the Rochester Quadrajet’s fuel-metering system. The procedure must follow the specifications for the exact carburetor model because differences in float settings, metering rods, accelerator pump assemblies, and choke mechanisms can affect how the rebuilt unit operates.
The rebuilding process begins by identifying the carburetor and obtaining a compatible rebuild kit. The carburetor identification number determines which gaskets, needle-and-seat assemblies, accelerator pump components, and calibration specifications apply. Before removal, the technician should photograph the vacuum hose connections, throttle linkage, fuel inlet, and choke mechanism. These references help prevent incorrect connections during reinstallation. Work must take place in a well-ventilated area away from sparks, flames, and other ignition sources because gasoline and cleaning solvents produce flammable vapors.
After removing the carburetor from the intake manifold, the technician separates its three main assemblies: the air horn, float bowl, and throttle body. Internal components, including the float, needle valve, accelerator pump, power piston, and metering rods, are removed according to the applicable service procedure. Small springs, retaining clips, and calibrated components should be kept organized because their dimensions and installation positions influence fuel delivery. For example, installing an incorrect metering rod can change the fuel mixture even when every gasket has been replaced correctly.
Cleaning removes varnish, sediment, and fuel deposits from the float bowl, jets, idle passages, and other accessible circuits. Compressed air and carburetor-safe cleaning products help clear passages without damaging calibrated openings. Inspection then determines whether components can be reused or require replacement. Particular attention should be given to throttle shaft wear, damaged castings, distorted gasket surfaces, and leaking fuel-control components. A rebuild kit addresses normal service items but cannot automatically correct structural damage or excessive mechanical wear.
Reassembly reverses the disassembly sequence while incorporating new gaskets, seals, and other specified replacement parts. The float level must be measured using the procedure and specifications for the identified Quadrajet model. Metering rods, the power piston, accelerator pump, and choke linkage must move freely without binding. After installation, the technician checks for fuel leaks, verifies throttle operation, and adjusts the idle mixture, idle speed, and choke according to the engine’s service specifications.
A successful Quadrajet rebuild restores correct component operation and fuel control rather than simply replacing old gaskets. If the carburetor continues to flood, hesitate, or idle poorly, the underlying cause may involve incorrect adjustments, damaged internal components, vacuum leaks, or an engine problem outside the carburetor.
How Do You Identify a Rochester Quadrajet Carburetor?
The most reliable way to identify a Rochester Quadrajet carburetor is to locate its factory identification number and match that number to the appropriate service specifications and rebuild kit. Quadrajet carburetors were produced in multiple configurations for different engines, model years, emissions requirements, and choke systems. Although many units share a similar external appearance, their internal calibration and replacement components are not necessarily interchangeable.
On many Rochester Quadrajet models, the identification number is stamped vertically into the main body casting near the secondary throttle area. Later versions and replacement units may use different identification markings or locations. Common Rochester identification numbers contain seven or eight digits, depending on the production period and application. Numbers beginning with prefixes such as 70, 170, or 1705 appear on various Quadrajet models, but the complete identification number is needed to establish the correct application. Casting numbers alone should not be treated as definitive carburetor identification because the same casting design may be used across multiple calibrated assemblies.
The identification number helps determine the carburetor’s original configuration, including its intended engine application, production period, and emissions calibration. For example, two Quadrajet carburetors installed on different Chevrolet V8 engines may have similar throttle bodies but use different primary jets, metering rods, float specifications, or choke components. Selecting a rebuild kit based only on the engine’s displacement can therefore result in incorrect gaskets or fuel-control parts, especially when the carburetor has been replaced during the vehicle’s service history.
Quadrajet variants also differ in choke design and electronic controls. Earlier 4MV configurations commonly use a divorced choke arrangement connected to a heat-operated mechanism on the intake manifold. Other versions, including M4MC configurations, use an integral choke assembly mounted on the carburetor. Electronically controlled models such as the E4ME incorporate additional components that interact with the engine’s electronic control system. These differences affect disassembly procedures, replacement parts, and post-rebuild adjustments.
Visual inspection provides supporting identification information. The technician should examine the choke housing, fuel inlet arrangement, vacuum connections, throttle linkage, and presence of electrical connectors. However, these features should be used to confirm the identification number rather than replace it. Carburetors may have undergone previous modifications, including changes to metering rods, choke mechanisms, or throttle linkage assemblies.
Before ordering a Quadrajet rebuild kit, record the complete identification number and verify it against the kit manufacturer’s application information. If the original number is missing or unreadable, identification may require comparing casting features, choke configuration, throttle body design, and internal components with a reliable Rochester service reference. Correct identification reduces the risk of installing incompatible parts and provides the foundation for accurate float adjustment, fuel metering, and final tuning.
Read more: louisiana inspection sticker
What Tools and Parts Do You Need for a Quadrajet Rebuild?
A Quadrajet carburetor rebuild requires basic hand tools, precision measuring equipment, carburetor cleaning supplies, and a rebuild kit matched to the carburetor’s identification number. The correct equipment allows the Rochester Quadrajet to be disassembled without damaging its castings, cleaned without altering calibrated fuel passages, and reassembled with the proper component clearances. Using incompatible replacement parts or unsuitable tools can create fuel leaks, incorrect float operation, and throttle response problems even when the original carburetor was mechanically sound.
The primary hand tools include properly sized screwdrivers, combination wrenches, sockets, needle-nose pliers, and small picks for removing retaining clips and seals. Screwdriver tips must fit the fastener heads closely because Quadrajet air horn screws and internal fasteners can become difficult to remove after years of exposure to fuel deposits and engine heat. A small magnetic parts tray and labeled containers help organize springs, linkage clips, screws, and metering components. Keeping these parts separated by assembly prevents incorrect installation and reduces the risk of losing small components during cleaning.
Cleaning equipment should include a carburetor-compatible cleaning solution, soft nylon brushes, lint-free cloths, and a regulated compressed-air source. Carburetor cleaner dissolves varnish and fuel residue that accumulate inside the float bowl, idle circuits, and fuel passages. Compressed air helps clear loosened deposits from accessible passages, but excessive pressure or directing air toward unsecured parts can damage components or propel debris. Protective eyewear, chemical-resistant gloves, and adequate ventilation are necessary when handling cleaning solvents. Rubber diaphragms, plastic parts, electrical components, and other solvent-sensitive materials must be removed or protected according to the cleaning product’s instructions.
A compatible Quadrajet rebuild kit generally supplies replacement gaskets, seals, an accelerator pump assembly, and selected fuel-control components, depending on the kit. Some kits include a needle-and-seat assembly, while floats, metering rods, jets, choke components, and throttle shaft repair parts may require separate purchases. A float-height gauge or suitable precision measuring tool is also necessary because the float setting must match the identified carburetor’s specifications. The applicable factory service manual or model-specific rebuilding instructions should be available before disassembly, particularly when working with electronically controlled Quadrajet versions.
The most important preparation step is verifying rebuild kit compatibility before opening the carburetor. A complete kit does not guarantee a successful repair if its gaskets, accelerator pump dimensions, or needle-and-seat components differ from the original configuration. Comparing the supplied parts with the identified carburetor and its service documentation prevents unnecessary reassembly problems and establishes the correct specifications for subsequent adjustments.
How Do You Remove and Disassemble a Quadrajet Carburetor?
Removing and disassembling a Quadrajet carburetor involves isolating the fuel supply, documenting external connections, removing the carburetor from the intake manifold, and separating its internal assemblies in a controlled sequence. The procedure must preserve the position and condition of calibrated components, linkage mechanisms, and gasket surfaces. Incorrect disassembly can bend the air horn, damage metering rods, disturb choke adjustments, or introduce debris into passages that control fuel delivery.
Begin with the engine switched off and completely cool. Disconnect the negative battery cable and work in a ventilated area free from smoking, sparks, open flames, and hot equipment. Before disconnecting the carburetor, photograph the fuel line, vacuum hoses, throttle linkage, transmission-related connections where fitted, and choke components. Vacuum hose routing is especially important because incorrect connections can produce rough idle, unstable ignition advance, or other symptoms that resemble carburetor calibration problems. Marking each hose and linkage connection provides a reliable reference during reinstallation.
Remove the air cleaner assembly to expose the carburetor and its external connections. Disconnect the throttle linkage and any transmission kickdown, throttle-valve, cruise-control, or choke connections according to the vehicle’s configuration. The fuel line should be disconnected carefully using appropriate line wrenches and a suitable container or absorbent material to control residual gasoline. Fuel-system pressure and residual fuel must be handled according to the vehicle’s service procedure. Once the connections are free, remove the carburetor mounting fasteners and lift the assembly vertically from the intake manifold. Cover the exposed intake opening immediately to prevent screws, gasket fragments, or dirt from entering the engine.
Place the carburetor on a clean workbench and inspect its external condition before opening it. Check for cracked castings, damaged mounting flanges, loose throttle shafts, missing linkage components, and evidence of fuel leakage. Photograph the accelerator pump linkage, choke mechanism, and secondary throttle connections from multiple angles. These components may appear straightforward, but their orientation and adjustment positions affect how the carburetor operates after reassembly. A linkage installed in the wrong position can restrict throttle movement or prevent the accelerator pump from delivering fuel at the intended point.
The Rochester Quadrajet consists of three principal cast sections: the air horn, the main body containing the float bowl, and the throttle body. Disassembly generally begins with removing the air horn fasteners and disconnecting the linkage components that prevent the upper casting from lifting freely. Depending on the Quadrajet model, the technician may need to remove or release the accelerator pump linkage, choke-related connections, and other retaining components before separating the air horn. Every fastener and linkage connection should be accounted for before lifting the casting. Forcing the air horn upward while a concealed fastener or linkage remains attached can distort its sealing surface.
Once the air horn is free, lift it carefully while protecting the accelerator pump components, float assembly, and other internal parts. Remove the air horn gasket and inspect its position before discarding it. The float, needle valve, retaining hardware, accelerator pump, power piston, and primary metering rods can then be removed as permitted by the specific model’s service procedure. Metering rods must be handled gently because bending or scratching their calibrated surfaces changes how they interact with the jets. Springs and small retaining components should be stored separately and identified by their original locations.
Further disassembly depends on the carburetor’s condition and the work required. The secondary metering rod hanger, choke components, and accessible fuel-metering parts should be removed only when the applicable service instructions call for it. Separating the throttle body from the main casting may be necessary to replace the relevant gasket or inspect internal passages, but excessive force must never be used to break apart stuck castings. Similarly, pressed-in components, factory plugs, and calibrated restrictions should not be disturbed during a routine rebuild unless a specific defect requires an approved repair procedure.
A correctly disassembled Quadrajet should have its reusable components organized, its gasket surfaces protected, and its calibrated parts preserved for inspection. The objective is to expose the fuel circuits and replaceable components without creating additional mechanical damage. Before cleaning begins, compare the removed parts with the rebuild kit and document any missing, worn, or visibly damaged components that may require replacement beyond the kit’s standard contents.
How Do You Clean and Inspect Quadrajet Carburetor Parts?
Cleaning and inspecting a Quadrajet carburetor requires removing fuel deposits from its internal passages, examining calibrated components for damage, and checking the castings for defects that could prevent proper fuel metering. The Rochester Quadrajet uses several interconnected fuel circuits to control idle, acceleration, and engine load. Varnish, corrosion, and sediment can restrict these circuits, while worn mechanical components can disrupt fuel delivery even after the carburetor has been thoroughly cleaned.
Begin by removing the old gaskets, seals, and other replaceable components identified during disassembly. The float bowl should be inspected for sediment, corrosion, and hardened fuel residue, particularly around the primary jets, accelerator pump well, and fuel inlet passages. Use a carburetor-compatible cleaning solution to dissolve deposits, followed by soft brushes and controlled compressed air to clear accessible passages. Cleaning products must be compatible with the carburetor’s metal castings and any remaining components. Rubber seals, plastic parts, electrical components, and solvent-sensitive materials should not be immersed unless the product manufacturer explicitly permits it.
The primary jets, idle fuel passages, and accelerator pump discharge circuit require particular attention because restrictions directly affect engine performance. A partially obstructed idle circuit can cause unstable idle or poor response to idle mixture adjustments. Deposits in the accelerator pump circuit can reduce the fuel delivered when the throttle opens, producing hesitation during acceleration. Clean these passages using approved solvent and compressed air rather than steel wire, drill bits, or other tools that could enlarge calibrated openings. Altering a jet or restriction changes the amount of fuel delivered and can make the carburetor difficult to calibrate.
Inspect the primary and secondary metering rods for bending, scoring, corrosion, and damaged tapered surfaces. The primary metering rods regulate fuel flow through the primary jets as the power piston responds to engine operating conditions. If a rod is bent or its surface is damaged, it may bind inside the jet or produce an incorrect fuel mixture. The power piston should move freely within its bore, and its spring should be inspected for damage. The secondary metering rod hanger and associated components also require examination because their position influences secondary fuel delivery.
The carburetor castings and throttle body must be checked for structural defects before reassembly. Examine the air horn and main body sealing surfaces for distortion, damaged screw holes, and evidence of previous overtightening. Inspect the throttle shafts for excessive movement in their bores, since worn shaft openings can admit unmetered air and contribute to unstable idle. Also inspect the float bowl for fuel leakage around casting plugs and other sealed areas. A routine gasket kit does not repair warped castings, worn throttle shaft bores, or defective casting plugs; these conditions may require specialized repair or replacement.
A Quadrajet component is suitable for reuse only when it is clean, mechanically sound, and consistent with the carburetor’s original specifications. Replace damaged gaskets, hardened seals, worn accelerator pump components, and defective fuel-control parts rather than relying on cleaning alone. Before proceeding, confirm that the accessible fuel passages are clear, the metering components are undamaged, and the casting surfaces can provide reliable sealing during reassembly.
How Do You Replace the Float, Needle, Seat, and Accelerator Pump?
Replacing the Quadrajet float, needle-and-seat assembly, and accelerator pump restores the components responsible for controlling fuel level and delivering additional fuel during throttle opening. These parts perform different functions but work together to maintain consistent fuel delivery. A defective float or needle valve can cause flooding and hard starting, while a worn accelerator pump can create hesitation when the driver presses the accelerator. Each replacement component must match the identified carburetor model and the specifications supplied with its rebuild kit.
The float controls fuel level inside the Quadrajet’s float bowl by moving the needle valve against its seat as fuel enters the carburetor. When the fuel reaches the specified level, the float raises the needle and restricts additional fuel flow. As the engine consumes fuel, the float drops and allows the inlet valve to open again. This process maintains the fuel level required for the jets and metering rods to deliver the intended mixture. A float that absorbs fuel, becomes damaged, or binds against the bowl can disrupt this control mechanism and cause an excessively rich or lean mixture.
Inspect the original float for cracks, deformation, signs of fuel intrusion, and interference with surrounding components. A float that no longer provides the intended buoyancy should be replaced with the correct type for the carburetor. Quadrajet floats vary by application, so appearance alone is not sufficient to establish compatibility. Install the float and its retaining hardware according to the applicable service procedure, ensuring that it pivots freely without contacting the bowl walls. The final float height must be measured and adjusted to the specification for the exact carburetor identification number rather than estimated visually.
The needle-and-seat assembly regulates fuel entering the float bowl. A worn needle tip, contaminated seating surface, or damaged seat can prevent the valve from closing completely, allowing the fuel level to rise beyond its intended limit. This can produce fuel flooding, a strong gasoline odor, black exhaust smoke, or difficult hot starting. During replacement, remove the old assembly using the appropriate tool, inspect the fuel inlet area for debris, and install the replacement seat with the specified gasket or sealing component. Avoid overtightening because damaged threads or a distorted sealing surface can create additional fuel-control problems.
After installing the needle and seat, verify that the needle moves freely and remains correctly aligned with the float mechanism. The float must open and close the valve without binding or placing abnormal sideways force on the needle. Incorrect alignment can prevent consistent sealing even when both components are new. Any fuel inlet filter, spring, or related hardware should be inspected and installed according to the carburetor’s original configuration. Replacement parts should not be mixed between different Quadrajet applications unless their compatibility has been established.
The accelerator pump provides a brief additional supply of fuel when the throttle opens rapidly. During sudden acceleration, airflow increases faster than fuel can be delivered through the normal metering circuits, creating a temporary lean condition. The accelerator pump compensates by forcing fuel through the discharge passages into the primary throttle bores. A hardened, torn, or incorrectly fitted pump seal reduces this fuel delivery and can cause hesitation, stumbling, or an off-idle flat spot.
To replace the accelerator pump, remove the original pump assembly from its bore and inspect the pump well for scoring, corrosion, and fuel deposits. Install the compatible replacement assembly using the lubrication and installation method specified by the rebuild kit manufacturer. The pump seal must be positioned correctly to maintain contact with the bore while allowing smooth movement. Some Quadrajet accelerator pump designs also incorporate springs, check components, or specific linkage arrangements that must be retained in their original positions. Forcing the pump into the bore or installing its seal incorrectly can damage the new component before the carburetor is reassembled.
Correct replacement is confirmed by unrestricted float movement, reliable needle-valve seating, and smooth accelerator pump travel. After reassembly and once the fuel bowl has been filled safely, accelerator pump operation can be checked by observing whether throttle movement produces a prompt, consistent fuel discharge into the primary bores. This check must be performed with the engine off, away from ignition sources, and with appropriate precautions against fuel spray. A weak or delayed discharge indicates that the pump linkage, seal, check components, or fuel passages require further inspection before final tuning.
How Do You Set the Float Level on a Quadrajet Carburetor?
Setting the Quadrajet float level requires measuring the float position with the needle valve seated and adjusting it to the specification for the carburetor’s identification number. Float height determines the fuel level maintained inside the Rochester Quadrajet’s float bowl. An incorrect setting changes the pressure relationship between the stored fuel and the carburetor’s metering circuits, affecting idle quality, acceleration, fuel consumption, and starting performance. Because Quadrajet models use different floats, needle-and-seat assemblies, and calibration settings, there is no single float-height measurement that applies to every version.
Before measuring the float, install the correct needle-and-seat assembly and verify that the float pivots freely on its retaining pin. The float must not contact the bowl walls, bind against the needle, or interfere with nearby components. Inspect the float hinge and retaining hardware for deformation because a bent hinge can change the float’s position even when the float itself is undamaged. The carburetor should be positioned as directed by the applicable service procedure, and the float should be measured using a suitable gauge or precision ruler at the specified reference point.
On many conventional Quadrajet models, float height is measured from the designated float surface to a reference surface on the main casting while the needle is seated. However, the required carburetor orientation, measurement location, and treatment of any spring-loaded needle mechanism depend on the specific design. The technician should follow the factory service instructions rather than assume that the float must always be measured with the carburetor inverted. Applying excessive pressure to a spring-loaded needle can produce a false measurement and an incorrect final fuel level.
If adjustment is necessary, carefully bend the designated float adjustment tab according to the model-specific procedure. The objective is to change the float’s resting position without twisting its hinge, damaging the needle, or altering the float’s buoyancy. After each adjustment, move the float through its operating range and repeat the measurement. Small changes in float position can influence fuel delivery because the float bowl supplies fuel to the primary and secondary metering circuits. An excessively high fuel level can contribute to flooding, rich operation, and fuel discharge from unintended locations, while an excessively low level can cause lean hesitation or insufficient fuel delivery under load.
Some Quadrajet configurations also require a float-drop check. Float drop describes how far the float can descend as fuel leaves the bowl and the needle valve opens. Excessive or insufficient movement can interfere with fuel replenishment, particularly when engine demand increases. Where a float-drop specification is provided, the adjustment must be completed separately from float height using the correct measurement points and procedure.
The float adjustment is complete only when the measured height matches the applicable specification, the needle valve operates freely, and the float moves without interference. The final fuel level should also be evaluated during initial startup because an incorrect fuel supply pressure, leaking needle valve, or defective float can cause flooding even when the static float measurement appears correct. Accurate float calibration establishes the foundation for stable fuel metering before idle mixture and choke adjustments begin.
How Do You Reassemble a Rochester Quadrajet Carburetor?
Reassembling a Rochester Quadrajet carburetor involves reinstalling the calibrated fuel-metering components, positioning the replacement gaskets, joining the carburetor castings, and verifying that every mechanical linkage moves correctly. The sequence generally reverses disassembly, but individual components must be installed according to the service instructions for the identified Quadrajet model. Correct reassembly preserves the relationships between the float system, accelerator pump, metering rods, power piston, choke mechanism, and throttle plates.
Begin by confirming that the cleaned castings are dry, the fuel passages are clear, and all replacement parts match the original carburetor configuration. Inspect the main body and throttle body sealing surfaces for remaining gasket material, scratches, or distortion. Install the appropriate replacement gasket between the throttle body and main casting if those sections were separated. The gasket must align with the intended vacuum and fuel passages without covering calibrated openings. Position the castings carefully and tighten the fasteners in the sequence and to the torque specified by the applicable service documentation. Excessive tightening can distort the castings and create air leaks that are difficult to correct through tuning.
Reinstall the primary jets and associated metering components according to their original locations and specifications. The power piston assembly must move freely within its bore, and the primary metering rods must enter their corresponding jets without bending or binding. These rods change the effective fuel-flow area through the primary jets as the power piston responds to engine operating conditions. If a rod is installed incorrectly or the piston sticks, the carburetor may deliver an excessively rich or lean mixture during transitions between idle, cruising, and acceleration. Springs, retainers, and other calibrated components must remain matched to the original configuration unless an approved calibration change is being performed.
Next, install the float assembly, needle valve, and accelerator pump using the procedures established during component replacement. Confirm the float setting before fitting the air horn because access becomes restricted after the upper casting is installed. The accelerator pump must move smoothly within its bore, and its spring and linkage components must be correctly positioned. Place the new air horn gasket onto the main body, checking that every opening and passage aligns with the casting. A misplaced gasket can obstruct fuel or vacuum circuits, while a folded gasket edge can prevent proper sealing.
Lower the air horn carefully into position without forcing it against the accelerator pump, float, metering rods, or choke-related components. Quadrajet air horns are susceptible to distortion when fasteners are overtightened or when the casting is pulled down against an incorrectly positioned internal part. If the air horn does not seat evenly, lift it and identify the interference rather than using screw pressure to close the gap. Once the casting sits correctly, install the fasteners and tighten them progressively in the specified sequence. Follow the model-specific torque requirements to maintain gasket compression without damaging the casting.
Reattach the accelerator pump linkage, choke connections, and secondary metering components in their documented positions. The secondary metering rod hanger must be correctly seated so the rods can move as the secondary air valve opens. The choke plate and associated linkage should operate through their intended range without sticking. On electronically controlled Quadrajet models, electrical components and connectors require additional care, and any specified electronic adjustments must follow the applicable vehicle service procedure. Linkage geometry should not be altered simply to compensate for an unrelated fuel-delivery problem.
Before reinstalling the carburetor on the engine, operate the primary throttle linkage by hand and verify that the throttle plates open and return smoothly. Check accelerator pump travel, choke movement, secondary air-valve operation, and any accessible linkage clearances. The throttle plates must return to their intended closed position without interference. Inspect the exterior for loose fasteners, missing retaining clips, and disconnected components. These checks identify assembly errors before gasoline is introduced into the rebuilt carburetor.
Install the carburetor onto the intake manifold using the correct base gasket and mounting procedure. The gasket must match the carburetor and manifold configuration to prevent vacuum leaks or blocked passages. Tighten the mounting fasteners according to the vehicle’s service specifications, then reconnect the fuel line, vacuum hoses, throttle linkage, choke connections, and any transmission-related controls. Verify that the throttle reaches its intended operating positions and returns freely. On vehicles equipped with a transmission throttle-valve cable, its adjustment must follow the transmission manufacturer’s procedure because incorrect geometry or adjustment can cause transmission damage.
A properly reassembled Quadrajet has sealed casting joints, correctly positioned metering components, unrestricted throttle movement, and functioning choke and accelerator pump mechanisms. Before starting the engine, inspect every fuel connection and confirm that no tools or loose components remain near the throttle linkage. Initial startup and final adjustments should begin only after the carburetor is mechanically complete and all fuel-system connections have been checked for safety.
How Do You Adjust a Quadrajet Carburetor After Rebuilding?
Adjusting a Quadrajet carburetor after rebuilding requires verifying fuel delivery, checking for leaks, setting the idle speed and idle mixture, and confirming that the choke and accelerator pump operate correctly. These adjustments establish the carburetor’s operating conditions after its internal components have been cleaned or replaced. The Rochester Quadrajet must also be matched to the engine’s ignition timing, vacuum system, and original calibration because carburetor adjustments cannot compensate for unrelated mechanical or ignition problems.
Before starting the engine, verify that the fuel line is securely connected, the throttle linkage returns freely, and all vacuum hoses are installed in their correct locations. Confirm that the choke mechanism moves as specified for the carburetor model. When the engine is started, inspect the fuel inlet, air horn gasket, float bowl area, and other accessible connections for leakage. If gasoline is leaking externally or overflowing into the carburetor, shut off the engine immediately and correct the problem before continuing. Fuel leakage may indicate a damaged sealing surface, an improperly installed needle-and-seat assembly, excessive fuel pressure, or an incorrect float setting.
Once the engine reaches its specified operating temperature, the idle speed can be adjusted according to the vehicle’s factory service procedure. The choke must be fully open during normal warm-idle adjustment, and the transmission and accessory operating conditions must match those specified for the engine. Idle speed is controlled by the throttle position at idle, while the idle mixture screws regulate fuel delivery through the idle circuits. These adjustments interact because changing throttle position can alter the airflow and vacuum conditions that determine how the idle system operates.
For a conventional, non-electronic Quadrajet with adjustable idle mixture screws, begin with the manufacturer’s specified baseline setting rather than an arbitrary number of turns. Make small, balanced adjustments while monitoring engine speed, smoothness, and manifold vacuum where the service procedure calls for it. The objective is to achieve the specified idle mixture and stable engine operation without opening the throttle plates excessively. If the engine requires unusually large adjustments or fails to respond to the mixture screws, inspect the idle passages, vacuum connections, throttle shaft condition, and ignition system before changing the carburetor calibration.
Electronically controlled Quadrajet models require a different approach because their fuel metering may depend on electronic feedback components and engine control inputs. Adjustments that are appropriate for a conventional 4MV or M4MC carburetor should not automatically be applied to an E4ME or another feedback-controlled configuration. These systems may require specified diagnostic conditions, electronic measurements, and adjustment procedures. Altering factory-sealed settings without the correct service information can produce drivability problems or interfere with emissions-control operation.
The choke system should be evaluated during both cold and warm engine operation. When the engine is cold, the choke restricts incoming air to provide the richer mixture needed for starting. As the engine warms, the choke must open according to its design and the fast-idle mechanism must release properly. A choke that remains excessively closed can cause rich operation, black exhaust smoke, and rough running after warm-up. A choke that opens too early can cause difficult cold starting or stalling. The correct adjustment depends on whether the carburetor uses a divorced, integral, electric, or electronically managed choke arrangement.
Finally, evaluate the accelerator pump and throttle response. With the engine off and the fuel bowl properly filled, throttle movement should produce a prompt fuel discharge from the accelerator pump circuit. During controlled engine operation, the throttle should respond without a pronounced stumble or delay. Any road test should take place only after fuel leaks have been ruled out and all throttle, transmission, and choke linkages have been verified.
A correctly adjusted Quadrajet should start reliably, maintain the specified warm idle, respond smoothly to throttle input, and operate without fuel leakage. Final settings must be based on the identified carburetor and engine combination, since differences in ignition timing, emissions equipment, and factory calibration determine the appropriate adjustment procedure.
Why Does a Quadrajet Carburetor Run Poorly After a Rebuild?
A Quadrajet carburetor that runs poorly after rebuilding usually has an unresolved fuel-metering problem, an incorrect adjustment, an air leak, or a component installed in the wrong position. Replacing gaskets and cleaning the float bowl does not guarantee proper operation if the needle valve, accelerator pump, metering rods, choke system, or vacuum connections are defective. Troubleshooting should begin with the specific symptom because flooding, rough idle, hesitation, and poor acceleration result from different operating conditions.
Hard starting and flooding frequently indicate excessive fuel entering the carburetor or an incorrect choke condition. A leaking needle-and-seat assembly can allow fuel to continue entering the float bowl after the intended level has been reached. Similarly, a float set too high can raise the fuel level enough to produce an excessively rich mixture. The resulting symptoms may include a strong gasoline odor, wet spark plugs, black exhaust smoke, or fuel dripping into the throttle bores. Excessive fuel supply pressure can produce similar symptoms even when the float and needle valve are correctly installed. If flooding occurs, the fuel level, inlet valve sealing, fuel pressure, and choke operation should be checked before changing the idle mixture.
Rough idle after a Quadrajet rebuild often results from unmetered air entering the engine or insufficient fuel delivery through the idle circuits. A leaking carburetor base gasket, incorrectly connected vacuum hose, or excessively worn throttle shaft bore can introduce additional air that the carburetor’s idle system cannot properly compensate for. Restricted idle passages can produce similar instability by limiting the fuel available at low throttle openings. When idle mixture screw adjustments have little effect, the technician should inspect the vacuum system and verify that the idle circuits are functioning rather than continuing to turn the screws beyond their intended adjustment range.
Acceleration hesitation commonly points to a problem with the accelerator pump or the transition between idle and primary fuel delivery. When the throttle opens rapidly, airflow increases before the normal fuel circuits can fully respond. The accelerator pump supplies an additional fuel charge to prevent a temporary lean condition. If its seal is damaged, its linkage is incorrectly positioned, or its discharge passages remain obstructed, the engine may stumble immediately after throttle movement. A weak or delayed pump discharge during a safe engine-off inspection provides evidence that the accelerator pump circuit requires further attention.
Poor performance during cruising or acceleration under load may involve the primary metering rods, power piston, or secondary fuel-metering components. The Quadrajet’s primary metering rods change the effective opening through the primary jets as engine operating conditions change. If the power piston sticks or the rods do not move freely, fuel delivery may not match engine demand. Incorrectly installed secondary metering rods or a binding secondary air valve can also contribute to hesitation when the secondaries begin operating. These problems should be diagnosed against the original carburetor calibration rather than corrected through arbitrary jet or metering rod changes.
Fuel leaks after rebuilding require immediate attention because they present a fire hazard. Leakage around the fuel inlet may result from damaged threads, an improperly seated fitting, or an incorrect sealing component. Leakage at casting joints may indicate a misplaced gasket, damaged sealing surface, or distorted air horn. Fuel appearing around the throttle body can also indicate internal flooding rather than a defective external gasket. The engine should not be operated until the source of the leak has been identified and repaired.
Not every drivability problem that appears after a rebuild originates inside the carburetor. Incorrect ignition timing, weak ignition components, intake manifold vacuum leaks, inadequate fuel delivery, and low engine compression can produce symptoms resembling carburetor faults. For example, an engine with a substantial intake vacuum leak may idle poorly despite correctly adjusted mixture screws and clean idle passages. Confirming the engine’s mechanical and ignition condition prevents unnecessary carburetor disassembly and avoids masking the actual cause with excessive fuel-mixture adjustments.
The most effective troubleshooting method is to connect each symptom to the carburetor circuit operating when the problem occurs. Flooding directs attention to fuel-level control, off-idle hesitation to the accelerator pump and transition circuits, unstable idle to idle fuel delivery and vacuum integrity, and poor loaded performance to the metering and secondary systems. This approach identifies the underlying defect while preserving the carburetor’s intended calibration.
How Can You Tell if a Quadrajet Rebuild Was Successful?
A successful Quadrajet carburetor rebuild restores reliable starting, stable idle, smooth throttle response, consistent fuel delivery, and leak-free operation under normal engine conditions. These results indicate that the Rochester Quadrajet’s fuel-metering circuits, float system, accelerator pump, and choke mechanism are functioning as intended. However, a carburetor that idles smoothly in the workshop is not necessarily operating correctly under acceleration or engine load. Rebuild quality must therefore be evaluated through several operating conditions rather than a single idle test.
Cold-start performance provides the first indication of whether the choke system and initial fuel delivery are functioning correctly. When the engine is cold, the choke should operate according to the carburetor’s original design, allowing the engine to start without excessive cranking or repeated throttle input. The fast-idle mechanism should maintain the specified elevated idle speed during warm-up and release as the choke opens. Difficult cold starting, repeated stalling, or prolonged high idle may indicate an incorrectly adjusted choke, restricted fuel passage, or linkage problem. These symptoms should be evaluated against the engine’s factory starting procedure because choke arrangements differ between Quadrajet applications.
Once the engine reaches normal operating temperature, the carburetor should maintain the manufacturer’s specified idle speed without persistent surging, stumbling, or stalling. Idle mixture adjustments should produce a predictable response on conventional Quadrajet models with adjustable mixture screws. A stable manifold vacuum reading, interpreted alongside the engine’s specifications and mechanical condition, can provide additional evidence of proper operation. If the idle remains unstable despite correct adjustments, the technician should check for vacuum leaks, ignition problems, or engine mechanical faults before assuming the rebuilt carburetor is defective.
Throttle response is another important indicator because the accelerator pump and primary metering system must respond immediately when airflow demand increases. A properly functioning accelerator pump supplies additional fuel during rapid throttle opening, preventing the temporary lean condition that causes hesitation. During controlled testing, the engine should accelerate smoothly without a pronounced stumble, backfire through the intake, or delayed response. As engine load increases, the primary metering rods and secondary fuel-delivery components must also operate correctly. Hesitation that occurs only when the secondary system begins opening may indicate a problem with the secondary air valve, metering rods, or associated linkage rather than the idle circuit.
Fuel containment must be verified throughout testing. Inspect the fuel inlet, air horn gasket, throttle body connections, and accessible casting areas for wetness or gasoline odor. The carburetor should not leak externally or discharge excessive fuel into the throttle bores. Any visible fuel leakage requires shutting down the engine and correcting the cause before further operation. Once the vehicle passes stationary checks, a controlled road test can confirm drivability during light acceleration, steady cruising, and moderate engine load. The throttle and transmission-related linkages must be correctly installed and adjusted before the vehicle is driven.
The rebuild can be considered successful when the carburetor operates consistently across cold starting, warm idle, throttle transitions, and normal driving without fuel leakage or recurring drivability symptoms. If a problem remains, diagnosis should identify whether it originates in the carburetor, ignition system, fuel supply, vacuum system, or engine itself. This distinction prevents unnecessary adjustments to a correctly rebuilt Quadrajet.
How Much Does a Quadrajet Carburetor Rebuild Cost?
The cost of a Quadrajet carburetor rebuild depends on the rebuild kit, replacement components, cleaning supplies, labor, and the condition of the original carburetor. A basic rebuild involving cleaning, new gaskets, an accelerator pump, and a needle-and-seat assembly requires less work than a restoration involving damaged castings, worn throttle shaft bores, or specialized calibration. The carburetor’s identification number also affects cost because some Rochester Quadrajet versions require application-specific parts that may be harder to obtain.
For a do-it-yourself rebuild, the rebuild kit is the primary parts expense. A typical kit may contain gaskets, seals, accelerator pump components, and selected fuel-control parts, although the exact contents vary by manufacturer and carburetor application. Additional expenses arise when the float, choke components, metering rods, fuel inlet hardware, or other parts need replacement. Cleaning solvent, compressed air, precision measuring tools, and suitable hand tools also contribute to the total cost if they are not already available. A basic rebuild kit should not be confused with a complete carburetor restoration because it does not normally correct excessive throttle shaft wear or structural casting damage.
Professional rebuilding costs more because the service includes disassembly, cleaning, inspection, replacement of service components, reassembly, and calibration labor. A specialist may also provide services such as throttle shaft bushing installation, casting repairs, or model-specific restoration. These operations require additional equipment and expertise beyond a routine gasket replacement. Labor charges depend on the carburetor’s condition, the extent of the work, and the service provider’s pricing structure. An accurate estimate should identify which parts and procedures are included rather than treating every Quadrajet rebuild as the same job.
The condition of the carburetor determines whether additional spending is justified. A complete unit with sound castings, usable throttle shaft bores, and intact calibration components is generally a better rebuild candidate than one with extensive corrosion, stripped threads, missing linkage parts, or severe mechanical wear. For example, a carburetor that only needs cleaning and replacement of deteriorated seals presents a different repair scope from one requiring casting repairs and throttle shaft machining. The latter may approach or exceed the cost of a suitable professionally remanufactured replacement.
The most reliable way to calculate rebuild cost is to identify the exact Quadrajet model, inspect its condition, price the required parts, and account for any specialized labor before beginning repairs. Published kit prices and professional service rates change over time, so current supplier listings and written repair estimates should be used for an actual budget. Comparing the complete repair cost with a compatible replacement carburetor provides a more useful decision than comparing rebuild kit prices alone.
Is It Better to Rebuild or Replace a Quadrajet Carburetor?
Rebuilding a Quadrajet carburetor is generally the better option when its castings, throttle shafts, and calibrated components remain serviceable, while replacement becomes more practical when structural damage or extensive mechanical wear makes restoration unreliable or uneconomical. The decision depends on the condition of the Rochester Quadrajet, the availability of compatible parts, the total repair cost, and whether maintaining the engine’s original carburetor configuration is a priority.
A Quadrajet with intact castings, undamaged mounting surfaces, and properly functioning throttle shafts is a strong candidate for rebuilding. Fuel deposits, deteriorated gaskets, worn accelerator pump seals, and defective needle-and-seat assemblies are service-related problems that can be corrected with cleaning and compatible replacement components. For example, a carburetor that develops acceleration hesitation because its accelerator pump seal has hardened may regain proper throttle response after the pump circuit is cleaned and the worn components are replaced. Rebuilding also preserves the carburetor’s original fuel-metering configuration when its jets, metering rods, and choke components remain appropriate for the engine.
Maintaining the original Quadrajet is particularly valuable for classic General Motors vehicles that retain their factory engine and induction system. The original carburetor may have calibration characteristics matched to the engine’s displacement, intake manifold, ignition system, and emissions equipment. Replacing it with a different carburetor can require changes to the throttle linkage, fuel connections, air cleaner, or intake manifold. Even a physically compatible replacement may deliver different fuel mixtures if its internal calibration was designed for another engine application. A correctly rebuilt original unit avoids many of these compatibility issues.
Replacement becomes more reasonable when the carburetor has severely warped castings, extensive corrosion, broken mounting surfaces, or damaged fuel passages that cannot be repaired reliably. Excessive throttle shaft wear also requires careful evaluation because air entering around worn shaft bores can cause persistent vacuum leaks and unstable idle. Although specialized rebuilding services can install throttle shaft bushings and repair certain casting defects, these operations increase the total restoration cost. A carburetor with multiple structural problems may require more labor and replacement components than a compatible remanufactured unit.
The choice of replacement carburetor also matters. A professionally remanufactured Quadrajet matched to the original identification number can preserve the intended application more closely than a generic aftermarket carburetor. However, remanufactured units must still be checked for correct calibration, choke configuration, linkage compatibility, and overall rebuilding quality. An aftermarket carburetor may be appropriate for a modified engine, but installation can involve additional adjustments and components. For vehicles subject to emissions regulations, the replacement must also comply with applicable legal requirements.
The best decision is to compare the cost of restoring the existing Quadrajet with the price and compatibility of a suitable replacement after inspecting the carburetor’s mechanical condition. Rebuild the original unit when its main components are sound and its problems involve normal wear, contamination, or replaceable fuel-control parts. Consider replacement when damage compromises reliable operation or the complete restoration cost exceeds the value of a properly matched replacement. In either case, correct carburetor identification and engine-specific calibration remain essential for reliable starting, stable idle, and consistent throttle response.