Chevy Cruze catalytic converter replacement involves removing a faulty catalytic converter and installing a compatible unit to restore proper exhaust flow and emissions control. Replacement costs depend on the vehicle’s model year, engine configuration, replacement part, and labor rates. The process requires accurate diagnosis because a check engine light or P0420 trouble code does not always mean the catalytic converter needs replacement.
A failing catalytic converter can cause reduced engine performance, poor acceleration, unusual exhaust noises, and increased emissions. These symptoms may result from a clogged or damaged catalyst, but faulty oxygen sensors, exhaust leaks, and engine misfires can produce similar warning signs. Identifying the underlying problem before replacing the converter helps prevent unnecessary repairs and premature failure of the new component.
Replacing a catalytic converter on a Chevrolet Cruze also requires selecting the correct part for the vehicle’s engine and emissions configuration. The 1.4L turbocharged and 1.8L gasoline engines have different exhaust system arrangements, making model-specific compatibility and installation procedures essential.
This guide explains Chevy Cruze catalytic converter replacement costs, common failure symptoms, diagnostic methods, required tools, installation steps, and replacement part options. It also covers when professional repair is preferable to DIY replacement and how to prevent recurring catalytic converter problems.
How Much Does Chevy Cruze Catalytic Converter Replacement Cost?
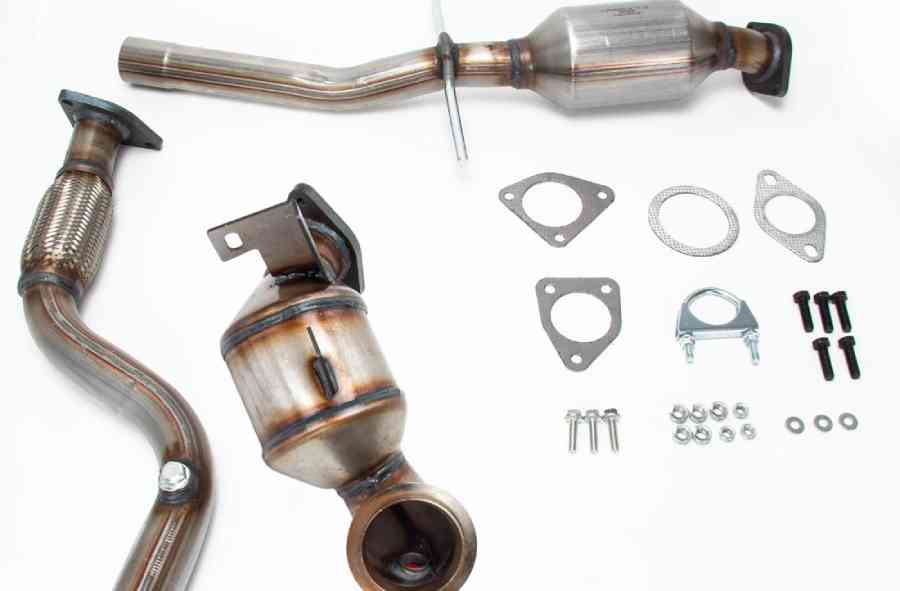
Chevy Cruze catalytic converter replacement typically costs $500 to $2,000 or more, including parts and labor, depending on the model year, engine configuration, converter type, and repair location. The total expense consists of the replacement catalytic converter, installation labor, and additional components such as exhaust gaskets, mounting hardware, or oxygen sensors when necessary. Vehicles requiring original equipment manufacturer (OEM) converters or emissions-certified replacements may have higher repair costs.
The 1.4L turbocharged and 1.8L gasoline engines use different exhaust configurations, which affect converter compatibility and installation complexity. Labor rates, access to exhaust fasteners, and corrosion also influence the final bill. Owners should confirm the required converter using the vehicle identification number (VIN) before comparing replacement estimates.
How Much Does a Chevy Cruze Catalytic Converter Cost?
A replacement catalytic converter for a Chevy Cruze can cost approximately $250 to $1,500 or more for the part alone. Aftermarket converters generally offer lower purchase prices, while OEM assemblies tend to cost more because they are designed for specific factory configurations. Actual prices depend on engine compatibility, converter location, emissions certification, and supplier availability.
Direct-fit catalytic converters are manufactured to connect to the vehicle’s existing exhaust system without extensive modification. Universal converters may have lower initial prices but require additional fabrication and must meet applicable emissions regulations. For example, a converter approved for a federal-emissions Cruze is not automatically legal for a vehicle subject to California Air Resources Board (CARB) replacement requirements.
How Much Does Labor Cost to Replace a Chevy Cruze Catalytic Converter?
Labor for Chevy Cruze catalytic converter replacement can cost approximately $150 to $600 or more, depending on the repair facility, regional hourly rates, and installation complexity. A straightforward replacement using accessible factory connections generally requires less labor than a repair involving seized exhaust fasteners, damaged mounting hardware, or additional exhaust system work.
On certain Cruze configurations, the catalytic converter is integrated with or positioned close to the exhaust manifold, making access more complicated. Technicians may need to remove surrounding components to reach mounting bolts and oxygen sensor connections. Corroded fasteners can increase repair time because they require careful removal to avoid damaging adjacent exhaust components.
Professional replacement also includes inspecting exhaust connections, checking for leaks, and verifying that the engine operates correctly after installation. Comparing written estimates that separately identify parts, labor, and additional repairs helps owners understand the actual replacement cost.
What Are the Signs of a Bad Catalytic Converter on a Chevy Cruze?
The main signs of a bad Chevy Cruze catalytic converter include an illuminated check engine light, reduced acceleration, engine power loss, unusual exhaust noises, and abnormal exhaust odors. These symptoms occur when the converter loses its ability to process exhaust gases efficiently, develops internal damage, or becomes restricted. However, each symptom requires further diagnosis because other engine and exhaust system problems can produce similar effects.
A check engine light accompanied by diagnostic trouble code P0420 indicates that the engine control module has detected catalyst system efficiency below its calibrated threshold. The system evaluates signals from oxygen sensors positioned around the catalytic converter to assess its performance. A deteriorated catalyst can trigger this code, but exhaust leaks, sensor faults, and improper engine combustion can also affect the readings. Therefore, P0420 alone does not establish that the converter must be replaced.
Poor acceleration and reduced engine power can develop when the catalytic converter becomes severely clogged. Exhaust gases must pass through the converter’s internal honeycomb structure before exiting the exhaust system. A damaged or melted substrate can restrict this flow, increasing exhaust backpressure and reducing the engine’s ability to expel combustion gases. For example, a Cruze with a restricted converter may accelerate normally at low engine loads but struggle to maintain power during highway acceleration or uphill driving.
Unusual rattling noises can indicate a fractured catalytic converter substrate. The internal ceramic material may break apart following excessive heat exposure or physical damage, allowing loose fragments to vibrate inside the converter housing. Abnormal exhaust odors can also accompany catalytic converter or engine combustion problems. A sulfur-like smell, for instance, may be associated with exhaust chemistry or an overly rich fuel mixture rather than converter failure alone.
Persistent symptoms should be investigated before replacement. An OBD-II scan, exhaust leak inspection, and evaluation of engine operating conditions help distinguish a failed catalytic converter from ignition, fuel delivery, or oxygen sensor problems. Correcting the underlying cause is essential because unresolved misfires or excessive fuel entering the exhaust can overheat and damage a newly installed converter.
How Do You Diagnose a Bad Chevy Cruze Catalytic Converter Before Replacement?
Diagnosing a bad Chevy Cruze catalytic converter requires checking diagnostic trouble codes, evaluating oxygen sensor data, inspecting the exhaust system, and identifying engine performance problems before replacing the converter. A P0420 code, reduced acceleration, or unusual exhaust odor can indicate catalytic converter failure, but these symptoms do not confirm that the converter itself is defective. Accurate diagnosis separates catalyst deterioration from exhaust leaks, sensor malfunctions, and combustion problems that produce similar symptoms.
The diagnostic process should begin with an OBD-II scanner capable of retrieving stored trouble codes, freeze-frame data, and live engine parameters. Freeze-frame information records operating conditions when a fault was detected, including engine speed, load, and coolant temperature. These details help determine whether the catalyst efficiency warning occurred during normal operation or alongside another engine malfunction. For example, a Chevy Cruze displaying P0420 together with a misfire code requires investigation of the misfire before catalytic converter replacement.
A visual inspection should follow the electronic diagnosis. Exhaust leaks near the manifold, converter connections, or oxygen sensors can introduce additional oxygen into the exhaust stream and interfere with catalyst monitoring. Damaged wiring, loose sensor connectors, and signs of excessive exhaust heat also require attention. Replacing the catalytic converter without correcting these faults can leave the original warning light unresolved or damage the new component.
What Does the P0420 Code Mean on a Chevy Cruze?
The P0420 code on a Chevy Cruze means “Catalyst System Efficiency Below Threshold (Bank 1).” It indicates that the engine control module has detected catalyst performance below its programmed efficiency threshold based on exhaust oxygen sensor signals and operating conditions. Bank 1 identifies the engine bank containing cylinder one. On the Cruze’s inline four-cylinder gasoline engines, there is only one cylinder bank.
The catalytic converter reduces harmful exhaust emissions through chemical reactions involving its internal catalyst materials. An upstream oxygen sensor monitors exhaust conditions before the converter, while a downstream sensor provides information used to evaluate catalyst operation. During appropriate operating conditions, the engine control module compares sensor behavior to determine whether the converter is functioning within its calibrated limits.
A deteriorated converter may allow downstream oxygen sensor readings to resemble upstream sensor activity more closely because its oxygen storage and conversion performance have declined. However, the monitoring strategy varies by engine calibration, and similar sensor behavior can result from exhaust leaks, incorrect fuel mixtures, or oxygen sensor problems. The diagnostic code therefore identifies a catalyst efficiency problem rather than proving a specific component has failed.
For example, a Chevy Cruze with P0420 and a leaking exhaust connection upstream of the downstream oxygen sensor may produce misleading catalyst monitoring data. Replacing the converter without repairing the leak may not resolve the code. Likewise, a malfunctioning oxygen sensor or persistent rich fuel mixture can affect catalyst monitoring and must be evaluated before replacement.
Drivers should also check for additional codes related to fuel trim, oxygen sensors, ignition misfires, or air-fuel mixture control. These faults can contribute to poor catalytic converter performance or cause actual catalyst damage. A flashing check engine light, especially when accompanied by rough running, requires immediate attention because an active misfire can overheat the converter.
How Can You Test a Chevy Cruze Catalytic Converter?
Testing a Chevy Cruze catalytic converter involves analyzing oxygen sensor signals, checking exhaust system integrity, evaluating engine operating conditions, and measuring exhaust restriction when necessary. No single test confirms every type of converter failure. Catalyst efficiency problems and physical exhaust blockages require different diagnostic approaches because a converter can lose emissions performance without becoming clogged.
An OBD-II scanner with live-data capability provides a starting point for catalyst efficiency diagnosis. After the engine reaches normal operating temperature and the required monitoring conditions are met, a technician can examine upstream and downstream oxygen sensor behavior. On systems using conventional narrowband oxygen sensors, the upstream signal typically changes with fuel mixture adjustments, while the downstream signal may show less switching when the catalyst is functioning correctly. Sensor type and control strategy must be considered because some Cruze configurations use different sensor technologies.
Exhaust leak inspection is equally important. Leaks near the converter or oxygen sensor mounting points can change measured oxygen concentrations and interfere with catalyst efficiency calculations. A technician can inspect exhaust joints, gaskets, welds, and sensor fittings for escaping gases or visible damage. Any identified leaks should be repaired before repeating catalyst monitoring tests.
Exhaust backpressure testing helps identify a physically restricted converter when symptoms include severe power loss or poor acceleration under load. A technician measures exhaust pressure at an appropriate test location using suitable equipment and compares the readings with the applicable service specifications. Excessive pressure upstream of the converter can indicate a restriction, although other exhaust components must also be considered. This test is particularly useful when a damaged internal substrate obstructs exhaust flow.
Converter temperature measurements can provide supplementary diagnostic information, but inlet and outlet temperature differences alone cannot reliably establish catalyst condition. Exhaust temperature depends on engine load, fuel mixture, catalyst activity, and operating conditions. A converter may reach high temperatures during normal chemical reactions, while an engine misfire can cause abnormal overheating. Temperature readings should therefore support, rather than replace, electronic and mechanical testing.
The final diagnosis should also address engine conditions capable of damaging the converter. Ignition misfires, leaking fuel injectors, excessive oil consumption, and coolant entering the combustion chamber can contaminate or overheat catalyst materials. For example, a Cruze with repeated misfires may send unburned fuel into the exhaust, where oxidation inside the converter generates excessive heat and damages the substrate. Installing a new converter without correcting the misfire exposes the replacement part to the same failure mechanism.
Catalytic converter replacement is justified when diagnostic evidence confirms catalyst deterioration or physical damage, competing causes have been investigated, and the selected repair addresses the underlying fault. This approach reduces unnecessary parts replacement and improves the likelihood that the vehicle will pass its applicable emissions inspection after repair.
How Do You Replace a Catalytic Converter on a Chevy Cruze?
Replacing a catalytic converter on a Chevy Cruze involves preparing the vehicle, disconnecting the oxygen sensors and exhaust connections, removing the damaged converter, installing a compatible replacement, and inspecting the exhaust system for leaks. The exact procedure depends on the model year, engine configuration, converter location, and condition of the mounting hardware. The 1.4L turbocharged and 1.8L gasoline engines have different exhaust layouts, so their removal procedures are not interchangeable.
Before beginning the replacement, confirm that the catalytic converter is defective and identify the correct replacement assembly using the vehicle identification number (VIN). The new converter must match the vehicle’s engine, exhaust configuration, and applicable emissions requirements. Replacement gaskets, seals, and mounting hardware should also be available before disassembly because deteriorated exhaust connections can cause leaks after installation.
Catalytic converter replacement requires particular attention to exhaust temperature, vehicle support, and oxygen sensor wiring. Exhaust components can remain hot after the engine is switched off, and fasteners exposed to repeated heating cycles may become difficult to remove. The vehicle must be supported securely using manufacturer-approved lifting points and properly rated equipment. A hydraulic jack alone is not sufficient support for working underneath a vehicle.
What Tools Do You Need to Replace a Chevy Cruze Catalytic Converter?
Replacing a Chevy Cruze catalytic converter requires a socket and ratchet set, oxygen sensor socket, torque wrench, penetrating oil, and appropriate vehicle support equipment. Additional tools depend on the engine configuration and accessibility of the converter mounting points.
The primary tools and supplies include:
- Socket and ratchet set: Removes exhaust fasteners, brackets, and components obstructing access to the converter.
- Oxygen sensor socket: Allows oxygen sensors to be removed without damaging their wiring or connector assemblies.
- Torque wrench: Tightens exhaust fasteners to the specifications provided in the applicable Chevrolet service information.
- Penetrating oil: Helps loosen corroded exhaust bolts and nuts before removal.
- Jack stands or a vehicle lift: Provides stable vehicle support when access underneath the Cruze is necessary.
- Safety glasses and protective gloves: Protect against rust particles, sharp exhaust components, and other workshop hazards.
- Replacement exhaust gaskets and hardware: Restore sealing at exhaust connections and replace damaged or specified single-use fasteners.
- OBD-II scanner: Checks diagnostic trouble codes and monitors engine operation after installation.
Some Cruze configurations also require additional sockets, extensions, heat shield removal tools, or equipment for accessing components around the exhaust manifold and turbocharger. Exact tool sizes should be confirmed using the service procedure for the vehicle’s engine and model year.
How Do You Remove and Install a Chevy Cruze Catalytic Converter?
Removing and installing a Chevy Cruze catalytic converter requires disconnecting the affected exhaust components, transferring or replacing applicable sensors, fitting the new converter, and restoring the exhaust connections according to factory specifications. The following procedure describes the general replacement sequence for gasoline-powered Cruze models. Component locations, fastener arrangements, and required disassembly steps vary by engine and model year.
Step 1: Prepare the vehicle for catalytic converter removal.
Park the Cruze on a level surface, engage the parking brake, and allow the engine and exhaust system to cool completely. Confirm the replacement converter’s part number and inspect the supplied gaskets and mounting hardware. Disconnect the negative battery cable when required by the vehicle-specific service procedure, following the manufacturer’s precautions for electronic systems.
Raise the vehicle only when necessary and support it at approved lifting points using properly rated equipment. Never work underneath a vehicle supported solely by a hydraulic jack. Identify the catalytic converter, oxygen sensor connectors, exhaust joints, and surrounding components before loosening any fasteners.
Step 2: Disconnect the oxygen sensors and related components.
Locate the oxygen sensors associated with the catalytic converter and identify their electrical connectors. Disconnect the connectors carefully and release the wiring from any retaining clips that prevent safe converter removal. Keep the wiring away from sharp edges and exhaust components.
Remove the sensors with an appropriate oxygen sensor socket when required by the service procedure. Avoid twisting the wiring harness or applying excessive force to the sensor body. Inspect the sensors and threaded mounting points for damage before deciding whether they can be reused. An oxygen sensor does not automatically require replacement whenever the catalytic converter is changed.
Step 3: Remove the old catalytic converter.
Apply penetrating oil to accessible exhaust fasteners and allow sufficient time for it to work. Remove the relevant heat shields, supports, and exhaust connections in the sequence specified for the vehicle. Support the converter assembly while removing its remaining mounting hardware to prevent sudden movement or damage to nearby components.
On certain 1.4L turbocharged configurations, the converter is located near the turbocharger outlet, while 1.8L gasoline configurations use a different exhaust arrangement. These differences affect access, surrounding components, and the fasteners that must be removed. Use the service instructions for the exact engine rather than assuming the same removal sequence applies to every Chevy Cruze.
Carefully separate the converter from the adjoining exhaust components and remove it without pulling on oxygen sensor wiring or forcing adjacent pipes. Inspect the mating surfaces, mounting points, and surrounding exhaust sections for cracks, corrosion, or damaged sealing areas.
Step 4: Install the replacement catalytic converter.
Compare the replacement converter with the removed assembly before installation. Confirm that the inlet and outlet connections, mounting locations, oxygen sensor ports, and emissions certification match the vehicle’s requirements.
Position the new converter using the correct replacement gaskets and specified mounting hardware. Start fasteners by hand where practical to reduce the risk of cross-threading, and align the exhaust assembly before final tightening. Tighten all connections in the required sequence using the manufacturer-specified torque values for the applicable engine and model year.
Reinstall the oxygen sensors according to the service instructions, observing the specified tightening requirements and any sensor manufacturer’s guidance regarding thread treatment. Reconnect the electrical connectors and secure the wiring in its original routing to prevent contact with hot exhaust components.
Step 5: Reassemble the exhaust system and inspect the installation.
Reinstall the removed heat shields, brackets, and surrounding components. Verify that the catalytic converter and exhaust piping have adequate clearance from nearby hoses, wiring, and heat-sensitive components. Confirm that all electrical connectors, mounting fasteners, and exhaust joints are secure.
Start the engine only after tools and personnel are clear of moving and hot components. Listen for unusual exhaust noises and inspect accessible connections for signs of leakage using a safe inspection method. Do not touch the exhaust system while it is operating or heating up.
Connect an OBD-II scanner to check for diagnostic trouble codes and confirm that relevant engine parameters are operating normally. Clearing codes does not prove that the repair succeeded because catalyst readiness monitors may require additional driving under specified conditions before completing their self-tests.
A controlled road test can help identify remaining exhaust leaks, abnormal noises, or engine performance problems. After the exhaust cools, perform any additional inspections required by the service procedure. If P0420 returns after the catalyst monitor completes, further diagnosis is necessary rather than assuming the replacement converter is defective.
Which Catalytic Converter Fits a Chevy Cruze?
The correct catalytic converter for a Chevy Cruze depends on the vehicle’s model year, engine type, exhaust system configuration, and emissions certification. A replacement converter must match the original mounting arrangement, exhaust connections, oxygen sensor locations, and applicable emissions requirements. Parts designed for one Cruze engine or model year are not automatically interchangeable with other versions.
Chevrolet Cruze models sold in the United States include different gasoline engine configurations, particularly the 1.4L turbocharged and 1.8L naturally aspirated engines found in first-generation vehicles. Later models introduced different engine designs and exhaust components. These variations affect catalytic converter placement, connection points, and replacement part numbers. For example, a converter designed for a first-generation Cruze with a 1.8L engine should not be assumed to fit a 1.4L turbocharged model.
The vehicle identification number (VIN) provides the most reliable starting point for identifying compatible replacement parts. Owners should use the VIN, model year, engine specification, and original emissions configuration when checking an OEM parts catalog or an aftermarket manufacturer’s fitment database. The emissions label under the hood can provide additional information about the vehicle’s certified emissions configuration. Matching these details reduces the risk of purchasing a converter with incorrect mounting points, sensor ports, or emissions specifications.
OEM catalytic converters are replacement components supplied through the vehicle manufacturer’s authorized parts system. They are designed for specified vehicle applications and generally provide factory-matched connections when the correct part number is selected. Their main disadvantage is purchase cost, which can be higher than that of comparable aftermarket replacements. An OEM converter should still be verified against the vehicle’s VIN because Chevrolet Cruze exhaust configurations differ across production years and engines.
Aftermarket catalytic converters are manufactured by independent parts suppliers and offer alternative replacement options at different price points. Direct-fit aftermarket converters are designed to connect to the original exhaust system without extensive modification. Universal converters require additional fitting or fabrication and are not suitable for every vehicle or emissions jurisdiction. A lower purchase price does not establish compatibility, durability, or legal compliance.
Emissions certification is another essential factor when selecting a Chevy Cruze catalytic converter. In the United States, replacement converters must satisfy applicable Environmental Protection Agency (EPA) requirements and relevant state regulations. Vehicles subject to California Air Resources Board (CARB) replacement requirements need an approved converter for the specific vehicle application. CARB-approved aftermarket converters are identified through applicable Executive Order information and vehicle application listings. A converter advertised as EPA-compliant is not automatically approved for use in California or other jurisdictions applying CARB requirements.
The correct replacement should also match the vehicle’s emissions equipment and oxygen sensor arrangement. Incorrect sensor port locations, incompatible exhaust flanges, or unsuitable catalyst specifications can create installation problems or prevent the engine control module from confirming proper catalyst operation. For example, installing a converter that physically attaches to the exhaust but lacks the required emissions approval may leave the vehicle unable to meet applicable inspection requirements.
Before purchasing a replacement catalytic converter, confirm the VIN-based fitment, engine compatibility, converter location, emissions certification, and required installation hardware. Compare the selected part number with the manufacturer’s application listing rather than relying solely on a product description that says it fits a Chevy Cruze. This verification helps prevent installation delays, unnecessary returns, and emissions compliance problems.
How Long Does a Chevy Cruze Catalytic Converter Last?
A Chevy Cruze catalytic converter can last 100,000 miles or longer when the engine operates correctly and the exhaust system remains in good condition. Catalytic converters do not have a fixed replacement interval because their lifespan depends on combustion efficiency, engine maintenance, operating temperatures, and exposure to contaminants. A properly functioning converter can remain effective well beyond 100,000 miles, while persistent engine problems can cause premature failure.
The most common causes of premature catalytic converter damage include engine misfires, excessive fuel entering the exhaust, oil consumption, and coolant contamination. Unburned fuel from a misfiring cylinder can ignite inside the converter, generating temperatures high enough to damage or melt its internal ceramic substrate. Engine oil and coolant entering the exhaust can contaminate catalyst surfaces, reducing their ability to convert harmful emissions. Physical impacts and severe corrosion can also damage the converter housing or exhaust connections.
Catalytic converter lifespan should not be confused with emissions warranty coverage. Under federal emissions warranty requirements, qualifying catalytic converters on covered vehicles generally receive 8 years or 80,000 miles of coverage, whichever occurs first. Warranty eligibility depends on the vehicle, applicable regulations, and warranty conditions. Owners should check their Chevrolet warranty documentation and vehicle identification number before paying for a replacement.
Can You Drive a Chevy Cruze With a Bad Catalytic Converter?
A Chevy Cruze may remain drivable with a deteriorating catalytic converter, but continued driving depends on the severity of the failure and the vehicle’s operating condition. A converter with reduced emissions efficiency may trigger a check engine light without immediately affecting engine performance. However, a severely clogged or overheating converter can restrict exhaust flow, reduce engine power, and create additional mechanical or safety risks.
A partially restricted converter increases exhaust backpressure, making it harder for the engine to expel combustion gases. As the restriction becomes more severe, the Cruze may experience sluggish acceleration, reduced power at higher engine speeds, or difficulty maintaining speed under load. A damaged converter can also generate excessive heat, particularly when an unresolved engine misfire sends unburned fuel into the exhaust system.
Drivers should stop operating the vehicle when symptoms indicate a potentially dangerous condition, including a flashing check engine light, severe power loss, overheating, or suspected exhaust gases entering the passenger compartment. Exhaust leaks can expose occupants to carbon monoxide, an odorless and potentially fatal gas. A vehicle displaying these symptoms should be inspected before further driving, and towing may be the safest option.
A steady check engine light accompanied by P0420 does not automatically mean the converter is clogged or that immediate mechanical failure is likely. Nevertheless, the underlying cause should be diagnosed promptly. Driving with an unresolved catalyst efficiency fault can result in emissions inspection failure and may allow an engine problem to damage other exhaust components.
Read more: Honda Pilot Catalytic Converter Replacement Guide
Can You Replace a Chevy Cruze Catalytic Converter Yourself?
You can replace a Chevy Cruze catalytic converter yourself if you have suitable mechanical experience, the required tools, safe vehicle support equipment, and access to the correct service instructions. The difficulty depends on the engine configuration, converter location, exhaust fastener condition, and surrounding components. A direct-fit replacement with accessible mounting hardware is generally less complicated than a converter located near tightly packaged engine or turbocharger components.
DIY replacement requires more than removing and installing an exhaust component. The repair involves identifying the correct converter, disconnecting oxygen sensors without damaging their wiring, handling corroded fasteners, replacing exhaust gaskets, and tightening connections to manufacturer specifications. An incorrectly installed converter can cause exhaust leaks, damaged sensor wiring, or persistent diagnostic trouble codes. Working beneath an improperly supported vehicle also creates a serious injury risk.
Professional replacement is preferable when the converter is difficult to access, exhaust fasteners are severely corroded, welding is required, or the underlying engine fault remains unidentified. A repair facility can perform additional diagnostic tests, verify converter compatibility, and inspect the exhaust system after installation. Professional service is particularly valuable when a replacement must meet specific state emissions requirements.
The financial benefit of DIY replacement depends on the labor cost avoided and the equipment already available. Owners who need to purchase specialized tools or repair damaged exhaust connections may save less than expected. The replacement should only proceed after confirming that the converter is defective and that the selected part meets the vehicle’s mechanical and emissions requirements.
How Can You Prevent a Chevy Cruze Catalytic Converter From Failing Again?
Preventing another Chevy Cruze catalytic converter failure requires correcting engine problems that damage catalyst materials, maintaining proper combustion, and addressing exhaust system faults before they become severe. Replacing the converter without fixing the original cause can expose the new component to the same excessive temperatures, contamination, or abnormal exhaust conditions that damaged the previous unit.
Engine misfires are among the most important problems to address because unburned fuel can enter the exhaust system and generate excessive heat inside the converter. Faulty spark plugs, ignition coils, fuel injectors, or other combustion-related components can contribute to misfires. For example, a Cruze with a failing ignition coil may continue sending unburned fuel into the exhaust even after the catalytic converter has been replaced. Repairing the ignition fault prevents the replacement converter from being exposed to the same damaging conditions.
Fuel mixture problems also affect converter durability. A rich air-fuel mixture can increase the amount of unburned fuel reaching the catalyst, while persistent lean operation can contribute to abnormal combustion temperatures under certain conditions. Faulty sensors, fuel delivery problems, and intake system leaks should be diagnosed using appropriate engine data rather than replacing components based solely on symptoms. Maintaining correct fuel control helps the converter operate within its intended temperature and emissions performance range.
Excessive oil consumption and internal coolant leaks require attention because oil additives and coolant contaminants can accumulate on catalyst surfaces. These deposits interfere with the chemical reactions that convert pollutants into less harmful exhaust gases. Owners should investigate unexplained oil loss, recurring coolant loss, abnormal exhaust smoke, and related engine trouble codes before installing a new converter.
Regular vehicle maintenance supports catalytic converter longevity by keeping the engine and exhaust system operating correctly. Follow the recommended spark plug replacement schedule, investigate check engine warnings, repair exhaust leaks, and address abnormal engine operation promptly. After catalytic converter replacement, confirm that the original diagnostic fault has been resolved and that the applicable emissions readiness monitors complete successfully.
A properly diagnosed repair protects the new catalytic converter and reduces the likelihood of repeated replacement costs. The most effective prevention strategy is to maintain correct engine combustion and resolve the underlying cause of the original converter failure, rather than treating the catalytic converter as an isolated exhaust component.