A Stanley FATMAX jump starter helps start a car with a weak or discharged battery by supplying the electrical power needed to crank the engine. To use a Stanley FATMAX jump starter, check that the unit is charged, connect the red clamp to the positive (+) battery terminal, and attach the black clamp to the designated negative connection or grounding point. Activate the jump-start function according to your model’s instructions, start the engine, and disconnect the clamps in the recommended order.
Stanley FATMAX jump starters are portable automotive emergency devices designed to provide starting power without requiring another vehicle. Depending on the model, they may also include an air compressor, USB charging ports, LED work lights, and battery status indicators. Models differ in peak amperage, control layout, charging methods, and operating procedures, so checking the specific model number is essential before use.
Proper clamp placement and operating sequence help prevent reverse-polarity connections, electrical damage, and unsuccessful starting attempts. This guide explains how to prepare a Stanley FATMAX jump starter, connect it to a vehicle battery, start the engine, and remove the clamps safely. It also covers common starting problems, recharging procedures, maintenance requirements, and vehicle compatibility.
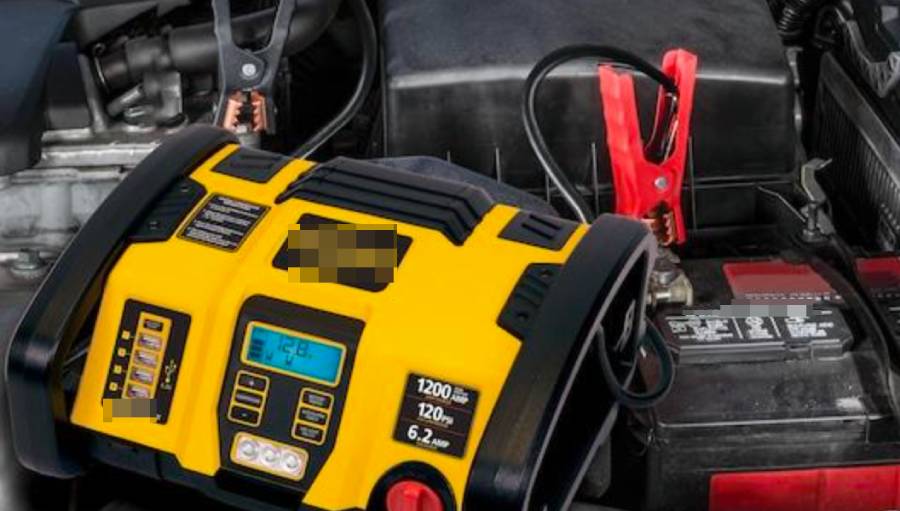
What Should You Check Before Using a Stanley FATMAX Jump Starter?
Before using a Stanley FATMAX jump starter, check the unit’s battery charge, vehicle battery voltage, jumper cable condition, and connection points. These four checks help determine whether the jump starter is ready to supply power and whether it can be connected safely to the vehicle.
First, check the jump starter’s internal battery level using its battery status indicator or battery check button. The unit should be fully charged before a jump-start attempt because its internal battery must deliver enough current to turn the vehicle’s starter motor. A partially discharged jump starter may illuminate its display or indicator lights but still lack sufficient power to crank the engine. Recharge the unit according to its model-specific instructions if the battery indicator shows a low charge.
Next, confirm that the vehicle uses a compatible battery system. Stanley FATMAX automotive jump starters are generally designed for 12-volt vehicle batteries, but their starting capabilities vary by model. Check the vehicle owner’s manual and the jump starter’s specifications before connecting the clamps. A unit rated for a small gasoline engine may not provide sufficient starting current for a larger diesel engine, particularly in cold weather when battery performance decreases and starting demands increase.
Inspect both jumper cables and battery clamps for cracked insulation, exposed wires, corrosion, or loose connections. Damaged cables can interfere with electrical current delivery and increase the risk of short circuits. The clamps should be clean, securely attached to their cables, and free from visible damage. Do not operate the jump starter if its cables or clamps are damaged.
Finally, locate the vehicle’s positive (+) battery terminal and the manufacturer-approved negative connection or grounding point. The positive terminal is typically marked with a plus symbol and may have a red protective cover. Some vehicles have dedicated jump-start terminals located away from the battery, especially when the battery is installed in the trunk or beneath a seat.
Park the vehicle on a stable surface, engage the parking brake, switch off the ignition, and turn off unnecessary electrical accessories before connecting the jump starter. Keep the clamps separated and ensure the cables remain clear of belts, fans, and other moving engine components. Do not attempt to jump-start a visibly damaged, leaking, or frozen battery.
How Do You Connect a Stanley FATMAX Jump Starter to a Car Battery?
To connect a Stanley FATMAX jump starter to a car battery, attach the red clamp to the positive (+) terminal and the black clamp to the manufacturer-approved negative connection or grounding point. Keep the jump-start power switch in the OFF position while connecting the clamps, if your model has a manual switch. Correct connections allow the jump starter to deliver electrical current to the vehicle’s starting system while reducing the risk of sparks, reverse polarity, and electrical damage.
Follow these five steps to connect the jumper cables:
- Turn off the vehicle and jump starter. Remove the ignition key or switch off the ignition, engage the parking brake, and ensure the jump-start function is disabled before handling the clamps.
- Locate the positive battery terminal. Identify the terminal marked with a plus (+) symbol. Remove its protective cover if necessary, and check that the terminal is clean and accessible.
- Connect the red clamp. Attach the red positive (+) clamp securely to the vehicle’s positive battery terminal or designated positive jump-start post. Ensure the metal jaws make firm contact with the connection point.
- Connect the black clamp. Attach the black negative (−) clamp to the grounding point specified in the vehicle and jump starter manuals. This may be a designated chassis ground or an approved negative connection. Avoid placing the clamp near moving engine components, fuel lines, or damaged wiring.
- Verify both connections. Confirm that the clamps are secure, their polarity is correct, and the cables are positioned away from belts, pulleys, and cooling fans. Check the jump starter for any reverse-polarity warning before activating the jump-start function.
Where Do You Connect the Red and Black Clamps?
The red clamp connects to the positive (+) battery terminal, while the black clamp connects to the vehicle’s approved negative connection or grounding point. The exact location of the negative connection depends on the vehicle’s electrical system and the instructions supplied with the Stanley FATMAX model.
On vehicles with batteries located in the engine compartment, the positive terminal is generally identified by a plus symbol or red cover. The negative terminal is marked with a minus (−) symbol, although the vehicle manufacturer may require the black clamp to be connected to a separate grounding point instead. Some modern vehicles use battery monitoring sensors or remote jump-start terminals that require a specific connection procedure.
A suitable grounding point must provide a secure electrical connection and be approved for jump-starting. Do not assume that any exposed metal surface is safe. Painted, corroded, or poorly grounded surfaces can prevent sufficient current from reaching the starting system.
After attaching both clamps, check the Stanley FATMAX jump starter’s connection indicators or warning signals, if equipped. A reverse-polarity alarm indicates that the connections require attention. Turn off the jump-start function and correct the connections according to the device’s instructions before proceeding. Never bypass a safety warning or allow the red and black clamps to touch each other.
Once both clamps are properly connected and no connection warning is present, the Stanley FATMAX jump starter is ready for the model-specific activation and engine-starting procedure.
How Do You Jump-Start a Car With a Stanley FATMAX Jump Starter?
To jump-start a car with a Stanley FATMAX jump starter, activate the jump-start function after connecting the clamps correctly, start the vehicle’s engine, and turn off the jump starter once the engine runs. The device supplies electrical current to the vehicle’s starter motor, allowing it to crank the engine when the car battery cannot provide sufficient starting power.
Follow these five steps to jump-start your vehicle:
- Verify the jumper cable connections. Confirm that the red clamp is attached to the positive (+) terminal and the black clamp is connected to the approved negative connection or grounding point. Make sure both clamps have secure metal-to-metal contact.
- Activate the jump-start function. Turn the jump-start power switch to the ON position if your Stanley FATMAX model uses a manual switch. Follow the operating instructions for models with different controls.
- Check the device’s indicators. Confirm that the jump starter is ready to operate and that no reverse-polarity or connection warning is active. Indicator colors and warning signals vary between models.
- Start the vehicle’s engine. Turn the ignition key or press the engine start button as you normally would. The jump starter provides additional starting current while the vehicle’s starter motor cranks the engine. Follow the manufacturer’s maximum cranking duration for your specific model.
- Turn off the jump-start function after the engine starts. Once the engine is running steadily, switch the jump-start function OFF if your model has a manual power switch. Remove the jumper cables using the disconnection procedure specified in the device and vehicle manuals.
A Stanley FATMAX jump starter provides temporary starting power rather than repairing the underlying battery problem. If the engine starts successfully but the vehicle repeatedly requires jump-starting, the battery, alternator, charging system, or electrical connections may need inspection.
How Do You Turn On a Stanley FATMAX Jump Starter?
Turn on a Stanley FATMAX jump starter by activating its jump-start power control after securing both battery clamps and confirming the correct polarity. The location and operation of this control depend on the specific model.
Stanley FATMAX jump starters equipped with a manual jump-start switch generally require the switch to remain OFF while the clamps are being connected. Once the connections are secure, the switch can be moved to ON according to the manufacturer’s instructions. Models with electronic controls or additional safety features may use a different activation sequence.
Check the device’s status indicators before attempting to start the engine. Some models provide visual or audible warnings when the clamps are connected incorrectly. A warning signal should be investigated before proceeding because incorrect polarity can damage the vehicle’s electrical components or the jump starter itself.
Do not confuse the battery status button, USB power control, air compressor switch, or work light switch with the jump-start activation control. These functions operate separately on models that include multiple accessories. Consult the model’s control labels and operating manual to identify the correct switch.
What Should You Do If the Engine Does Not Start?
If the engine does not start with a Stanley FATMAX jump starter, stop cranking, check the jump starter’s charge level, inspect the clamp connections, and follow the manufacturer’s required waiting interval before another attempt. Repeatedly cranking the engine without sufficient recovery time can overheat the jump starter, cables, or vehicle’s starting components.
Start by observing what happens when you turn the ignition. A rapid clicking sound often indicates insufficient voltage or current reaching the starter motor. A single click without engine rotation may indicate a starter circuit problem, although a weak battery or poor electrical connection can produce similar symptoms. If the engine cranks normally but does not start, the problem may involve fuel delivery, ignition, or another engine system rather than the battery.
Check the jump starter’s battery indicator next. A low internal charge reduces the current available for engine starting, especially in cold weather or vehicles with larger engines. Recharge the unit if its charge level is insufficient, and avoid continuing with repeated unsuccessful attempts.
Inspect the battery clamps for loose connections, corrosion, or poor contact with the designated terminals. Turn off the jump-start function before adjusting the clamps. Reconnect them according to the correct procedure and verify that no reverse-polarity warning is present.
Allow the jump starter to recover between attempts according to its model-specific instructions. Do not exceed the manufacturer’s maximum cranking duration or recommended number of attempts. These limits protect the device from overheating and excessive battery discharge.
If the vehicle still fails to start after the permitted attempts, stop using the jump starter and investigate the vehicle’s battery and starting system. A severely deteriorated battery, faulty starter motor, damaged battery cables, or charging system problem may require professional diagnosis. A jump starter cannot correct mechanical engine failures or every type of electrical fault.
How Do You Disconnect a Stanley FATMAX Jump Starter After Starting the Car?
To disconnect a Stanley FATMAX jump starter after starting your car, turn off the jump-start function, remove the black negative (−) clamp first, and then remove the red positive (+) clamp. This sequence is used for models that specify negative-first disconnection and helps reduce the risk of accidental short circuits. Always follow the disconnection instructions provided with your specific jump starter and vehicle.
Follow these five steps to disconnect the Stanley FATMAX jump starter safely:
- Confirm that the engine is running. Make sure the vehicle’s engine has started successfully and is operating steadily before disconnecting the jump starter. Keep the vehicle in Park or Neutral with the parking brake engaged.
- Turn off the jump-start function. Move the jump-start power switch to the OFF position if your Stanley FATMAX model has a manual switch. Follow the manufacturer’s shutdown procedure for models with different controls.
- Remove the black negative clamp. Carefully detach the black clamp from the designated grounding point or negative connection. Keep the clamp away from the vehicle’s battery terminals, exposed electrical connections, and moving engine components.
- Remove the red positive clamp. Disconnect the red clamp from the positive (+) battery terminal or designated positive jump-start post. Prevent the metal jaws from touching the vehicle’s body, other electrical terminals, or the black clamp.
- Secure the jumper cables. Return both clamps to their designated storage holders on the jump starter. Make sure the cables are properly secured and cannot accidentally contact each other.
After disconnecting the jump starter, allow the vehicle’s charging system to replenish the battery while the engine runs. The alternator generates electrical power during engine operation, but the time required to restore the battery’s charge depends on its condition, discharge level, and the vehicle’s charging system. A short period of idling does not guarantee that a deeply discharged battery will recover fully.
If the vehicle starts successfully but fails to restart after the engine is turned off, have the battery and charging system tested. A battery that no longer holds a charge may require replacement, while a malfunctioning alternator or poor electrical connection can prevent proper recharging.
Recharge the Stanley FATMAX jump starter according to its operating manual after use. Restoring its internal battery charge helps ensure that sufficient starting power is available during the next roadside emergency.
What Safety Precautions Should You Follow When Using a Stanley FATMAX Jump Starter?
The most important safety precautions when using a Stanley FATMAX jump starter are verifying battery polarity, preventing clamp contact, inspecting the vehicle battery, and following the manufacturer’s operating limits. These precautions reduce the risk of electrical damage, sparks, battery explosions, and personal injury during jump-starting.
Always connect the red positive (+) clamp to the correct positive terminal and the black negative (−) clamp to the approved negative connection or grounding point. Reversing these connections can create a reverse-polarity condition that may damage the jump starter or the vehicle’s electrical system. Some Stanley FATMAX models include reverse-polarity alarms, but these features do not replace the need to verify the connections manually.
Keep the red and black clamps separated throughout the procedure. Direct contact between energized clamps can cause a short circuit, producing sparks and excessive heat. Position the jumper cables away from engine belts, cooling fans, pulleys, and other moving components. Remove loose clothing or accessories that could become caught in the engine compartment.
Inspect the vehicle battery before connecting the jump starter. Never attempt to jump-start a frozen, leaking, cracked, or visibly swollen battery. Damaged lead-acid batteries can release flammable hydrogen gas or leak corrosive electrolyte. Sparks near the battery may ignite accumulated gas, while contact with battery acid can cause chemical burns. Stop the procedure if you notice physical damage, unusual odors, or signs of electrolyte leakage.
Use the jump starter only with a compatible vehicle electrical system. Many Stanley FATMAX automotive jump starters are designed for 12-volt lead-acid battery systems, but compatibility must be verified using the specific model’s instructions. Connecting a 12-volt jump starter to an incompatible electrical system can damage the equipment or vehicle electronics.
Operate the jump starter in a dry, well-ventilated area and follow its environmental operating restrictions. Do not expose the unit to rain, standing water, or excessive moisture unless its manufacturer explicitly permits those conditions. Keep the device away from open flames, cigarettes, and other ignition sources.
Finally, observe the manufacturer’s cranking limits and required recovery intervals. Jump starters deliver high electrical current during engine starting, which generates heat in their internal components and cables. Excessive cranking can trigger thermal protection or damage the equipment. Stop immediately if the unit overheats, emits smoke, produces an unusual smell, or displays a fault warning.
Following these precautions helps protect the jump starter, vehicle battery, and electrical system while reducing the hazards associated with roadside jump-starting.
Why Is My Stanley FATMAX Jump Starter Not Starting My Car?
A Stanley FATMAX jump starter may fail to start your car because of a low internal battery charge, loose jumper clamps, incorrect connections, insufficient starting current, or a fault in the vehicle’s starting system. Identifying the cause requires checking the jump starter’s status indicators and observing how the vehicle responds when you turn the ignition.
A low internal battery charge is one of the first conditions to check. The jump starter may have enough power to illuminate its indicator lights but not enough current to operate the vehicle’s starter motor. Check the battery status display or charge indicator and recharge the unit if necessary. A jump starter that has been stored without periodic recharging may also have a deteriorated internal battery.
Poor electrical contact can prevent starting current from reaching the vehicle. Corrosion on battery terminals, loose clamps, and improperly selected grounding points increase electrical resistance and reduce current delivery. Turn off the jump-start function before inspecting or adjusting the clamps. Clean or repair corroded battery connections as appropriate, and reconnect the clamps securely.
Vehicle compatibility also affects starting performance. A Stanley FATMAX jump starter must provide sufficient starting current for the engine and battery system. Larger engines, diesel engines, and vehicles operating in low temperatures can require greater starting current. Check the device’s specifications and the vehicle manufacturer’s requirements rather than relying on peak amperage alone.
If the jump starter is fully charged and correctly connected but the engine still does not start, the problem may involve the vehicle’s battery, starter motor, ignition system, or fuel delivery system. The symptoms observed during the starting attempt help narrow down the cause.
Why Does My Stanley FATMAX Jump Starter Beep?
A Stanley FATMAX jump starter may beep to indicate reverse polarity, an improper connection, or another operating warning, depending on the model. The meaning of the audible signal must be confirmed using the device’s indicator labels and operating manual.
A reverse-polarity warning occurs when the positive and negative connections are incorrect. On models equipped with this protection, an audible alarm or warning light may activate when the clamps are connected improperly. Stop the procedure, disable the jump-start function, and inspect the clamp connections before attempting to start the vehicle.
Other warning signals may relate to battery charge, operating faults, or additional functions such as the built-in air compressor. The same beep pattern does not necessarily have the same meaning across Stanley FATMAX models. Identify the model number and consult its troubleshooting instructions to determine the specific warning condition.
Never ignore a persistent warning or bypass a safety feature to force the jump starter to operate. Correct the identified problem before making another starting attempt.
Why Does My Car Click but Not Start With a Jump Starter?
A car that clicks but does not start with a Stanley FATMAX jump starter may have insufficient starting current, poor battery connections, or a faulty starter motor. The clicking sound typically comes from a relay or starter solenoid attempting to engage when the ignition is activated.
Rapid clicking commonly occurs when voltage drops too low during the starting attempt. This can happen when the vehicle battery is severely discharged, the jump starter has insufficient charge, or resistance at the battery connections prevents adequate current delivery. Check the jump starter’s charge level and inspect both clamp connections before trying again.
A single click without engine rotation may indicate a starter motor or starter solenoid problem. However, a weak battery, damaged cable, or poor ground connection can produce similar symptoms. A voltage test and inspection of the starting circuit may be necessary to identify the actual fault.
If the engine cranks at normal speed but does not start, the problem is less likely to be caused solely by insufficient battery power. Fuel delivery, ignition components, engine sensors, or other mechanical and electrical faults may prevent combustion even when the starter motor operates correctly.
Stop repeated jump-start attempts if the vehicle fails to respond after the manufacturer’s permitted attempts. Continued cranking can overheat the jump starter and place additional stress on the vehicle’s electrical system. Have the battery and starting system inspected if the cause cannot be identified through basic checks.
How Do You Recharge a Stanley FATMAX Jump Starter After Use?
To recharge a Stanley FATMAX jump starter after use, turn off the unit, connect the manufacturer-approved charging adapter to its designated charging input, and charge the internal battery until the device indicates a full charge. Recharging after each jump-start helps restore the battery’s available capacity and keeps the unit ready for future emergencies.
First, disconnect the jump starter from the vehicle and make sure all powered accessories, including the air compressor and work light, are switched off. Inspect the charging port, adapter, and power cable for visible damage before connecting the charger. Use only a charging method approved for your specific Stanley FATMAX model, because charging inputs and power requirements differ between versions.
Next, connect the appropriate charging adapter to the unit’s designated charging input and a compatible power source. Depending on the model, charging may be supported through an AC adapter, a built-in AC charging connection, or an approved DC charging accessory. A USB output port intended for charging mobile devices should not be treated as a charging input unless the manufacturer’s instructions explicitly identify it as one.
Monitor the battery charge indicator while the unit is charging. Stanley FATMAX models may use LED indicators, illuminated battery symbols, or digital displays to communicate charging progress. Refer to the operating manual to identify the correct full-charge indication.
Charge the jump starter in a dry, well-ventilated location within the temperature range specified by the manufacturer. Keep the unit away from flammable materials and avoid covering it during charging. Disconnect the charging equipment when instructed by the manufacturer, and store the unit with its cables secured.
How Long Does a Stanley FATMAX Jump Starter Take to Charge?
The charging time of a Stanley FATMAX jump starter depends on its model, internal battery capacity, remaining charge level, and charging method. There is no single charging duration that applies to every Stanley FATMAX jump starter.
A deeply discharged internal battery requires more charging time than a partially charged battery. Charging performance also depends on the output of the approved charging equipment and the battery’s condition. An aging battery may charge differently from a healthy battery and may no longer retain its original capacity.
Check the model number printed on the jump starter’s housing or identification label to determine the correct charging specifications. The manufacturer’s operating manual provides the applicable charging procedure, expected duration, and full-charge indicator information.
Do not estimate charging completion solely from the amount of time the unit has been plugged in. Use the specified charge indicator to confirm its status. If the battery does not reach a full charge within the manufacturer’s expected charging period, inspect the power source and charging equipment. A defective adapter, damaged charging connection, or deteriorated internal battery may prevent normal charging.
Recharge the Stanley FATMAX jump starter promptly after use and follow its recommended maintenance charging schedule during storage. Keeping the internal battery properly charged helps preserve its readiness and reduces the likelihood of discovering a discharged jump starter during an emergency.
Read more: How to Use Schumacher Battery Charger: Step-by-Step
How Do You Maintain a Stanley FATMAX Jump Starter?
To maintain a Stanley FATMAX jump starter, recharge its internal battery regularly, store it in a dry environment, inspect the jumper cables, and keep the battery clamps clean. Proper maintenance helps preserve starting performance, reduce battery deterioration, and ensure the device remains ready for roadside emergencies.
Recharge the jump starter immediately after each use and follow the maintenance charging interval specified in its operating manual. Internal batteries gradually lose charge during storage, even when the device is switched off. Many Stanley FATMAX jump starters use sealed lead-acid batteries, which are vulnerable to sulfation when left in a discharged state. Sulfation occurs when lead sulfate crystals accumulate on the battery plates, reducing the battery’s ability to accept and deliver electrical current.
Check the battery charge indicator periodically, particularly before long trips or during periods when the jump starter has not been used. A unit may display normal indicator lights while lacking sufficient capacity to deliver the high current required for engine starting. If the battery repeatedly loses charge shortly after recharging, its internal capacity may have deteriorated. Consult the manufacturer’s service instructions rather than attempting an unauthorized battery replacement.
Store the Stanley FATMAX jump starter in a clean, dry location protected from direct sunlight, excessive heat, freezing conditions, and moisture. Extreme temperatures accelerate battery degradation and can affect the device’s electrical components. Follow the storage temperature limits in the model’s manual, and avoid leaving the unit in a vehicle exposed to prolonged temperature extremes.
Inspect the jumper cables and clamps before storage and after each use. Look for cracked insulation, exposed conductors, loose connections, corrosion, or damaged clamp springs. Clean dirty clamp surfaces with a dry cloth or an appropriate cleaning method recommended by the manufacturer. Do not use the jump starter if the cables or clamps are damaged.
Keep the jumper cables secured in their designated storage holders to prevent accidental contact between the positive and negative clamps. Make sure the jump-start power switch is OFF and all accessories are disabled before storing the unit. If the device includes an air compressor, USB ports, or an LED work light, inspect these components for damage and keep their connections free from dust and moisture.
Replace or professionally service the jump starter if its internal battery can no longer hold a usable charge, its housing is damaged, or its electrical connections become unreliable. Regular charging, proper storage, and routine inspections help extend the device’s service life and maintain dependable starting performance.
Can You Use a Stanley FATMAX Jump Starter on Different Vehicles?
A Stanley FATMAX jump starter can be used on different vehicles, including passenger cars, SUVs, pickup trucks, and some diesel-powered vehicles, provided the vehicle’s battery voltage and starting requirements match the jump starter’s specifications. Compatibility depends on the specific Stanley FATMAX model, engine size, battery condition, and electrical system.
Most Stanley FATMAX automotive jump starters are designed for 12-volt vehicle electrical systems. However, sharing the same battery voltage does not guarantee that a jump starter can start every vehicle. Larger engines require greater starting current, especially in cold temperatures when engine oil becomes more viscous and battery performance decreases.
Passenger cars with smaller gasoline engines generally require less starting current than large pickup trucks or diesel-powered vehicles. Diesel engines typically have higher compression ratios, which increase the torque required to crank the engine. As a result, a jump starter suitable for a compact gasoline car may not provide enough current to start a large diesel truck.
Check the jump starter’s peak amperage rating and any manufacturer-specified engine compatibility limits before use. Peak amps describe a maximum current capability under defined conditions, but this rating alone does not establish compatibility with every engine. Starting performance also depends on the device’s internal battery condition, cable resistance, ambient temperature, and the vehicle’s electrical requirements.
Some trucks and commercial vehicles use 24-volt electrical systems rather than 12-volt systems. Do not connect a 12-volt Stanley FATMAX jump starter to a 24-volt battery system. Using equipment with an incompatible voltage can damage the jump starter and vehicle electronics and create electrical hazards.
Hybrid and electric vehicles require additional consideration. Many have a separate 12-volt auxiliary battery, but their jump-starting procedures differ from those of conventional gasoline vehicles. Some manufacturers permit external assistance for the auxiliary battery while restricting specific connection methods. Follow the vehicle manufacturer’s instructions and never connect a conventional 12-volt jump starter to a high-voltage traction battery.
Before using a Stanley FATMAX jump starter on an unfamiliar vehicle, verify three specifications: the vehicle’s electrical system voltage, the jump starter’s supported applications, and the manufacturer’s approved connection procedure. These checks help determine whether the device can provide starting assistance without exceeding its operating limits.