Installing a blend door actuator requires removing the old actuator, checking the blend door, aligning the replacement actuator with the door shaft, securing it to the HVAC housing, reconnecting the electrical connector, and calibrating the HVAC system when required. The actuator controls the position of the blend door, allowing the climate control system to change the temperature of the air entering the cabin. Correct installation is therefore necessary for restoring normal temperature control.
The exact replacement procedure depends on the vehicle’s make, model, model year, and HVAC configuration. A blend door actuator may be accessible behind the glove box, below the dashboard, near the center console, or deeper inside the HVAC assembly. Some vehicles also use multiple actuators for temperature, airflow mode, and recirculation control, so identifying the correct actuator is essential before removing any parts.
This guide explains the complete installation process, including the tools you need, how to locate and remove the old actuator, how to inspect and align the blend door, and how to install the replacement. It also covers actuator calibration, post-installation testing, common installation mistakes, and troubleshooting steps if the new actuator does not operate correctly.
What Do You Need to Install a Blend Door Actuator?
You need the correct replacement blend door actuator, basic hand tools, a work light, and vehicle-specific repair information to install a blend door actuator. The exact tools depend on the fasteners and dashboard components used in the vehicle, but most accessible actuators can be replaced with a small socket and ratchet set, screwdrivers, and plastic trim removal tools.
Confirm that the replacement actuator matches the vehicle before removing the old unit. Vehicles with single-zone and dual-zone climate control can use different actuators even within the same make, model, and model year. Comparing the replacement part number, electrical connector, mounting points, and output shaft with the original actuator reduces the risk of installing an incompatible component.
A flashlight or work light is useful because most blend door actuators are installed in confined areas behind or below the dashboard. A trim removal tool can also prevent damage when an access panel, glove box, or center trim piece must be removed. Keep a small container nearby for mounting screws because HVAC actuator fasteners are small and can easily fall behind the dashboard.
Check the vehicle’s service information before disconnecting components or removing dashboard panels. The repair procedure identifies the actuator location, required access components, fastener locations, and calibration procedure for that specific vehicle. Disconnect the battery when the manufacturer specifies it, particularly when the repair requires working around electrical components or areas containing supplemental restraint system components.
Where Is the Blend Door Actuator Located?
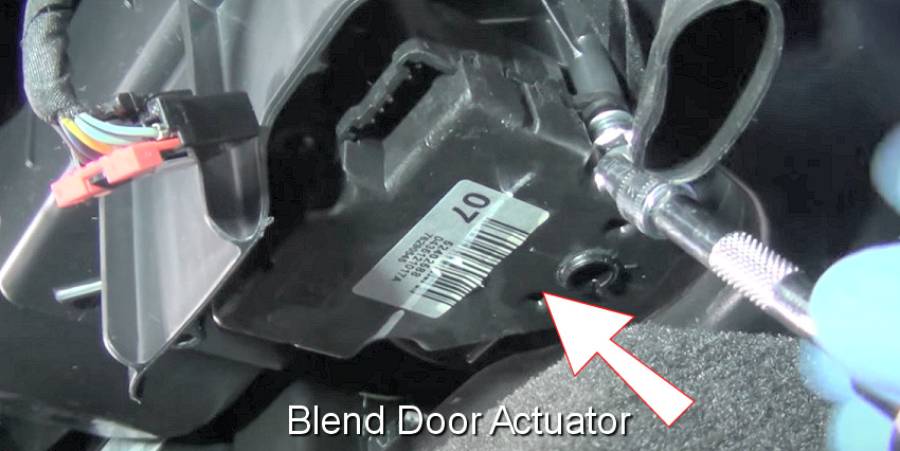
The blend door actuator is mounted to the HVAC housing, usually behind or underneath the dashboard. Depending on the vehicle, it may be accessible through the glove box opening, driver-side footwell, passenger-side footwell, center dashboard area, or another HVAC access point. The actuator is positioned where its output shaft or gear can move the blend door inside the HVAC case.
Finding an actuator behind the dashboard does not automatically mean it controls the blend door. A vehicle can have separate actuators for temperature blending, vent mode selection, and air recirculation. Dual-zone climate control systems can add separate temperature actuators for the driver and passenger sides. Identify the actuator by its function and location using the vehicle’s repair information rather than replacing the first HVAC actuator you can reach.
A failed temperature actuator is generally associated with incorrect temperature control in the zone it operates. For example, the selected temperature may change on the control panel while the air remains hot or cold because the blend door is not moving to the commanded position. Clicking from the actuator area can also indicate damaged internal actuator gears, but the symptom alone does not identify which HVAC actuator has failed.
Locate and visually inspect the actuator before beginning removal. Compare its connector, mounting arrangement, and position with the replacement part when possible. This step is especially important on HVAC systems containing multiple actuators because installing the correct replacement part in the wrong actuator position will not repair the original temperature-control problem.
Do You Have to Remove the Dashboard to Replace a Blend Door Actuator?
You do not always have to remove the entire dashboard to replace a blend door actuator. Many vehicles provide access after removing a glove box, lower dashboard panel, kick panel, center trim component, or another relatively small interior part. Other vehicles position the actuator deeper in the HVAC assembly, making the repair substantially more labor-intensive.
Actuator accessibility depends on the HVAC housing design and the position of the affected blend door. An actuator mounted on the outside edge of the HVAC case may be reachable from a footwell after removing one or two panels. An actuator located between the HVAC housing and another dashboard component can require additional disassembly simply because there is not enough clearance to reach its connector and mounting screws.
Do not start removing the complete dashboard solely because the actuator is difficult to see. First determine the manufacturer-specified access path. In some applications, removing the glove box or viewing the HVAC housing from underneath the dashboard exposes a mounting screw that initially appears inaccessible. Using the specified access route reduces unnecessary disassembly and the risk of damaging trim, wiring, connectors, or other dashboard components.
More extensive dashboard disassembly is appropriate when the vehicle’s repair procedure requires it or when the failed component cannot otherwise be accessed safely. If the repair involves major dashboard removal, HVAC housing removal, or work around airbag components, the job is considerably more complex than a basic actuator replacement. In that situation, following vehicle-specific service information is essential rather than applying a universal blend door actuator replacement procedure.
How Do You Remove the Old Blend Door Actuator?
Remove the old blend door actuator by gaining access to the HVAC housing, disconnecting the actuator’s electrical connector, removing its mounting screws, and carefully pulling the actuator away from the blend door shaft. Note the actuator’s installed position before removal because its orientation can help you align the replacement part correctly.
Start by removing the glove box, lower dashboard panel, center trim, or other component required to reach the actuator. Follow the vehicle-specific service procedure because the access route varies between vehicles. Place removed screws and clips in a container and keep track of their original locations, especially when several trim components use different fasteners.
Locate the actuator and verify that it is the temperature blend door actuator before disconnecting it. Release the locking tab on the electrical connector and pull the connector from its housing rather than pulling on the wires. Inspect the connector and visible wiring for loose terminals, corrosion, damaged insulation, or other physical damage. An electrical connection problem can prevent a functional actuator from responding to commands from the HVAC control system.
Remove the actuator mounting screws with the appropriate screwdriver or socket. Support the actuator while removing the final fastener so it does not fall into the dashboard area. Keep the original screws unless the replacement actuator includes the correct new hardware. Avoid dropping the fasteners into the HVAC housing or inaccessible areas behind the dashboard.
Pull the actuator straight away from its mounting surface after the fasteners have been removed. Do not twist or pry aggressively if it does not release easily. Resistance can occur when the actuator output is engaged tightly with the blend door shaft or when a hidden fastener remains installed. Check the mounting points again before applying additional force.
Compare the removed actuator with the replacement before installation. The electrical connector, mounting holes, actuator output, housing dimensions, and general orientation should correspond with the original component. A visual comparison provides another opportunity to identify an incorrect replacement part before it is installed.
How Do You Check the Blend Door Before Installing a New Actuator?
Check the blend door for binding, obstruction, shaft damage, and abnormal movement before installing the new actuator. A replacement actuator cannot restore normal temperature control if the blend door itself is physically stuck or its shaft is damaged.
Inspect the exposed blend door shaft after removing the actuator. Look for cracks, rounded engagement surfaces, broken plastic, or other visible damage where the actuator connects to the door. The new actuator depends on this connection to transfer rotational movement to the blend door. A damaged shaft can allow the actuator to operate while the door remains stationary.
Check blend door movement only when the vehicle-specific repair procedure allows the shaft to be moved manually. The door should move through its intended range without excessive resistance or obvious binding. Do not force the shaft beyond its normal travel because the blend door and HVAC housing commonly contain plastic components that can break under excessive force.
Resistance at the blend door can indicate a mechanical problem inside the HVAC case rather than an actuator failure. For example, a foreign object, damaged door, broken hinge, or distorted internal component can restrict movement. Installing a new actuator against a mechanically jammed door can leave the original HVAC problem unresolved and place unnecessary load on the replacement actuator.
The actuator mounting surface should also be inspected before installation. Remove loose debris and check that the mounting points are intact. The replacement actuator needs to sit correctly against the HVAC housing so its output engages the blend door shaft without being pulled into position by the mounting screws.
Complete this inspection before fitting the new component. If the blend door moves normally, the shaft is intact, and the mounting surface is undamaged, proceed with actuator alignment and installation. If the door is stuck or physically damaged, diagnose the mechanical HVAC problem before installing the replacement actuator.
How Do You Install a New Blend Door Actuator?
Install a new blend door actuator by aligning its output with the blend door shaft, seating the actuator flat against the HVAC housing, installing the mounting screws, and reconnecting the electrical connector. Correct alignment is the most important part of installation because the actuator must engage the blend door without forcing either component beyond its normal position.
Compare the new actuator with the removed unit before positioning it on the HVAC housing. Confirm that the electrical connector, mounting holes, output shape, and housing orientation match. The actuator should fit the mounting location naturally. If the mounting holes do not align or the output does not match the blend door shaft, verify the replacement part before proceeding.
Position the actuator over the blend door shaft and gently engage the two components. Keep the actuator square to the mounting surface rather than approaching the shaft at an angle. Once engaged correctly, the actuator should sit against the HVAC housing with its mounting holes aligned. Do not use the mounting screws to pull an incorrectly positioned actuator against the housing.
Install the mounting screws after the actuator is fully seated. Start each screw by hand when access allows, then tighten the fasteners evenly with the appropriate tool. The actuator housing and HVAC case commonly contain plastic components, so excessive tightening can damage the mounting points. The objective is to secure the actuator firmly without deforming or cracking its housing.
Reconnect the electrical connector after securing the actuator. Push the connector into place until its locking mechanism engages, then check that it cannot easily pull free. Reinstall only the components necessary to operate the vehicle safely at this stage. When practical, leave easily removable access panels or the glove box off until the actuator has been calibrated and tested. This makes correcting an installation problem easier if the actuator needs to be accessed again.
How Do You Align the Blend Door Actuator Correctly?
Align the blend door actuator by matching the actuator output position with the position of the blend door shaft before tightening the actuator to the HVAC housing. The two components must engage naturally because incorrect alignment can prevent full blend door travel, create binding, or stop the actuator from sitting flat against its mounting surface.
Check the position of both components before applying force. If the actuator output and blend door shaft are significantly misaligned, do not rotate either component beyond its intended range simply to make them fit. The correct method for positioning an actuator can vary by HVAC system, and some replacement procedures specify a particular door or actuator position before installation.
Never use the mounting screws as a method of alignment. For example, if the actuator remains several millimeters away from the HVAC housing after its output contacts the blend door shaft, tightening the screws to close that gap can force the internal gears or blend door mechanism into an incorrect position. Remove the actuator, verify the shaft orientation, and align the components again instead.
Correct alignment should result in three observable conditions: the actuator engages the blend door shaft, its housing sits flush against the mounting surface, and its mounting holes line up without significant force. These checks reduce the risk of damaging the new actuator before the HVAC system is even operated.
After installation, avoid assuming that correct mechanical alignment completes the replacement. The HVAC control system may still need to learn the actuator’s operating positions. Complete the required calibration or relearn procedure before judging whether the new actuator is functioning correctly.
How Do You Calibrate a Blend Door Actuator After Installation?
Calibrate a new blend door actuator using the relearn or calibration procedure specified for the vehicle’s HVAC system. There is no single calibration procedure that applies to every vehicle because manufacturers use different HVAC control modules, actuator designs, and position-learning strategies.
Some HVAC systems can perform an actuator relearn automatically under the conditions specified by the manufacturer. Other systems require a particular ignition and climate-control sequence, while certain vehicles use a diagnostic scan tool to initiate an HVAC actuator calibration procedure. Follow the service information for the exact make, model, model year, and HVAC configuration rather than applying a battery-disconnection or fuse-removal procedure from another vehicle.
During calibration, the HVAC control system can command an actuator through its operating range to establish or verify door positions. Interrupting the specified process can prevent the control module from completing the relearn. Avoid changing climate-control settings or cycling vehicle power during calibration when the manufacturer instructs that the system should remain undisturbed.
Do not repeatedly disconnect the battery or remove HVAC fuses in an attempt to force calibration unless that action is part of the vehicle-specific procedure. A method that initiates relearn on one vehicle does not establish a universal reset procedure for all blend door actuators.
Complete the calibration before reinstalling all easily removable trim when possible. If the HVAC system still produces the wrong air temperature or the actuator does not respond after the correct calibration procedure, keeping the actuator accessible makes it easier to inspect its alignment, electrical connection, and operation during the next diagnostic step.
How Do You Test a New Blend Door Actuator?
Test a new blend door actuator by operating the HVAC system through its temperature range and confirming that the vent temperature changes with the climate-control setting. Perform this test after completing any required actuator calibration but before reinstalling easily removable access panels. Testing at this stage allows you to correct an alignment or connection problem without disassembling the dashboard area again.
Start the vehicle or operate the HVAC system according to the vehicle-specific service procedure. Set the blower to a noticeable speed, then move the temperature control from cold toward hot. Allow enough time for the HVAC system to respond after each control change. Air from the selected vents should change temperature as the blend door moves between its commanded positions.
Listen to the actuator while changing the temperature setting. A properly installed actuator should move without repeated clicking, grinding, or continuous attempts to reposition itself. Repeated clicking can indicate that the actuator gears are not transferring movement correctly, the actuator is incorrectly positioned, or the blend door mechanism is preventing normal travel. Do not assume that noise from the dashboard automatically means the new actuator itself is defective.
Check the complete temperature range rather than testing only one setting. For example, move the control from its coldest setting toward its hottest setting and then back again. The test confirms that the blend door can travel in both directions instead of merely reaching one position. If the vehicle has dual-zone climate control, test the driver and passenger temperature controls separately because each zone may use a different blend door actuator.
Finish the test by confirming that the original symptom has been corrected. If the repair was performed because the vents remained hot when cold air was selected, verify that the system now responds correctly to both hot and cold commands. Reinstall the glove box, lower dashboard panel, trim pieces, and other removed components after actuator operation has been confirmed.
Why Is My New Blend Door Actuator Not Working?
A new blend door actuator may not work because of incorrect installation, improper alignment, incomplete calibration, a mechanical blend door problem, or an electrical fault. Replacing the actuator only corrects the problem when the original fault is actually within the actuator and the replacement component is installed and controlled correctly.
Check the actuator alignment first if the problem appeared immediately after installation. The actuator output must engage the blend door shaft in the correct position and the actuator housing should sit flush against its mounting surface. If the actuator was forced into position with the mounting screws, remove it and inspect the output, blend door shaft, and mounting points for damage before attempting installation again.
Verify the calibration procedure next. An actuator can be mechanically installed correctly while the HVAC control system has not learned or recognized its operating positions. Follow the relearn procedure specified for the vehicle rather than repeatedly disconnecting the battery, removing fuses, or cycling the ignition based on a procedure intended for a different model.
Inspect the blend door itself if the actuator operates but the cabin temperature does not respond correctly. A stuck door, damaged shaft, broken connection, or internal HVAC case problem can prevent actuator movement from changing the airflow temperature. For example, the actuator may visibly rotate when the temperature control is adjusted while a damaged blend door shaft fails to transfer that movement to the door.
Check the electrical connection when the actuator shows no response. Make sure the connector is fully seated and its locking tab is engaged. Inspect accessible wiring for damaged insulation, loose terminals, corrosion, or wires disturbed during dashboard disassembly. Check the relevant fuse when the vehicle’s wiring information identifies a fused circuit associated with the HVAC system.
Further diagnosis may require checking HVAC-related diagnostic trouble codes and actuator command data with an appropriate scan tool. A fault in the wiring or HVAC control module can prevent a functional replacement actuator from receiving the correct command. Diagnostic information is particularly useful when the actuator remains inactive after its mechanical installation, connector, and required calibration have been verified.
Do not replace the new actuator a second time until the installation and surrounding system have been checked. A second replacement component will not correct a stuck blend door, damaged wiring, incorrect part application, or control-system fault. Diagnose the failed part of the system before repeating the repair.
What Mistakes Should You Avoid When Installing a Blend Door Actuator?
There are 6 main mistakes to avoid when installing a blend door actuator: buying the wrong replacement part, removing the wrong HVAC actuator, misaligning the actuator, forcing it into position with the mounting screws, skipping required calibration, and reinstalling the interior trim before testing the repair. Avoiding these errors reduces the risk of repeating the repair or damaging the actuator and blend door mechanism.
The first mistake is buying the wrong replacement actuator. A single vehicle can use different actuators depending on its model year, HVAC configuration, and temperature zones. Compare the new component with the original actuator and verify the part application before installation. The connector, mounting pattern, housing orientation, and actuator output should correspond with the component being replaced.
The second mistake is removing the wrong HVAC actuator. Climate-control systems can use separate actuators to operate the temperature blend door, airflow mode door, and recirculation door. Dual-zone systems may use additional actuators to control the driver and passenger temperature zones independently. Confirm the function and location of the failed actuator with vehicle-specific repair information before removing it.
The third mistake is installing the actuator with its output incorrectly aligned with the blend door shaft. Correct alignment allows the actuator to engage the shaft and sit flat against the HVAC housing without significant force. Misalignment can restrict door travel, prevent installation, or place excessive load on the actuator mechanism.
The fourth mistake is using the mounting screws to force the actuator into position. Mounting screws are designed to secure an actuator that is already seated correctly; they are not alignment tools. If tightening the screws is necessary to pull the actuator against the HVAC housing, remove the actuator and check the shaft position before continuing.
The fifth mistake is skipping a required calibration or relearn procedure. Mechanical installation does not guarantee that the HVAC control system has established the actuator’s operating positions. Complete the manufacturer-specified calibration when the vehicle requires it, including a scan-tool procedure when applicable.
The sixth mistake is reinstalling every dashboard component before testing the repair. Keep easily removable access components off until the actuator has been calibrated and its operation confirmed when it is safe to do so. If the actuator needs to be realigned or its connector needs to be checked, this approach prevents unnecessary disassembly.
Read more: Clutch Master Cylinder Replacement: Symptoms, Cost, and Process
How Long Does It Take to Install a Blend Door Actuator?
The time required to install a blend door actuator depends primarily on its location and how much of the dashboard or interior trim must be removed to reach it. Removing and installing the actuator itself can be relatively straightforward; gaining physical access to it is often the more complicated part of the repair.
An easily accessible actuator requires fewer disassembly steps. For example, an actuator located behind a removable glove box or lower dashboard panel can be exposed without dismantling major sections of the interior. Once accessible, the repair consists mainly of disconnecting the electrical connector, removing the mounting screws, checking the blend door, installing the new actuator, completing any required calibration, and testing the HVAC system.
A moderately difficult installation involves additional trim, restricted working space, or fasteners that are difficult to reach. These conditions increase repair time even though the actuator replacement sequence remains similar. Working in a confined footwell can also make a small number of screws considerably more difficult to remove and reinstall.
The most labor-intensive installations occur when the actuator is positioned deep within the dashboard or access requires extensive disassembly. In these cases, the time spent removing and reinstalling dashboard components can exceed the time spent replacing the actuator itself. Vehicle-specific service information is therefore more reliable for estimating repair time than a universal time estimate.
Do not judge installation difficulty solely by the size of the replacement actuator. A small actuator in an accessible location can be a manageable DIY repair, while the same type of component behind a complex dashboard assembly can require substantially more work.
Can You Install a Blend Door Actuator Yourself?
You can install a blend door actuator yourself when you can correctly identify the failed actuator, access it without complex dashboard disassembly, and follow the vehicle-specific installation and calibration procedure. The repair is more suitable for DIY work when the actuator is accessible through the glove box, lower dashboard area, or footwell and only basic hand tools are required.
A DIY replacement also requires an accurate diagnosis. Incorrect cabin temperature does not prove that the blend door actuator itself has failed because a stuck blend door, damaged shaft, electrical fault, or HVAC control problem can produce similar symptoms. Confirming the failed component before purchasing and installing a replacement reduces unnecessary parts replacement.
Professional diagnosis becomes more appropriate when the actuator cannot be reached without extensive dashboard removal. Dashboard assemblies can contain wiring harnesses, electronic modules, fragile trim components, and supplemental restraint system components. A repair that requires substantial disassembly introduces risks beyond the basic task of replacing an HVAC actuator.
Professional assistance is also appropriate when the new actuator does not work after correct installation and calibration. Diagnosing actuator command circuits, HVAC control modules, related diagnostic trouble codes, or internal blend door damage can require vehicle-specific diagnostic information and equipment.
Use accessibility, diagnostic certainty, calibration requirements, and repair complexity to make the DIY decision. If the actuator is correctly identified and readily accessible, replacement can be a practical automotive repair. If the job requires major dashboard disassembly or deeper HVAC diagnosis, professional repair can prevent additional damage and unnecessary parts replacement.