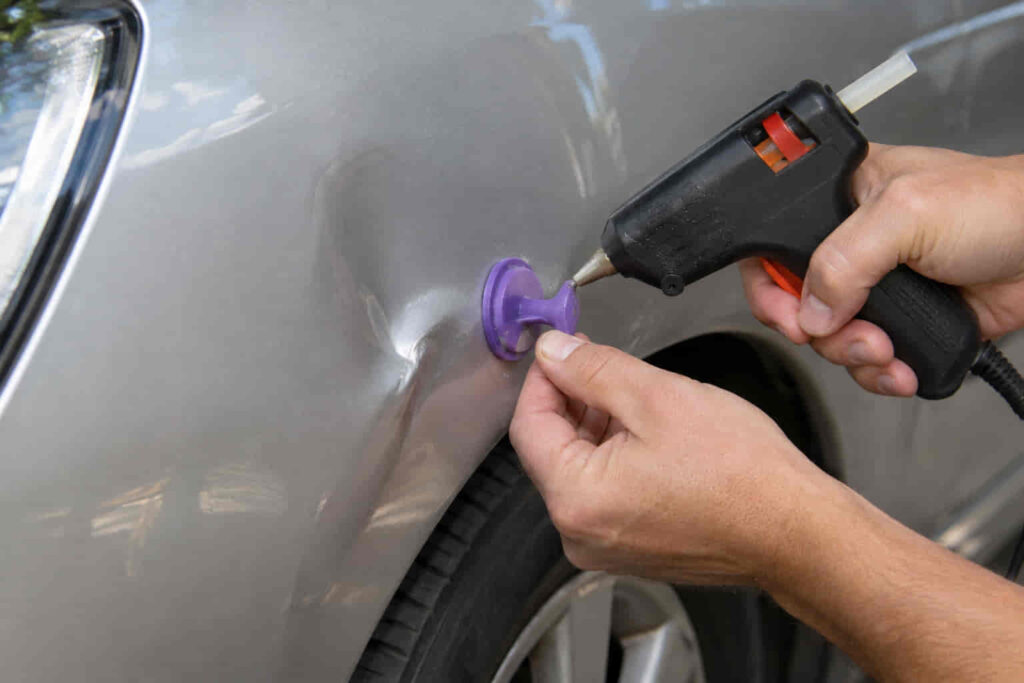
Small car dents can often be repaired at home without repainting if the damage is shallow, the paint remains intact, and the body panel has not been sharply creased or stretched. Minor door dings, small hail dents, and rounded depressions are common examples of damage that may respond to paintless dent removal techniques. However, choosing the wrong repair method can turn a minor cosmetic problem into damaged paint or a distorted body panel.
The safest way to fix small car dents is to inspect the damage before applying pressure or pulling force. A dent’s shape, depth, location, and surrounding paint condition determine whether a suction cup, glue pulling kit, or controlled pressure from behind the panel is appropriate. Metal doors and fenders also behave differently from flexible plastic bumper covers, so a technique that works on one surface may damage another. For example, a shallow dent in the center of a steel door may be suitable for careful pulling, while a sharp crease near the door’s edge typically requires professional paintless dent repair.
This guide explains how to assess small car dents, prepare the damaged surface, and use suitable DIY repair methods while protecting the factory finish. It also identifies common mistakes, realistic repair limitations, and situations where professional repair is the better option. The goal is to improve the panel’s shape without creating additional damage or unnecessary repainting costs.
What Types of Small Car Dents Can You Fix at Home?
Shallow, rounded dents with intact paint are the best candidates for DIY car dent repair. These dents create a smooth depression in the exterior panel without sharply folding the metal or damaging its protective finish. Common examples include minor parking-lot door dings, small hail dents, and light impacts from objects that press against a car door or fender. When the surrounding metal retains its original flexibility and the paint remains undamaged, controlled pulling or pressure may restore much of the panel’s original shape without sanding, body filler, or repainting.
The shape of a dent matters more than its visible diameter alone. A broad, shallow depression generally distributes deformation across a larger surface, allowing the metal to move back toward its original contour with relatively little force. A narrow dent with a sharp center concentrates deformation in a smaller area and may permanently stretch or crease the panel. For example, a rounded dent approximately one inch across in the middle of a car door may respond to a suitable dent puller, while a smaller dent with a sharp fold can remain difficult to correct even with professional equipment.
Minor door dings and isolated hail dents are often easier to repair than creased dents or damage along body lines. A door ding typically occurs when another vehicle’s door contacts the outer panel, creating a localized indentation. If the impact leaves a smooth depression away from reinforced edges, the damaged area may be accessible to suction pulling, glue pulling, or professional paintless dent repair (PDR). Hail dents can have similar characteristics, although multiple impacts across a hood or roof may require more precise tools and experience to correct without leaving visible surface distortion.
Dent location also determines whether home repair is practical. Flat or gently curved areas of a door, hood, or fender generally provide better working conditions than narrow edges, stamped body lines, or sections reinforced from behind. A dent near a door handle, wheel arch, or panel seam may be difficult to reach and may resist pulling because the surrounding structure limits movement. Aluminum panels can also require different repair techniques and force control than steel panels, making material identification important before attempting correction.
A dent is not automatically suitable for DIY repair simply because it is small. Sharp creases, visibly stretched metal, cracked paint, and damage near structural components are warning signs that a professional assessment is preferable. The practical goal of home dent removal is to improve a localized cosmetic depression while preserving the existing finish, not to force every damaged panel back into shape regardless of its condition.
How Can You Tell Whether a Small Car Dent Can Be Fixed Without Repainting?
A small car dent is a candidate for repair without repainting when the paint and clear coat remain intact and the panel can be reshaped without further damaging the finish. Paintless dent repair works by gradually restoring the panel’s contour while preserving the original paint system. Because automotive paint has limited flexibility, the finish must be able to tolerate the movement required to correct the dent. A shallow depression with smooth edges and no visible paint damage is generally more suitable than a sharply creased dent that places concentrated stress on the coating.
Start by examining the damaged area under bright, indirect lighting after cleaning the surface. Look for paint chips, hairline cracks, peeling clear coat, exposed metal, or unusual discoloration around the dent. Viewing the panel from several angles helps reveal defects that are difficult to see directly. A reflected straight line, such as the edge of a garage door or a dedicated PDR reflection light, can make the dent’s shape easier to evaluate. Smoothly curved reflections indicate gradual deformation, while abrupt changes in the reflected line may reveal a sharp crease or raised edge.
Intact factory paint improves the chances of successful paintless dent removal, but it does not guarantee that the dent can be repaired at home. A panel may have undamaged paint while the underlying metal has stretched beyond the point where simple pulling can restore its original contour. Previous body repairs also affect suitability because repainted surfaces may have different adhesion characteristics from factory-applied finishes. For example, a glue pulling kit used on a previously repainted door may lift the paint rather than correct the dent, even when the surface initially appears smooth and undamaged.
The panel’s material and construction provide another important clue. Steel and aluminum body panels respond differently to deformation, while plastic bumper covers are designed to flex and may require a separate repair approach. A shallow depression in a steel door may be suitable for conventional PDR techniques, whereas a similar-looking mark on a plastic bumper involves different material behavior. The presence of nearby trim, reinforcement, sensors, or internal components can further restrict access and make an otherwise minor dent unsuitable for a beginner.
The most reliable DIY assessment combines paint condition, dent geometry, panel material, and repair accessibility. A small, rounded dent with undamaged factory paint, gradual edges, and sufficient working space presents a reasonable opportunity for careful home repair. A dent with cracked paint, a sharp crease, a raised ridge, or evidence of previous refinishing should be evaluated more cautiously. If restoring the panel requires substantial force or the repair method could disturb the existing finish, professional PDR or conventional body repair is the safer choice.
Read more: texas inspection sticker
What Tools Do You Need to Fix Small Car Dents at Home?
The basic tools for fixing small car dents at home include a suction cup dent puller, a paintless dent repair (PDR) glue pulling kit, microfiber cloths, and a reflection light for checking panel distortion. The appropriate equipment depends on the dent’s shape, size, location, and the material beneath the paint. A shallow depression on a smooth exterior panel may respond to a simple suction tool, while a smaller dent that cannot accommodate a suction cup may require a properly sized glue tab. Specialized PDR rods and knockdown tools provide greater control but demand more experience to avoid damaging the panel.
A suction cup dent puller works by creating a seal against the painted surface and applying outward force to the depressed area. The tool is most useful when the dent is broad enough to support the cup and the surrounding surface is relatively smooth. For example, a shallow dent near the center of a car door may provide sufficient contact area for a small suction puller. However, suction tools cannot reliably grip sharply creased metal, narrow body lines, or uneven surfaces where air enters beneath the cup. Selecting a cup that fits within the dented area helps prevent pulling on undamaged sections of the panel.
A glue pulling kit provides more precise contact with small dents that are unsuitable for suction cups. These kits typically contain adhesive tabs in different sizes, a compatible hot glue system, and a pulling device such as a bridge puller or mini lifter. The adhesive temporarily connects the pulling tab to the damaged surface, allowing controlled outward pressure to lift the depression. A small round tab may suit an isolated door ding, while a broader tab can distribute force across a larger shallow dent. Glue pulling should be avoided on cracked paint, poorly bonded finishes, or previously repainted areas unless a qualified technician has confirmed that the surface can tolerate the procedure.
A reflection light or PDR line board is useful because small changes in panel curvature are difficult to judge under ordinary lighting. When reflected lines cross a dent, their distortion reveals the location of low spots, raised edges, and uneven areas. This visual feedback helps the person performing the repair recognize when the metal is moving in the intended direction. A clean microfiber cloth and automotive-safe cleaning products are also important because dirt, grit, and adhesive residue can scratch the finish during tool placement or removal.
PDR rods, soft-tipped pushing tools, and knockdown tools are better suited to controlled metal correction than improvised household objects. A PDR rod applies pressure from behind the panel, while a knockdown tool is used to lower raised areas created during repair. Both require an understanding of how force moves through sheet metal. Using a screwdriver, hammer, or other hard object directly against the panel can create concentrated pressure points and permanent surface distortion. Beginners should avoid specialized pushing techniques when the damaged area is difficult to access or the tool position cannot be monitored.
Tool selection should prioritize control rather than pulling strength. A small, shallow dent may need only a suitable puller and careful inspection, while a complex dent may remain unsuitable for home repair even with an expensive kit. The purpose of the equipment is to restore the panel gradually without compromising its protective coating or surrounding components.
How Should You Prepare a Car Panel Before Removing a Small Dent?
Prepare a car panel for dent removal by cleaning the surface, checking the paint, identifying the panel material, and confirming that the chosen repair method can be applied safely. Proper preparation prevents surface contamination from interfering with suction or adhesive contact and reduces the risk of scratching the finish. It also provides an opportunity to identify hidden complications before force is applied to the damaged area. A dent that appears suitable at first glance may require a different approach after the panel’s construction and surrounding components are examined.
Begin by washing the affected area with an automotive-safe car shampoo and water, then dry it with a clean microfiber towel. Removing road dust, grease, and other contaminants improves contact between the tool and the painted surface. For suction pulling, a clean panel helps the cup form a consistent seal. For glue pulling, the surface must also meet the adhesive manufacturer’s preparation requirements. Harsh solvents, abrasive cleaners, and aggressive scraping should be avoided because they can damage the clear coat or weaken the finish before the repair begins.
The paint must be inspected again after cleaning because dirt and reflections can conceal damage. Examine the dent under bright, indirect lighting and look for cracks, chips, peeling clear coat, or signs of previous refinishing. Pay particular attention to the center of the depression and any raised edges around it, where the coating may have experienced concentrated stress during the impact. For example, a door ding that initially appears to be a smooth indentation may reveal a fine paint fracture once the surface is clean. Applying a glue tab to that area could pull away weakened paint rather than lift the dent.
Identifying the panel material is equally important. Steel and aluminum body panels require different levels of force and respond differently to deformation, while plastic bumper covers should not be treated as conventional sheet-metal panels. Vehicle manufacturer information, repair documentation, and the construction of the affected part can help determine the material. Avoid relying solely on a magnet, because magnetic attraction can identify some steel panels but cannot distinguish aluminum from plastic or other nonmagnetic materials.
Before attempting backside access, inspect the area for wiring, sensors, reinforcement structures, and safety equipment. Modern vehicle doors may contain side-impact sensors, airbags, window regulators, electrical harnesses, and structural reinforcement beams. Removing interior trim or inserting tools without understanding these components can cause damage or create safety hazards. A dent near a door handle or reinforced edge may also have limited access, making a pulling method or professional PDR assessment more appropriate. Do not disconnect airbag components or remove safety-related assemblies solely to reach a minor cosmetic dent.
The final preparation step is to establish a controlled working environment. Position the vehicle on a stable, level surface with enough room to move around the damaged panel. Use suitable lighting to observe the dent from multiple angles, and keep repair tools clean and organized to prevent accidental contact with surrounding paint. Avoid working on excessively hot panels or applying uncontrolled heat to make the metal easier to move, as temperature extremes can affect paint, adhesives, and plastic components.
A properly prepared panel allows the repair method to be selected according to the actual damage rather than trial and error. When the surface is clean, the paint is sound, the material is identified, and the working area is accessible, controlled dent removal has a better chance of improving the panel without creating additional defects. If preparation reveals cracked paint, restricted access, or nearby safety-related components, the appropriate decision is to stop and seek a professional assessment before proceeding.
How Do You Fix a Small Car Dent With a Suction Cup?
You can fix some small car dents with a suction cup by creating a secure seal over a shallow depression and applying gradual outward pressure until the panel moves closer to its original shape. This method works best on broad, rounded dents located on smooth sections of a car door, hood, or fender. The suction cup must have enough contact area to grip the panel without pulling excessively on the surrounding undamaged metal. A sharply creased dent or a depression smaller than the cup’s contact surface is unlikely to respond well because the tool cannot concentrate its force where correction is needed.
Start with a clean, dry panel and a suction cup designed for automotive dent removal. Position the cup so its contact surface sits evenly against the dented area, following the manufacturer’s instructions for creating a seal. Some suction tools use a locking handle to produce suction, while others rely on a flexible cup pressed firmly against the surface. The cup should remain securely attached without sliding across the paint. For example, a broad, shallow depression in the center of a steel door may provide enough smooth surface for the tool to grip, whereas a dent crossing a stamped body line may prevent the cup from sealing properly.
Once the suction cup is attached, pull outward slowly and evenly rather than using a sudden, forceful motion. The objective is to reverse the panel’s inward deformation without stretching the metal or creating a raised area. Apply controlled pressure in the direction that allows the dented section to move toward its original contour, then release the tool and inspect the result under reflected light. A shallow dent may improve after a gentle pull, but the panel may also return only partway because the surrounding metal retains some deformation. Increasing force without understanding that resistance can worsen the damage.
Suction pulling has an important mechanical limitation: it applies force over the area covered by the cup rather than precisely controlling individual low spots. When a dent has a raised perimeter or a sharp center, pulling the entire area may lift surrounding metal without correcting the deepest point. This can leave a visible ring, an uneven reflection, or a high spot that is more difficult to repair than the original depression. A small dent caused by a rounded object is therefore a more suitable candidate than a narrow crease caused by the edge of another vehicle’s door.
Stop using the suction cup if the panel begins to rise above its surrounding contour, the tool slips repeatedly, or the dent does not respond to gentle pressure. Repeated aggressive pulling does not guarantee improvement and can introduce additional distortion. Do not strike the puller, attach improvised weights, or use excessive force to overcome a dent that resists movement. After removing the tool, inspect the paint for scuffs or other changes and clean the contact area with an automotive-safe product if necessary.
A suction cup is a reasonable first option for a suitable shallow dent because it does not require adhesive bonding or access behind the panel. However, it cannot reliably restore every minor indentation. When the dent is too small for the cup, has a sharply defined center, or remains visibly distorted after a controlled attempt, a more precise repair method or professional paintless dent repair may be necessary.
How Do You Remove a Small Car Dent With a Glue Pulling Kit?
You can remove certain small car dents with a glue pulling kit by attaching a temporary adhesive tab to the depressed area and using a controlled pulling tool to lift the panel. Glue pulling is a paintless dent repair technique designed to apply force through a tab rather than a suction seal. It is particularly useful for isolated door dings and shallow dents that are too small or irregular for a conventional suction cup. However, it is appropriate only when the paint is securely bonded to the panel, because the adhesive can pull weakened or previously repaired paint away from the surface.
The process begins with selecting a glue tab that matches the dent’s approximate size and shape. A small, rounded tab concentrates the pulling force near the center of a localized depression, while a larger tab distributes force across a broader area. Using an oversized tab on a small dent may pull undamaged metal along with the damaged section, creating an uneven contour. For example, a minor door ding with a distinct low point may respond better to a correctly sized round tab than to a wide tab that extends beyond the depression.
Apply only the adhesive specified for the dent repair kit and follow its instructions for temperature, application, and bonding time. The adhesive must develop enough grip to transfer force from the pulling tool to the metal without permanently bonding to the paint. Attach the tab carefully to the intended area and allow the adhesive to set for the period recommended by the manufacturer. Working on an excessively hot panel, using incompatible glue, or attempting to pull before the adhesive has bonded can reduce control and increase the likelihood of an unsuccessful repair.
After the adhesive has set, connect the tab to the kit’s mini lifter or bridge puller and apply gradual outward force. The pulling device transfers pressure through the tab, encouraging the depressed metal to rise toward the surrounding panel surface. Watch the reflection across the dent as the panel moves, and stop before the corrected area becomes raised above its original contour. A controlled pull may reduce the depth of a small indentation, but the result depends on the dent’s geometry and the condition of the surrounding metal. A sharp crease may remain visible even when the center of the dent has been lifted.
Remove the glue tab using the manufacturer’s approved release procedure rather than twisting, scraping, or prying against the painted surface. Many PDR kits use a compatible release agent to weaken the temporary adhesive bond, allowing the tab to separate with less stress on the finish. The exact procedure depends on the adhesive system, so household solvents or improvised tools should not be substituted without confirming paint compatibility. Once the tab is removed, clean away residue with an appropriate automotive-safe product and inspect the surface for paint lifting, discoloration, or distortion.
Glue pulling requires particular caution on repainted panels. Factory-applied automotive finishes generally have controlled adhesion characteristics, but a previously refinished surface may contain body filler, primer, or paint layers with different bonding strength. Pulling a tab from such a surface can separate the coating from the underlying panel, turning a cosmetic dent into a repair that requires refinishing. Cracked clear coat, peeling paint, or an unknown repair history are reasons to avoid DIY glue pulling until the finish has been professionally assessed.
A successful glue pulling attempt improves the panel’s contour without lifting paint or creating raised metal. If the dent remains after a controlled attempt, increasing the pulling force or repeating the process aggressively may create more damage than improvement. Professional PDR technicians can combine pulling with precise metal correction, but beginners should not assume that a glue pulling kit alone can reproduce those results. The method is most appropriate when the dent is shallow, the paint is sound, and the repair can be performed with limited, carefully controlled force.
How Do You Push Out a Small Car Dent From Behind the Panel?
You can push out a small car dent from behind the panel by applying gradual, controlled pressure to the depressed metal until it moves toward its original contour. This approach is known as backside pushing and is one of the principal techniques used in paintless dent repair (PDR). It works when the technician can safely reach the back of the damaged area without disturbing structural components or safety equipment. Unlike suction and glue pulling, which apply outward force from the painted surface, backside pushing allows pressure to be directed at individual low spots within the dent.
The technique relies on the relationship between the depressed center and the surrounding metal. When a panel is struck, the impact pushes part of its surface inward and may create tension around the edges of the indentation. Correcting the dent requires carefully redistributing that deformation rather than simply forcing the center outward. Professional PDR technicians use shaped rods and specialized tips to apply small amounts of pressure while monitoring reflected lines across the exterior surface. This allows them to identify how each adjustment changes the panel’s curvature.
Backside pushing is most suitable for accessible dents on metal panels where the paint remains intact and the surrounding structure does not obstruct the repair area. For example, a shallow dent in a removable steel fender may be reachable from behind once the relevant wheel-well liner is safely moved according to the vehicle manufacturer’s service instructions. However, a dent in a car door may be blocked by a reinforcement beam, window mechanism, wiring, or side-impact safety equipment. The visible location of the dent does not guarantee that its underside can be reached safely.
If the back of the dent is already accessible without dismantling safety-related components, the repair begins by identifying the lowest portion of the depression and observing its shape under reflected light. A suitable PDR tool with a smooth, appropriate tip is positioned behind the damaged area, and pressure is applied in small, controlled increments. The objective is to raise the low spot gradually while keeping the surrounding metal level. Concentrating excessive force at one point can produce a raised bump, commonly called a high spot, that becomes more visible than the original dent.
The most common problem with inexperienced backside pushing is applying too much pressure before the panel’s movement can be evaluated. Thin automotive sheet metal responds to localized force, and an incorrectly positioned tool can create a sharp outward projection or damage the protective coating on the panel’s inner surface. For example, pressing directly against the deepest point of a door ding with a hard metal rod may produce a small peak instead of restoring a smooth contour. Correcting that peak may require additional specialized tools and experience.
Vehicle safety systems create another important limitation. Modern doors can contain side-impact sensors, airbag components, electrical wiring, and reinforced structures that must not be disturbed during cosmetic repairs. Removing interior trim, disconnecting electrical connectors, or inserting tools into an unfamiliar door cavity can damage these systems. The appropriate response is to consult vehicle-specific service information or choose professional PDR when access requires disassembly near safety equipment.
Backside pushing should stop when the panel resists gentle correction, the tool cannot be positioned accurately, or a raised area begins to form. A successful repair restores a smooth transition between the corrected area and the surrounding panel without introducing new surface distortion. Because precise metal movement requires practice, backside pushing is generally better suited to experienced repairers than to beginners working on an unfamiliar vehicle.
Can Heat Help Remove a Small Dent From a Plastic Car Bumper?
Controlled heat can help reshape certain small dents in flexible plastic bumper covers, but it does not reliably remove every dent and must be applied carefully to protect the paint. Many modern bumper covers are made from thermoplastic materials that become more flexible as their temperature increases. When a suitable plastic panel is warmed within the material’s safe working range, it may become easier to return a shallow deformation toward its original shape. This behavior differs from steel and aluminum body panels, which do not respond to ordinary warming in the same way.
The effectiveness of heat depends on the bumper cover’s material, the severity of the deformation, and whether the plastic has been permanently stretched or creased. A shallow indentation caused by low-speed contact may respond to controlled warming and gentle reshaping if the material has retained its structural integrity. In contrast, a sharply folded bumper corner, cracked plastic, or a damaged mounting bracket may prevent the panel from returning to its original position. Heating these areas does not repair broken attachments or restore material that has been permanently deformed.
The safest approach is to follow the vehicle manufacturer’s bumper repair guidance rather than use boiling water or an uncontrolled heat source. Professional repair procedures specify suitable temperatures, heating methods, and precautions for the particular plastic and finish. Excessive heat can soften the paint, distort the bumper cover, weaken adhesive bonds, or damage nearby sensors and trim. A household heat gun can create concentrated hot spots, while boiling water exposes the surface and the person performing the repair to unnecessary burn risks without providing reliable temperature control.
When a manufacturer-approved repair method permits warming, the damaged area must be heated evenly within the specified temperature range. The bumper should be supported so that any reshaping force is distributed across the affected area rather than concentrated at a single point. Gentle pressure may help the softened plastic move toward its original contour, but forcing a cold or insufficiently flexible section can create stress marks or additional deformation. For example, a rounded depression on an accessible bumper section may improve with controlled warming and support, while a dent along a sharply folded corner may remain visible despite repeated attempts.
Paint condition is a critical limitation because a plastic bumper can flex more than its coating can tolerate. Even when the underlying plastic regains its shape, the paint may contain microscopic cracks, weakened adhesion, or surface distortion caused by the original impact. Additional bending or heating can enlarge these defects. A bumper with peeling clear coat, exposed plastic, or visible paint fractures is therefore not a suitable candidate for paint-preserving DIY reshaping.
The location of the dent also affects repair safety. Bumper covers may conceal parking sensors, radar components, wiring, energy-absorbing materials, and mounting structures. Damage near these components can require inspection beyond the visible cosmetic defect. A bumper that looks only slightly dented may have a displaced sensor bracket or damaged internal support, making external reshaping insufficient to restore the assembly correctly.
Heat-assisted bumper repair is appropriate only when the plastic is undamaged, the paint is sound, and the manufacturer permits the required reshaping procedure. If the repair would require excessive heating, forceful bending, or removal of components near driver-assistance sensors, professional assessment is the safer option. The goal is to improve the bumper’s contour while preserving its finish and function, not merely to make the visible dent disappear.
How Can You Check Whether a Small Car Dent Has Been Repaired Correctly?
A small car dent has been repaired correctly when the panel has regained a smooth, consistent contour without new paint damage, raised areas, or visible surface distortion. The most reliable way to evaluate the result is to examine the repaired section under reflected light from several viewing angles. A dent may appear to have disappeared when viewed directly, yet remain visible when light travels across the panel at an angle. Checking the reflection helps reveal whether the repair has restored the original surface geometry rather than simply reducing the depth of the indentation.
A paintless dent repair reflection light or line board provides a useful reference because straight reflected lines change shape when they cross uneven metal. A remaining low spot causes the lines to bend inward, while a raised area produces distortion in the opposite direction. When the panel is properly corrected, the reflected lines should flow smoothly across the repaired area and match the surrounding curvature. For example, a door ding that appears invisible under overhead garage lighting may still produce a noticeable ripple when examined beside a bright vertical reflection.
The repaired area should also be inspected from the front, side, and along the length of the panel. Different viewing angles reveal different aspects of the deformation. Looking directly at the surface helps identify obvious depressions, while viewing along the panel exposes subtle waves and changes in curvature. A successful repair does not require every panel to appear perfectly flat because vehicle doors, hoods, and fenders are manufactured with intentional curves. The correct comparison is the surrounding undamaged contour, not an assumed flat surface.
Paint integrity is another essential measure of repair quality. Examine the corrected area for clear coat cracks, scratches, discoloration, adhesive residue, or lifting paint. These defects indicate that the repair may have affected the finish even if the metal’s shape has improved. For instance, a glue pulling attempt might reduce a dent’s depth but leave a small area of clear coat separation near the pulling tab. That result should not be considered a complete paintless repair because the protective finish has been compromised.
A repaired dent should not leave a raised center or a visible ridge around its original perimeter. These defects can develop when pulling or pushing force exceeds the amount needed to restore the panel’s shape. Raised metal reflects light differently from the surrounding surface and may require specialized knockdown techniques to correct. Attempting to flatten a high spot with a household hammer or another hard object can concentrate force and create additional damage. If the repair produces a raised area, further DIY adjustments should stop until the panel can be evaluated properly.
The final assessment should consider both appearance and the condition of the surrounding components. Check that nearby trim remains securely attached, panel gaps have not changed, and any accessible mounting points are undamaged. If the repair involved a plastic bumper cover, confirm that the cover sits correctly and that nearby sensors or lights have not been displaced. Cosmetic improvement alone does not establish that a damaged bumper assembly is functioning correctly.
Stop repairing when additional attempts are unlikely to improve the result without increasing the risk of damage. A small residual low spot may be less costly to correct professionally than a distorted panel created by repeated pulling. The practical standard for a successful home repair is a visibly improved contour, intact paint, and no new damage to the panel or its surrounding components.
Which Small Car Dents Should You Not Try to Fix at Home?
You should not attempt DIY dent removal when the damage includes sharp creases, cracked paint, stretched metal, structural deformation, or components that require specialized inspection. These conditions make paint-preserving correction less predictable because the damage extends beyond a simple, shallow depression. Although a dent may occupy only a small area, its shape and location can indicate that the metal has undergone concentrated deformation or that nearby components have absorbed part of the impact.
Sharp creases are particularly difficult to repair without professional equipment. A crease forms when the panel bends along a narrow line rather than deforming into a smooth depression. This concentrates stress in the metal and may exceed the flexibility of the paint system. For example, a narrow dent created by the edge of another vehicle’s door can leave a sharp fold even when the surrounding surface appears undamaged. Pulling the center outward may reduce the depression while leaving the crease visible or creating raised metal along its edges.
Dents with cracked, chipped, or peeling paint should not be treated as ordinary paintless repair candidates. The damaged coating no longer provides continuous protection to the underlying material, and additional panel movement can enlarge existing fractures. On steel panels, exposed metal is also vulnerable to corrosion when moisture reaches the unprotected surface. A dent with a paint chip may require surface preparation, corrosion protection, and refinishing in addition to metal correction. Removing the indentation alone does not restore the protective function of the original finish.
Damage near panel edges, seams, and reinforced body lines presents another challenge. These areas are often less flexible because of folded metal, bonded joints, or structural reinforcement. A dent along a wheel arch or the folded edge of a door may resist correction even when its visible diameter is small. Applying excessive force can distort the panel’s edge, change its alignment, or damage the finish where the metal has been sharply bent. Such repairs are better evaluated by a technician who can determine whether paintless correction is appropriate.
A dent should also be professionally assessed when the impact may have affected structural or safety-related components. Vehicle doors contain reinforcement structures, while bumpers may conceal energy-absorbing materials, mounting brackets, and driver-assistance sensors. A small exterior dent does not rule out damage beneath the visible surface. For example, a low-speed impact that leaves a modest depression in a bumper cover may also displace a parking sensor bracket or damage an internal support. Reshaping the outer plastic would not correct those hidden problems.
Previously repaired panels require additional caution because their surface coatings and underlying materials may differ from factory construction. Body filler, replacement paint, and repaired metal can respond unpredictably to pulling force. A glue tab may detach a weakly bonded paint layer, while backside pressure may crack filler beneath an otherwise smooth finish. If a vehicle has a known collision repair history in the damaged area, a professional inspection is preferable before attempting a paintless technique.
DIY dent removal is unsuitable when the repair requires force, access, or equipment beyond the owner’s ability to control safely. Warning signs include a dent that does not respond to gentle correction, a panel that begins developing high spots, restricted access near airbags or wiring, and damage that changes the alignment of adjacent parts. These conditions indicate that continuing the repair may increase the eventual cost of restoration.
The safest decision is to stop before a minor cosmetic defect becomes a larger body repair. Professional paintless dent repair is appropriate for certain complex dents with intact paint, while conventional body repair may be necessary when the coating, panel structure, or underlying components are damaged. The correct method depends on the complete condition of the affected area rather than the dent’s apparent size alone.
What Mistakes Can Damage Your Car During DIY Dent Removal?
The most damaging DIY dent removal mistakes are applying excessive force, using incompatible adhesives, overheating the panel, and continuing to work after the metal stops responding predictably. These errors can turn a shallow cosmetic dent into a raised spot, damaged paint, or a larger area of surface distortion. Successful paintless dent repair depends on controlling how the panel moves, not on applying enough force to make the dent disappear in a single attempt.
Excessive pulling force is a common problem when using suction cups or glue pulling kits. A dented panel does not necessarily return to its original contour evenly because the impact may have created tension around the depression. Pulling too hard can lift the center above the surrounding surface while leaving the outer edges distorted. For example, an aggressive pull on a small door ding may replace the original indentation with a raised bump that remains visible under reflected light. Correcting that high spot requires more precise metalworking than the original shallow dent.
Using the wrong adhesive can damage automotive paint even when the dent itself is suitable for glue pulling. Paintless dent repair adhesives are designed to create a temporary bond that can be released through a compatible removal procedure. Household construction adhesives, permanent glues, and unsuitable solvents do not provide the same controlled behavior. A strong adhesive may resist removal and transfer excessive stress to the clear coat or underlying paint layers. This risk increases on previously repainted panels, where the bond between the coating and the metal may be weaker than on an undamaged factory finish.
Heat-related mistakes create a different type of damage. Automotive paint, plastic bumper covers, adhesive bonds, and nearby electronic components have different temperature tolerances. Applying concentrated heat without a manufacturer-approved procedure can soften coatings, discolor plastic, or distort the panel. For example, holding a heat gun too close to a painted bumper may create a glossy or warped patch even if the original indentation becomes less noticeable. Alternating extreme heat and cold is also an unreliable approach because rapid temperature changes do not provide precise control over the damaged material.
Incorrect tool placement can create new dents or damage components behind the exterior panel. A hard pushing tool concentrates pressure at its contact point, while an oversized pulling tab distributes force beyond the intended repair area. Both situations can alter metal that was not damaged by the original impact. In a vehicle door, poorly positioned tools may also contact window mechanisms, wiring, or reinforcement structures. The resulting repair expense can extend beyond the exterior panel if an internal component is damaged.
Repeated repair attempts are another source of unnecessary damage. When a dent resists gentle correction, the remaining deformation may involve stretched metal, a crease, or tension that requires professional techniques. Repeating the same pull with increasing force does not resolve those underlying conditions. Instead, it increases the chance of paint stress, raised metal, and irregular reflections. A small improvement followed by resistance is a reason to reassess the method rather than continue automatically.
The safest stopping point is the first sign that the repair is creating a new defect or requires substantially greater force. Paint cracking, adhesive-related lifting, unexpected panel movement, and newly formed high spots indicate that the procedure is no longer controlled. At that stage, a professional assessment can prevent additional damage and help determine whether the remaining dent can still be corrected without repainting.
How Much Does It Cost to Fix a Small Car Dent at Home?
Fixing a small car dent at home may cost approximately $10–$80 for basic tools, but the total expense depends on the repair method and whether the first attempt succeeds. A simple suction cup puller generally costs less than a complete glue pulling kit, while specialized paintless dent repair equipment can require a substantially larger investment. These figures are approximate shopping ranges rather than fixed national prices. The actual cost varies by tool quality, kit contents, retailer, and the number of dents being repaired.
A basic suction cup dent puller may cost roughly $10–$30, making it one of the least expensive options for a suitable broad, shallow dent. A beginner glue pulling kit may cost approximately $20–$80, depending on the number of tabs, pulling devices, adhesives, and accessories included. More advanced PDR kits can exceed these amounts because they include specialized rods, knockdown tools, and reflection equipment. However, purchasing additional tools does not guarantee better results when the dent’s geometry or location makes DIY repair unsuitable.
The lowest tool price does not always produce the lowest repair cost. A dent puller that cannot grip the damaged area may provide no improvement, while an incompatible glue kit can create paint damage that requires professional refinishing. For example, spending $25 on a basic repair tool is inexpensive if it safely corrects a shallow door ding. The same purchase becomes poor value if an unsuccessful attempt creates a raised area or removes paint, requiring a body shop to correct both the original dent and the additional damage.
Professional paintless dent repair provides a useful cost comparison. A technician may charge approximately $75–$250 or more to repair a single minor dent, although actual quotes vary considerably by location, panel access, dent size, material, and complexity. A small, accessible door ding may fall toward the lower end of a shop’s pricing structure, while a dent along a body line or on an aluminum panel may cost more. Multiple hail dents are often priced using a different assessment method because the technician must evaluate the number, size, and location of individual impacts.
Traditional body repair generally costs more than a simple paintless correction when sanding, body filler, and repainting are required. Conventional repair involves additional labor and materials to restore the panel’s surface and finish. Paint matching and blending into adjacent panels can further increase the expense. A small dent with intact paint may therefore be relatively inexpensive to correct through PDR, while the same dent accompanied by cracked paint can require a more extensive repair. The cost difference comes from the work required to restore the protective coating, not simply from the dent’s visible size.
Time and repair quality should also be included in the cost decision. A DIY attempt may require purchasing tools, learning how to use them, preparing the panel, and making careful adjustments. Professional PDR includes the technician’s experience and specialized equipment, which can be valuable when the vehicle has a high-visibility finish or the dent is difficult to access. For a single minor dent, paying a professional may be more economical than buying an advanced tool kit that will rarely be used.
DIY dent repair offers the greatest financial advantage when the damage is simple, the required tools are inexpensive, and the risk of paint damage is low. If the repair involves uncertain panel access, previous repainting, or a dent that resists controlled correction, professional PDR may provide better value despite its higher initial price. Vehicle owners should compare the total expected repair expense, including the possibility of correcting mistakes, rather than judge the decision by tool cost alone.
When Should You Choose Professional Paintless Dent Repair?
You should choose professional paintless dent repair (PDR) when a small car dent requires precise metal correction, specialized panel access, or a level of control that basic DIY tools cannot provide. Professional PDR is designed to restore the shape of damaged automotive panels while preserving the existing paint finish. It is particularly valuable for dents with complex contours, restricted access, or visible tension around the damaged area. Although the repair may appear minor from the outside, correcting the panel without creating new distortion can require specialized equipment and experience.
A professional PDR technician begins by examining the dent’s depth, shape, location, and surrounding paint condition. This assessment determines whether the metal can be returned toward its original contour without sanding, body filler, or repainting. The technician also evaluates the panel material and available access points before selecting a repair method. For example, a shallow dent on an accessible steel door may be corrected using controlled pressure from behind, while a dent along a sharply defined body line may require a combination of precise pushing, pulling, and surface refinement.
Professional repair is especially appropriate when the dent is located on a body line, near a reinforced edge, or behind components that restrict access. These areas require greater precision because the surrounding panel structure limits how the metal can move. An inexperienced repair attempt may lift the center of the dent while leaving a visible crease or creating a raised section nearby. PDR technicians use reflection lighting and specialized tools to monitor small changes in the panel’s contour, allowing them to make controlled adjustments that are difficult to reproduce with general-purpose dent removal kits.
Aluminum body panels provide another reason to consider professional service. Aluminum has different forming and work-hardening characteristics from automotive steel, and its response to deformation depends on the alloy, panel design, and repair conditions. A technician familiar with aluminum PDR can evaluate whether the damaged section is suitable for paintless correction and select equipment appropriate for the material. For example, an aluminum hood with a localized hail dent may require a different repair approach from a comparable dent in a steel door. Applying excessive force without understanding these differences can increase surface distortion or make the repair more difficult.
The condition and value of the vehicle’s paint finish should also influence the decision. Preserving an undamaged factory finish avoids the need for color matching and refinishing, which can be particularly important on vehicles with complex metallic, pearl, or specialty paint colors. Professional PDR can offer an advantage when a dent is repairable without disturbing that finish. However, paintless repair is not appropriate for every type of damage. Cracked paint, significant metal stretching, damaged structural components, or previous repairs involving body filler may require conventional bodywork instead.
A professional assessment becomes more valuable when an initial DIY attempt has produced limited improvement or unexpected panel movement. Continuing to pull a dent that has developed a raised edge or uneven reflection can make the final correction more complicated. A qualified technician can determine whether the remaining deformation is still suitable for PDR and whether the existing paint can withstand additional metal movement. For example, a door ding that has been partially lifted with a glue pulling kit may still be repairable without repainting, but the next correction may require precise work on the surrounding metal rather than another strong outward pull.
Choose professional PDR when the expected cost of a mistake exceeds the savings from attempting the repair yourself. A straightforward shallow dent with sound paint and easy access may justify a careful DIY approach. A dent involving a sharp contour, uncertain paint adhesion, aluminum construction, or restricted access presents greater repair risk. In these situations, obtaining a professional PDR assessment before further work helps protect the vehicle’s finish and prevents a small cosmetic defect from becoming a more expensive body repair.