If your Ford shows the “Check Fuel Inlet” warning, you are not the only one. Many Ford owners face problems with the capless fuel system after a few years. The Ford Easy Fuel design was made to simplify refueling and keep dirt out, but it often wears down over time. When that happens, you might smell fuel, see leaks, or struggle to insert the nozzle.
Doing a Ford Capless Fuel Filler Replacement is the best way to fix the issue. It saves money and prevents more serious damage. With the right tools and clear steps, you can handle the repair at home without a trip to the dealership.
This 2025 guide will show you how to spot a bad filler, pick the right replacement kit, and install it safely. By following this simple process, you will stop the warning light and keep your Ford running smoothly again.
Contents
What Is a Ford Capless Fuel Filler and Why It Fails
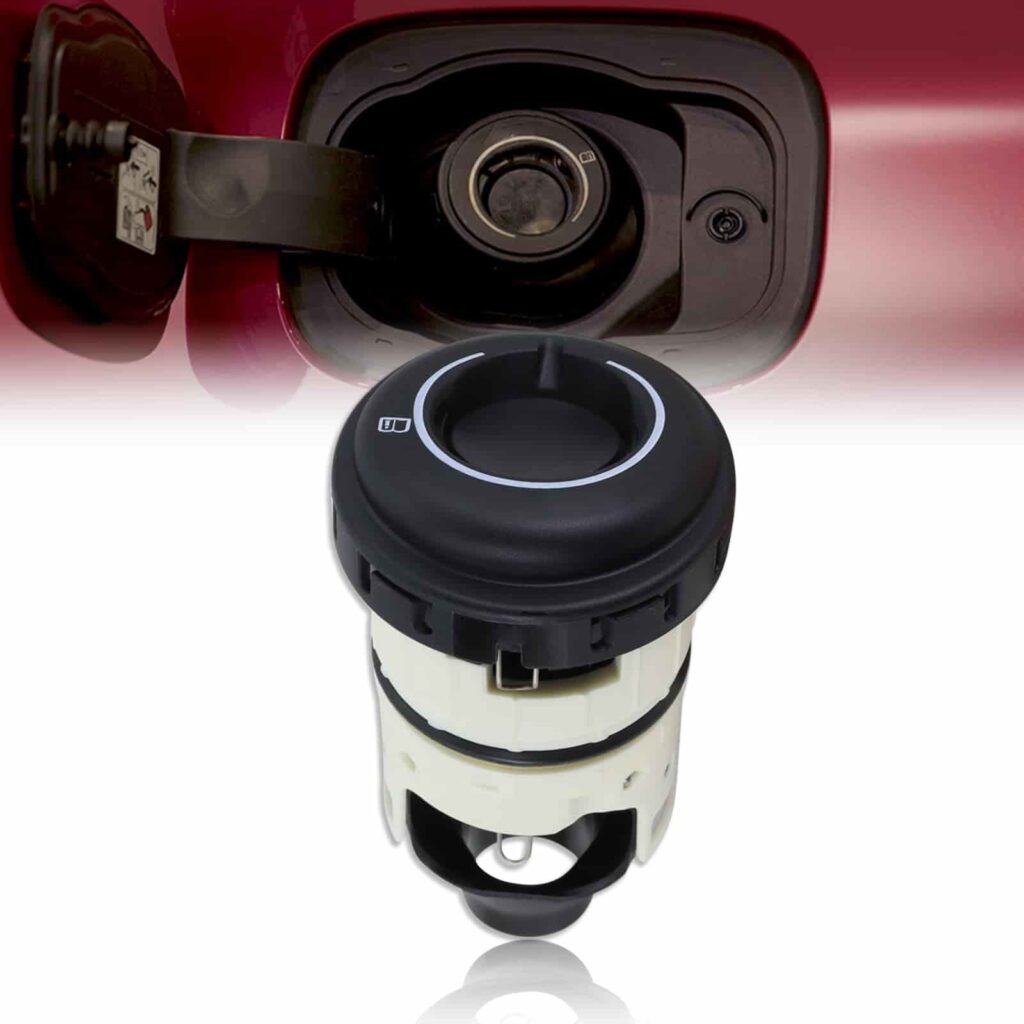
The Ford Capless Fuel Filler, also known as the Easy Fuel system, is a special design that removes the need for a gas cap. Instead of twisting a cap, you simply insert the fuel nozzle directly into a spring-loaded flap. This setup keeps dirt and water out while making refueling faster and cleaner.
Over time, the internal parts of the system can wear out. Dust, road debris, and constant exposure to fuel vapors can cause the spring or seal to lose tension. When that happens, the flap may not close properly, leading to small leaks or the “Check Fuel Inlet” warning on your dashboard.
Drivers also damage the system by forcing the fuel nozzle or using cheap adapters. If the flap stays open even a little, the system detects it as a fault. Once this happens, a Ford Capless Fuel Filler Replacement becomes the most effective solution.
Replacing the part not only removes the warning light but also restores your car’s fuel efficiency and prevents further contamination inside the tank.
Tools and Parts You’ll Need for Replacement
Before starting the Ford Capless Fuel Filler Replacement, prepare the right tools and parts. Having everything ready will save time and prevent mistakes during the repair.
You will need a screwdriver set, a socket wrench, and a pair of gloves to protect your hands. A small flashlight helps you see tight areas around the fuel filler neck. Always keep a clean cloth nearby to remove dirt or fuel residue before installing the new part.
The most important item is the Ford Capless Fuel Filler Replacement Kit. You can find it at local auto stores or trusted online sellers such as Amazon, AutoZone, and FordParts.com. Choose a kit that matches your car model, like the Ford F-150, Escape, or Explorer. Make sure it includes a rubber seal and anti-siphon flap for a proper fit and long-term durability.
Checking part compatibility before you begin can prevent leaks and ensure smooth installation later. Once you have gathered everything, you are ready to start the replacement process safely and confidently.
Step-by-Step DIY Ford Capless Fuel Filler Replacement
Replacing your Ford capless fuel filler may sound complicated, but it is a simple process when done carefully. Follow each step below to complete the repair safely and correctly.
Step 1 – Prepare Your Vehicle
Park the car on a flat surface and make sure the engine is off. Open the fuel door and disconnect the negative terminal of the battery. This step protects the electrical system while you work around the fuel area.
Step 2 – Access the Fuel Filler Neck
Locate the filler neck behind the small cover inside the wheel well or trunk area, depending on your Ford model. Use the screwdriver and wrench to remove the screws holding the old filler in place. Keep the screws safe for reinstallation later.
Step 3 – Remove the Old Capless Filler
Gently pull the old filler assembly out. Wipe the surrounding area with a clean cloth to remove dirt and debris. Avoid twisting or forcing any part since that may damage the connecting hose or seal.
Step 4 – Install the New Capless Fuel Filler
Place the new filler into position. Tighten the screws until the assembly feels secure. Check that the flap opens and closes smoothly. If your kit includes a rubber seal, press it evenly around the neck to prevent air leaks.
Step 5 – Test and Verify
Reconnect the battery and turn on the ignition. Listen for air pressure changes and look for any signs of fuel leakage. If your dashboard warning light remains on, reset it using an OBD2 scanner. Once confirmed, close the fuel door and ensure the system feels firm and sealed.
Completing these steps correctly ensures your Ford Capless Fuel Filler Replacement works efficiently. You now have a clean and secure system ready for years of reliable performance.
Common Mistakes to Avoid
Even though a Ford Capless Fuel Filler Replacement is simple, many people make small errors that cause leaks or warning lights to return. Knowing what to avoid can save you time and money.
One of the most common mistakes is forgetting to disconnect the battery before working. The fuel system is sensitive, and even a small spark can trigger an error code or sensor issue. Always disconnect the negative terminal before you begin.
Another mistake is using the wrong replacement part. Not all kits fit every Ford model. A loose or mismatched filler may cause air leaks and fuel vapor problems. Always check the model number on the package before installation.
Some people also rush the process and tighten screws too much. Over-tightening can damage the plastic housing and make the seal uneven. Take your time and apply gentle pressure to keep the filler secure.
Finally, skipping the leak test is a big error. After finishing the job, always start the car and check for any sign of fuel smell or moisture around the filler neck. Catching a small issue early prevents larger repairs later.
Avoiding these mistakes will make your Ford Capless Fuel Filler Replacement last longer and keep your car running efficiently.
Cost Comparison: DIY vs Dealership
When it comes to a Ford Capless Fuel Filler Replacement, the biggest question is often about cost. Many drivers wonder if it is better to do the repair themselves or pay for professional service. The answer depends on your comfort level and the condition of your vehicle.
Doing the replacement at home is the cheapest option. Most DIY kits cost between thirty-five and sixty dollars. You will only need basic tools and a little patience. The job usually takes about one hour once you have everything ready.
A dealership, on the other hand, charges much more. Labor costs and part markups can raise the total price to between two hundred fifty and four hundred fifty dollars. While they offer guaranteed service, many of these repairs are simple enough for a careful owner to complete.
If you prefer convenience or have a complex fuel system, a professional mechanic might be the best choice. However, if you want to save money and enjoy learning more about your car, the DIY method gives you full control and valuable experience.
Understanding the cost difference helps you make a smart choice for your next Ford Capless Fuel Filler Replacement.
Preventive Maintenance Tips
A few simple habits can help you avoid another Ford Capless Fuel Filler Replacement in the future. Regular care keeps the system clean and working properly for years.
Start by cleaning the fuel filler area every few months. Use a soft cloth and mild cleaner to remove dirt or fuel residue. Keeping the flap free of debris helps it close tightly and prevents small leaks.
Avoid refueling when the engine is running. Doing this can cause pressure changes that may damage the filler seal. Always turn off the car before inserting the nozzle.
If you often drive on dusty or muddy roads, consider using a temporary fuel door cover. It protects the filler neck from particles that can enter the system.
Finally, pay attention to the smell of fuel or any difficulty inserting the nozzle. These are early signs of wear or blockage. Fixing small issues early prevents larger repairs later.
Taking a few minutes for regular care will extend the life of your fuel system and reduce the need for another Ford Capless Fuel Filler Replacement.
Conclusion
A Ford Capless Fuel Filler Replacement is one of the easiest and most rewarding car repairs you can do yourself. With the right tools and clear instructions, anyone can complete the job safely and restore their vehicle’s fuel system in less than an hour.
By replacing the filler on your own, you avoid high dealership costs and gain a better understanding of how your car works. More importantly, you stop fuel leaks, clear warning lights, and keep your Ford running at its best.
Regular cleaning and simple maintenance will prevent the same problem from returning. Always check your fuel inlet for signs of dirt, leaks, or loose seals before they become serious issues.
If your car still shows the “Check Fuel Inlet” message, do not ignore it. Take action today and follow this guide to bring your Ford back to perfect condition. A little care now will save you time, money, and frustration in the long run.