Removing a fuel injector from a 6.7 Powerstroke engine requires careful preparation. The injector operates inside a high-pressure common rail fuel system, so every step affects engine reliability. A proper removal process protects the cylinder head, prevents fuel contamination, and reduces the risk of expensive repairs. Whether you plan to replace a faulty injector or inspect the fuel system, following the correct procedure saves time and prevents unnecessary damage.
Several problems can appear during 6.7 Powerstroke injector removal. Carbon deposits often lock the injector inside the cylinder head. Old sealing washers may stick to the injector bore, while dirt can enter the fuel system if you skip proper cleaning. These issues reduce fuel system performance and may shorten the service life of new injectors. For that reason, technicians always clean the work area before removing any fuel system component.
This guide explains the complete 6.7 Powerstroke injector removal process from start to finish. You will learn how to prepare the engine, choose the right tools, remove the injector safely, and inspect the surrounding components before installation. You will also discover the correct torque specifications, the most common removal mistakes, and the best practices for restoring reliable engine performance after the repair.
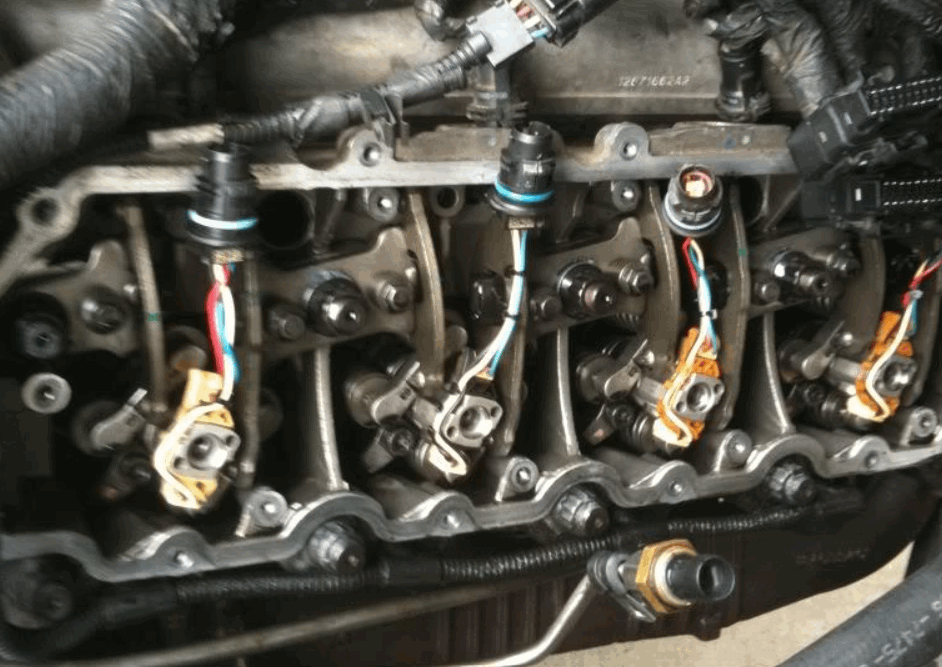
What Should You Know Before Starting 6.7 Powerstroke Injector Removal?
6.7 Powerstroke injector removal becomes necessary when an injector fails or delivers fuel incorrectly. Common symptoms include rough idling, hard starting, white smoke, fuel knock, poor acceleration, and lower fuel economy. The engine control module may also store injector-related diagnostic trouble codes. Recognizing these warning signs helps confirm the repair before you remove any fuel system component. It also reduces unnecessary labor and prevents incorrect part replacement.
Before starting the repair, inspect the entire fuel system carefully. A faulty injector can produce symptoms that resemble a failing high-pressure fuel pump or a clogged fuel filter. Restricted fuel lines can also create similar problems. Scan the vehicle for diagnostic codes and complete a visual inspection before disassembly. If several injectors show the same symptoms, inspect the fuel for water or metal debris. Fuel contamination can damage every injector in the system.
The difficulty of 6.7 Powerstroke injector removal depends on the engine’s condition. High-mileage engines often develop heavy carbon deposits around the injector body. Corrosion can also cause the injector to seize inside the cylinder head. Never force the injector out because excessive force may damage expensive engine components. Instead, inspect the area first and prepare the correct extraction tools before beginning the removal process.
A clean work area protects the fuel system throughout the repair. Dirt can enter exposed fuel passages within seconds after you disconnect the injector. Even small particles may affect fuel pressure and injector spray patterns. Therefore, clean the engine thoroughly before disassembly and cover every open connection during the repair. This simple step improves repair quality and helps restore reliable engine performance.
What Tools Are Required for 6.7 Powerstroke Injector Removal?
Using the correct tools makes 6.7 Powerstroke injector removal safer and more efficient. Standard hand tools complete most of the job, but several specialty tools help prevent damage to the injector and cylinder head. Preparing every tool before disassembly also reduces downtime and keeps the repair process organized.
Most technicians begin with a basic socket set, ratchets, torque wrenches, screwdrivers, and trim removal tools. These tools allow you to remove the valve cover, electrical connectors, and mounting hardware without damaging nearby components. A magnetic pickup tool also proves useful because it prevents small bolts from falling into the engine bay. Good lighting and a clean workbench further improve visibility throughout the repair.
Specialty tools become important when an injector sticks inside the cylinder head. An injector puller applies steady lifting force and reduces the chance of cracking the injector body. A slide hammer may also help remove heavily seized injectors, but it should only be used with the correct adapter. Applying uncontrolled force can damage the injector bore or the cylinder head. Therefore, always follow the manufacturer’s recommended removal method before increasing extraction force.
Replacement parts should be available before removing the injector. New copper sealing washers and O-rings help restore a proper seal after installation. Many technicians also replace the injector hold-down bolt because repeated use may reduce its clamping force. Finally, keep brake cleaner, lint-free towels, and compressed air nearby. These supplies help remove dirt from the injector bore and protect the high-pressure fuel system from contamination during reassembly.
How Do You Prepare the Engine Before Removing the Injector?
Proper engine preparation reduces the risk of damage during 6.7 Powerstroke injector removal. It also protects the high-pressure fuel system from contamination and helps every component come apart more easily. Spending a few extra minutes on preparation often prevents costly repairs later.
Begin by parking the truck on a level surface and allowing the engine to cool completely. Disconnect both negative battery cables before touching any electrical or fuel system component. This step prevents accidental short circuits and eliminates the risk of activating the fuel system during service. After that, remove the engine cover and any components that limit access to the valve cover. Creating enough working space makes the remaining steps faster and safer.
Next, relieve fuel system pressure according to the manufacturer’s service procedure. Although the engine is no longer running, pressurized fuel may remain inside the system. Opening fuel connections without releasing pressure can cause fuel to spray onto nearby components. Once the pressure has been relieved, disconnect the electrical connectors carefully and inspect them for broken locking tabs or damaged wiring. Replacing worn connectors now helps prevent future injector faults.
Clean the area around each injector before removing any hardware. Dirt, sand, and carbon deposits can fall into the injector bore after the injector comes out. Even small particles may damage the high-pressure fuel system or affect injector performance. Use compressed air and a non-residue cleaner to remove loose debris from the cylinder head. Finally, cover every exposed fuel opening with a clean lint-free cloth until you begin the removal process. Proper preparation creates a cleaner repair and reduces the chance of contamination after reassembly.
How Do You Remove a 6.7 Powerstroke Injector Step by Step?
6.7 Powerstroke injector removal requires a consistent sequence to protect the injector and the cylinder head. Following each step in the correct order reduces the risk of fuel contamination and prevents damage to surrounding components. Rushing the process often creates problems that are difficult and expensive to repair.
Start by removing the valve cover to expose the fuel injectors. Locate the injector you plan to remove and disconnect its electrical connector. Press the locking tab gently before pulling the connector straight away from the injector. Next, disconnect the fuel return line according to the manufacturer’s procedure. Keep every opening clean because even small amounts of dirt can enter the high-pressure fuel system.
After gaining full access, remove the injector hold-down bolt and lift away the hold-down clamp. Place both parts in a clean container to prevent contamination or loss. Grip the injector carefully and pull it upward with steady pressure. If the injector does not move, stop immediately and use a dedicated injector puller. Avoid twisting the injector aggressively because excessive force may damage the injector body or the cylinder head.
Inspect the injector and the injector bore as soon as the injector comes out. Check the nozzle for carbon buildup, scoring, or physical damage. Make sure the old copper sealing washer has not remained inside the cylinder head. Remove any remaining debris before installing replacement parts. Finally, cover the open injector bore with a clean lint-free cloth until you begin reassembly. This simple precaution helps keep the fuel system clean and supports reliable engine performance after the repair.
How Do You Remove a Stuck 6.7 Powerstroke Injector Safely?
A stuck injector requires controlled force instead of excessive force. Most injectors seize because carbon deposits, corrosion, or heat cycles create a tight bond between the injector body and the cylinder head. Pulling the injector too aggressively can damage the injector bore, crack the injector body, or break the hold-down hardware. A careful approach protects these components and reduces repair costs.
Begin by inspecting the area around the injector for heavy carbon buildup or corrosion. Clean away loose debris before applying any extraction tool. If the injector remains firmly seated, install a dedicated injector puller that matches the 6.7 Powerstroke injector design. Apply steady upward pressure instead of sudden impacts. This method allows the injector to break free gradually while reducing stress on the cylinder head.
Some injectors require additional extraction force after years of service. In this situation, attach a slide hammer to the injector puller and use controlled movements. Short and consistent pulls work better than aggressive strikes because they reduce the chance of component damage. If the injector still refuses to move, stop the repair and inspect the mounting area again. Additional carbon buildup or hidden corrosion may require further cleaning before another removal attempt.
Inspect the injector bore immediately after removing a seized injector. Look for scratches, carbon residue, or signs of damage inside the cylinder head. Remove any remaining deposits with approved cleaning tools and avoid using abrasive materials that could change the sealing surface. Finally, replace every sealing washer and O-ring before reassembly. New seals help restore proper fuel system pressure and reduce the risk of leaks after the engine returns to service.
What Should You Inspect Before Installing a New Injector?
Inspecting the surrounding components before installation improves injector performance and prevents future fuel system problems. Installing a new injector without checking the sealing surfaces or injector bore can lead to compression leaks, fuel leaks, and premature injector failure. A careful inspection also confirms that the removal process did not damage the cylinder head.
Start by examining the injector bore inside the cylinder head. The sealing surface should appear clean, smooth, and free from scratches. Remove any remaining carbon deposits with an approved bore cleaning tool. Do not use sharp metal objects because they can damage the sealing surface. Even minor scratches may prevent the new copper washer from sealing correctly.
Next, inspect the fuel lines, electrical connector, and injector hold-down hardware. Replace any component that shows corrosion, cracks, or excessive wear. Check the electrical connector for bent terminals or broken locking tabs. A loose connection can interrupt injector operation and trigger diagnostic trouble codes after the repair. Replacing damaged parts now helps avoid repeated disassembly later.
Finally, compare the replacement injector with the original unit before installation. Verify that the part number, nozzle design, and electrical connector match exactly. Install a new copper sealing washer and new O-rings instead of reusing the old seals. Lightly lubricate the O-rings with clean diesel fuel if the manufacturer recommends this step. Proper preparation helps the injector seat correctly, creates a reliable seal, and supports consistent engine performance after reassembly.
What Are the Correct Torque Specifications for 6.7 Powerstroke Injectors?
Correct torque specifications help secure the injector without damaging the surrounding components. Over-tightening can stretch the hold-down bolt or distort the injector clamp. Under-tightening may allow the injector to move during engine operation. Either mistake can lead to compression leaks, fuel leaks, or poor engine performance.
Always follow the torque values published in the official Ford service manual for the specific model year and engine version. Torque specifications can vary between production years and updated service procedures. Using incorrect values may reduce the clamping force or damage threaded holes in the cylinder head. For that reason, verify the latest service information before beginning reassembly.
Use a calibrated torque wrench to tighten the injector hold-down bolt. Thread the bolt by hand before applying torque to prevent cross-threading. Tighten the bolt in one smooth and controlled motion unless the service procedure requires multiple stages or an angle-tightening sequence. If the manufacturer specifies a torque-to-yield bolt, replace it with a new one during every injector installation. Reusing a stretched bolt can reduce clamping force and increase the risk of future injector movement.
After tightening the injector, reconnect the fuel lines and electrical connector according to the recommended procedure. Double-check every connection before reinstalling the valve cover. Once the engine is fully assembled, start it and inspect the injector area for fuel leaks, unusual noises, or compression leaks. A careful final inspection confirms that the injector has seated correctly and that the repair meets professional service standards.
What Common Mistakes Should You Avoid During 6.7 Powerstroke Injector Removal?
Avoiding common mistakes helps protect the engine and improves the quality of the repair. Many injector problems occur because technicians skip basic preparation or rush the removal process. Careful work reduces the risk of damaged parts, fuel contamination, and repeat repairs.
One common mistake is working on a dirty engine. Dust, sand, and carbon deposits can enter the injector bore after the injector is removed. Even small contaminants may affect injector performance or damage the high-pressure fuel system. Always clean the work area before disconnecting any fuel system component. Cover exposed openings whenever the repair pauses.
Another mistake is using excessive force to remove a seized injector. Twisting or prying the injector can damage the cylinder head and increase repair costs. Instead, use an injector puller that matches the injector design. Apply steady pressure and inspect the injector if it does not move. Taking extra time is safer than forcing the injector out.
Many technicians also reuse old sealing washers, O-rings, or hold-down bolts. These parts lose their sealing ability after repeated use. Reinstalling worn components increases the risk of fuel leaks and compression leaks. Always install new seals and replace torque-to-yield bolts when the service manual requires them. Finish the repair by checking every connection and inspecting the engine for leaks during the first startup. A careful inspection confirms that the injector operates correctly and that the repair is complete.
Frequently Asked Questions About 6.7 Powerstroke Injector Removal
How long does 6.7 Powerstroke injector removal take? Most experienced technicians complete the job in three to six hours. The exact time depends on the engine condition, the number of injectors being replaced, and the amount of carbon buildup. Seized injectors usually increase the repair time because they require additional cleaning and specialized extraction tools.
Can you remove a 6.7 Powerstroke injector without a special puller? It is possible in some cases, but it is not recommended. Injectors that move freely may come out with gentle hand pressure. However, many high-mileage engines develop heavy carbon deposits around the injector body. A dedicated injector puller applies controlled force and greatly reduces the risk of damaging the injector or the cylinder head.
Should you replace the injector seals during installation? Yes. Every injector installation should include new copper sealing washers and new O-rings. These components create the proper seal between the injector and the cylinder head. Reusing old seals increases the risk of compression leaks, fuel leaks, and poor engine performance after the repair.
Why is carbon buildup a common problem during injector removal? High engine temperatures allow carbon deposits to accumulate around the injector over time. These deposits lock the injector inside the cylinder head and make removal more difficult. Cleaning the injector bore after removal also prepares the surface for the new injector and helps create a reliable seal during reassembly.
Conclusion
6.7 Powerstroke injector removal is a precision repair that requires the correct tools, careful preparation, and the proper removal technique. Every step influences the reliability of the fuel system and the long-term performance of the engine. Taking time to inspect each component, clean the injector bore, and protect the fuel system from contamination helps prevent avoidable problems during reassembly.
Following the recommended service procedure also reduces the risk of damaging the injector, the cylinder head, and other expensive engine components. Replacing worn sealing washers, O-rings, and any required torque-to-yield hardware creates a secure seal and supports consistent fuel delivery. Verifying every connection before starting the engine provides an additional layer of protection against fuel leaks and installation errors.
Whether you are replacing a failed injector or performing preventive maintenance, understanding the complete 6.7 Powerstroke injector removal process leads to a safer and more professional repair. Applying the correct methods from preparation through final inspection helps restore engine performance, improve reliability, and reduce the likelihood of future injector-related issues.