Replacing a Lexus cabin air filter involves accessing the filter housing, removing the old filter, and installing a compatible replacement in the correct orientation. In many Lexus models, including the RX, ES, NX, and IS, the cabin air filter is located behind the passenger-side glove box. The replacement process generally requires no specialized tools, although access methods vary by model and year.
The cabin air filter removes airborne particles such as dust, pollen, and road debris from the air entering the vehicle’s heating, ventilation, and air conditioning (HVAC) system. As particles accumulate in the filter, airflow resistance increases, potentially reducing ventilation performance. A dirty filter may also contribute to unpleasant cabin odors, although odors can originate from other HVAC components.
Lexus cabin air filter replacement typically involves six steps: locating the filter housing, opening the access cover, removing the used filter, checking the airflow direction, inserting the new filter, and reassembling the housing. Choosing the correct filter is essential because dimensions and part numbers differ across Lexus models and production years.
This guide explains the replacement procedure, filter locations, required tools, compatibility checks, maintenance intervals, and replacement costs. It also covers common installation mistakes and troubleshooting steps for weak airflow after replacement.
How Do You Replace a Lexus Cabin Air Filter?
To replace a Lexus cabin air filter, open the filter compartment, remove the used filter, and install a compatible replacement with the correct airflow orientation. In many Lexus vehicles, the filter compartment is accessible behind the passenger-side glove box. The procedure typically takes 5–15 minutes when the filter housing is readily accessible, although the exact time depends on the model and year.
The Lexus cabin air filter replacement process consists of six main steps:
- Locate the cabin air filter housing. Open the passenger-side glove box and identify the filter access compartment. Some Lexus models require releasing a glove box damper or repositioning the glove box to reach the housing.
- Open the filter access cover. Release the retaining tabs or clips securing the cover. Avoid forcing plastic components because their attachment mechanisms differ between vehicle generations.
- Remove the old cabin air filter. Slide the filter or filter tray out of the housing, noting its installed orientation. Inspect the compartment for leaves, dust, and other loose debris.
- Check the replacement filter orientation. Compare the new filter with the removed component and follow the airflow direction markings. An airflow arrow indicates air movement, while an UP arrow indicates the filter’s intended upright position.
- Install the new cabin air filter. Insert the correctly sized filter into the housing without folding or compressing its pleats. Make sure the filter sits securely and the access cover closes completely.
- Reassemble and test the HVAC system. Return the glove box and any removed components to their original positions. Turn on the ventilation system and check for normal airflow and unusual blower noises.
The replacement procedure is similar across many Lexus sedans and SUVs because their cabin filters serve the same function within the HVAC system. However, glove box retention mechanisms, filter trays, and access covers differ between models and production years. Checking the applicable owner’s manual or service instructions helps prevent damage to interior components.
Where Is the Cabin Air Filter Located in a Lexus?
The cabin air filter in many Lexus vehicles is located behind the passenger-side glove box, inside the HVAC air intake housing. This position allows the filter to capture dust, pollen, and other airborne particles before the ventilation system distributes air through the cabin vents. Depending on the vehicle’s design, accessing the filter may require opening, lowering, or temporarily repositioning the glove box.
The Lexus RX, ES, NX, and IS commonly use glove-box-area cabin filter access, although their compartment layouts and removal procedures are not identical. The filter may sit inside a removable tray or directly behind a rectangular access cover. Some configurations also have a separate inner panel that must be opened before the filter becomes visible.
For the Lexus RX, the cabin air filter is generally accessible through the passenger-side glove box area. Depending on the model year, access may involve releasing glove box retainers or removing an interior access panel. The filter housing is positioned within the dashboard HVAC assembly, and its cover must be opened before the filter can be withdrawn.
In the Lexus ES, the filter is also commonly positioned behind the glove box. Certain generations use a removable filter tray, while others provide access through a filter compartment cover. The glove box arrangement and retaining components depend on the vehicle’s production year, making model-specific instructions important when opening the compartment.
The Lexus NX and Lexus IS generally place the cabin filter within the passenger-side dashboard HVAC assembly. Access procedures vary by generation, particularly in how the glove box and filter cover are secured. The exact filter position and removal method should be confirmed using the vehicle’s model year and maintenance documentation.
The most reliable way to identify the correct location is to consult the owner’s manual for the specific Lexus model and year. This also helps distinguish the cabin air filter from the engine air filter, which is located in the engine compartment and filters air entering the engine rather than the passenger cabin.
What Tools Do You Need to Replace a Lexus Cabin Air Filter?
Replacing a Lexus cabin air filter generally requires a compatible replacement filter and no specialized tools. Many Lexus models feature a cabin filter compartment accessible through the passenger-side glove box, allowing owners to remove and install the filter by releasing plastic retaining clips. However, certain model years and configurations require additional steps or tools to access the filter housing.
The following items are useful for Lexus cabin air filter replacement:
- Compatible cabin air filter: Select a replacement designed for the specific Lexus model, production year, and HVAC configuration. OEM and compatible aftermarket filters are available with standard particulate or activated carbon filtration media.
- Flashlight: Use a compact flashlight to locate the filter access cover, identify retaining clips, and inspect the housing for accumulated debris.
- Clean microfiber cloth: Wipe accessible dust and debris from the filter compartment without pushing contaminants into the HVAC system.
- Plastic trim removal tool: Use this only when the applicable service procedure requires removing an interior trim panel. A plastic tool reduces the risk of scratching dashboard surfaces compared with metal tools.
- Screwdriver: Some vehicle configurations may require a screwdriver to remove a fastener or access panel. Check the model-specific service instructions before attempting disassembly.
Before starting the replacement, park the vehicle on a level surface, turn off the ignition and HVAC system, and remove items from the glove box. These preparations provide clear access to the filter compartment and prevent loose objects from falling during glove box removal.
How Do You Change a Lexus Cabin Air Filter Step by Step?
To change a Lexus cabin air filter, access the HVAC filter housing behind the glove box, remove the existing filter, and install a correctly sized replacement before reassembling the compartment. The general procedure is similar across many Lexus models, but the exact glove box release mechanism and filter housing design depend on the vehicle’s model and production year.
How Do You Access the Lexus Cabin Air Filter Housing?
To access the Lexus cabin air filter housing, open the passenger-side glove box and locate the compartment or access panel leading to the HVAC filter assembly. On many Lexus vehicles, the filter is positioned behind the glove box, allowing replacement without removing the dashboard.
Start by emptying the glove box and lowering its door completely. Inspect the rear of the compartment for a removable access panel or filter cover. Some Lexus models provide direct access through an opening inside the glove box, while others require the glove box to be lowered beyond its normal opening position.
For vehicles with glove box side stops, carefully release the retaining tabs according to the model-specific procedure. If the glove box has a damper arm, disconnect it only when required by the service instructions. Support the glove box while releasing its retaining components to prevent sudden movement or damage to the hinges.
Once the glove box is positioned correctly, identify the rectangular cabin filter access cover on the HVAC housing. The cover generally uses plastic retaining clips that release by hand. Press the appropriate tabs and remove the cover without twisting or forcing the plastic.
Some Lexus configurations include an additional filter tray or inner cover. Remove these components only as directed by the applicable maintenance procedure. The filter housing should be fully accessible before attempting to pull out the existing filter.
How Do You Remove the Old Lexus Cabin Air Filter?
To remove the old Lexus cabin air filter, open the filter housing cover and carefully slide the filter or removable filter tray out of its compartment. Keep the filter level during removal to reduce the amount of accumulated dust and debris falling into the HVAC housing.
Before removing the filter completely, examine its orientation markings. Cabin filters may display an AIR FLOW arrow indicating the direction of airflow or an UP arrow indicating the intended installation position. These markings have different meanings and should not be treated as interchangeable. Note the original filter’s position and check the housing for corresponding instructions.
If the filter sits inside a reusable plastic tray, separate the used filter from the tray without bending or breaking its retaining edges. Some Lexus models use a filter that slides directly into the housing without a separate tray. The replacement must match the original mounting configuration.
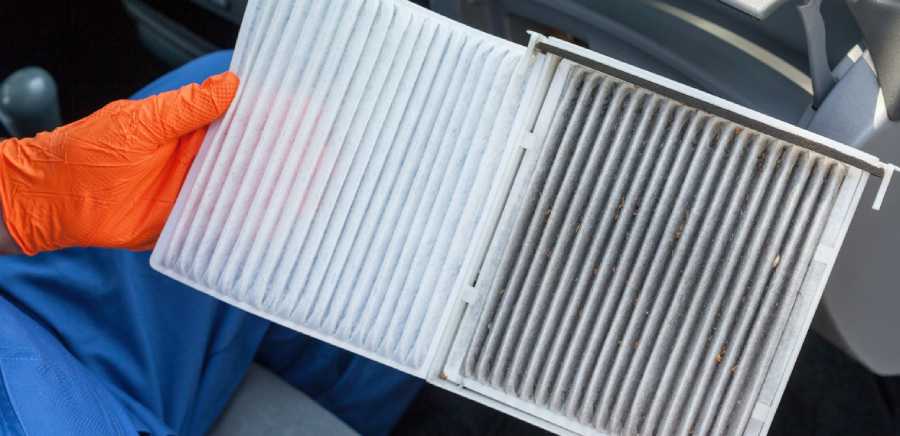
Inspect the removed filter for accumulated dust, pollen, leaves, and other debris. A heavily contaminated filter can restrict airflow through the HVAC system, increasing resistance as the blower pushes air through the filter media. Visible dirt also indicates that the filter has captured airborne particles during normal vehicle operation.
Check the accessible filter compartment for loose debris before installing the replacement. Remove visible dust with a clean microfiber cloth, taking care not to push particles deeper into the air passages. Avoid inserting tools into the blower assembly or spraying cleaning chemicals directly into the housing.
Do not reinstall a damaged, wet, or heavily contaminated disposable cabin air filter. Replace it with a compatible new filter to restore the intended filtration function.
How Do You Install a New Lexus Cabin Air Filter?
To install a new Lexus cabin air filter, confirm that its dimensions, shape, and mounting design match the original filter and the vehicle’s specified replacement part. An incompatible filter may leave gaps around the housing, restrict airflow, or prevent the access cover from closing correctly.
Begin by checking the directional markings on the new filter. If the filter displays an AIR FLOW arrow, position it in the actual direction of airflow through the housing. If it displays an UP arrow, orient that marking upward as instructed by the manufacturer. Follow the vehicle’s filter housing markings and service documentation rather than assuming every Lexus model uses the same airflow direction.
For filters installed inside a reusable tray, place the replacement filter securely within the tray’s retaining edges. Ensure the pleats remain evenly positioned and the filter media does not fold or extend beyond the tray. A filter installed directly into the housing should slide into its designated guides without excessive force.
Insert the filter or tray into the HVAC compartment until it reaches its intended seated position. The filter should fit securely without significant gaps or deformation. Reattach the filter access cover and confirm that its retaining clips engage completely. An improperly secured cover can allow unfiltered air to bypass the filter or produce unwanted noise during blower operation.
Reassemble the glove box by reversing the applicable access procedure. Reconnect the damper arm if it was removed, restore the side stops or retaining clips, and verify that the glove box opens and closes normally.
After reassembly, start the vehicle or activate the ignition as required for HVAC operation. Turn on the ventilation fan and check airflow at several fan speeds. Listen for rattling, whistling, or scraping sounds that could indicate an improperly seated filter, loose access cover, or displaced component.
A correctly installed Lexus cabin air filter should sit securely in its housing, allow the access cover to close fully, and permit normal HVAC operation. If airflow remains weak after replacement, inspect the filter fit and housing assembly before investigating other HVAC components, such as the blower motor or air intake passages.
How Do You Choose the Correct Cabin Air Filter for Your Lexus?
To choose the correct cabin air filter for your Lexus, match the replacement filter to the vehicle’s model, model year, and HVAC system configuration. Lexus vehicles use different filter dimensions, mounting designs, and part numbers, so a cabin air filter designed for one model may not fit another. Even vehicles within the same model series can require different filters after a generation change or HVAC system update.
The most reliable method is to identify the original equipment manufacturer (OEM) part number through the Lexus owner’s documentation, an official parts catalog, or a dealership parts department. The vehicle identification number (VIN) can help confirm the correct component for a specific vehicle. For example, a Lexus RX 350 and a Lexus ES 350 from the same production year should not be assumed to use interchangeable cabin air filters without verifying their part numbers.
OEM Lexus cabin air filters are designed to meet the specifications of their intended vehicle applications, including filter dimensions, housing fit, and filtration requirements. Compatible aftermarket filters from manufacturers such as DENSO, Bosch, and FRAM provide alternative replacement options. However, compatibility must be verified using the manufacturer’s application catalog rather than relying on brand reputation or visual similarity alone.
Filter media also affects the selection process. Standard particulate cabin filters capture airborne contaminants such as dust, pollen, and road debris. Activated carbon filters combine particulate filtration with an adsorbent layer designed to reduce certain odors and gaseous pollutants. The additional carbon layer does not automatically make a filter more effective at capturing fine particles; particulate filtration performance depends on the filter’s construction and specifications.
Before purchasing a replacement, verify the filter’s part number, physical dimensions, mounting design, and listed vehicle applications. A correctly fitted cabin air filter is more important than choosing a particular brand, because gaps around the filter can allow air to bypass the filtration media. The replacement should also meet the vehicle manufacturer’s airflow and filtration requirements to avoid unnecessary restriction within the HVAC system.
What Mistakes Should You Avoid When Replacing a Lexus Cabin Air Filter?
The most common Lexus cabin air filter replacement mistakes involve incorrect filter orientation, incompatible replacement parts, damaged access components, and improper filter installation. These errors can reduce filtration effectiveness, restrict ventilation, or create noise inside the HVAC system. Most can be prevented by checking the original filter arrangement and following the applicable vehicle service instructions.
There are six installation mistakes to avoid:
1. Installing the filter in the wrong orientation. Cabin filters may use AIR FLOW or UP markings, which indicate different installation requirements. An AIR FLOW arrow must follow the direction of air movement, while an UP arrow identifies the intended upright position. Follow the markings on the replacement filter and vehicle housing rather than assuming that the arrow must always point downward.
2. Choosing an incompatible replacement filter. A filter with incorrect dimensions or mounting features may not seal properly inside the housing. For example, a filter that is too narrow can leave gaps that allow unfiltered air to pass around the media, while an oversized filter may become compressed and restrict airflow. Verify compatibility using the Lexus model, year, and applicable part number.
3. Forcing the glove box or access cover. Plastic retaining clips, glove box stops, and damper attachments can break when excessive force is applied. Their release mechanisms differ across Lexus generations. Identify the attachment points before removing the glove box or opening the filter compartment.
4. Leaving debris inside the filter housing. Leaves, dust, and other loose materials can remain in the compartment after the old filter is removed. If debris enters the blower area, it may cause rattling or interfere with airflow. Inspect the accessible housing and carefully remove loose contamination before installing the replacement.
5. Compressing or folding the replacement filter. Cabin air filters are designed to maintain their specified shape inside the housing. Folding the pleats or forcing the filter into an undersized compartment can distort the filtration media and create gaps along the mounting edges. Insert the filter smoothly and confirm that it sits flat within the tray or housing.
6. Failing to secure the filter cover. An improperly attached access cover may allow air to bypass the filter or produce vibration and noise during HVAC operation. After installation, confirm that all retaining clips are engaged and that the glove box components have been reassembled correctly.
Another important consideration is the condition of the HVAC system before replacement. A new cabin air filter does not automatically eliminate musty odors, weak airflow, or unusual blower noises. These symptoms can also originate from a contaminated evaporator, obstructed air intake, malfunctioning blower motor, or other ventilation components.
The final installation check should confirm three conditions: the filter fits correctly, the housing is fully secured, and the HVAC system operates normally. If any of these conditions are not met, inspect the replacement filter and reassembly procedure before continuing to use the ventilation system.
How Often Should You Replace a Lexus Cabin Air Filter?
Lexus cabin air filters commonly require replacement every 10,000–15,000 miles or approximately 12 months, although the correct interval depends on the model, model year, and maintenance schedule. Some Lexus maintenance schedules specify different replacement intervals or recommend earlier replacement under severe driving conditions. The vehicle’s official maintenance guide should determine the scheduled replacement frequency.
The cabin air filter gradually accumulates dust, pollen, road debris, and other airborne particles as outside air passes through the HVAC system. These contaminants collect within the filter media, increasing resistance to airflow. As the filter becomes more restrictive, the ventilation system may deliver less air through the dashboard vents at the same blower setting. Replacing the filter at the recommended interval helps maintain proper airflow and filtration performance.
Driving conditions directly affect how quickly a Lexus cabin air filter becomes contaminated. Vehicles frequently operated on unpaved roads, in construction zones, or in areas with high airborne dust concentrations may require more frequent inspection and replacement. For example, a Lexus RX driven regularly on dusty rural roads may accumulate debris faster than a Lexus ES primarily operated on clean, paved urban roads. However, mileage alone cannot establish the filter’s condition because airborne particle exposure varies between driving environments.
Lexus owners should also consider the filter’s physical condition when determining whether replacement is necessary. A filter containing heavy dust deposits, embedded leaves, moisture damage, or visible deterioration should be replaced even when the scheduled maintenance interval has not been reached. A filter that appears relatively clean may still contain fine particles, so visual inspection should supplement rather than replace the manufacturer’s maintenance recommendations.
The most reliable maintenance approach is to follow the model-specific Lexus replacement schedule and inspect the filter earlier when driving conditions or ventilation symptoms justify it. Recording the replacement date and odometer reading also helps owners track maintenance history and avoid unnecessary or overdue replacements.
What Are the Signs That a Lexus Cabin Air Filter Needs Replacing?
The main signs that a Lexus cabin air filter needs replacing are reduced HVAC airflow, visible filter contamination, persistent unpleasant odors, and decreased ventilation performance. These symptoms develop when the filter accumulates airborne debris or becomes damaged, although similar problems can also originate from other HVAC components. Inspecting the filter helps determine whether replacement is the appropriate maintenance action.
There are five warning signs to check:
1. Reduced airflow from the dashboard vents. A heavily clogged cabin air filter increases resistance within the HVAC air path, reducing the amount of air delivered through the vents at a given blower speed. For example, a Lexus RX that previously produced strong airflow at a medium fan setting may deliver noticeably less air when the filter becomes severely restricted. Weak airflow can also indicate blower motor problems or blocked ventilation passages.
2. Musty or unpleasant odors from the HVAC system. Moisture and organic debris trapped around the filter compartment can contribute to unpleasant smells when the ventilation system operates. However, persistent musty odors may also originate from microbial contamination on the air conditioning evaporator or inside the HVAC housing. Replacing the filter addresses contamination within the filter itself but does not necessarily eliminate odors from other components.
3. Visible dust and debris on the filter. A cabin filter containing thick dust deposits, leaves, insects, or other accumulated material indicates substantial exposure to airborne contaminants. Heavy debris buildup can obstruct sections of the filtration media and increase airflow resistance. Inspecting the filter’s pleats provides a more useful indication of contamination than examining only its outer frame.
4. Reduced windshield defogging performance. A severely restricted cabin air filter can reduce the volume of conditioned air directed toward the windshield, potentially slowing moisture removal from the glass. However, poor defogging can also result from incorrect HVAC settings, excessive cabin humidity, or air conditioning system faults. The filter should be inspected as part of the diagnosis rather than assumed to be the sole cause.
5. A damaged or moisture-saturated filter. Torn filtration media, distorted pleats, or a filter that remains wet can compromise filtration performance. Moisture can also encourage unpleasant odors and contribute to contamination within the filter compartment. A damaged or wet disposable cabin air filter should be replaced, and the source of persistent moisture should be investigated.
These warning signs should be evaluated alongside the vehicle’s maintenance history and operating conditions. For example, reduced airflow accompanied by a heavily contaminated filter supports replacement as an appropriate first maintenance step. If airflow remains weak after installing a correctly fitted filter, the blower motor, air intake, and other HVAC components may require further inspection.
A Lexus cabin air filter should be replaced when its scheduled service interval is reached or when inspection confirms excessive contamination, damage, or airflow restriction. This approach maintains filtration performance without treating every HVAC symptom as evidence of a clogged filter.
How Much Does Lexus Cabin Air Filter Replacement Cost?
Lexus cabin air filter replacement typically costs $15–$45 for a DIY replacement or approximately $50–$120 at a professional service facility in the United States. These are general budgeting estimates rather than verified current quotes. The final cost depends on the Lexus model, replacement filter type, parts supplier, and labor charges. Most DIY replacements require purchasing only the filter because the compartment is accessible without specialized equipment on many Lexus vehicles.
The replacement filter accounts for the primary expense when performing the maintenance yourself. Standard aftermarket cabin air filters commonly fall within an estimated $15–$30 price range, while activated carbon filters and certain OEM Lexus replacements may cost approximately $25–$50 or more. Prices vary according to filter dimensions, filtration media, manufacturer, and vehicle compatibility. A Lexus RX, ES, or NX may require a different part number, so pricing should be checked against the specific model and production year.
Professional replacement costs include the filter price and labor required to access the HVAC housing, remove the existing filter, and install the replacement. Dealerships may charge higher labor rates than independent automotive repair shops, although actual pricing depends on the service provider and location. Some maintenance packages also include cabin air filter replacement, which can affect the amount charged for the individual service.
The following table compares illustrative replacement cost ranges for Lexus vehicles in the United States.
| Replacement method | Estimated cost |
|---|---|
| DIY with standard aftermarket filter | $15–$30 |
| DIY with activated carbon or OEM filter | $25–$50+ |
| Independent repair shop | $50–$90 |
| Lexus dealership | $60–$120+ |
These estimates exclude applicable taxes and unusual access or repair requirements. Requesting a vehicle-specific quote provides a more accurate comparison.
Is It Cheaper to Replace a Lexus Cabin Air Filter Yourself?
Replacing a Lexus cabin air filter yourself is generally cheaper than paying a dealership or repair shop because it eliminates professional labor charges. For Lexus models with an easily accessible glove box filter compartment, the replacement can typically be completed in 5–15 minutes once the correct filter and access procedure are identified.
For example, purchasing a compatible cabin air filter for $25 and installing it yourself results in a $25 parts expense. If a professional service provider quotes $85 for the same replacement, the DIY option saves $60. The actual savings depend on the filter selected, local labor rates, and whether the vehicle requires additional disassembly.
DIY replacement is particularly practical for Lexus owners who can access the filter housing without removing complex dashboard components. However, professional service may be preferable when glove box components are damaged, the filter compartment is difficult to access, or the vehicle has additional HVAC problems. In these situations, improper disassembly can create repair expenses greater than the labor cost of a routine filter replacement.
The best way to reduce Lexus cabin air filter replacement costs is to verify the correct part number, compare compatible filter prices, and follow the vehicle-specific replacement procedure. This avoids unnecessary labor charges while reducing the risk of purchasing an incompatible filter or damaging interior components.
Read more: H6 vs H7 Battery: Size, Specs & Compatibility
What Is the Difference Between Standard and Activated Carbon Lexus Cabin Air Filters?
The main difference between standard and activated carbon Lexus cabin air filters is that activated carbon filters add gas and odor adsorption to particulate filtration. Both filter types are designed to capture airborne particles entering the vehicle’s HVAC system, but activated carbon media provides an additional mechanism for reducing certain gaseous contaminants and unpleasant smells.
Standard cabin air filters use filtration media, commonly made from synthetic fibers or other engineered materials, to capture particles such as dust, pollen, and road debris. As air passes through the filter, particles are retained through filtration mechanisms that depend on particle size, fiber structure, and airflow conditions. Filtration efficiency varies by product, so a standard filter should not be assumed to have identical performance to every other particulate filter.
Activated carbon cabin air filters incorporate a layer containing porous carbon material. The carbon provides a large internal surface area that adsorbs certain gases and odor-producing compounds from passing air. This makes activated carbon filters useful for drivers frequently exposed to traffic exhaust odors or other gaseous pollutants. However, adsorption capacity is limited, and performance depends on the contaminant, carbon quantity, airflow, and filter condition.
The differences between these two filter types are summarized below.
| Feature | Standard cabin air filter | Activated carbon cabin air filter |
|---|---|---|
| Dust and pollen filtration | Yes | Yes |
| Particulate filtration | Depends on filter specifications | Depends on filter specifications |
| Odor reduction | Limited | Adsorbs certain odor compounds |
| Gaseous pollutant reduction | Generally limited | Targets certain gases |
| Typical price | Lower | Higher |
| Replacement compatibility | Model-specific | Model-specific |
For Lexus owners primarily concerned with dust and pollen, a compatible standard particulate filter may provide adequate filtration. Drivers seeking additional reduction of certain odors and gaseous pollutants may prefer an activated carbon filter, provided it meets the vehicle’s fitment and airflow requirements.
Activated carbon does not automatically provide superior fine-particle filtration, and neither filter type eliminates every airborne contaminant. The effectiveness of particulate filtration depends on the filter media and tested performance, while gas adsorption depends on the carbon layer and operating conditions.
When selecting either type, prioritize compatibility with the Lexus HVAC housing and the manufacturer’s specified filtration requirements. A properly fitted standard filter is preferable to an incompatible activated carbon filter because gaps around the filter can allow contaminated air to bypass the filtration media.
Why Is Lexus AC Airflow Still Weak After Replacing the Cabin Air Filter?
Weak Lexus AC airflow after cabin air filter replacement can result from incorrect filter installation, blocked air intake passages, blower motor problems, or HVAC airflow control faults. A new cabin air filter removes one potential source of airflow restriction, but it does not correct mechanical or electrical problems elsewhere in the ventilation system. Identifying the cause requires checking the filter installation before inspecting additional HVAC components.
There are five main causes of weak airflow after replacing a Lexus cabin air filter:
1. Incorrect cabin air filter installation. A replacement filter that is folded, oversized, or improperly seated can restrict airflow through the HVAC housing. A filter installed outside its designated guides may also interfere with the housing cover. Remove the filter and verify its dimensions, orientation markings, and seating position. Confirm that the filter tray and access cover are securely installed.
2. Blocked outside air intake. Leaves, dust, and other debris can accumulate around the HVAC fresh-air intake, which is commonly located near the base of the windshield. An obstructed intake reduces the volume of outside air entering the ventilation system. Inspect accessible intake openings for visible debris and remove loose material without pushing it into the ductwork.
3. Blower motor or blower control problems. The blower motor moves air through the HVAC system and distributes it through the cabin vents. A failing motor, damaged fan wheel, or malfunctioning blower control circuit can reduce airflow even when the cabin air filter is clean. Symptoms include inconsistent fan operation, unusual noises, or little change in airflow when adjusting the fan speed. Electrical diagnosis may be necessary when these symptoms persist.
4. Obstructed HVAC ducts or malfunctioning air doors. Airflow can become restricted when debris enters the ventilation passages or an internal HVAC door fails to move correctly. For example, a malfunctioning mode door may prevent sufficient air from reaching the dashboard vents while directing airflow toward another outlet. Check whether airflow changes normally when switching between dashboard, floor, and windshield ventilation modes.
5. An excessively restrictive replacement filter. Cabin air filters differ in filtration media, construction, and airflow resistance. A filter that is incompatible with the vehicle’s HVAC specifications may reduce airflow despite fitting inside the compartment. Compare the replacement filter’s application listing and specifications with the correct OEM part number. Higher filtration efficiency does not necessarily indicate excessive restriction, so filter compatibility and manufacturer specifications should guide the assessment.
The first troubleshooting step is to compare airflow at different blower speeds and ventilation modes. If airflow was normal before the filter replacement but became weak immediately afterward, inspect the newly installed filter, its orientation, and the access cover first. This timing suggests an installation-related issue, although it does not establish the cause without inspection.
If airflow remains weak with a correctly installed filter, check the accessible air intake and listen for abnormal blower operation. A blower that produces unusual grinding or rattling noises may have debris inside the fan housing or a mechanical problem. Avoid inserting tools into the blower assembly while the system is operating.
Weak airflow and poor cooling are different HVAC symptoms. Weak airflow means insufficient air is moving through the vents, while poor cooling means the delivered air is not reaching the expected temperature. A Lexus AC system that produces strong airflow but insufficient cooling may have a refrigerant, compressor, condenser, or temperature-control problem rather than a cabin air filter issue.
Professional HVAC diagnosis is appropriate when airflow remains restricted after basic filter and intake checks, the blower operates inconsistently, or unusual noises continue. A technician can inspect blower operation, electrical controls, internal air doors, and duct restrictions using the appropriate vehicle service procedures.
A properly installed Lexus cabin air filter should allow the HVAC system to deliver airflow consistent with its design and operating conditions. When replacing the filter does not resolve weak ventilation, identifying the actual airflow restriction is more effective than repeatedly installing new filters.