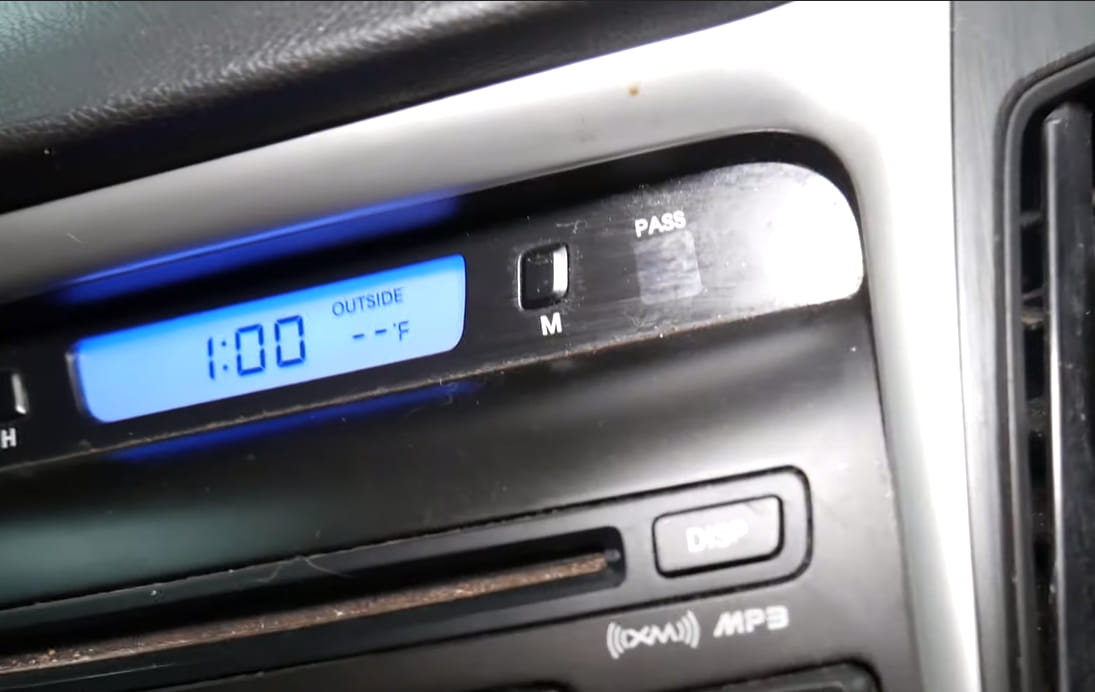
Concerned about your Hyundai outside temperature display not working?
It can be a real pain to deal with but you don’t have to worry about it any longer.
If you notice that the temperature gauge is glitchy, or perhaps it is not functioning at all, then you can most definitely have this issue addressed quickly.
Considering how important your temperature gauge is, consider these tips and some guidelines when it comes to fixing the temperature display for your peace of mind.
Contents
Hyundai Outside Temperature Display Not Working – What You Can Do
When it comes to a malfunctioning temperature display in your Hyundai vehicle, there are a few fixes that should fix it right up.
Here are some troubleshooting tips you can try including some steps you might want to try when you find yourself in a pickle.
1. Wear protection devices.
Not only is it messy to work on your car. It also involves dealing with surfaces that you have probably not cleaned before. Moreover, some dangerous materials such as hot liquids could land on your toes and skin. So, before you go ahead and work on your car, be sure to wear safety devices that will keep you away from danger.
These safety gear include mechanic gloves, eye protection, a mask to prevent you from inhaling harmful fumes, a long sleeve shirt to keep your arms protected, and goggles.
2. Get your workspace ready.
Once you have your protective devices, you can now organize your workspace and get it ready for work. Have your gear and tools ready so that everything is within your reach. You can do the work at your garage floor or the driveway.
Among the tools you will need are screwdrivers, light, wrenches, OBD2 scanner, pliers, and a bucket for draining the coolant. If your temperature gauge is broken, then you may need a new thermostat and temperature sensor. Some coolant may also be required for this job.
3. Check your coolant temperature sensor.
The most typical cause of a malfunctioning temperature display is a damaged coolant temperature sensor. It is found near your car’s thermostat close to the base of your radiator. When build up occurs, this component may fail.
Use your OBD2 scanner to see if this component provides you with live temperature readings. In case this does not happen, then you need to replace this part. Allow the coolant to cool down for about 15 to 20 minutes. You may need to jack up the car’s front end to give you better clearance.
4. Add more coolant.
Remove your radiator cap and drain your radiator as per your vehicle’s repair manual. Make sure that you disconnect the wiring connector of your temperature sensor.
Then, remove your temperature sensor and install a brand new one. Reconnect and keep the coolant plugs securely in place. Add coolant and put the cap on the reservoir.
At this point, you can now bring your car back down and start your engine. If the temperature gauge reads properly, you can conduct a test drive and observe the coolant level if it stays in place.
Once the level has not dropped, then it’s good to go. But you will need to refill it if the level has gone down.
5. Replacing your thermostat.
It is possible that you may need to replace the thermostat if it is showing signs of damage. This component manages the coolant flow from your radiator and to your engine. In some cases, it can get stuck either closed or open – and both are not ideal for your engine.
If the issue is with the thermostat, you should test it by taking it off and letting it sink in a bucket with hot water. When you notice that it opens, then you can conduct further work on it.
When the thermostat stays closed in near-boiling or very hot water, then there is damage to it, which means you need to replace it.ư
If replacement is needed, keep your coolant plugs secure and add some coolant and put the cap on the reservoir. Lower the car and start your engine. When the coolant level remains intact or you have refilled the coolant if the level dropped, then it is good to go.
Checking For Air In A Faulty Temperature Display
Your temperature gauge may not be working because air makes its way right into your radiator hose. Air tends to pool near the thermostat or the temperature sensor, which can lead to zero readings or faulty readings. Moreover, this can impact cooling efficiency.
So, if this is the problem, you should diagnose and fix this issue with air in the hoses.
Start by jacking up the front of your vehicle to help remove air. Then, start your car with your radiator cap removed.
The coolant should start to cycle through your engine. In case air is trapped, it will expel the air. Just let your car stay on idle for about 15 to 20 minutes until warm. When enough air is removed, put the radiator cap back and lower the car.
Conduct a test drive and check the coolant level. If it drops, add more coolant, and it should be good to go.
Additional Tips You Should Know
When you see a fluctuation or dip in the fuel economy, this may mean that your thermostat or temperature sensor are faulty. You may also notice that the check engine light turns on, which lets you know that something is wrong.
If you find yourself in this situation while stuck on the road side because of a radiator leak, some life hacks will come in handy if you don’t have the right tools available. In case you are close to a grocery store, you can plug this leak by pouring some egg white (uncooked) into your radiator filler hole. Avoid the yolk since this clogs up your heater core.
Do take note that this hack only works during an emergency and there is no mechanic in sight or you have no tools available.
When your car overheats, turn your heater on and open the windows. Your heater can help to remove heat from your engine.
Read More: Hyundai Clicking Noise Dash – What Causes This Problem?
Final Thoughts
When your Hyundai outside temperature display is not working, it can be concerning. After all, you rely on it to show you whether your engine is at the optimal temperature or not.
Consider these tips when dealing with a faulty temperature display, so you can avoid further problems.