The Hyundai Elantra Headlight Bulb Replacement is a common maintenance task for many car owners. It often becomes necessary when driving at night or in poor visibility conditions. A weak or failed headlight reduces safety and driving comfort. It also increases the risk of accidents on the road.
Many drivers notice problems like dim light, flickering, or a complete bulb failure. At that point, they often think a workshop repair is required. However, this is not always true. In most cases, you can replace the headlight bulb at home without advanced skills.
For Hyundai Elantra owners, this task is simple when you understand the basic system. Most bulb failures happen due to normal wear, heat, or aging components. Instead of paying high service fees, you can fix the issue yourself in a short time with basic tools.
This guide will help you complete the process step by step. You will learn how to identify the correct bulb type and prepare the right tools. You will also see how to install the new bulb safely and avoid common mistakes.
The goal of this guide is to make the Hyundai Elantra Headlight Bulb Replacement easy and clear. You can save money, improve safety, and gain more confidence in basic car maintenance.
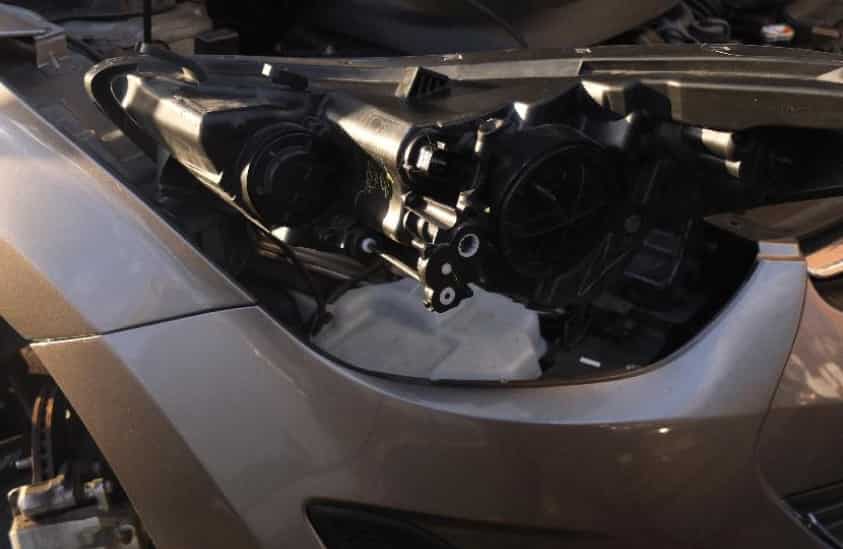
Understanding Your Hyundai Elantra Headlight System
The Hyundai Elantra uses a straightforward headlight system designed for efficiency and safety. Most models come with halogen bulbs in the standard trim, while newer or higher trims may use LED technology. Before you start any Hyundai Elantra Headlight Bulb Replacement, you need to understand which system your car uses. This step helps you avoid buying the wrong bulb and wasting time.
Halogen bulbs are the most common option. They produce light by heating a tungsten filament inside a glass bulb. These bulbs are affordable and easy to replace. However, they usually have a shorter lifespan compared to LED options. LED bulbs use a different technology. They create light through semiconductor diodes. They last longer and produce brighter light while consuming less energy.
The headlight assembly in the Hyundai Elantra includes the bulb, housing, wiring connector, and protective cover. Each part plays a role in keeping the light stable and safe. When one part fails, the entire system can appear to malfunction. For example, a loose connector may cause flickering even if the bulb is still in good condition.
Most Hyundai Elantra models use common bulb sizes such as H11 or H7 depending on the production year. You should always check your vehicle manual or existing bulb before purchasing a replacement. Installing the wrong type will not only prevent proper lighting but can also damage the socket.
Many car owners make the mistake of skipping this identification step. As a result, they face installation issues or poor lighting performance. Taking a few minutes to confirm the correct bulb type will make the entire replacement process much smoother and safer.
Tools You Need for Headlight Bulb Replacement
Before starting the Hyundai Elantra Headlight Bulb Replacement, you should prepare all necessary tools. Proper preparation helps you work faster and avoid mistakes during installation. It also reduces the risk of damaging the headlight housing or electrical connectors.
In most cases, you only need a few basic tools. A screwdriver set is often required to remove small screws or access panels around the headlight area. Some Hyundai Elantra models allow direct access without removing major parts, but having a screwdriver still helps in tight spaces.
You should also prepare a pair of gloves. Gloves protect your hands from heat and dirt inside the engine bay. They also prevent skin oils from touching the new bulb. This is important because oil from your fingers can shorten the lifespan of halogen bulbs and affect performance.
A clean cloth is another useful item. You can use it to handle the bulb safely or clean the surrounding area before installation. Keeping the surface clean helps ensure a stable connection and reduces the chance of dust entering the headlight housing.
Of course, the most important item is the replacement bulb. You must choose the correct type that matches your Hyundai Elantra model. Using the wrong bulb can cause poor lighting or installation failure. Always double check the specifications before buying.
Some drivers also keep a small flashlight ready. It helps when working in low light conditions inside the engine bay. This makes it easier to see connectors and alignment points clearly.
Preparing these tools in advance makes the entire replacement process smoother. It also helps you stay focused and complete the job without unnecessary interruptions.
Step-by-Step Hyundai Elantra Headlight Bulb Replacement Process
This section shows you how to complete the Hyundai Elantra Headlight Bulb Replacement step by step. Follow each step carefully to avoid mistakes and ensure safe installation.
Step 1: Turn off the engine and disconnect the battery
Start by turning off your vehicle completely. Remove the key from the ignition. Open the hood and disconnect the negative battery terminal. This step protects you from electric shock and prevents short circuits while working on the headlight system.
Step 2: Open the hood and locate the headlight assembly
Move to the front of your Hyundai Elantra. Open the hood fully and secure it. Locate the headlight assembly behind the front section of the engine bay. You will see the back side of the headlight unit with wiring connectors and a protective cover.
Step 3: Remove the dust cover
Find the rubber or plastic dust cover at the back of the headlight. Gently twist or pull it depending on the model. Set it aside in a clean place. This cover protects the bulb from dust and moisture, so avoid damaging it.
Step 4: Disconnect the bulb connector
Carefully unplug the wiring connector from the old bulb. Hold the connector, not the wires, to avoid damage. If it feels tight, gently wiggle it until it releases.
Step 5: Remove the old bulb
Unlock the bulb by rotating it or releasing the metal clip, depending on your Elantra model. Pull the bulb straight out. Avoid applying force because the glass can break easily. Dispose of the old bulb properly.
Step 6: Install the new bulb
Take the new bulb and avoid touching the glass surface with your fingers. Insert it into the socket in the correct position. Lock it in place by twisting or securing the clip. Make sure it sits firmly and evenly.
Step 7: Reconnect the wiring
Plug the connector back into the new bulb. Ensure it fits tightly. A loose connection can cause flickering or failure.
Step 8: Test the headlight
Reconnect the battery terminal. Turn on your headlights and check if the new bulb works properly. Test both low beam and high beam if available. Make sure the light is stable and bright.
Step 9: Reassemble the cover
Once everything works correctly, reinstall the dust cover. Close the hood carefully. Ensure all parts are secure before driving.
Important note
Do not rush the process. Small mistakes like touching the bulb glass or loose connectors can reduce performance or damage the system.
Can You Replace the Bulb Without Removing the Bumper?
Many Hyundai Elantra owners worry that they need to remove the front bumper to complete a headlight bulb replacement. In most cases, this is not necessary. The design of the Hyundai Elantra allows rear access to the headlight assembly in many model years. This makes the Hyundai Elantra Headlight Bulb Replacement much easier for DIY users.
In standard situations, you can reach the bulb from the engine bay. You only need to open the hood and access the back of the headlight unit. This rear access design saves time and reduces the complexity of the job. It also allows most drivers to complete the replacement without professional help.
However, some Elantra models or aftermarket modifications may limit access space. In these cases, you might feel that removing the bumper is required. This usually happens when the engine bay is tight or when additional components block the rear headlight area. Even then, bumper removal is a last resort, not a standard requirement.
If access is limited, you should first check if other components can be gently moved aside. Air intake parts or plastic covers sometimes block the working space. Adjusting these parts carefully can create enough room to reach the bulb without full disassembly.
Avoid removing the bumper unless you are experienced. Bumper removal increases the risk of clips breaking or misalignment during reassembly. It also adds unnecessary time to a simple maintenance task.
For most Hyundai Elantra owners, rear access is enough to complete the job. This makes the replacement process faster, safer, and more practical for everyday DIY maintenance.
Common Mistakes During Hyundai Elantra Headlight Bulb Replacement
Many people think the Hyundai Elantra Headlight Bulb Replacement is simple, but small mistakes can still cause serious problems. These errors often lead to poor lighting performance, shorter bulb lifespan, or even damage to the headlight system. Understanding these mistakes helps you complete the job safely and correctly.
One of the most common mistakes is touching the glass part of the bulb with bare hands. Oil and dirt from your skin can create hot spots on halogen bulbs. This reduces bulb lifespan and may cause early failure. Always handle the bulb by its base or wear clean gloves during installation.
Another frequent issue is choosing the wrong bulb type. Many Hyundai Elantra owners buy bulbs without checking the exact specification. This leads to compatibility problems and poor lighting performance. Always confirm the correct bulb size before purchasing to avoid unnecessary rework.
Loose or incorrect electrical connections are also a common problem. Some users do not fully secure the connector after installation. This can cause flickering lights or complete failure while driving. Always ensure the connector clicks firmly into place.
Some people also skip testing the headlight before closing the hood. This is a critical step. If something is wrong, you will need to reopen everything again, which wastes time and effort. Always test both low beam and high beam immediately after installation.
Another mistake is rushing the process. Forcing parts or skipping steps can damage clips, wiring, or the bulb socket. A careful and slow approach always gives better results.
Avoiding these mistakes makes the Hyundai Elantra Headlight Bulb Replacement safer, faster, and more reliable. It also helps ensure your headlights perform at their best in all driving conditions.
Testing and Adjusting Your New Headlight
After completing the Hyundai Elantra Headlight Bulb Replacement, you need to test and adjust the new headlight. This step ensures the light works correctly and provides safe visibility while driving at night or in poor weather conditions.
Start by turning on your headlights while the car is parked on a flat surface. Check both low beam and high beam if your vehicle supports it. The light should turn on instantly without flickering. If you notice dim light or instability, recheck the bulb connection before moving forward.
Next, observe the beam pattern on a wall or garage door. Park the car a few meters away and look at how the light spreads. A proper beam should be even and aligned. It should not point too high or too low. Incorrect alignment can reduce visibility or blind other drivers on the road.
If the beam is not aligned properly, adjust the headlight angle using the adjustment screws located near the headlight assembly. Turn them slowly and check the result after each small adjustment. This helps you achieve the correct balance without overcorrecting.
You should also test the lights in real driving conditions at night if possible. Drive in a safe area and check how far the light reaches. Make sure the road is clearly visible and there are no dark spots or uneven brightness.
Proper testing and adjustment are important because even a correctly installed bulb can perform poorly if the alignment is wrong. Taking a few extra minutes here improves safety and ensures the Hyundai Elantra Headlight Bulb Replacement delivers the best possible result.
Maintenance Tips to Extend Bulb Lifespan
After completing the Hyundai Elantra Headlight Bulb Replacement, proper maintenance plays an important role in keeping your headlights working longer. Many bulbs fail early not because of manufacturing issues, but because of poor usage habits or lack of care.
One important tip is to avoid moisture inside the headlight housing. Water or condensation can damage the bulb and electrical components over time. Always check the headlight seal and dust cover after installation. If you notice fog or moisture inside, you should fix the sealing issue as soon as possible.
Another key practice is to inspect your headlights regularly. A quick visual check once a month helps you detect early signs of dimming, flickering, or discoloration. Early detection allows you to fix problems before they become serious.
You should also use high quality bulbs from reliable brands. Cheap or low quality bulbs often have shorter lifespans and unstable performance. Investing in a good bulb reduces replacement frequency and improves driving safety.
It is also important to avoid turning headlights on and off repeatedly within a short time. Frequent switching can put stress on the bulb filament or LED driver, depending on your system type. Keeping stable usage helps extend bulb life.
Finally, make sure your vehicle’s electrical system is in good condition. Voltage fluctuations can shorten bulb lifespan. If you notice repeated bulb failures, it may be a sign of an underlying electrical issue that needs inspection.
Good maintenance habits ensure your Hyundai Elantra Headlight Bulb Replacement lasts longer and performs consistently. This not only saves money but also improves safety during night driving.
Conclusion
The Hyundai Elantra Headlight Bulb Replacement is a simple but important maintenance task that every car owner should understand. A properly working headlight system improves visibility, increases safety, and ensures a more comfortable driving experience at night or in low light conditions.
By following the steps in this guide, you can complete the replacement process at home without professional assistance. You only need basic tools, the correct bulb type, and a careful step by step approach. This helps you save money and reduce unnecessary workshop visits while still maintaining your vehicle in good condition.
Throughout this guide, you learned how to identify the correct headlight system, prepare essential tools, replace the bulb safely, and avoid common mistakes. You also learned how to test and adjust the headlight for proper alignment and how to maintain it for longer lifespan. These steps are designed to help you achieve stable performance and reliable lighting after every replacement.
Consistent maintenance and correct installation habits will ensure your Hyundai Elantra continues to perform well on the road. If you notice early signs of bulb failure, it is always better to replace it immediately rather than waiting for complete failure.
With the right knowledge and careful execution, the Hyundai Elantra Headlight Bulb Replacement becomes a quick and manageable task for any car owner.