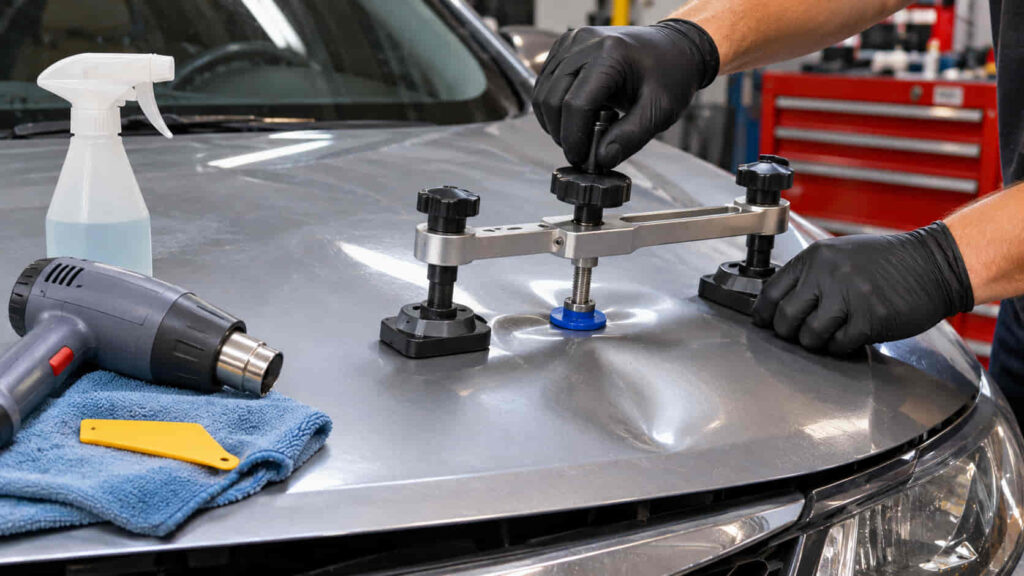
To repair a dent in a car hood, first inspect its depth, shape, paint condition, and location. Small, shallow dents with intact paint can sometimes be repaired using a suction cup dent puller or a glue pulling kit, while sharp creases, cracked paint, and damaged hood reinforcements generally require professional repair. The appropriate method depends on how the metal has deformed and whether the affected area can be repaired without damaging the hood’s structure or finish.
A car hood consists of an outer metal panel supported by internal reinforcements. Most vehicle hoods are made from steel or aluminum, and each material responds differently to dent removal techniques. For example, a shallow, rounded dent in an accessible section of the hood is a better candidate for DIY repair than a sharp crease near the hood’s edge. Applying excessive pulling force can create raised spots, damage the paint, or increase the cost of subsequent repairs.
This guide explains how to assess hood damage, select the appropriate dent removal tools, and repair suitable dents using suction and glue pulling methods. It also covers professional paintless dent repair, damaged paint, repair costs, and the conditions that make hood replacement necessary.
What Are the Best LoJack Alternatives in 2026?
The seven best LoJack alternatives in 2026 are CarLock, OnStar, Bouncie, Spytec GPS, LandAirSea 54, Tracki Pro, and BrickHouse Livewire Pro. These systems provide different levels of vehicle security through GPS tracking, unauthorized movement alerts, location history, and stolen vehicle recovery assistance. CarLock is particularly suitable for theft detection, OnStar offers direct coordination with law enforcement for eligible vehicles, and Bouncie combines vehicle location tracking with driving diagnostics. Spytec GPS and BrickHouse Livewire Pro provide vehicle-powered tracking options, while LandAirSea 54 and Tracki Pro offer portable, rechargeable devices. Their differences in recovery services, power sources, and subscriptions determine which alternative best meets an owner’s needs.
CarLock is a strong LoJack alternative for drivers who prioritize early theft detection and immediate security notifications. The system connects to a compatible vehicle’s OBD-II port and uses GPS positioning, cellular connectivity, and motion sensors to monitor suspicious activity. CarLock sends smartphone alerts when the engine starts, the vehicle moves beyond its monitored area, unusual vibrations occur, or the tracking device is disconnected. For example, a driver can receive a movement notification if a parked vehicle is towed without authorization. Unlike a managed stolen vehicle recovery service, however, CarLock notifies the owner rather than automatically contacting law enforcement. Its tracking services also require an active subscription.
OnStar is one of the closest LoJack alternatives for owners who need professional assistance recovering a stolen vehicle. Available on eligible General Motors vehicles with qualifying services, OnStar connects vehicle location technology with trained advisors who cooperate with law enforcement. After the owner reports a theft to the police, OnStar can provide vehicle location information directly to authorized officers. Eligible vehicles may also support Remote Ignition Block, which prevents an engine from restarting after being turned off, or Stolen Vehicle Slowdown when authorities determine conditions are appropriate. Unlike standalone GPS trackers, OnStar does not provide stolen vehicle location information directly to owners during the recovery process. Its primary limitation is vehicle and service eligibility.
Bouncie is a practical LoJack alternative for drivers who want GPS tracking combined with everyday vehicle monitoring. Its compact device connects directly to the OBD-II diagnostic port of most compatible vehicles manufactured from 1996 onward. Bouncie records vehicle location, trip history, driving behavior, and diagnostic information through a smartphone application. Owners can monitor vehicle movements and receive notifications related to driving activity or defined geographic areas. For example, a family can review a vehicle’s travel history while also monitoring engine-related diagnostic codes. Although location information may assist authorities after a theft, Bouncie does not provide the same dedicated law enforcement recovery service as OnStar. The device requires a monthly subscription.
Spytec GPS is a versatile LoJack alternative for vehicle owners who want flexible installation and frequent location updates. Its vehicle tracking range includes plug-in OBD devices and hardwired tracking systems. The OBD version supports location reporting as frequently as once per second, while compatible wired devices offer configurable updates and vehicle-powered operation. Spytec’s tracking platform includes geofencing, driving behavior monitoring, and alerts for events such as device tampering or movement beyond designated boundaries. A hardwired tracker suits owners who prefer a permanent installation rather than a removable OBD device. However, reporting performance depends on cellular connectivity, and continued access to tracking functions requires a paid service plan.
LandAirSea 54 is a suitable LoJack alternative for drivers who prefer a portable GPS tracker without permanent vehicle installation. The compact device includes a built-in magnet, an IP67-rated enclosure, and 4G cellular connectivity. Owners can monitor location through the SilverCloud platform, review historical movements, and configure geofencing alerts. Its rechargeable battery supports approximately one to three weeks of operation under certain active tracking settings, while low-power operation can extend battery life substantially. Actual endurance depends on reporting frequency, signal conditions, and environmental factors. For example, a driver monitoring a vehicle daily must recharge the device more frequently than someone using less frequent location updates. A subscription is required for tracking.
Tracki Pro is a LoJack alternative designed for long-duration tracking without connecting directly to a vehicle’s electrical system. The device combines a 10,000 mAh rechargeable battery, 4G connectivity, a waterproof enclosure, and magnetic mounting accessories. According to the manufacturer, battery operation ranges from approximately two to twelve months depending on tracking settings and network conditions. This makes Tracki Pro relevant for vehicles, trailers, and other assets that remain parked for extended periods. Location reporting intervals vary by subscription plan, and frequent updates consume more battery power. Tracki Pro supplies location information and alerts but does not offer an equivalent managed police recovery service.
BrickHouse Livewire Pro is a LoJack alternative for owners who prefer a permanently powered GPS tracking system. Unlike rechargeable portable trackers, Livewire Pro connects to the vehicle’s electrical supply and supports ongoing location monitoring without routine charging. The device provides geofencing, location history, speed notifications, and reporting through the BrickHouse tracking platform. A small internal backup battery offers limited operation when external power is interrupted. Its hardwired configuration is particularly relevant for commercial vehicles and owners who want an installed tracking device rather than a removable plug-in unit. However, installation is more involved than connecting an OBD tracker, and continued monitoring requires a subscription.
The best LoJack replacement ultimately depends on whether the owner prioritizes theft alerts, vehicle recovery assistance, monitoring functions, or installation flexibility. OnStar offers a recovery service involving law enforcement for eligible GM vehicles, while CarLock emphasizes unauthorized activity detection. Bouncie supports broader vehicle monitoring, Spytec GPS and BrickHouse Livewire Pro suit vehicle-powered tracking needs, and LandAirSea 54 and Tracki Pro provide portable alternatives. None of these systems guarantees vehicle recovery, making their actual capabilities more important than the presence of GPS tracking alone.
Can You Repair a Dent in a Car Hood at Home?
You can repair a dent in a car hood at home if the damage is shallow, the paint remains intact, and the affected metal has not developed a sharp crease. Suitable dents can sometimes be removed with a suction cup puller or a glue pulling kit without sanding, applying body filler, or repainting the hood. However, successful removal depends on the dent’s shape, location, panel material, and the amount of metal deformation.
Shallow, rounded dents are generally better candidates for DIY repair because the metal has a smoother deformation that may respond to controlled outward pressure. For example, a small dent caused by a lightweight object falling onto the center of a hood may be easier to correct than a sharp crease near its edge. Dents located over internal reinforcement panels are also more difficult to repair because access and panel movement are restricted.
Professional repair is the safer option when a hood has cracked paint, stretched metal, sharp folds, or damage near its hinges or latch. These conditions may require specialized paintless dent repair techniques, conventional bodywork, or hood replacement. Attempting to force severely deformed metal back into position can create raised areas, damage the existing finish, and increase the complexity of the repair.
How Do You Inspect a Dent in a Car Hood Before Repairing It?
To inspect a dent in a car hood, examine its size, depth, shape, paint condition, and location before selecting a repair method. These characteristics determine whether the damage is primarily cosmetic or involves components that require professional attention. A careful inspection also prevents unnecessary pulling on dents that cannot be corrected safely with basic DIY tools.
Start by cleaning the affected area and examining it under bright, angled lighting. Reflections across the hood reveal changes in the metal’s contour, including shallow depressions, sharp creases, and raised edges around the dent. View the damaged area from several angles to identify its boundaries. A smooth, rounded depression indicates a different deformation pattern from a narrow crease with sharply defined edges. The latter concentrates deformation into a smaller area and is generally harder to restore without specialized techniques.
Next, inspect the paint and clear coat for chips, cracks, peeling, or exposed metal. Even small fractures matter because paintless dent repair restores the panel’s shape without replacing its protective coating. A magnifying glass can help identify fine cracks that are difficult to see under normal lighting. If the paint is damaged, pulling the dent outward will not restore the original finish, and additional refinishing may be necessary.
Finally, examine the dent’s position relative to the hood’s internal reinforcement, hinges, and latch assembly. Open the hood only if it operates normally, and inspect the underside without removing or modifying structural components. Check for uneven gaps between the hood and adjacent fenders, visible deformation around mounting points, or abnormal latch operation. A hood that does not close and latch securely requires professional inspection before the vehicle is driven.
Read more: Caterpillar 3126 Engine Specs
What Tools Do You Need to Repair a Dent in a Car Hood?
The tools needed to repair a dent in a car hood include a suction cup dent puller, a glue pulling kit, a reflection light, and cleaning supplies. The appropriate equipment depends on the dent’s size, depth, location, and the condition of the paint. Shallow dents with smooth surfaces may respond to basic pulling tools, while sharp creases and complex metal deformation require specialized paintless dent repair equipment.
A suction cup dent puller uses negative pressure to grip the hood’s exterior surface and apply outward force to the depressed metal. This tool works best on broad, shallow dents with enough smooth surface area to maintain a secure seal. A glue pulling kit uses adhesive tabs attached to the painted surface, allowing controlled pulling force to be applied to specific areas of a dent. Glue pulling offers more flexibility when the dent’s shape prevents a suction cup from making sufficient contact, but it carries a risk of paint damage, particularly on repainted or deteriorated surfaces.
A reflection light or LED dent inspection board helps identify surface distortions before, during, and after the repair. Straight reflection lines appear curved or interrupted when the metal contains low spots or raised areas. For example, a hood that appears smooth under overhead lighting may still show a shallow depression when viewed against a reflection board. A microfiber cloth and automotive-safe cleaning solution are also necessary to remove dirt, grease, and other contaminants that interfere with tool contact.
Professional paintless dent repair technicians use additional equipment, including PDR rods, specialized tips, and knockdown tools. These tools allow precise manipulation of the metal from behind the panel and controlled correction of raised spots. However, using them correctly requires knowledge of panel construction, metal movement, and the location of internal reinforcements. Beginners should select tools appropriate for accessible cosmetic dents rather than attempting complex repairs with professional equipment.
How Do You Remove a Dent From a Car Hood With a Suction Cup Puller?
To remove a dent from a car hood with a suction cup puller, clean the damaged surface, position the suction cup over a suitable shallow dent, establish a secure seal, and apply gradual outward pulling force. This method works by creating negative pressure between the suction cup and the hood, allowing the tool to grip the metal without drilling holes or removing the paint. Its effectiveness depends on the dent’s geometry, the strength of the suction seal, and the flexibility of the affected panel.
Begin by parking the vehicle on a level surface, switching off the engine, and allowing the hood to cool. Clean the damaged area with an automotive-safe cleaner and a microfiber cloth to remove dust, grease, and debris. A clean surface helps the suction cup form a consistent seal and reduces the chance of scratching the paint. Inspect the dent under angled lighting to identify its lowest point and determine whether the cup can contact a sufficiently smooth section of the panel. A broad, rounded dent is more suitable for suction pulling than a narrow crease or a dent crossing a sharp body line.
Place the suction cup against the damaged surface according to the tool manufacturer’s instructions. Position it so the pulling force acts on the depressed area without putting excessive pressure on surrounding undamaged metal. Activate the suction mechanism and confirm that the cup is firmly attached before pulling. Apply steady, controlled outward force rather than sudden jerks, which can cause the tool to detach or produce uneven deformation. For example, a shallow dent near the center of an unobstructed hood panel may respond to a gradual pull, while a dent near a reinforced edge may remain unchanged because the surrounding metal restricts movement.
After releasing the suction cup, inspect the repaired area from several angles using natural light or a reflection board. Check whether the original depression has decreased and whether raised spots have formed around its edges. A remaining shallow depression does not automatically justify stronger pulling force. Repeated aggressive attempts can distort the surrounding panel and make professional repair more difficult.
Suction cup dent pullers are less effective on sharp creases, deeply stretched metal, irregular surfaces, and dents located near reinforced sections of the hood. The cup may also fail to maintain suction on strongly curved surfaces, preventing sufficient force from reaching the damaged area. Stop the repair if the tool repeatedly slips, the metal develops raised areas, or the paint shows signs of damage. These conditions indicate that a different repair technique or professional assessment is necessary.
How Do You Fix a Car Hood Dent With a Glue Pulling Kit?
To fix a car hood dent with a glue pulling kit, attach an adhesive pulling tab to the depressed metal, allow the glue to set, and use a dent lifter to gradually restore the panel’s shape. This method is suitable for certain shallow dents with intact paint, particularly when the damaged area cannot maintain the seal required for a suction cup puller. Glue pulling applies concentrated outward force to the dent through an adhesive connection, allowing the metal to move without drilling holes or accessing the underside of the hood.
Begin by inspecting the paint for cracks, chips, peeling, or evidence of previous refinishing. Glue pulling places tension directly on the painted surface, making damaged or repainted finishes more vulnerable to peeling. Clean the repair area with an automotive-safe cleaner and remove any wax, grease, or dirt that could interfere with adhesion. The hood should be dry and within the temperature range specified by the repair kit manufacturer. Avoid working on an excessively hot hood because surface temperature affects adhesive performance and paint safety.
Select a pulling tab that matches the dent’s shape and fits within the depressed area. A tab that is too large can distribute force across the surrounding undamaged metal, while a poorly positioned tab may lift one section unevenly. Apply the recommended PDR adhesive to the tab using the kit’s glue gun, then position it over the intended pulling point. Allow the adhesive to set according to the manufacturer’s instructions before attaching the pulling tool. Using the specified adhesive and setting time helps establish a predictable connection between the tab and the painted surface.
Once the adhesive has set, connect the dent lifter and apply gradual outward pressure while monitoring the panel’s movement. Controlled pulling allows the depressed metal to rise without placing unnecessary force on the surrounding surface. For example, a shallow dent near the center of a steel hood may respond to a series of gentle, accurately positioned pulls. Excessive force can create a raised spot where the metal extends above its original contour, requiring additional correction. Release the pulling tab using the adhesive removal method recommended by the kit manufacturer, then inspect the surface under angled lighting before considering another pull.
Stop the repair if the paint begins to lift, the metal develops sharp raised areas, or repeated controlled pulls fail to improve the dent. Glue pulling cannot reliably correct every deep crease, stretched panel, or dent near a reinforced hood edge. These conditions require professional assessment because further pulling can increase deformation or damage the finish. A successful glue pulling repair should restore a more uniform hood contour while preserving the existing paint and avoiding additional damage.
How Does Paintless Dent Repair Fix a Car Hood Dent From Behind?
Paintless Dent Repair (PDR) fixes a car hood dent by applying controlled pressure to the underside of the damaged metal until the panel returns to its original contour. Professional technicians use specialized PDR rods, precision tips, and reflection lights to reshape the hood without removing the factory paint. This technique is most effective when the paint remains intact, the metal has not been excessively stretched, and the damaged area can be accessed safely.
The repair begins with an inspection of the hood’s internal structure to identify an appropriate access point. Technicians may remove the hood insulation or other non-structural components when permitted by the vehicle manufacturer. A PDR rod is then positioned behind the dent to apply small, controlled movements to the depressed metal. Rather than pushing the entire dent outward in one motion, the technician gradually corrects individual low spots while monitoring the surrounding panel. Drilling new access holes or removing structural reinforcements is not an acceptable way to perform PDR.
A reflection light helps the technician identify subtle changes in the hood’s contour throughout the repair. Distorted reflection lines reveal remaining depressions and raised areas that require further adjustment. For example, a shallow hail dent on an accessible section of a hood may be corrected through repeated, precisely positioned movements without repainting. However, sharp creases, inaccessible sections, and cracked paint can prevent successful paintless repair.
PDR also requires attention to the protective coating on the underside of the hood. Contact from repair tools can scratch the original corrosion-resistant coating even when the exterior paint remains undamaged. Restoring disturbed corrosion protection according to manufacturer procedures helps prevent future deterioration and ensures the repair addresses more than the visible surface.
How Do You Repair a Car Hood Dent With Damaged Paint?
To repair a car hood dent with damaged paint, the deformed metal must be repaired using an approved method before the affected surface is prepared and refinished. Cracked, chipped, or peeling paint prevents a paintless-only repair from fully restoring the hood because reshaping the metal does not repair the protective coating. Conventional body repair addresses both the dent and the damaged finish, making it more appropriate when the surface requires repainting.
The repair begins with evaluating the depth of the dent, the extent of the paint damage, and the condition of the underlying metal. A technician determines whether the panel can be restored within the vehicle manufacturer’s repair limits. Approved metalworking techniques are then used to correct the deformation. Where permitted, a thin application of automotive body filler may be used to finish minor surface irregularities after the metal has been properly shaped. Body filler does not replace structural repairs or correct damage to the hood’s reinforcements.
After the panel’s contour has been restored, the damaged finish is prepared for refinishing. This process involves removing compromised coating material, preparing the substrate, applying suitable primer, and restoring the color coat and clear coat according to the paint manufacturer’s specifications. Proper surface preparation supports coating adhesion, while compatible refinishing materials help protect exposed metal against corrosion.
For example, a hood dent caused by a falling object may leave a shallow depression surrounded by cracked clear coat and chipped paint. Even if the metal can be reshaped successfully, the damaged coating still requires attention. A professional body shop can evaluate whether localized refinishing is appropriate or whether a larger refinishing area is necessary to achieve a consistent appearance. Severe deformation, damaged reinforcements, or compromised hood mounting points may require replacement instead of conventional dent repair.
How Do You Check Whether a Car Hood Dent Has Been Repaired Correctly?
To check whether a car hood dent has been repaired correctly, examine the panel’s surface contour, paint condition, alignment, and latch operation. A successful repair should restore the hood’s original shape without creating raised spots, damaging the protective coating, or affecting the hood’s ability to close securely. Visual improvement alone does not confirm that the repair is complete, particularly when the dent is close to a reinforced section or mounting point.
Inspect the repaired area under bright, angled lighting or with an LED reflection board. Straight reflection lines should follow the hood’s natural curvature without noticeable distortion around the repaired section. Examine the surface from several viewing angles because shallow depressions and raised spots may remain invisible under direct overhead lighting. For example, a dent that appears completely removed when viewed from above may still produce uneven reflections when examined from the side.
Next, inspect the paint and clear coat for scratches, cracks, peeling, or discoloration caused during the repair. Pay particular attention to areas where adhesive tabs or pulling tools contacted the surface. If the repair involved access behind the panel, the underside should also be checked for damaged corrosion-resistant coatings. Paintless dent repair tools can disturb these coatings without leaving visible damage on the exterior, making appropriate corrosion protection an important part of the completed repair.
Finally, check the hood’s alignment with the surrounding fenders and confirm that its primary and secondary latches function correctly. Uneven panel gaps, abnormal closing resistance, or an insecure latch indicate problems that require professional inspection. Do not drive the vehicle if the hood cannot be secured reliably.
Does Hood Material Affect How a Car Dent Should Be Repaired?
Hood material affects dent repair because steel and aluminum have different mechanical properties, deformation characteristics, and manufacturer-specified repair limitations. Both materials can be repaired using paintless dent repair techniques under suitable conditions, but the appropriate method depends on the metal grade, panel construction, dent severity, and vehicle manufacturer’s repair procedures. Identifying the hood material before attempting a repair helps prevent unnecessary deformation and damage.
Steel hoods can often be repaired using controlled pulling or approved metalworking techniques when the damage is limited to the outer panel. The repair process depends on the steel grade and the extent of deformation. For example, a shallow dent in an accessible mild-steel hood panel may respond to paintless dent repair, while a sharp crease in a high-strength steel section may fall outside the manufacturer’s permitted repair limits. Applying excessive force can stretch the metal, create raised areas, or compromise the panel’s intended shape.
Aluminum hoods require particular attention to the degree of deformation and the repair method. Aluminum alloys can behave differently from steel during straightening, and excessive manipulation may lead to cracking or additional material damage. A shallow dent in an aluminum hood may still qualify for professional PDR when the paint and panel condition permit it. However, sharp folds, severely stretched areas, or damage near bonded reinforcements may require specialized repair procedures or panel replacement.
Heating a damaged hood to make the metal easier to reshape should not be attempted without an approved manufacturer procedure. Temperature restrictions vary by material and vehicle design, and uncontrolled heating can affect coatings, adhesives, and surrounding components. Before repairing a steel or aluminum hood, consult the vehicle-specific repair information to determine whether straightening is permitted and which techniques are acceptable.
How Much Does It Cost to Repair a Dent in a Car Hood?
Repairing a dent in a car hood can cost approximately $75 to $450 for minor or moderate paintless repairs in some U.S. markets, while complex damage and repairs requiring repainting can cost considerably more. The final price depends on the dent’s size, depth, location, hood material, paint condition, and the labor required to restore the panel. For example, a paintless dent repair specialist in Plano, Texas, lists approximately $75–$200 for small dents and $150–$450 for medium-sized dents in its 2026 pricing guide. These are local estimates rather than fixed prices for every hood repair.
Professional Paintless Dent Repair (PDR) generally costs less than conventional body repair when the original paint remains intact. PDR avoids the sanding, priming, color matching, and refinishing labor associated with traditional repairs. However, a deep dent near a hood reinforcement may require additional technician time or specialized access, increasing the price even if the visible damage appears small. Aluminum panels and sharp creases can also require more complex repair procedures.
DIY hood dent repair eliminates professional labor charges but introduces the cost of purchasing suitable tools and the risk of additional damage. A suction cup puller or glue pulling kit may be economical for a simple, shallow dent, provided the repair is successful without damaging the paint. Excessive pulling, adhesive-related paint removal, or panel distortion can turn a minor cosmetic repair into a more expensive bodywork job.
The most reliable way to determine the repair cost is to obtain an estimate based on the actual damage. A technician should assess the hood’s construction, paint condition, dent accessibility, and required repair method before providing a final quotation.
When Should You Replace a Car Hood Instead of Repairing It?
A car hood should be replaced instead of repaired when damage compromises its structural integrity, designed collapse zones, hinge mounting areas, or striker mounting areas, subject to the vehicle manufacturer’s repair requirements. Replacement may also be the more practical option when severe deformation makes an approved, durable repair uneconomical. A hood must maintain its intended shape and secure attachment, not merely appear undamaged from the outside.
Car hoods incorporate reinforcement structures and controlled deformation areas designed to influence how the panel behaves during a collision. Damage to these areas can affect the hood’s safety performance even when the exterior dent appears repairable. According to I-CAR collision repair guidance, damage to hood collapse zones generally requires replacement unless the vehicle manufacturer specifies otherwise. Damage to the hood’s hinge or striker mounting areas also requires replacement because these components influence secure hood operation and vehicle safety.
Severe creases, torn metal, damaged bonded reinforcements, and extensive stretching can also make hood replacement necessary. For example, a hood that has folded during a frontal collision may have permanent deformation extending beyond its visible outer surface. Straightening the exterior panel does not necessarily restore the original reinforcement geometry or its intended performance.
The repair-versus-replacement decision must also account for total cost. Conventional repair may require extensive metalwork, refinishing, corrosion protection, and labor, while replacement involves purchasing a suitable panel, fitting it correctly, and completing any necessary painting and alignment. A qualified body shop should compare these requirements against the manufacturer’s repair procedures before recommending either option. If the hood cannot latch securely, the vehicle should not be driven until the problem is corrected.
Do Hot Water or Hair Dryer Methods Work on Car Hood Dents?
Hot water and hair dryer methods are not reliable ways to remove dents from a metal car hood. Pouring boiling water over a dent or heating it with a household hair dryer does not provide the controlled force needed to restore deformed steel or aluminum. Although heat causes metal to expand, thermal expansion alone does not reliably reverse a dent, particularly when the panel contains sharp creases or stretched metal.
Some DIY techniques combine heating with pushing or pulling, but the mechanical force is responsible for reshaping the panel. Applying excessive heat can damage automotive paint, affect adhesives, or harm insulation beneath the hood. Rapid cooling after heating is also not a dependable substitute for an approved metal repair procedure.
Professional technicians sometimes use controlled heating to assist metal straightening, but only when permitted by the vehicle manufacturer. For shallow dents with intact paint, suitable suction or glue pulling techniques provide more controlled repair options. Deep creases, damaged paint, and complex panel deformation require professional assessment rather than experimental heating methods.