The NOCO Boost HD GB70 is a 2000-amp portable lithium jump starter designed to start vehicles with 12-volt lead-acid batteries, including cars, trucks, SUVs, and motorcycles. To use the NOCO Boost HD GB70, make sure the jump starter is charged, turn off the vehicle, connect the red clamp to the positive (+) battery terminal, and attach the black clamp to the negative (−) terminal or a manufacturer-approved grounding point. Once the GB70 indicates it is ready, start the engine and disconnect the clamps safely.
The NOCO GB70 supports gasoline engines up to 8.0 liters and diesel engines up to 6.0 liters. Its spark-proof technology and reverse polarity protection help reduce connection risks during normal operation. The device also includes a Manual Override mode for severely discharged batteries that cannot be detected automatically. However, this mode disables certain safety protections and requires careful verification of clamp polarity before activation.
This guide explains how to use the NOCO Boost HD GB70 step by step, including battery preparation, clamp connections, engine starting, Manual Override, and LED indicator meanings. It also covers common jump-starting problems, charging procedures, USB power output, flashlight operation, and maintenance practices to keep the device ready for roadside emergencies.
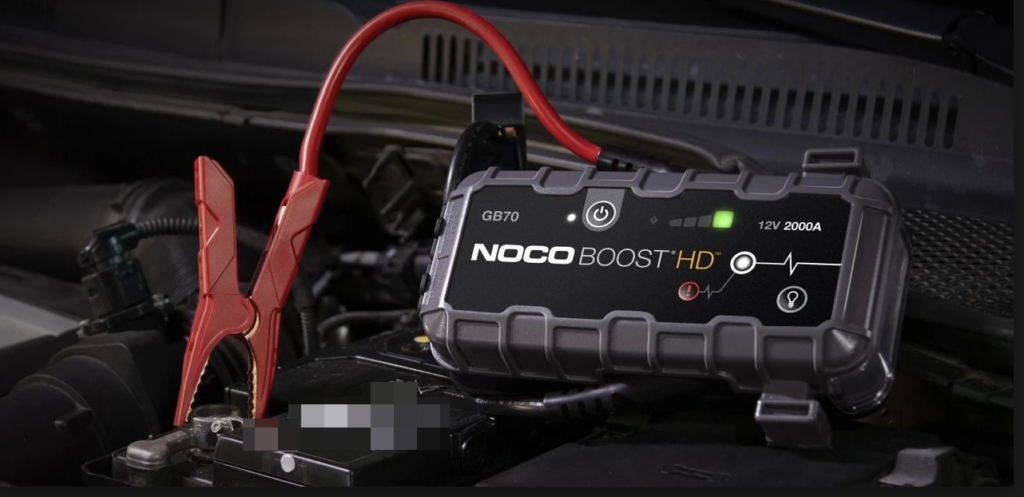
How Do You Use the NOCO Boost HD GB70 to Jump-Start a Car?
To use the NOCO Boost HD GB70 to jump-start a car, connect the jump starter to a compatible 12V battery, wait for the white Boost LED to indicate a ready connection, and start the engine. The GB70 delivers up to 2,000 amps of peak current and supports gasoline engines up to 8.0 liters and diesel engines up to 6.0 liters. Its automatic safety system checks battery polarity before enabling the jump-start function.
Follow these six steps to jump-start a vehicle with the NOCO GB70:
1. Prepare the vehicle and jump starter. Turn off the ignition, engage the parking brake, and switch off electrical accessories such as headlights, air conditioning, and the radio. Check that the GB70 has sufficient charge before connecting it to the battery.
2. Connect the battery clamps. Insert the clamp connector into the GB70’s 12V jump-start port. Attach the red clamp to the battery’s positive (+) terminal. Connect the black clamp to the negative (−) terminal or the grounding point specified by the vehicle manufacturer.
3. Turn on the NOCO GB70. Press the power button to activate the jump starter. The device will check the battery connection and monitor for reverse polarity or other connection errors.
4. Check the Boost LED. A solid white Boost LED indicates that the GB70 has detected the battery and is ready to deliver starting power. If the error LED illuminates, stop and inspect the connections before proceeding.
5. Start the vehicle. Turn the ignition key or press the engine start button. If the engine does not start, stop cranking, allow the jump starter to recover as directed in the manufacturer’s instructions, and check the vehicle before attempting another start.
6. Disconnect the GB70. Once the engine starts, turn off the jump starter, remove the black clamp first, and then disconnect the red clamp. Store the clamps securely and recharge the GB70 after use.
The GB70 normally detects a connected battery automatically. However, a severely discharged battery with voltage below the device’s detection threshold may require Manual Override. This mode should only be used after confirming the correct polarity because it bypasses automatic safety protections.
What Should You Check Before Using the NOCO GB70?
Before using the NOCO GB70, check five essential conditions: battery compatibility, jump starter charge level, battery terminal condition, clamp integrity, and vehicle safety requirements. These checks help prevent incorrect connections, insufficient starting power, and damage to the vehicle’s electrical system.
1. Battery compatibility. The NOCO GB70 is designed for 12V lead-acid batteries, including compatible flooded, AGM, gel, and maintenance-free types. It must not be used to jump-start 24V electrical systems or incompatible battery chemistries. Check the vehicle’s battery specifications before connecting the device.
2. Jump starter charge level. Press the power button and examine the GB70’s internal battery charge indicators. A fully charged unit provides the greatest available starting capacity, particularly for larger engines or vehicles with heavily discharged batteries. Recharge the device before use when its charge level is low.
3. Battery terminal condition. Inspect the positive and negative terminals for corrosion, loose connections, or physical damage. Corrosion and poor electrical contact increase resistance, reducing the current delivered to the starter motor. The clamps must contact clean, secure metal connection points.
4. Clamp and cable condition. Examine both clamps, their insulation, and the jump-start connector for cracks, exposed wires, or damaged contacts. Do not use the GB70 with damaged cables or clamps. Keep the red and black clamps separated to prevent accidental short circuits.
5. Vehicle safety requirements. Consult the vehicle owner’s manual to identify approved jump-start terminals and grounding locations. Some vehicles have batteries installed in the trunk or beneath interior panels and provide dedicated connection points under the hood. Never attempt to jump-start a frozen, leaking, swollen, or visibly damaged battery.
Completing these checks helps ensure the NOCO GB70 is compatible with the vehicle and ready to supply starting current safely.
How Do You Connect the NOCO GB70 to a Car Battery?
To connect the NOCO GB70 to a car battery, attach the red clamp to the positive (+) terminal and the black clamp to the negative (−) terminal or the vehicle manufacturer’s approved grounding point. Correct clamp placement establishes the electrical connection needed to deliver starting current while reducing the risk of reverse polarity, short circuits, and damage to the vehicle’s electrical system.
Start by locating the vehicle’s 12V battery or designated jump-start terminals. The positive terminal is typically marked with a plus (+) symbol and may have a red protective cover. The negative terminal is marked with a minus (−) symbol and is commonly connected to the vehicle’s chassis. Some vehicles have remote jump-start terminals under the hood, even when the battery is installed elsewhere.
Follow these steps to connect the NOCO GB70 correctly:
1. Turn off the vehicle. Make sure the ignition and electrical accessories are switched off. Position the GB70 on a stable surface away from moving engine components, excessive heat, and battery fluid.
2. Connect the jump-start cable to the GB70. Insert the cable connector firmly into the device’s 12V jump-start port. Keep the red and black clamps separated while preparing the connections.
3. Attach the red clamp to the positive terminal. Secure the red (+) clamp to the battery’s positive post or designated positive jump-start terminal. Ensure the metal jaws make firm contact with the terminal rather than plastic covers or heavily corroded surfaces.
4. Attach the black clamp to the negative connection point. Connect the black (−) clamp to the negative battery terminal or a suitable chassis ground, following the vehicle manufacturer’s instructions. Use an approved grounding point away from fuel lines, moving components, and the battery when specified.
5. Verify the connections. Confirm that both clamps are secure, the polarity is correct, and the cables are clear of belts, fans, and other moving engine parts. Press the GB70 power button and check its status indicators before attempting to start the vehicle.
The NOCO GB70 includes reverse polarity protection during normal operation. If the clamps are connected incorrectly, the device displays an error indication instead of enabling a normal jump start. Do not attempt to start the engine while a reverse polarity error is displayed. Turn off the GB70, correct the connections, and verify the indicator status before proceeding.
A secure electrical connection is essential because the starter motor requires substantial current to crank the engine. Loose clamps, corroded terminals, or contact with painted metal surfaces increase electrical resistance and reduce the current reaching the vehicle’s starting system.
How Do You Start a Vehicle With the NOCO GB70?
To start a vehicle with the NOCO GB70, press the power button after connecting the clamps, confirm that the white Boost LED is illuminated, and crank the engine for no longer than five seconds per attempt. The Boost LED indicates that the jump starter has detected a suitable battery connection and is ready to supply starting current.
Once the GB70 is connected, press its power button and examine the front control panel. A solid white Boost LED indicates that the automatic jump-start function is ready. If the Boost LED does not illuminate, check the battery connection, device charge level, and error indicators before proceeding. A battery below the automatic detection threshold requires a separate assessment before Manual Override is considered.
Turn the ignition key or press the vehicle’s start button while keeping the GB70 securely positioned away from moving engine components. The jump starter supplies additional electrical current to the vehicle’s starting system, allowing the starter motor to crank the engine when the vehicle battery cannot provide sufficient current on its own.
Limit each starting attempt to five seconds. If the engine does not start, stop cranking and wait approximately 20–30 seconds before another attempt, following the manufacturer’s operating limits. Repeated unsuccessful attempts can heat the jump starter and indicate problems beyond a discharged battery, including poor electrical connections, a faulty starter motor, or insufficient fuel delivery.
Once the engine starts, turn off the NOCO GB70 and disconnect the black negative clamp first, followed by the red positive clamp. Remove the jump-start cable connector from the GB70 and store the equipment securely. Keep the clamps separated during removal to prevent accidental electrical contact.
Allow the vehicle to operate according to its manufacturer’s recommendations after a successful jump start. A running engine allows the alternator to recharge a serviceable vehicle battery, but a deeply discharged or deteriorated battery may require charging with a dedicated battery charger. If the vehicle repeatedly needs a jump start, inspect the battery and charging system rather than relying on the GB70 as a permanent solution.
How Do You Use Manual Override on the NOCO GB70?
To use Manual Override on the NOCO GB70, connect the battery clamps with the correct polarity, press and hold the Manual Override button for approximately three seconds, and confirm that the Boost LED begins flashing. This function allows the jump starter to supply power when a severely discharged 12V battery cannot be detected through its normal automatic starting system.
The NOCO GB70 normally detects connected batteries with a voltage of at least 2 volts. When battery voltage falls below this threshold, the device may not activate its standard Boost function even when the clamps are correctly attached. Manual Override bypasses the automatic detection process, allowing the GB70 to deliver starting current without first confirming the battery’s condition.
Manual Override disables the GB70’s spark-proof and reverse polarity protection features. Incorrect clamp connections can therefore cause sparks, electrical damage, or serious injury. Use this function only when necessary, after verifying battery polarity and confirming that the vehicle has a compatible 12V lead-acid battery.
When Should You Use Manual Override on the NOCO GB70?
Manual Override should be used only when a compatible 12V battery is too deeply discharged for the GB70 to detect automatically. The primary indication is that the white Boost LED does not illuminate despite correct clamp placement and sufficient charge in the jump starter.
For example, a vehicle left unused for an extended period may have a battery voltage below 2 volts. At this level, the GB70’s automatic detection system cannot confirm a normal battery connection, preventing standard Boost activation. Manual Override provides a way to attempt a jump start under these conditions.
However, an undetected battery does not always indicate low voltage. Loose clamps, corroded terminals, damaged cables, and incorrect connections can also prevent battery detection. Inspect these conditions before activating Manual Override. Do not use the function on frozen, leaking, swollen, or otherwise damaged batteries.
How Do You Activate Manual Override on the NOCO GB70?
To activate Manual Override, follow these six steps:
- Verify battery compatibility. Confirm that the vehicle uses a compatible 12V lead-acid battery and that the battery is not physically damaged.
- Connect the clamps correctly. Attach the red clamp to the positive (+) terminal and the black clamp to the approved negative connection or grounding point.
- Confirm the polarity. Check the battery markings and both clamp positions manually because reverse polarity protection will not operate in Manual Override.
- Activate Manual Override. Press and hold the Manual Override button, identified by a red exclamation mark, for approximately three seconds.
- Check the Boost indicator. The white Boost LED should flash, indicating that Manual Override is active. Attempt to start the engine while observing the manufacturer’s cranking limits.
- Exit Manual Override. Press the Manual Override button again to deactivate the function. Once the engine starts, disconnect the black clamp first, followed by the red clamp.
Manual Override should not be used repeatedly when the vehicle fails to start. A battery discharged below 2 volts may have internal damage or may no longer accept a normal charge. If the engine does not start after the permitted attempts, stop the procedure and inspect the battery, starter motor, and electrical connections.
What Do the LED Indicators on the NOCO GB70 Mean?
The NOCO GB70 uses four main indicator groups to display its internal battery charge, operating status, jump-start readiness, and connection errors. These indicators help users determine whether the device is ready to start a vehicle, requires recharging, or has detected a condition that prevents safe operation.
The following table explains the NOCO GB70 LED indicators and their meanings, based on the manufacturer’s user guide.
| LED indicator | Status | Meaning |
|---|---|---|
| Internal Battery Level LEDs | 25%, 50%, 75%, or 100% | Displays the GB70’s approximate internal battery charge |
| Power LED | Solid white | The jump starter is powered on |
| Boost LED | Solid white | Boost is active and the device is ready to jump-start |
| Boost LED | Flashing white | Manual Override is active |
| Error LED | Solid red | Reverse polarity detected |
| Error LED | Flashing red | Internal battery temperature is too high |
The white Boost LED is the primary indicator to check before starting a vehicle. During normal operation, the GB70 automatically detects a compatible battery when the clamps are connected correctly. A solid white Boost LED confirms that the jump-start function is active. If the LED remains off, the vehicle battery may be below the 2-volt detection threshold, or the connection may be incomplete.
The red Error LED identifies conditions requiring attention. A solid red light indicates that the clamps have been connected with reversed polarity. Turn off the device and correct the connections before continuing. A flashing red Error LED indicates an internal temperature problem, requiring the GB70 to cool down before another starting attempt.
The internal battery level LEDs indicate how much charge remains in the jump starter. The four charge levels help users determine whether the GB70 should be recharged before use. Maintaining a high charge level is particularly important when jump-starting larger engines or operating in cold weather, where battery performance and engine starting requirements can be more demanding.
Do not confuse a flashing white Boost LED with normal jump-start readiness. Flashing white indicates Manual Override, which disables automatic safety protections. A solid white Boost LED is the expected ready indication during standard operation.
Why Is the NOCO GB70 Not Jump-Starting Your Car?
The NOCO GB70 may fail to jump-start a car because of six main problems: insufficient jump starter charge, loose battery connections, severely discharged vehicle batteries, reverse polarity, overheating, or mechanical and electrical faults in the vehicle. Identifying the cause is essential because the GB70 can supply starting current but cannot repair a damaged battery, faulty starter motor, or malfunctioning ignition system.
1. The NOCO GB70 has insufficient battery charge. A low internal battery charge reduces the jump starter’s ability to deliver the high current required to crank an engine. Larger engines and cold-weather starts place greater demands on the device. Check the GB70’s battery level indicators and recharge it before attempting another jump start. A fully charged GB70 provides the greatest available starting capacity.
2. The battery clamps have poor electrical contact. Loose clamps, corroded terminals, and improper grounding increase electrical resistance between the GB70 and the vehicle battery. This resistance restricts current flow to the starter motor, preventing the engine from cranking effectively. Remove the clamps with the device switched off, inspect the terminals, and reconnect them securely to clean, approved connection points.
3. The vehicle battery is below the automatic detection threshold. The NOCO GB70 normally requires at least 2 volts to detect a connected battery and activate its standard Boost function. When battery voltage falls below this level, the white Boost LED may remain off even when the clamps are correctly connected. Manual Override can bypass automatic detection, but it disables spark-proof and reverse polarity protection. Use this function only after verifying battery compatibility, clamp polarity, and battery condition.
4. The clamps are connected with reversed polarity. A solid red Error LED indicates that the positive and negative connections have been reversed during normal operation. The GB70 prevents standard jump-start activation to reduce the risk of electrical damage. Turn off the device, disconnect the clamps, and reconnect the red clamp to the positive (+) terminal and the black clamp to the approved negative connection point. Never use Manual Override to bypass a reverse polarity error.
5. The NOCO GB70 has overheated. Repeated starting attempts or excessive operating temperatures can activate the device’s thermal protection system. A flashing red Error LED indicates an internal temperature condition that prevents normal operation. Stop using the GB70 and allow it to return to a safe operating temperature before attempting another start. Avoid placing the device near hot engine components or exposing it to unnecessary heat.
6. The vehicle has a problem unrelated to battery charge. A jump starter cannot correct faults involving the starter motor, starter relay, ignition system, fuel delivery, or other essential engine components. If the engine cranks normally but does not start, the problem may not be insufficient battery power. If the engine does not crank despite a fully charged GB70 and secure connections, the starter circuit or another electrical component may require inspection.
The following table summarizes the most common NOCO GB70 jump-starting problems and their corrective actions.
| Problem | Likely cause | Recommended action |
|---|---|---|
| GB70 does not power on | Low internal battery charge | Recharge the GB70 |
| White Boost LED stays off | Poor connection or battery voltage below 2V | Check clamps and battery voltage |
| Solid red Error LED | Reverse polarity | Correct the clamp connections |
| Flashing red Error LED | Internal temperature too high | Stop and allow the device to cool |
| Engine cranks but will not start | Possible ignition, fuel, or engine fault | Inspect the vehicle’s starting requirements |
| Engine does not crank | Insufficient current or starter circuit fault | Check charge, connections, and starter system |
If the NOCO GB70 repeatedly fails to start a vehicle, stop further attempts and test the vehicle battery and charging system. A digital multimeter can help identify battery voltage, while a battery load test can determine whether the battery can deliver sufficient starting current. Repeated jump-start failures should be diagnosed rather than addressed through continuous starting attempts, which can place additional stress on the GB70 and the vehicle’s electrical components.
How Do You Charge the NOCO Boost HD GB70?
To charge the NOCO Boost HD GB70, connect a compatible power source to its Micro-USB input or use the 12V XGC charging input with the appropriate NOCO charging accessory. The GB70 has an internal lithium-ion battery that must be recharged periodically to maintain sufficient power for jump-starting vehicles. Charging time depends on the input method, power output, and remaining battery capacity.
The NOCO GB70 supports two primary charging methods. The Micro-USB input accepts a compatible 5V USB power source, while the 12V XGC input supports faster charging through a compatible NOCO XGC charging accessory. The GB70 can take approximately 7 hours to charge using a 10W USB source, while lower-powered USB chargers require considerably longer. The 12V XGC charging method can reduce charging time to approximately 2–3 hours under suitable conditions.
Follow these five steps to recharge the NOCO GB70:
- Turn off the jump starter. Disconnect the GB70 from the vehicle battery and ensure the jump-start clamps are not attached to any electrical system.
- Select a compatible charging source. Use a suitable Micro-USB cable and USB power adapter or a compatible NOCO 12V XGC charging accessory.
- Connect the charging cable. Insert the charging connector into the corresponding input port on the GB70, then connect the charger to its power source.
- Monitor the battery indicators. The internal battery level LEDs display charging progress at 25%, 50%, 75%, and 100% capacity.
- Disconnect after charging. Once the GB70 indicates a full charge, disconnect the charging cable and store the device in a clean, dry location.
The GB70’s battery level indicators help identify its charging status. During charging, the indicators progress as the internal battery gains capacity. When charging is complete, the 100% charge indicator remains solid rather than flashing. A fully charged GB70 is better prepared to deliver the high starting current required for larger engines and cold-weather operation.
Charging performance also depends on ambient temperature and the condition of the internal lithium battery. Avoid charging the GB70 near excessive heat, moisture, or flammable materials. Use compatible charging equipment and inspect the charging cable for damage before connecting it.
Recharge the NOCO GB70 after each jump start and check its charge level regularly during storage. NOCO recommends recharging the device at least every six months to maintain battery readiness. More frequent charge checks are useful when the jump starter is stored in a vehicle exposed to changing temperatures.
How Do You Use the NOCO GB70 as a USB Power Bank?
To use the NOCO GB70 as a USB power bank, connect a compatible USB-powered device to the GB70’s USB output port and activate the power output. The built-in lithium-ion battery can supply power to smartphones, tablets, GPS devices, and other compatible USB electronics without requiring a connection to a vehicle battery.
The NOCO GB70 includes a 5V USB output rated at up to 2.1 amps, providing approximately 10.5 watts of maximum output power. This connection allows the jump starter to function as a portable charging source during roadside emergencies, camping trips, and situations where a conventional electrical outlet is unavailable.
Follow these four steps to charge a USB device with the NOCO GB70:
- Check the GB70 battery level. Confirm that the jump starter has sufficient remaining charge to power the connected device.
- Connect the USB cable. Insert a compatible USB cable into the GB70’s USB output port and connect the other end to the smartphone, tablet, or other device.
- Activate the GB70. Press the power button if the USB output is not already active. Check that the connected device begins charging.
- Disconnect the device. Remove the USB cable after charging and turn off the GB70 to conserve its internal battery.
USB charging draws energy from the same internal battery used for vehicle jump-starting. Charging external electronics therefore reduces the energy available for subsequent engine starts. Keep the GB70 adequately charged when relying on it as emergency roadside equipment.
The USB output should also be distinguished from the GB70’s 12V XGC output, which is intended for compatible 12V accessories. Do not connect a USB device directly to the 12V output, because the voltage exceeds the standard 5V USB power requirement and can damage incompatible electronics.
Read more: How to Reset Jeep Uconnect: Step-by-Step Guide
How Do You Turn On the Flashlight on the NOCO GB70?
To turn on the NOCO GB70 flashlight, press the light mode button marked with a light bulb symbol on the control panel. The GB70 features a built-in 400-lumen LED flashlight with seven lighting modes, allowing drivers to illuminate engine compartments, inspect battery terminals, and signal for assistance during roadside emergencies.
The NOCO GB70 provides three brightness settings, three emergency signaling modes, and an off setting. The brightness settings include 100%, 50%, and 10% output, while the emergency modes include SOS, Blink, and Strobe. Each mode serves a different purpose, from illuminating a vehicle battery to improving visibility during an unexpected breakdown.
Follow these four steps to operate the NOCO GB70 flashlight:
- Check the battery charge. Ensure the GB70 has enough internal battery power to operate the flashlight, particularly when the device may also be needed for jump-starting.
- Press the light mode button. Activate the flashlight using the dedicated button marked with a light bulb symbol.
- Select the lighting mode. Press the button repeatedly to cycle through the available brightness and emergency signaling settings until the desired mode is active.
- Turn off the flashlight. Continue cycling through the settings until the light turns off, or use the manufacturer’s specified control sequence.
The 100% brightness setting provides maximum illumination when locating battery terminals or inspecting the engine compartment at night. The 50% and 10% settings reduce power consumption when less illumination is required, making them suitable for reading vehicle instructions or locating tools inside the car.
The SOS, Blink, and Strobe modes provide additional signaling options during roadside emergencies. SOS produces a recognizable distress signal, while Blink and Strobe generate repeated flashes to attract attention. These functions are particularly useful when a vehicle becomes disabled in an area with limited lighting.
Avoid directing the flashlight into another person’s eyes or toward approaching drivers. High-intensity illumination and flashing modes can temporarily impair visibility. Position the GB70 securely when using the flashlight near an open engine compartment, keeping it away from moving parts, hot surfaces, and vehicle fluids.
How Should You Store and Maintain the NOCO GB70?
To store and maintain the NOCO GB70, keep the device in a cool, dry location, recharge it at least every six months, and inspect its cables, clamps, and charging ports regularly. Proper maintenance helps preserve the internal lithium-ion battery, prevents connection problems, and ensures the jump starter remains ready for unexpected battery failures.
The GB70 uses an internal lithium-ion battery that gradually loses charge during storage. Leaving the device discharged for an extended period increases the risk of deep discharge, which can reduce available capacity and shorten battery service life. Recharging the jump starter after use and monitoring its charge level during storage help maintain reliable starting performance.
Five maintenance practices are essential for keeping the NOCO GB70 in working condition.
1. Recharge the GB70 regularly. Recharge the jump starter after each use and at least every six months during storage, following NOCO’s maintenance guidance. Check the battery level before long trips or seasonal changes. A fully charged device provides the greatest available starting capacity when a vehicle battery fails unexpectedly.
2. Store the device within its recommended temperature range. The GB70 should be stored in a dry, temperature-controlled environment whenever practical. NOCO specifies a storage temperature range of approximately −20°C to 50°C (−4°F to 122°F). Prolonged exposure to high temperatures accelerates lithium-ion battery degradation, while extreme cold temporarily reduces available power. Avoid leaving the jump starter in direct sunlight or near heat sources.
3. Inspect the battery clamps and cables. Check the red and black clamps for corrosion, loose connections, cracked insulation, and damaged metal contacts. Worn or contaminated clamps increase electrical resistance and reduce the current delivered during jump-starting. Clean external contacts with a dry cloth and replace damaged accessories with compatible components. Never operate the GB70 with exposed conductors or damaged jump-start cables.
4. Keep charging ports clean and dry. Dust, moisture, and debris inside the Micro-USB or XGC connectors can interfere with charging and electrical contact. Inspect the ports periodically and remove loose debris carefully while the device is disconnected from power. Do not insert metal objects into the connectors or use excessive liquid when cleaning the housing.
5. Protect the GB70 during transportation. Store the jump starter and its accessories in a protective case or secure compartment to prevent impact damage and accidental contact between the clamps. Avoid placing heavy tools directly on the device or allowing the cables to become trapped beneath vehicle equipment. Secure storage is especially important when carrying the GB70 in a trunk or roadside emergency kit.
The GB70 should also be inspected after accidental drops, exposure to water, or unusual heating during operation. Stop using the device if its housing becomes swollen, cracked, or excessively hot, or if it produces an unusual odor. These conditions may indicate internal battery damage that requires professional assessment or replacement.
Regular charging, safe storage, and routine inspection help maintain the NOCO GB70’s reliability throughout its service life. Before a long journey, verify that the device powers on, the battery charge indicators function correctly, and the jump-start accessories are in good condition. These checks reduce the likelihood of discovering an equipment problem during a roadside emergency.