A 4R100 transmission rebuild involves disassembling the transmission, inspecting its internal components, replacing worn or damaged parts, and reassembling the unit to restore proper shifting and performance. The process typically includes replacing clutch friction plates, seals, gaskets, and other worn components while inspecting the torque converter, valve body, transmission pump, and planetary gearsets for damage.
The Ford 4R100 is a four-speed automatic transmission used in heavy-duty vehicles, including the Ford F-250, F-350, and Excursion. Although designed for demanding applications, the transmission can develop problems such as slipping gears, delayed engagement, overheating, and internal clutch wear. A complete rebuild may be necessary when internal damage makes individual repairs insufficient.
The cost of rebuilding a 4R100 transmission depends on labor rates, replacement parts, and the extent of internal damage. A professional rebuild generally costs more than a DIY rebuild because it includes specialized labor, inspection, and testing. However, rebuilding the existing transmission may be more economical than purchasing a replacement unit, particularly when major internal components remain serviceable.
This guide explains the signs of transmission failure, rebuild costs, required parts, step-by-step rebuilding procedures, and post-rebuild testing. It also compares rebuilding with replacement and explains how proper maintenance affects long-term transmission reliability.
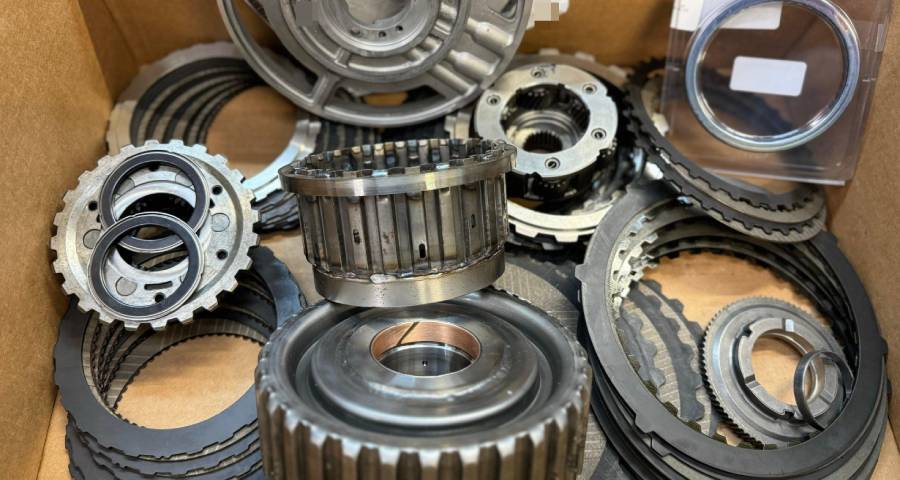
What Is a 4R100 Transmission Rebuild?
A 4R100 transmission rebuild is the process of restoring a Ford 4R100 four-speed automatic transmission by disassembling it, inspecting internal components, replacing worn or damaged parts, and reassembling the unit according to factory specifications. Unlike a minor transmission repair, which addresses an isolated problem, a rebuild involves a comprehensive inspection of the transmission’s mechanical and hydraulic systems.
The rebuilding process focuses on components responsible for transmitting engine power and controlling gear changes. These include clutch packs, planetary gearsets, the transmission pump, valve body, shafts, bushings, and sealing components. Worn friction plates, hardened seals, and damaged bushings are replaced as necessary, while reusable hard parts are cleaned, measured, and inspected for wear. The torque converter must also be evaluated because internal contamination or converter failure can damage a newly rebuilt transmission.
A 4R100 rebuild differs from a complete transmission replacement because the original transmission case and serviceable internal components are retained. A rebuilt transmission is restored using a combination of reusable and replacement parts, whereas a remanufactured transmission generally undergoes a standardized restoration process with defined inspection and replacement requirements. The quality of either option depends on the procedures, components, and testing standards used.
Rebuilding a 4R100 transmission is appropriate when internal wear or damage requires extensive repairs but the transmission remains economically repairable. However, problems caused by external electrical faults, defective sensors, or isolated hydraulic components may be resolved without a complete rebuild. A proper diagnosis is therefore necessary before disassembly.
What Are the Signs That a 4R100 Transmission Needs a Rebuild?
The four major warning signs of a failing 4R100 transmission are gear slipping, delayed engagement, overheating, and contaminated transmission fluid. These symptoms can indicate internal clutch wear, hydraulic pressure loss, torque converter problems, or mechanical damage. However, they do not automatically mean the transmission requires rebuilding because external control and cooling system faults can produce similar symptoms.
Gear slipping occurs when the transmission cannot maintain the intended gear ratio under load. The engine speed may increase without a corresponding increase in vehicle speed, particularly during acceleration or towing. Worn clutch friction plates, insufficient hydraulic pressure, and leaking internal seals can prevent clutch assemblies from holding properly. In the 4R100, persistent slipping can generate excessive heat and accelerate friction material deterioration. Diagnostic trouble codes, pressure testing, and operating data help determine whether the problem originates from internal damage or a control-related fault.
Delayed engagement occurs when the transmission takes longer than expected to engage Drive or Reverse after the gear selector is moved. This delay can result from low transmission fluid, internal seal leakage, pump wear, or valve body problems that interfere with hydraulic pressure delivery. For example, a transmission that hesitates before engaging Reverse may have a hydraulic circuit problem rather than a failed gearset. Rebuilding becomes a stronger consideration when testing confirms substantial internal leakage or damage that cannot be corrected through a targeted repair.
Transmission overheating is another warning sign because excessive heat reduces automatic transmission fluid performance and accelerates deterioration of friction materials and seals. The 4R100 can experience elevated operating temperatures during heavy towing, prolonged high-load operation, or when the transmission cooling system is restricted. A malfunctioning torque converter clutch can also contribute to heat generation. Overheating should be investigated by checking fluid condition, cooling system operation, converter performance, and transmission load before concluding that internal rebuilding is necessary.
Contaminated transmission fluid can provide evidence of internal component deterioration. Dark fluid with a burnt odor suggests thermal stress, while excessive friction material or metallic debris in the transmission pan can indicate clutch or mechanical wear. Fine material on the pan magnet is not necessarily abnormal, but substantial metal fragments, heavy debris accumulation, or damaged friction material require further inspection. Fluid color alone cannot establish the condition of the transmission because service history and operating conditions also affect its appearance.
A complete 4R100 transmission rebuild is generally justified when diagnostic testing confirms extensive internal clutch damage, significant mechanical wear, or multiple component failures. Before recommending a rebuild, a technician should inspect fluid level and condition, retrieve diagnostic trouble codes, evaluate electrical controls, and perform hydraulic pressure tests where appropriate. Confirming the underlying failure prevents unnecessary rebuilding and reduces the risk of the same problem returning after repairs.
How Much Does a 4R100 Transmission Rebuild Cost?
A 4R100 transmission rebuild typically costs an estimated $2,000–$4,500 at a professional transmission shop, while a DIY rebuild may cost approximately $700–$2,000 or more in parts and supplies. These are broad budgeting estimates rather than verified current market prices. Actual expenses depend on the transmission’s condition, replacement components, labor rates, and whether the torque converter or major internal assemblies require replacement.
The largest cost variables are labor and internal component damage. A transmission with worn clutch packs and deteriorated seals generally requires fewer replacement parts than one with damaged planetary gearsets, drums, shafts, or a failed pump. Additional expenses may include transmission removal and installation, torque converter replacement, cooler servicing, transmission fluid, and diagnostic testing. Consequently, a rebuild estimate based only on a standard parts kit may substantially underestimate the final repair cost.
How Much Does a Professional 4R100 Rebuild Cost?
A professional 4R100 transmission rebuild can be budgeted at approximately $2,000–$4,500, with more extensive repairs potentially exceeding that range. The price generally reflects transmission disassembly, component inspection, replacement parts, reassembly, and testing. Whether transmission removal, installation, fluid, and torque converter replacement are included depends on the repair shop’s estimate.
Labor represents a substantial portion of the expense because rebuilding an automatic transmission requires specialized equipment, precise measurements, and knowledge of hydraulic and mechanical systems. Technicians must inspect clutch assemblies, verify component clearances, evaluate the valve body, and identify wear that could compromise the rebuilt unit. Replacing damaged hard parts increases costs beyond those of a standard rebuild.
For example, a 4R100 with worn friction plates and leaking seals may require a rebuild kit, selected bushings, and a replacement torque converter. A transmission with a damaged planetary assembly or severely worn pump requires additional components and labor. The second repair will generally cost more even though both jobs are classified as transmission rebuilds.
A professional rebuild may also include a limited warranty covering specified parts and workmanship. Warranty terms vary by shop and should be reviewed for mileage limits, coverage duration, labor reimbursement, towing-related exclusions, and required maintenance.
How Much Does a DIY 4R100 Rebuild Cost?
A DIY 4R100 transmission rebuild may require approximately $700–$2,000 or more for parts, fluid, and supplies, excluding tools already owned and the value of the mechanic’s labor. The final expense increases when the transmission requires a torque converter, pump, planetary components, specialized tools, or outside machining services.
A basic rebuild kit generally contains friction plates, seals, gaskets, and related service components, although the exact contents vary by manufacturer and kit level. Additional purchases may include steel plates, bushings, bearings, a transmission filter, and a replacement torque converter. Rebuild kits are not interchangeable across every transmission configuration, so parts must be matched to the specific 4R100 application.
Specialized equipment is another important expense. A DIY mechanic may need a transmission jack, clutch spring compressors, snap-ring pliers, dial indicators, measuring tools, and suitable assembly fixtures. Accurate measurements are essential because incorrect clutch clearances, damaged seals, or improper component installation can cause immediate transmission failure.
DIY rebuilding can reduce labor expenses for experienced mechanics who already possess the required tools and technical knowledge. However, first-time rebuilders must account for equipment purchases, potential assembly errors, and the possibility of paying a professional shop to correct problems. A DIY rebuild is most practical when the mechanic has access to the appropriate service manual, a clean workspace, and the equipment needed to verify assembly specifications.
What Parts Are Needed for a 4R100 Transmission Rebuild?
The main parts needed for a 4R100 transmission rebuild include clutch friction plates, steel plates, seals, gaskets, bushings, a transmission filter, and other components identified as worn or damaged during inspection. The torque converter, transmission pump, valve body, planetary gearsets, and electronic controls must also be evaluated, but they do not automatically require replacement in every rebuild.
A 4R100 master rebuild kit commonly includes friction materials and sealing components used to restore clutch operation and hydraulic pressure integrity. Friction plates work with steel plates to engage and hold the transmission’s clutch assemblies. When friction material wears or overheats, the affected clutch may slip under load, generating additional heat and accelerating internal damage. Replacement friction plates must match the transmission’s specifications, and clutch pack clearances must be measured during assembly.
Seals and gaskets restore hydraulic sealing and help prevent internal pressure loss and external fluid leakage. Internal lip seals, sealing rings, and other elastomeric components deteriorate through heat exposure, age, and mechanical wear. Damaged seals can allow hydraulic pressure to escape, interfering with clutch application and gear engagement. Replacing accessible wear-related seals during a complete rebuild reduces the risk of leaving deteriorated components inside the transmission.
Bushings and bearings support rotating components and maintain proper alignment within the transmission. Worn bushings can increase shaft movement, contribute to hydraulic leakage, and accelerate wear on adjacent parts. These components should be inspected for scoring, excessive clearance, and surface damage. Replacement decisions should follow measured wear limits rather than assuming every bushing or bearing is defective.
The torque converter requires particular attention because contamination or internal damage can compromise a newly rebuilt 4R100 transmission. The converter transfers engine torque to the transmission and contains a lockup clutch that improves mechanical coupling under appropriate operating conditions. A worn lockup clutch, damaged internal components, or trapped debris can produce drivability problems and introduce contaminants into the rebuilt unit. A suitable replacement or professionally remanufactured converter is commonly used when converter condition cannot be reliably verified.
The transmission pump and valve body control the hydraulic pressure needed for clutch operation and gear selection. Pump wear can reduce pressure delivery, while valve body wear, sticking valves, or hydraulic leakage can disrupt shift timing and clutch application. These assemblies should be cleaned, inspected, and tested as appropriate. Solenoids and related electrical components should be evaluated using applicable diagnostic procedures rather than replaced solely because the transmission is being rebuilt.
Planetary gearsets, shafts, drums, and other hard parts must be examined for cracked surfaces, damaged teeth, excessive wear, and signs of overheating. Serviceable components can be reused when they meet the required specifications. Damaged assemblies must be replaced because installing new friction materials cannot correct structural or mechanical defects.
A successful 4R100 rebuild depends on selecting parts according to inspection results rather than relying exclusively on a rebuild kit. Matching replacement components to the transmission’s identification and application, verifying critical clearances, and addressing contamination throughout the transmission and cooling system are essential to restoring reliable operation.
How Do You Rebuild a 4R100 Transmission Step by Step?
Rebuilding a 4R100 transmission involves six main stages: preparation, disassembly, component inspection, replacement of worn parts, reassembly, and reinstallation. Each stage requires careful handling of mechanical and hydraulic components to restore proper clutch engagement, fluid pressure, and gear operation. The process also requires specialized tools and accurate measurements because incorrect clearances or damaged seals can cause transmission failure after installation.
Before beginning, confirm that the transmission is a Ford 4R100 and identify its specific configuration. The 4R100 was used in several Ford truck and SUV applications, and component specifications can vary by model year and vehicle configuration. Obtain the appropriate factory service information, including assembly diagrams, tightening specifications, clutch clearance limits, and diagnostic procedures.
Prepare a clean workspace with a stable transmission workbench, suitable holding fixtures, a transmission jack, clutch spring compressors, snap-ring pliers, dial indicators, and measuring equipment. Cleanliness is essential because dirt, metal particles, and friction material can obstruct hydraulic passages or damage newly installed components.
Remove the transmission from the vehicle using the applicable service procedure. Support the transmission securely, disconnect the necessary electrical connectors and hydraulic lines, and separate it from the engine without placing excessive force on the input shaft or torque converter. Once removed, drain the remaining fluid and inspect the transmission exterior for cracks, damaged fittings, and signs of leakage.
How Do You Disassemble a 4R100 Transmission?
To disassemble a 4R100 transmission, remove its external components, hydraulic control assemblies, and internal rotating components in the sequence specified by the applicable service manual. Organizing and documenting each component during removal helps prevent assembly errors and makes it easier to identify the source of internal damage.
Begin by removing the transmission pan and filter. Inspect the pan for friction material, metal particles, and other debris before cleaning it. Excessive clutch material can indicate friction plate deterioration, while larger metallic fragments may point to damage involving gears, bearings, shafts, or other rotating components. Record these findings because they help determine which assemblies require closer inspection.
Remove the valve body and associated hydraulic control components according to the service procedure. Keep bolts, check balls, separator plates, springs, and related components organized by their original positions. The valve body contains precisely machined passages that direct transmission fluid to the appropriate clutch circuits. Incorrect check ball placement or damaged sealing surfaces can produce shifting problems even when the mechanical components are properly rebuilt.
Continue disassembly by removing the pump and internal assemblies in the required order. The 4R100 contains clutch assemblies, planetary gearsets, shafts, drums, and other components that work together to produce its four forward gear ratios and reverse operation. Use appropriate holding fixtures and lifting tools to prevent damage to machined surfaces or distortion of internal components.
Clutch assemblies require particular care because their retaining rings and spring-loaded components can store considerable mechanical force. Use the correct spring compression tools before removing retaining components. Arrange friction plates, steel plates, pressure plates, and related hardware in their original order to support inspection and identify abnormal wear patterns.
Document component orientation, wear patterns, and measurements throughout disassembly. Photographs and labeled storage containers help distinguish similar parts and prevent the accidental mixing of components from different assemblies. This documentation is especially useful when identifying which parts can be reused and which must be replaced.
How Do You Inspect and Replace Worn 4R100 Components?
Inspecting a 4R100 transmission involves checking clutch friction materials, steel plates, seals, bushings, bearings, shafts, drums, planetary gearsets, and hydraulic components for wear or damage. Components that exceed the applicable service limits must be replaced, while reusable parts should be cleaned and measured before reinstallation.
Start with the clutch packs. Examine friction plates for worn lining, glazing, discoloration, or signs of overheating. Inspect steel plates for warping, scoring, and heat-related damage. A clutch pack with severely worn friction material may no longer hold the required torque, causing slipping and additional heat generation. Replace defective components and verify that the assembled clutch pack meets the specified clearance requirements.
Inspect clutch drums and related rotating assemblies for cracks, damaged splines, scoring, and abnormal wear. Check planetary gearsets for chipped or broken teeth, excessive movement, damaged thrust surfaces, and bearing deterioration. Shafts should be inspected for damaged splines, surface wear, and other defects that could interfere with power transmission or proper component alignment.
The transmission pump must be evaluated for scoring, wear, and damage to its internal components and mating surfaces. Pump problems can reduce hydraulic pressure and prevent clutch assemblies from applying correctly. Inspect the valve body for sticking valves, damaged bores, worn surfaces, and contamination. Hydraulic control problems should be corrected according to the identified failure rather than assuming that replacing friction plates will restore normal shifting.
Replace worn seals, gaskets, and bushings using installation methods appropriate for the specific component. New seals must be installed in the correct orientation without cutting or distorting their sealing lips. Bushings should be installed with suitable drivers and checked for proper fit and alignment. Incorrect installation can create internal hydraulic leakage or excessive movement between rotating components.
Measure critical component clearances using the procedures and limits provided in the applicable 4R100 service information. Clutch pack clearance, endplay, and other specified dimensions affect how components engage and operate. Excessively tight clearances can contribute to dragging and heat generation, while excessive clearance can delay clutch application or reduce holding performance. Do not substitute generic clearance values from another transmission model.
Inspect the torque converter for signs of failure and determine whether it requires replacement or professional remanufacturing. A contaminated or damaged converter can release debris into the hydraulic system after the transmission has been rebuilt. The transmission cooler and fluid lines must also be inspected and cleaned or replaced as necessary to prevent residual contamination from damaging the rebuilt components.
How Do You Reassemble a 4R100 Transmission?
Reassembling a 4R100 transmission requires installing the inspected and replacement components in the correct sequence, verifying mechanical clearances, and restoring the hydraulic control system according to factory specifications. Proper lubrication, seal installation, component orientation, and torque procedures are essential for reliable operation.
Begin by preparing the transmission case and reusable internal components. Remove residual debris, inspect fluid passages, and confirm that all replacement parts match the transmission configuration. Lubricate seals, bushings, bearings, and other components using the appropriate assembly lubricant or specified transmission fluid. Avoid introducing lint, dirt, or excess sealant into hydraulic passages.
Reassemble the clutch packs using the correct friction plates, steel plates, pressure plates, and retaining components. Verify the number and arrangement of plates against the applicable service information. Measure clutch pack clearances after assembly and correct any measurements that fall outside the specified limits. Installing new friction materials without verifying clearance can result in poor engagement, excessive heat, or premature clutch failure.
Install the planetary gearsets, shafts, drums, and associated internal assemblies in the prescribed order. Check that mating splines engage correctly and that rotating components move as intended. Verify transmission endplay and other specified measurements before completing the internal assembly. These checks help identify incorrectly seated components or dimensional problems before the transmission is returned to the vehicle.
Reinstall the transmission pump and hydraulic control components using the correct gaskets, seals, and tightening procedures. The valve body must be assembled with its check balls, separator plates, springs, and related components in their specified positions. Tighten fasteners using the applicable torque specifications and sequence to avoid distortion, leakage, or damage to threaded surfaces.
Install the transmission filter and pan after confirming that the internal assemblies and hydraulic controls are properly secured. Inspect external sealing surfaces, electrical connectors, and fittings before preparing the transmission for installation.
Reinstall the rebuilt 4R100 transmission using a correctly matched torque converter and the vehicle-specific installation procedure. Ensure the converter is fully seated in the transmission before mating the transmission to the engine. An improperly seated converter can damage the transmission pump when the bellhousing fasteners are tightened. Never use the bellhousing bolts to force the transmission and engine together.
Reconnect the transmission mounts, driveshaft, electrical connectors, cooler lines, and other components removed during disassembly. Follow the specified tightening procedures and confirm that the transmission cooling system is free from restrictions and contamination.
Fill the transmission with the manufacturer-specified automatic transmission fluid, using the correct level-checking procedure for the vehicle. Initial filling does not establish the final fluid level because the converter, cooler, and hydraulic circuits must fill during operation. Verify the fluid level under the specified operating conditions and inspect for leaks before proceeding to functional testing.
A 4R100 rebuild is not complete until the transmission passes hydraulic, mechanical, and operational checks. Correct assembly restores the transmission’s internal components, but pressure verification, shift evaluation, and road testing are necessary to confirm that the rebuilt unit operates properly under actual driving conditions.
How Do You Test a 4R100 Transmission After Rebuilding?
Testing a rebuilt 4R100 transmission involves checking transmission fluid levels, hydraulic pressure, gear engagement, shift operation, torque converter performance, and operating temperature. These inspections confirm that the rebuilt transmission functions correctly before it returns to regular driving or towing service. Testing should begin with stationary checks, followed by a controlled road test under progressively increasing loads.
The first step is to verify the transmission fluid level using the procedure specified for the vehicle. The engine must be running and the transmission must be within the appropriate temperature range when required by the manufacturer’s instructions. Insufficient fluid can cause hydraulic pressure loss and delayed engagement, while excessive fluid can produce aeration and unstable pressure. Inspect the transmission pan, cooler lines, electrical connectors, and external seals for leaks before proceeding.
Hydraulic line pressure testing helps determine whether the rebuilt 4R100 can generate and regulate the pressure required for clutch operation. A technician connects a suitable pressure gauge to the designated test port and compares readings with the specifications for the transmission configuration. Measurements are taken under the operating conditions prescribed by the service manual. Pressure below specification can indicate pump problems, internal leakage, or hydraulic control faults, while abnormal pressure regulation can contribute to harsh shifting or component damage.
Next, check gear engagement while the vehicle remains stationary and the service brakes are applied. Move the gear selector through the appropriate positions and observe whether Drive and Reverse engage without excessive delay, abnormal noise, or severe vibration. Engagement should be consistent, although exact response characteristics depend on transmission temperature, idle speed, and operating conditions. Any unusual delay or harsh engagement requires investigation before road testing.
A controlled road test verifies that the rebuilt 4R100 shifts through its four forward gears and operates its torque converter clutch correctly. Begin with light acceleration on a safe, level road while monitoring engine speed, vehicle speed, and transmission behavior. The transmission should complete gear changes without persistent slipping, unexpected neutral conditions, or abnormal mechanical noise. Shift timing and firmness must be evaluated against the vehicle’s calibration and operating conditions rather than a universal shift-speed value.
Continue testing under moderate acceleration after normal operation has been confirmed at lighter loads. Monitor the relationship between engine speed and vehicle speed to identify possible clutch slipping. Verify torque converter clutch operation under suitable driving conditions, using scan-tool data when available. Abnormal engine-speed fluctuations, shuddering, or unexpected converter clutch behavior may indicate hydraulic, mechanical, or electronic control problems.
Transmission temperature must also be monitored during testing. Excessive heat can indicate converter clutch problems, cooling restrictions, clutch slippage, or insufficient fluid circulation. The expected operating temperature depends on vehicle configuration, ambient conditions, and driving load. Compare measurements with the applicable service information instead of relying on a single temperature limit for every 4R100 application.
After the road test, inspect the transmission for leaks, verify the fluid level under the specified conditions, and retrieve any stored diagnostic trouble codes. Investigate abnormal shifting, unexpected pressure readings, or new fault codes before returning the vehicle to service. A rebuilt 4R100 should not be considered ready for normal operation until its mechanical, hydraulic, and electronic functions have been verified.
How Long Does It Take to Rebuild a 4R100 Transmission?
A professional 4R100 transmission rebuild may take approximately 2–5 business days from removal through reinstallation and testing, while a DIY rebuild can take several days or longer. These are general planning estimates rather than standardized labor times. Actual turnaround depends on the extent of internal damage, technician availability, parts sourcing, and whether additional machining or component replacement is required.
A professional rebuild includes several separate operations: removing the transmission, disassembling its internal assemblies, inspecting components, obtaining replacement parts, reassembling the unit, reinstalling it, and performing operational tests. A shop with the required parts in stock can complete the work more quickly than one waiting for a replacement torque converter, planetary assembly, or other specialized component. Unexpected damage discovered during disassembly can extend the repair schedule.
DIY rebuilds generally take longer because the mechanic must complete precision inspection and assembly work without the production workflow of a specialized transmission shop. Additional time may be needed to identify components, obtain tools, measure clutch clearances, consult service information, and correct assembly problems. A first-time rebuilder should prioritize accurate measurements and proper installation rather than completing the job within a fixed number of hours.
The rebuild process can also be delayed by problems outside the transmission itself. A contaminated transmission cooler may require replacement, damaged cooler lines may need repair, and electronic control faults may require additional diagnosis. These issues must be resolved because reinstalling a properly rebuilt transmission without correcting the original cause of failure can result in repeated damage.
The total rebuild timeline should include diagnostic work, parts availability, assembly, installation, and post-rebuild testing. A repair shop’s estimated turnaround should therefore be confirmed after the transmission has been inspected and the required replacement components have been identified.
Is It Better to Rebuild or Replace a 4R100 Transmission?
Rebuilding a 4R100 transmission is generally the better option when its case and major internal components remain serviceable, while replacement becomes more practical when extensive damage makes rebuilding uneconomical. The decision depends on the transmission’s mechanical condition, total repair cost, replacement availability, warranty coverage, and intended vehicle use.
A transmission rebuild retains the original case and reusable internal components while replacing worn friction materials, seals, gaskets, bushings, and damaged parts. This approach allows technicians to address specific failures without replacing every component. For example, a 4R100 with worn clutch packs and deteriorated internal seals may be economically rebuilt when its planetary gearsets, shafts, drums, and transmission case remain in acceptable condition.
A remanufactured 4R100 transmission is an alternative when the original unit has extensive internal damage or the owner wants a replacement assembled under a defined remanufacturing process. Remanufactured transmissions are typically disassembled, cleaned, inspected, restored with replacement or reconditioned components, and tested according to the supplier’s standards. However, inspection procedures, component upgrades, testing methods, and warranty terms vary between remanufacturers.
A used 4R100 transmission may have a lower initial purchase price than a rebuilt or remanufactured unit, but its internal condition and remaining service life are less predictable. Mileage, maintenance history, previous towing loads, and operating temperatures can affect wear. A used transmission may also require additional repairs after installation, increasing the total ownership cost.
The following factors help determine which option provides the best value:
| Factor | Rebuilt Transmission | Remanufactured Transmission | Used Transmission |
|---|---|---|---|
| Initial cost | Depends on damage and labor | Depends on supplier and warranty | Often lower purchase price |
| Internal components | Serviceable parts reused | Restored under supplier standards | Existing components retained |
| Reliability | Depends on rebuild quality | Depends on remanufacturing quality | Depends on unknown or documented history |
| Warranty | Varies by repair shop | Varies by supplier | Often limited |
| Installation | Original unit reinstalled | Replacement unit installed | Replacement unit installed |
| Best application | Repairable original transmission | Extensive damage or replacement preference | Budget repair with accepted risk |
Total installed cost is more important than the transmission’s purchase price alone. A replacement transmission may require a compatible torque converter, transmission fluid, cooler servicing, installation labor, and additional components. Similarly, a rebuild estimate must account for damaged hard parts discovered during inspection. Comparing written estimates with equivalent parts, labor, and warranty coverage provides a more accurate financial assessment.
Vehicle application also affects the decision. A Ford F-250 or F-350 used for frequent heavy towing places different demands on its transmission than a lightly driven vehicle. Owners planning to retain their trucks for several years should consider rebuild quality, cooling system condition, torque converter compatibility, and warranty support rather than selecting the least expensive option.
Rebuilding is usually worthwhile when the original transmission can be restored with predictable costs and properly inspected components. Replacement is preferable when structural damage, extensive hard-part failure, or repair expenses make restoring the existing unit less economical than installing a suitable replacement.
How Long Does a Rebuilt 4R100 Transmission Last?
A properly rebuilt 4R100 transmission can provide years of service, but its actual lifespan depends on rebuild quality, component condition, operating temperature, towing demands, and maintenance. There is no universally reliable mileage figure for every rebuilt 4R100 because operating conditions and rebuild standards differ substantially between vehicles.
Rebuild quality is one of the most important factors affecting transmission durability. Correct clutch clearances, properly installed seals, serviceable hard parts, and adequate hydraulic pressure allow internal components to operate as designed. Incorrect measurements, damaged sealing surfaces, or overlooked mechanical wear can cause premature failure even when new friction materials have been installed.
Transmission operating temperature directly affects the durability of friction materials, seals, and automatic transmission fluid. Excessive heat accelerates fluid oxidation and can reduce the performance of internal components. The 4R100 is commonly used in trucks that experience sustained loads during towing or hauling, making the condition of the transmission cooler and fluid circulation system particularly important. A restricted cooler or malfunctioning torque converter clutch can contribute to repeated overheating after a rebuild.
Driving conditions also influence service life. Frequent heavy towing, repeated high-load acceleration, and operation near the vehicle’s rated capacity increase the demands placed on the transmission. A 4R100 installed in a lightly loaded truck may experience different wear patterns from one regularly pulling a heavy trailer through mountainous terrain. Transmission durability therefore depends on both the quality of the rebuild and how the vehicle is operated afterward.
Maintenance helps preserve the condition of a rebuilt transmission by maintaining proper lubrication and hydraulic operation. Using the specified automatic transmission fluid, checking fluid levels correctly, repairing leaks, and following an appropriate service schedule reduce avoidable operating problems. Owners should also investigate delayed engagement, slipping, abnormal shift behavior, or unexplained temperature increases before these symptoms lead to more extensive damage.
The expected lifespan of a rebuilt 4R100 should be evaluated through workmanship quality, warranty coverage, operating conditions, and maintenance history rather than a guaranteed mileage estimate. A properly assembled transmission with effective cooling and suitable maintenance has a stronger foundation for long-term reliability than one rebuilt without addressing the original cause of failure.
Read more: How Much Is a Transmission Fluid Change at Jiffy Lube?
How Can You Prevent a Rebuilt 4R100 Transmission From Failing Again?
Preventing a rebuilt 4R100 transmission from failing again requires maintaining proper fluid condition, controlling operating temperatures, preventing hydraulic contamination, and correcting problems before they cause internal damage. These measures protect the rebuilt clutch assemblies, torque converter, transmission pump, and hydraulic control system from premature wear.
Maintaining the correct automatic transmission fluid level is essential for reliable hydraulic pressure and lubrication. The 4R100 relies on pressurized fluid to engage clutch assemblies, operate hydraulic controls, and transfer heat away from internal components. Insufficient fluid can cause pressure loss, delayed engagement, and clutch slipping, while excessive fluid can lead to aeration and inconsistent hydraulic operation. Check the fluid level using the vehicle manufacturer’s specified procedure and use a fluid that meets the applicable Ford specification.
Transmission cooling is another critical factor in preventing repeat failures. Excessive operating temperatures accelerate fluid oxidation, deteriorate seals, and damage clutch friction materials. Inspect the transmission cooler, cooler lines, and connections for restrictions, leaks, and contamination. When the original transmission fails internally, debris can remain trapped in the cooling system and circulate into the rebuilt unit. Proper cooler cleaning or replacement is necessary when contamination cannot be reliably removed.
Regular transmission maintenance helps identify developing problems before they result in extensive internal damage. Follow the service intervals appropriate for the vehicle’s model year and operating conditions, including any severe-duty recommendations for frequent towing or heavy hauling. Inspect the transmission pan and filter during scheduled servicing, and investigate unusual debris, fluid discoloration, or persistent burnt odors. These findings should be evaluated alongside operating symptoms rather than used as the sole basis for diagnosing internal failure.
Driving habits also influence the durability of a rebuilt 4R100. Repeated high-load acceleration, excessive towing loads, and prolonged operation with abnormal shifting increase stress on clutch packs and other internal components. Use the appropriate transmission operating range for the driving conditions and follow the vehicle manufacturer’s towing instructions. Avoid continuing to drive when the transmission slips, overheats, or repeatedly engages harshly because these conditions can rapidly damage newly installed components.
Correcting the original cause of transmission failure is as important as replacing damaged internal parts. For example, rebuilding a transmission that failed from overheating without repairing a restricted cooler leaves the underlying problem unresolved. Similarly, defective electrical controls, hydraulic pressure problems, or an improperly functioning torque converter can cause repeat failures if they are overlooked during diagnosis.
After rebuilding, monitor shift quality, fluid leaks, and operating temperature during normal driving. Investigate changes such as delayed engagement, unexpected engine-speed increases during acceleration, torque converter shudder, or abnormal transmission noise. Early diagnosis can prevent an isolated problem from developing into another complete transmission failure.
A rebuilt 4R100 transmission achieves its best long-term reliability when the mechanical rebuild is supported by effective cooling, correct lubrication, appropriate vehicle operation, and consistent maintenance. These practices reduce avoidable wear and help preserve the performance restored during rebuilding.
Can a Rebuilt 4R100 Transmission Handle Heavy Towing?
A properly rebuilt 4R100 transmission can handle heavy towing when its components are restored to the appropriate specifications and the vehicle operates within its manufacturer-rated towing limits. However, rebuilding the transmission does not automatically increase the vehicle’s towing capacity or guarantee reliable performance under loads exceeding its original design requirements.
The 4R100 was used in heavy-duty Ford applications, including certain F-250, F-350, and Excursion models equipped with engines such as the 7.3L Power Stroke diesel and 6.8L Triton V10. Its suitability for towing depends on the complete vehicle configuration, including engine output, axle ratio, cooling equipment, gross combined weight rating, and trailer weight. Two vehicles equipped with a 4R100 may therefore have different manufacturer-approved towing capacities.
Transmission cooling becomes especially important during towing because sustained loads increase the heat generated by the torque converter and internal friction components. Long uphill grades, stop-and-go traffic, and operation in high ambient temperatures can increase thermal stress. A properly functioning transmission cooler helps remove heat from the fluid, while a healthy torque converter clutch reduces unnecessary converter slip when operating conditions permit lockup.
The quality of the rebuild also affects towing reliability. Correct clutch pack clearances, serviceable planetary gearsets, adequate hydraulic pressure, and a properly matched torque converter help the transmission transfer engine torque without excessive slipping. A stock-specification rebuild is intended to restore the transmission’s original operating capability, not create additional towing capacity beyond the vehicle manufacturer’s rating.
Performance-oriented rebuilds may incorporate upgraded friction materials, modified hydraulic components, or torque converters designed for specific operating demands. These changes must be selected as a compatible system because increasing clutch apply pressure or changing shift characteristics without considering other components can create additional mechanical stress. Upgraded transmission components also do not increase the rated capacity of the vehicle’s brakes, frame, axles, tires, or towing equipment.
For reliable towing after a 4R100 rebuild, the vehicle should remain within its specified weight ratings and have a properly functioning transmission cooling system. Owners should monitor transmission behavior during demanding operation and investigate slipping, abnormal temperatures, or unusual shifting before continuing to tow heavy loads. A correctly rebuilt and maintained 4R100 can support the towing duties for which its vehicle configuration was designed.