Rebuilding a 4L80E transmission involves disassembling the transmission, inspecting internal components, replacing worn parts, and reassembling the unit to restore proper shifting and hydraulic operation. The process requires specialized tools, accurate measurements, and a clear understanding of the transmission’s mechanical and electronic systems.
The GM 4L80E is a four-speed automatic transmission designed for heavy-duty applications, including Chevrolet and GMC trucks, vans, and other vehicles. Over time, clutch friction materials, seals, bushings, and hydraulic components can wear out, causing slipping gears, delayed engagement, harsh shifts, or transmission failure. A complete rebuild addresses internal wear and damage rather than replacing only the components responsible for an immediate symptom.
A successful 4L80E transmission rebuild follows seven main stages: preparing tools and replacement parts, disassembling the transmission, inspecting internal components, replacing damaged clutches and seals, servicing the valve body and oil pump, reassembling the transmission, and testing its operation. Each stage requires careful attention to component orientation, clutch clearance, endplay, and hydraulic sealing.
This guide explains the 4L80E rebuild process step by step, including required tools, component inspection, assembly procedures, testing methods, and rebuild costs. Exact torque specifications and clearance limits must be verified against the service manual for the specific transmission model year.
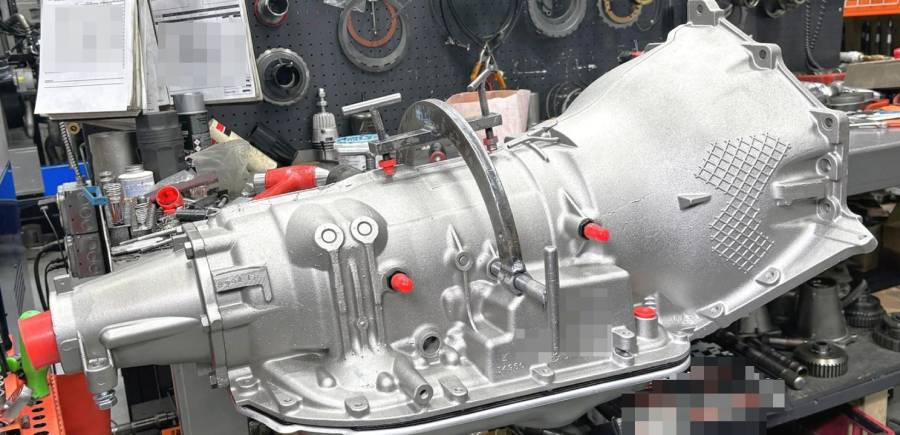
What Do You Need to Rebuild a 4L80E Transmission?
A 4L80E transmission rebuild requires specialized transmission tools, a compatible rebuild kit, replacement components, and model-specific service information. The essential equipment includes a transmission jack, clutch spring compressor, snap-ring pliers, torque wrench, dial indicator, feeler gauges, and seal installation tools. A clean workbench and organized storage containers are also necessary because the 4L80E contains multiple clutch assemblies, hydraulic components, and small retaining parts that must return to their correct positions.
A typical 4L80E master rebuild kit includes friction plates, steel plates, piston seals, O-rings, gaskets, and sealing rings. Some kits also include bushings, a filter, and additional wear components. However, rebuild kits do not necessarily contain replacement hard parts such as planetary gearsets, clutch drums, shafts, or the oil pump. These components must be inspected separately and replaced when their condition falls outside service specifications.
Selecting the correct rebuild kit requires identifying the transmission’s production year and configuration. The 4L80E underwent design revisions during its production history, including changes to internal components and electronic controls. Parts that fit one version may not be interchangeable with another. Verify the transmission identification information and compare replacement components with the applicable GM service documentation before ordering parts.
Additional supplies include approved automatic transmission fluid, assembly lubricant, lint-free cleaning materials, and suitable transmission cleaning solvent. A transmission assembly lubricant helps retain thrust washers, bearings, and seals during installation while providing initial lubrication. Clean components thoroughly before assembly because metal particles, clutch debris, and dirt can obstruct hydraulic passages or damage newly installed friction components.
Prepare the work area by arranging labeled trays for clutch assemblies, snap rings, thrust washers, and valve-body components. Photograph component orientation during disassembly and record existing clutch clearances and transmission endplay where applicable. These measurements help identify excessive wear and provide reference points during reassembly. A factory service manual is essential for verifying component order, fastener torque, clutch clearance, and endplay specifications.
How Do You Disassemble a 4L80E Transmission?
Disassembling a 4L80E transmission involves removing the unit from the vehicle, draining its fluid, separating the hydraulic control components, and extracting the internal clutch assemblies and geartrain. The transmission must be supported securely throughout removal because its weight and attached torque converter create significant handling risks.
Begin by disconnecting the battery and raising the vehicle using properly rated lifting equipment. Support the transmission with a transmission jack before disconnecting the driveshaft, electrical connectors, shift linkage, transmission cooler lines, and related brackets. Remove the torque converter fasteners, support the engine as required, and disconnect the transmission crossmember and bellhousing fasteners. Lower the transmission carefully while keeping the torque converter secured inside the bellhousing.
Once the transmission is on a stable workbench, drain the remaining automatic transmission fluid and clean the exterior case. Inspect the drained fluid for discoloration, a burnt odor, and metallic particles. Dark fluid containing clutch debris suggests friction material deterioration, while large metal fragments indicate possible damage to gears, bearings, or other internal components. These findings help determine which assemblies require closer inspection.
How Do You Remove the 4L80E Valve Body and Oil Pump?
Remove the 4L80E valve body and oil pump by first exposing the hydraulic control assembly, documenting its component positions, and then extracting the pump using the correct service tools. The valve body controls transmission fluid flow through hydraulic passages, while the oil pump generates the pressure required for clutch application and lubrication.
Start by removing the transmission oil pan and filter. Examine the pan and magnet for accumulated debris before cleaning them. Disconnect the internal electrical connectors and remove the valve-body retaining bolts according to the applicable service procedure. Keep track of bolt lengths and locations because installing an incorrect fastener can damage the valve body or transmission case.
Carefully separate the valve body and associated components while preserving the positions of checkballs, separator plates, gaskets, and hydraulic control parts. Checkball arrangements and separator-plate configurations vary between 4L80E versions, so document their locations before removal. Incorrect checkball placement can disrupt hydraulic circuits and produce slipping, delayed engagement, or improper shifting after the rebuild.
After removing the necessary internal components, position the transmission for front pump removal. Remove the pump retaining bolts and use an appropriate pump puller to extract the assembly evenly from the case. Avoid prying against machined sealing surfaces because scratches or distortion can create internal pressure leaks.
Inspect the exposed pump sealing surfaces and surrounding case for scoring, cracks, or damaged sealing areas. Store the pump components together until detailed inspection begins. The pump’s internal gears, bushings, and pressure-regulation components will be evaluated during the inspection and hydraulic-system rebuilding stages.
How Do You Remove the 4L80E Clutch Packs and Geartrain?
Remove the 4L80E clutch packs and geartrain in the sequence specified by the service manual, keeping each assembly’s thrust components, retaining rings, and selective parts organized. The transmission contains multiple friction elements and planetary gearsets that work together to produce four forward speeds and reverse.
Begin removing the accessible internal assemblies after the front pump has been extracted. Depending on the transmission configuration and disassembly stage, these include the overdrive components, forward and direct clutch assemblies, and associated geartrain parts. Lift assemblies straight from the case when possible to prevent damage to splines, sealing surfaces, and clutch drum components.
Some internal assemblies require additional disassembly before their clutch plates or pistons can be removed. Use a suitable clutch spring compressor to compress return springs before removing retaining rings. Release spring pressure gradually after the retaining ring has been removed. Attempting to remove spring-loaded retaining components without proper compression equipment can cause parts to eject unexpectedly.
Separate friction plates and steel plates from each clutch assembly while preserving their original installation order for inspection. Examine the plates for burnt friction material, heat discoloration, scoring, and uneven wear. Record any abnormal conditions before cleaning the components because wear patterns can reveal lubrication problems, insufficient clutch pressure, or mechanical misalignment.
Continue disassembling the geartrain and rear case components according to the applicable 4L80E service procedure. Keep planetary carriers, shafts, bearings, thrust washers, and selective spacers grouped by their original locations. Do not interchange visually similar thrust components without confirming their specifications, as incorrect placement can change transmission endplay and cause premature wear.
After disassembly, inspect the empty transmission case for cracks, damaged threads, worn bearing surfaces, and accumulated debris. Clean the case and reusable components with transmission-compatible cleaning products, then dry them using methods that prevent contamination. Keep hydraulic passages free of lint and abrasive particles.
A properly documented disassembly provides the foundation for the remaining rebuild stages. Every removed component should be identifiable by its original location, orientation, and condition before the inspection process begins.
How Do You Inspect 4L80E Transmission Components for Damage?
Inspecting 4L80E transmission components requires checking friction surfaces, hydraulic components, gears, shafts, bearings, bushings, and seals for wear that could cause transmission failure after reassembly. The purpose of this inspection is to distinguish reusable components from parts that require replacement or professional evaluation. A rebuild kit addresses routine wear items, but damaged hard parts can require additional components and significantly increase the total repair cost.
Begin by cleaning the disassembled components with transmission-compatible cleaning products and examining them under adequate lighting. Look for burnt friction material, scoring, cracks, damaged splines, metal particles, and signs of overheating. Use a micrometer, dial indicator, feeler gauges, or other appropriate measuring instruments when the service manual specifies dimensional checks. Visual inspection alone cannot establish whether a component remains within its allowable wear limits.
How Do You Inspect 4L80E Clutch Packs for Wear?
Inspect 4L80E clutch packs by examining the friction plates, steel plates, clutch drums, pistons, and related sealing components for heat damage, excessive wear, and dimensional irregularities. Clutch packs transfer engine torque through friction between alternating friction and steel plates. When hydraulic pressure applies a clutch piston, the plates compress together to engage the corresponding transmission element. Worn friction material or inadequate hydraulic pressure can prevent complete engagement and cause slipping.
Examine friction plates for burnt surfaces, missing friction material, glazing, uneven wear, and damaged tabs. Friction material that appears severely discolored or has a burnt odor can indicate overheating or prolonged slipping. Inspect steel plates for blue or dark heat marks, warping, scoring, and surface damage. Replace plates that fail the applicable service criteria rather than assuming that cleaning will restore their original performance.
Next, inspect the clutch drums and internal splines. Damaged splines can prevent proper engagement or allow excessive movement between components. Examine the clutch pistons for cracks, distortion, and damaged sealing surfaces. Hardened, cut, or flattened piston seals can allow hydraulic pressure to escape, reducing the force available to apply the clutch pack.
Measure clutch clearance using the procedure specified for the particular clutch assembly. Excessive clearance can delay clutch engagement, while insufficient clearance can prevent complete release and cause drag or overheating. The correct clearance depends on the specific assembly and configuration, so use the appropriate GM service specifications instead of applying one measurement to every clutch pack.
Also inspect the return springs, retaining rings, and spring retainers. Damaged retaining components can compromise assembly security, while weakened or incorrectly installed springs can affect clutch release. Replace defective components and record the final clearance measurements during reassembly to confirm that the clutch assembly meets the applicable requirements.
How Do You Check the 4L80E Oil Pump and Planetary Gearsets?
Check the 4L80E oil pump and planetary gearsets by inspecting their working surfaces, gear teeth, bearings, bushings, shafts, and lubrication passages for wear or damage. The oil pump supplies hydraulic pressure and supports lubrication, while the planetary gearsets provide the gear ratios required for different driving conditions. Damage to either system can compromise transmission operation even when the clutch packs and seals are new.
Begin with the oil pump. Inspect the pump body and gear surfaces for scoring, cracks, abnormal wear, and heat damage. Check the pressure-regulating components for sticking, contamination, and bore wear where applicable. Examine sealing surfaces and bushings for damage that could affect oil pressure or component alignment. If the pump shows evidence of severe wear, measure the relevant clearances according to the service manual and determine whether the affected parts can be reused.
Inspect the planetary gearsets for chipped teeth, pitting, cracks, and abnormal contact patterns. Rotate the gears by hand where the assembly permits and check for roughness, binding, or excessive play. Examine the planetary carrier, pinions, sun gear, ring gear, and associated bearings for damage. Metal fragments found in the oil pan or filter can provide additional evidence of internal gear or bearing failure.
Check the input shaft and other applicable shafts for damaged splines, scoring, distortion, and excessive wear. Inspect bushings and bearings for rough surfaces, looseness, or signs of inadequate lubrication. Measure shaft endplay and other specified clearances using the correct procedures and equipment. Components that fall outside the manufacturer’s service limits require replacement or approved repair.
Finally, inspect the transmission case for cracks, damaged threads, worn bearing supports, and damaged sealing surfaces. A damaged case can prevent a successful rebuild even when the internal components have been replaced. Document each defect and prepare a complete replacement-parts list before proceeding to clutch and seal installation.
How Do You Replace Clutches and Seals in a 4L80E Transmission?
Replacing clutches and seals in a 4L80E transmission involves removing worn friction components, inspecting the associated assemblies, installing compatible replacement parts, and verifying the required clearances. New friction plates cannot compensate for damaged clutch drums, leaking pistons, worn hydraulic components, or incorrect assembly. A reliable rebuild addresses the entire clutch assembly rather than replacing only the visibly damaged plates.
Before installation, confirm that replacement friction plates, steel plates, seals, and related components match the transmission configuration. Compare new parts with the original components for dimensions, thickness, spline arrangement, and design differences. Clean the clutch drums and related parts thoroughly, ensuring that hydraulic passages and sealing surfaces remain free of debris.
Lubricate friction plates and applicable seals with the specified assembly lubricant or transmission fluid before installation. Follow the service manual for the correct plate arrangement, piston installation procedure, and clutch clearance measurements. Never assume that every clutch assembly uses an identical friction stack or that every rebuild kit contains all the necessary components.
How Do You Replace 4L80E Clutch Plates?
Replace 4L80E clutch plates by disassembling the affected clutch pack, inspecting the drum and piston, installing the specified friction and steel plates in the correct order, and measuring the completed assembly. The forward, direct, intermediate, and overdrive clutch assemblies perform different functions, so their component arrangements and clearance specifications must be verified individually.
Start by removing the clutch pack’s retaining ring and releasing the return spring with the appropriate compressor when required. Remove the piston and seals according to the applicable assembly procedure. Keep the original plate arrangement documented, but use the service manual to establish the correct replacement configuration rather than relying exclusively on the order of previously installed parts.
Inspect the clutch drum for worn splines, scoring, cracks, and damaged surfaces. Check the piston bore and sealing areas for defects that could cause hydraulic leakage. Replace damaged components before installing the new clutch stack. Clean the assembly and ensure that the lubrication passages remain unobstructed.
Install the replacement friction and steel plates in the specified sequence. Apply the appropriate lubricant to the friction surfaces and confirm that each plate seats correctly on its splines. Avoid forcing plates into position because misalignment can damage the friction material or the drum.
After installing the retaining components, measure clutch clearance using the prescribed procedure. Depending on the assembly, this involves checking the movement of the clutch pack or using a specified measuring method. Compare the result with the applicable factory specifications. If the clearance is incorrect, verify the plate thicknesses, component order, retaining-ring seating, and any permitted selective components before repeating the measurement.
Complete the same inspection and installation process for each clutch assembly that requires rebuilding. Record the measurements and inspect the assemblies for binding or abnormal movement before proceeding to transmission reassembly.
How Do You Install New 4L80E Piston Seals?
Install new 4L80E piston seals by selecting the correct seal for the piston, lubricating it appropriately, preserving its specified orientation, and fitting it without twisting, cutting, or stretching the sealing lip. Piston seals retain hydraulic pressure inside the clutch assembly. If a seal leaks, the piston may not apply the clutch with sufficient force, potentially causing slipping, overheating, or delayed engagement.
Remove the old seals carefully and clean the piston grooves and sealing surfaces. Inspect the piston for cracks, scoring, corrosion, and distortion. A new seal will not correct damage to the piston or bore that prevents proper sealing. Replace defective components or have them evaluated using the manufacturer’s approved repair procedures.
Compare each replacement seal with the original component and verify its part number and application. Some seals have specific lip orientations or installation requirements, so follow the relevant service documentation. Lubricate the seal and piston with the specified assembly lubricant or transmission fluid before installation. Use suitable seal installation tools when necessary to prevent damage to the sealing lip.
Fit the seal into its designated groove without twisting or rolling it. If the seal must pass over a sharp edge or spline, use the appropriate protective sleeve or installation tool. Do not force a seal into place with a screwdriver or another sharp implement, as even a small cut can create a hydraulic leak.
After installation, verify that the seal sits evenly in its groove and moves or compresses as intended by the assembly design. Reinstall the piston using the specified procedure, taking care not to dislodge the seal during insertion. Where the service procedure calls for an air check, use regulated air pressure and the specified test method to assess piston application and excessive leakage.
Inspect the completed clutch assembly before moving to the next rebuilding stage. Correct seal installation, clean hydraulic passages, and verified clutch clearances provide the foundation for proper hydraulic operation after the transmission is reassembled.
How Do You Rebuild the 4L80E Valve Body and Oil Pump?
Rebuilding the 4L80E valve body and oil pump requires cleaning hydraulic passages, inspecting valves and pressure-regulating components, checking electrical solenoids, and replacing worn parts that prevent correct fluid pressure and flow. The valve body directs hydraulic fluid to the appropriate clutch circuits, while the oil pump supplies the pressure needed to apply clutches, operate hydraulic controls, and lubricate internal components. Defects in either assembly can cause slipping, delayed engagement, abnormal shifting, or transmission overheating.
Begin by disassembling the valve body on a clean workbench. Keep the separator plate, gaskets, checkballs, springs, valves, and retaining components organized according to their original positions. The number and location of checkballs, as well as separator-plate configurations, can vary with transmission design and production year. Use the correct service manual and component diagram to avoid mixing parts or installing them in the wrong locations.
Clean the valve body and its passages using transmission-compatible cleaning products. Inspect the valves for scoring, sticking, contamination, and wear in their bores. A valve that cannot move freely may interfere with hydraulic pressure regulation or shift control. Check the separator plate for damage around fluid passages and checkball seats. Replace damaged gaskets and other components according to the applicable service procedure.
Inspect the pressure regulator and related hydraulic components for wear that could cause excessive leakage or unstable line pressure. Check valve movement using the specified inspection procedure rather than assuming that a visually clean component operates correctly. If a valve bore is excessively worn, replacing the valve alone might not correct the problem; an approved repair or replacement of the affected valve-body section may be necessary.
How Do You Test 4L80E Shift Solenoids?
Test 4L80E shift solenoids by inspecting their electrical connections, checking resistance against the correct service specifications, and performing the prescribed functional tests. The electronically controlled transmission uses solenoids to regulate hydraulic circuits in response to commands from the transmission control system. Electrical faults, damaged connectors, contaminated valves, or mechanically sticking solenoids can cause incorrect shifting and diagnostic trouble codes.
Begin by inspecting the internal wiring harness and connectors for damaged insulation, corrosion, loose terminals, and signs of overheating. Check that the connector terminals fit securely and that the wiring has not been damaged during disassembly. Electrical continuity and resistance measurements can identify certain faults, but they do not establish that a solenoid operates correctly under every hydraulic condition.
Use a digital multimeter to measure solenoid resistance when the service manual specifies this test. Compare the readings with the applicable limits for the particular solenoid and transmission version. Do not apply a generic resistance specification to every 4L80E solenoid because electrical designs and component specifications must be verified against the correct documentation.
If the electrical measurements are within specification, continue with any required functional checks. A solenoid can pass a basic resistance test yet still stick mechanically or fail to control fluid flow correctly. Inspect the associated hydraulic passages and valve movement before concluding that the solenoid is the only cause of a shifting problem.
Replace defective solenoids with compatible parts and route the internal wiring harness correctly during reassembly. Ensure that connectors are fully seated and that wires cannot become trapped between the valve body and transmission case. These checks help prevent electrical faults from compromising an otherwise successful rebuild.
How Do You Reassemble the 4L80E Oil Pump?
Reassemble the 4L80E oil pump by inspecting its components, replacing worn parts, lubricating the working surfaces, and verifying the required clearances and assembly measurements. The pump must generate sufficient hydraulic pressure without excessive internal leakage. Worn gears, damaged sealing surfaces, or incorrectly installed components can reduce pressure and interfere with clutch engagement.
Disassemble the pump according to the service procedure and clean its components thoroughly. Inspect the pump body, gears, bushings, pressure-regulating valve, and related parts for scoring, cracks, excessive wear, and heat damage. Examine the gear contact surfaces and pump housing for damage that exceeds the manufacturer’s limits. Measure specified clearances using the appropriate tools rather than relying solely on visual inspection.
Replace defective components and lubricate the relevant surfaces with the specified assembly lubricant or transmission fluid. Reinstall the gears, valves, seals, and retaining components in their designated positions. Ensure that the pressure-regulating components move correctly and that the assembly is free from debris.
Check the pump’s specified internal clearances and other required measurements against the correct service documentation. Do not substitute generic clearance values because pump designs and service limits can differ. If the pump body or gear surfaces are excessively damaged, use an approved repair method or replace the assembly.
Before installation, inspect the pump-to-case sealing surfaces and ensure that the required seals and gaskets are correctly positioned. The pump must align with the transmission’s internal components without binding. Correct assembly and verified clearances are essential for maintaining hydraulic pressure after the transmission is returned to service.
How Do You Reassemble a 4L80E Transmission?
Reassembling a 4L80E transmission requires installing the inspected clutch assemblies, planetary geartrain, thrust components, oil pump, valve body, and torque converter in the correct sequence. Each component must engage properly with the parts around it, and specified clearances must be verified before the transmission is closed. Incorrect assembly can cause binding, hydraulic leakage, abnormal endplay, or premature failure even when all replacement parts are new.
Before beginning reassembly, confirm that the transmission case and reusable components are clean. Lay out the inspected assemblies, replacement parts, recorded measurements, and service documentation. Apply the specified assembly lubricant to the appropriate bearings, bushings, thrust surfaces, and seals. Keep lint, metal particles, and cleaning residue away from the internal hydraulic passages.
Reinstall the internal components according to the manufacturer’s assembly sequence. Confirm that thrust washers, bearings, selective spacers, and retaining rings are present and correctly positioned. These components establish the alignment and operating clearances of the rotating assemblies. A missing or incorrectly installed thrust component can change endplay and create excessive wear.
How Do You Reinstall the 4L80E Clutch Assemblies and Geartrain?
Reinstall the 4L80E clutch assemblies and geartrain by following the specified assembly sequence, lubricating the components, confirming proper engagement, and checking that each assembly seats fully. The clutch packs and planetary gearsets must work together to produce the required gear ratios. Incorrect component orientation or incomplete engagement can prevent proper operation after installation.
Begin with the internal assembly designated first by the applicable service manual. Install the required thrust washers, bearings, spacers, and geartrain components in their specified locations. Confirm that each component matches the configuration documented during disassembly and that any selective parts are retained or replaced according to the service measurements.
Install the clutch assemblies in the prescribed order. Align the clutch hubs and splines carefully rather than forcing components into position. If an assembly does not seat correctly, remove it and inspect the alignment, thrust components, and engagement surfaces. Forcing a misaligned assembly can damage splines, seals, or other precision components.
Check the movement of the installed assemblies as the procedure permits. Rotating components should move as intended without unexplained binding. Some resistance is normal because of seals, clutch contact, and assembly lubrication, but unusual mechanical interference requires investigation before proceeding.
Install the retaining rings and other securing components using the correct tools. Verify that retaining rings are fully seated in their grooves and that thrust components remain in position. A partially seated retaining ring can allow an assembly to move incorrectly during operation.
Continue with the remaining geartrain and clutch assemblies, maintaining a record of the installation sequence. After the internal assemblies are installed, verify the applicable endplay and clutch clearances before installing the pump and closing the transmission. These measurements provide an important final check that the internal components have been assembled correctly.
How Do You Check 4L80E Transmission Endplay and Clutch Clearance?
Check 4L80E transmission endplay and clutch clearance using the measurement methods and specifications provided in the applicable service manual. Endplay measures the permitted axial movement of an assembly or shaft, while clutch clearance measures the space within a clutch pack when it is released. Both measurements affect transmission operation, component loading, and durability.
To measure endplay, position the transmission and measurement equipment according to the specified procedure. Attach a dial indicator at the prescribed reference point and apply controlled movement in the direction required by the test. Record the indicated travel and compare it with the applicable specification. The correct measurement method and allowable range depend on the component being measured and the transmission configuration.
If endplay exceeds the specified limit, inspect the thrust washers, bearings, selective spacers, retaining components, and seating surfaces. If endplay is too small, check for incorrectly installed parts, excessive component thickness, or assemblies that have not seated fully. Do not attempt to correct a measurement by changing selective components without following the manufacturer’s procedure.
Measure clutch clearance using the method specified for each clutch assembly. Depending on the assembly, the procedure may involve a feeler gauge, dial indicator, or another approved measuring technique. Verify the friction and steel plate arrangement, retaining-ring position, and plate dimensions if the result falls outside the permitted range.
Correct excessive clearance by identifying the cause and selecting only approved components or adjustment methods. Insufficient clearance also requires correction because a clutch that cannot release properly may drag, overheat, or wear prematurely. Never apply one universal clearance value to all 4L80E clutch assemblies.
Record the final measurements for the assemblies that require verification. These records provide evidence that the transmission meets the applicable dimensional requirements and help establish a reference for later troubleshooting if a problem develops.
After verifying the measurements, reinstall the oil pump and valve body using the specified gaskets, seals, fastener sequence, and torque values. Confirm that checkballs and separator-plate components occupy their designated positions. Tighten fasteners to the service-manual specifications because excessive torque can damage threads or distort components, while insufficient torque can allow leakage or movement.
Finally, inspect the transmission for leftover components, unsecured connectors, misplaced seals, and contamination before installing the torque converter. A systematic reassembly procedure reduces the risk of overlooking small parts that have a direct effect on hydraulic performance.
How Do You Install the 4L80E Torque Converter Correctly?
Install the 4L80E torque converter by inspecting the converter and pump engagement surfaces, lubricating the applicable components, and ensuring that the converter fully engages the transmission’s internal drive and pump features before the transmission is mounted to the engine. Incorrect installation can damage the oil pump when the bellhousing is tightened against the engine.
Inspect the torque converter for external damage, fluid leakage, damaged mounting pads, and signs of overheating. If the original transmission experienced severe clutch failure or extensive contamination, evaluate the converter for internal contamination and damage. Replace or professionally service it when its condition or the manufacturer’s recommendations warrant doing so.
Apply the specified transmission fluid or lubricant to the converter hub and relevant sealing surfaces. Position the converter squarely at the transmission input and rotate it while applying gentle inward pressure. The converter must engage the applicable splines and pump drive features through the required engagement stages. Do not force it into place.
Verify converter seating by following the service procedure and checking the specified installed depth or clearance where applicable. A converter that remains too far forward may not be fully engaged with the pump. If the converter does not seat correctly, remove it and inspect the alignment instead of using bellhousing bolts to pull the transmission toward the engine.
During installation, support the transmission and align it with the engine without placing excessive load on the converter. Once the transmission is secured according to the manufacturer’s procedure, verify the specified converter-to-flexplate clearance before attaching the converter to the flexplate. Use the applicable service specifications because the correct clearance depends on the assembly configuration.
After installation, rotate the engine by hand as directed by the service manual and confirm that the converter and engine components move without abnormal interference. Complete the remaining connections, fluid filling, and installation checks before beginning the initial operating tests.
How Do You Test a Rebuilt 4L80E Transmission?
Testing a rebuilt 4L80E transmission involves verifying fluid level, hydraulic pressure, electrical operation, gear engagement, shift quality, and leak prevention before returning the vehicle to normal use. A transmission that has been assembled correctly must still demonstrate that its hydraulic and electronic systems work together under operating conditions. Initial testing helps identify assembly errors, incorrect fluid levels, electrical faults, and internal pressure problems before they cause additional damage.
Before starting the engine, confirm that the transmission is securely installed and that the torque converter, flexplate fasteners, transmission mounts, driveshaft, cooler lines, electrical connectors, and shift linkage have been installed correctly. Verify that the cooler system is clean and that any contamination from the previous transmission failure has been addressed. Debris left in the cooler or lines can enter the rebuilt transmission and damage its internal components.
Fill the transmission with the specified automatic transmission fluid using the applicable service procedure. The required fluid type and filling quantity depend on the transmission configuration, torque converter, cooler arrangement, and whether the system is completely dry. Avoid relying on a single generic capacity figure because an installed transmission and a fully disassembled unit require different amounts of fluid.
Start the engine according to the manufacturer’s procedure and inspect for immediate leaks or abnormal noises. Follow the specified process for circulating fluid through the hydraulic circuits and checking the fluid level at the required temperature and selector position. Do not accelerate the engine excessively or attempt a road test when fluid level, engagement, or hydraulic operation is uncertain.
How Do You Check 4L80E Transmission Fluid and Line Pressure?
Check 4L80E transmission fluid and line pressure by following the correct fluid-level procedure, inspecting the transmission for leaks, and measuring hydraulic pressure when required by the service manual. Fluid level and line pressure directly affect clutch application, lubrication, cooling, and shift quality. Incorrect fluid level or inadequate hydraulic pressure can cause slipping, delayed engagement, overheating, and premature component wear.
Begin by checking the fluid specification for the exact transmission application. Use the designated dipstick or level-checking method and follow the manufacturer’s requirements for operating temperature, engine status, and selector position. If the procedure requires the engine to run, keep the vehicle securely supported and apply the parking brake. Do not place yourself beneath a vehicle supported only by a jack.
Inspect the fluid for abnormal discoloration, a burnt odor, and visible contamination. Fresh fluid does not eliminate the need to investigate persistent debris or a burnt smell, particularly when the previous transmission suffered severe internal damage. Examine the transmission pan area, cooler connections, case seals, electrical connector, and torque converter area for leakage.
To check line pressure, connect a suitable hydraulic pressure gauge to the specified test port using the appropriate adapter. Follow the service manual’s procedure for engine speed, selector position, fluid temperature, and test duration. Compare the readings with the manufacturer’s pressure specifications for the particular operating condition. Pressure values should not be interpreted without considering the relevant test conditions.
Low line pressure can result from several faults, including an oil pump problem, pressure-regulator wear, internal hydraulic leakage, incorrect fluid level, or a restricted filter. Excessively high pressure may indicate a pressure-regulation problem or an electronic control issue, depending on the observed conditions. Additional testing is necessary to identify the underlying cause rather than replacing components based on a single reading.
If pressure is outside the specified range, stop testing under conditions that could damage the transmission. Recheck fluid level and external connections, review the assembly measurements, and investigate the hydraulic system according to the service procedure. Correct pressure and fluid-level verification provide an essential foundation for evaluating shift quality during the next testing stage.
How Do You Test Drive a Rebuilt 4L80E Transmission?
Test drive a rebuilt 4L80E transmission by confirming that all gears engage correctly, shifts occur without abnormal slipping or harshness, operating temperature remains within the appropriate range, and no leaks or warning indicators appear. The first drive should be controlled and conservative because the transmission has not yet demonstrated reliable operation under normal driving conditions.
Before moving the vehicle, verify that the brakes, parking brake, steering, transmission mounts, driveshaft, and related safety systems are functioning correctly. With the engine running and the service procedure followed, check engagement in the available selector positions. Allow the transmission to engage without applying excessive throttle. Delayed engagement, repeated engagement attempts, severe impact, or unusual mechanical noise requires investigation before driving.
Begin the road test in a safe area with light throttle and low vehicle load. Observe the transition between forward gears and monitor whether the transmission maintains engagement during acceleration and deceleration. Check that reverse operates correctly and that the transmission does not flare between shifts, slip under light load, or produce unexpected harsh engagement.
Use a scan tool where appropriate to monitor transmission-related data and diagnostic trouble codes. Depending on the vehicle’s control system, useful information may include commanded gear, input and output speed signals, transmission temperature, and solenoid control status. Compare the actual behavior with the expected operation for the vehicle’s configuration.
Monitor transmission temperature throughout the test. Abnormally rapid temperature increases may indicate slipping, inadequate fluid circulation, cooling-system problems, or another mechanical fault. Stop the test if the transmission produces severe noise, loses drive, leaks fluid, or shows symptoms that suggest internal damage.
After the initial drive, park the vehicle safely and inspect the transmission, cooler connections, and surrounding components for leaks. Recheck the fluid level using the required temperature-dependent procedure. Review any stored trouble codes and address abnormal operating conditions before continuing to more demanding driving.
A successful initial road test is not a substitute for completing all required service checks. Confirm that the transmission operates consistently under the specified conditions and follow any additional inspection or maintenance recommendations in the applicable service documentation.
How Much Does It Cost to Rebuild a 4L80E Transmission?
The cost of rebuilding a 4L80E transmission depends on the condition of the internal components, the price of replacement parts, the tools required, and whether the work is performed at home or by a professional transmission shop. A basic rebuild may require only a compatible rebuild kit and a limited number of additional parts, while a transmission with damaged planetary gearsets, a worn oil pump, or a failed torque converter can require substantially more investment.
The main cost categories are replacement parts, specialized tools, automatic transmission fluid, cleaning supplies, machine work, and labor. A master rebuild kit covers common wear components such as friction plates, steel plates, seals, and gaskets, but it does not necessarily include every hard part that may be damaged. The transmission must therefore be disassembled and inspected before the full repair cost can be established.
How Much Does a DIY 4L80E Rebuild Cost?
A DIY 4L80E rebuild generally costs less in labor because the vehicle owner performs the disassembly, inspection, component replacement, and reassembly. However, the total expense depends on the existing tool inventory, the condition of the transmission, and the number of parts that require replacement. Owners who already have a transmission jack, torque wrench, measuring instruments, and appropriate specialty tools can avoid purchasing those items specifically for the rebuild.
The parts budget should account for a compatible rebuild kit, any required hard parts, a torque converter when replacement is justified, automatic transmission fluid, filter components, and cleaning supplies. Additional expenses may include a replacement valve body, oil pump components, bushings, bearings, or professional inspection of damaged assemblies. A transmission with extensive internal damage can cost significantly more to rebuild than one that needs routine wear components.
Tool costs deserve separate consideration. A clutch spring compressor, snap-ring pliers, dial indicator, and suitable measuring tools may be necessary for safe disassembly and accurate assembly. Purchasing these tools increases the initial cost, although reusable tools can support future transmission repairs.
Before beginning the project, prepare a parts budget that distinguishes confirmed replacement items from potential expenses. Obtain current prices for the rebuild kit and commonly damaged components, then reserve funds for additional parts identified during inspection. This approach reduces the risk of leaving the transmission disassembled because the budget did not account for internal damage.
DIY rebuilding also carries an opportunity cost. The owner must account for workshop time, transportation needs, the possibility of measurement errors, and the cost of correcting an unsuccessful rebuild. Saving labor charges does not automatically make DIY rebuilding the least expensive option if specialized tools, machining, or extensive troubleshooting are required.
How Much Does a Professional 4L80E Rebuild Cost?
A professional 4L80E rebuild includes labor for removing and disassembling the transmission, inspecting components, replacing damaged parts, reassembling the unit, and performing appropriate tests. The final price varies with local labor rates, the transmission’s condition, the parts selected, and the warranty included in the repair.
A professional estimate should distinguish the cost of the rebuild itself from removal and installation labor. Some shops quote a transmission rebuild separately from the labor required to remove the unit from the vehicle and reinstall it. Other estimates include the complete repair, including fluid, filter components, cooler-system servicing, and initial testing. Comparing quotes requires confirming which services and parts are included.
The extent of internal damage is another major cost factor. A transmission that needs friction plates, seals, and gaskets may require fewer parts than one with damaged gearsets, a worn pump, a cracked case, or extensive contamination. A professional inspection helps identify these additional expenses before the final repair is authorized.
Warranty coverage should also influence the decision. Review the duration of coverage, mileage limitations, labor coverage, and conditions that could invalidate the warranty. Confirm whether the warranty covers the rebuilt transmission only or also includes removal and reinstallation if a covered failure occurs.
Request an itemized estimate showing parts, labor, additional machining, fluid, installation, and warranty terms. Because prices vary by location and transmission condition, obtain current local quotes rather than relying on an undated universal price range. Compare the total installed cost with the cost of a remanufactured transmission before choosing a repair option.
Read more: VW DSG Transmission Problems: Symptoms, Causes & Fixes
Is Rebuilding a 4L80E Transmission Difficult?
Rebuilding a 4L80E transmission is a technically demanding project that requires mechanical experience, specialty tools, accurate measurements, and careful handling of hydraulic and electronic components. Although a mechanically skilled DIY enthusiast can perform the work with appropriate training and service documentation, a complete rebuild is more complex than replacing an external sensor or changing transmission fluid.
The difficulty comes from the number of interacting components inside the transmission. Clutch packs must have the correct clearances, thrust components must remain in their designated positions, and hydraulic valves must move freely. Incorrect assembly can produce slipping, delayed engagement, abnormal shifting, or immediate internal damage after installation.
Accurate measurement is particularly important. Endplay and clutch clearance must meet the specifications for the particular transmission configuration. A component that looks acceptable may still be outside its service limits, while a new replacement part can create problems if it is installed in the wrong sequence or with an incompatible component.
Cleanliness is another essential requirement. Dirt, lint, and metal particles can obstruct small hydraulic passages or damage precision surfaces. A suitable workspace, organized component storage, and a consistent inspection process reduce the likelihood of contamination and assembly mistakes.
Beginners should evaluate their experience with mechanical assemblies, measuring instruments, electrical diagnosis, and service-manual procedures before attempting a complete rebuild. If the work requires tools or skills that are unavailable, professional rebuilding may offer better value than purchasing equipment and risking an incorrect assembly.
The time required also depends on experience, tool availability, parts sourcing, and the amount of damage found during inspection. A straightforward rebuild can take substantially less time than a project involving hard-part replacement, machining, or repeated diagnostic work. Separate the actual assembly time from vehicle removal, cleaning, parts ordering, and post-rebuild testing when estimating the project schedule.
Is It Better to Rebuild or Replace a 4L80E Transmission?
Rebuilding a 4L80E transmission is generally worth considering when the transmission case and major internal components remain serviceable, while replacing it may be more practical when extensive damage makes rebuilding uneconomical. The right decision depends on the condition of the transmission, the availability of replacement parts, labor costs, warranty coverage, and the vehicle’s intended use.
A rebuild allows a technician to inspect the internal components and replace damaged parts while retaining serviceable assemblies. This approach can be appropriate when the case, shafts, and planetary gearsets remain within acceptable service limits. It also provides an opportunity to address the original failure and replace worn components that could otherwise cause future problems.
Replacing the transmission with a remanufactured unit offers a different set of advantages. A remanufactured transmission is rebuilt by a specialist according to a defined process and may include updated components and warranty coverage. However, the buyer must verify that the replacement matches the vehicle’s application, electronic controls, and installation requirements.
The total installed cost is more useful than the price of the transmission alone. A replacement unit may require shipping, a core charge, installation labor, new fluid, cooler-system servicing, and additional parts. A rebuild estimate may also increase after disassembly reveals damage that was not visible during initial diagnosis.
Before choosing either option, compare itemized estimates and confirm what each warranty covers. Consider the vehicle’s age, overall condition, expected ownership period, and intended workload. A well-supported rebuild can be a sensible choice for a vehicle worth keeping, while a compatible remanufactured unit can reduce the amount of in-house rebuilding work required.
When Is Rebuilding a 4L80E Transmission Worth It?
Rebuilding a 4L80E transmission is worth considering when the case is intact, the damaged components can be replaced economically, and the total repair cost is reasonable compared with the vehicle’s value and intended service life. The decision should follow a complete inspection rather than assumptions based on symptoms alone.
A transmission with worn clutch friction material, leaking piston seals, or repairable pump wear may be a suitable rebuild candidate. These faults can often be addressed by replacing affected components and verifying that the remaining assemblies meet service specifications. However, the actual repair scope depends on the condition of the geartrain, shafts, bearings, valve body, and case.
A rebuild can also make sense when the vehicle has a specialized configuration or when retaining the original transmission is preferable to sourcing a compatible replacement. The rebuilder can inspect the internal assemblies and select replacement components appropriate to the vehicle’s operating requirements. Any performance-oriented modifications should be based on the intended application and supported by suitable technical information.
Budget planning remains essential. Obtain a preliminary estimate for the rebuild kit, likely replacement components, labor, and any required machining. Then compare that estimate with the cost of a remanufactured transmission, including installation and warranty terms. If inspection reveals extensive hard-part damage, recalculate the estimate before authorizing additional work.
The vehicle’s overall condition should also influence the decision. Rebuilding a transmission may be financially justified for a well-maintained truck that is expected to remain in service for years. The same repair may be less attractive when the vehicle has major engine, structural, or other expensive mechanical problems.
When Should You Replace a 4L80E Instead of Rebuilding It?
Replacing a 4L80E transmission may be preferable when the case has severe damage, several major internal assemblies require replacement, suitable rebuild parts are unavailable, or the total rebuilding cost approaches that of a reliable replacement unit. The decision becomes clearer after a qualified inspection establishes the extent of the damage.
A cracked transmission case, severely damaged gearsets, or extensive damage to multiple hard parts can increase the cost and complexity of rebuilding. Some components may require specialized repair or replacement, while others may not be economically recoverable. If the combined cost of parts, machining, and labor becomes excessive, a remanufactured transmission may offer better overall value.
Replacement is also worth evaluating when the owner lacks the tools, experience, or time required for a successful rebuild. A specialist-supplied transmission can reduce the amount of internal assembly work performed by the vehicle owner, although correct installation, cooling-system preparation, and compatibility checks remain necessary.
Before purchasing a replacement, verify the transmission’s exact application. Check compatibility with the vehicle’s model year, engine, bellhousing arrangement, output configuration, electronic controls, and other relevant specifications. The 4L80E designation alone does not guarantee that every unit is interchangeable with every vehicle using that transmission family.
Ask the supplier whether the transmission is rebuilt, remanufactured, or used, and confirm the warranty conditions. A used unit may have an unknown service history, while a remanufactured unit may include documented inspection procedures and defined coverage. Verify whether the warranty requires a particular cooler-flushing procedure, installation process, or supporting-component replacement.
The final comparison should include the complete installed cost, expected service requirements, warranty coverage, and the condition of the replacement unit. Selecting the lowest purchase price without evaluating these factors can lead to additional expenses if compatibility or installation problems arise.
How Can You Extend the Life of a Rebuilt 4L80E Transmission?
You can extend the life of a rebuilt 4L80E transmission by maintaining the correct fluid level, keeping the cooling system effective, addressing leaks promptly, and diagnosing abnormal shifting before continued operation causes additional damage. These measures help protect friction materials, hydraulic components, bearings, and other internal parts from excessive heat, inadequate lubrication, and contamination.
Maintain the transmission fluid according to the vehicle manufacturer’s recommendations and the requirements of the installed transmission. Use the specified fluid type and follow the correct temperature-dependent checking procedure. Both low fluid levels and excessive fluid levels can interfere with proper operation, so avoid adding fluid without verifying the current level.
Keep the transmission cooler and associated lines in good condition. Excessive operating temperature can accelerate fluid deterioration and damage friction materials and seals. When the previous transmission failed internally, inspect the cooler circuit and address contamination before installing the rebuilt unit. Follow the transmission builder’s instructions for cooler cleaning or replacement because residual debris can damage newly rebuilt components.
Inspect the transmission and cooler connections for leaks during routine maintenance. Pay attention to changes in shifting, delayed engagement, slipping, unusual noises, and warning indicators. These symptoms do not always mean the transmission needs another rebuild, but they require timely diagnosis to prevent a smaller hydraulic, electrical, or installation problem from becoming major internal damage.
Use the vehicle within its intended operating limits. Heavy towing, repeated high-load acceleration, and operation under excessive heat place additional demands on the transmission. Confirm that the vehicle has an appropriate cooling arrangement for its workload and follow the applicable towing and maintenance recommendations.
Finally, retain the rebuild documentation, including replaced parts, measured clearances, fluid specifications, and warranty information. These records help technicians diagnose later problems and establish which components were serviced. Consistent maintenance and prompt troubleshooting provide a practical way to protect the investment in a rebuilt 4L80E transmission.