You walk up to your Tesla, key card in hand, tap it on the pillar—and nothing happens. No beep, no unlock, no response. Frustration builds, especially if you’re running late or parked somewhere unfamiliar.
The Tesla key card, a simple RFID-based backup for your phone key, is supposed to be reliable in moments like this. But when it fails, it can feel like being locked out of your own technology. Many Tesla owners report this exact issue after a software update, exposure to strong magnets, or even cold weather conditions.
The good news? In most cases, the fix is quick and doesn’t require a service visit. In this guide, we’ll uncover seven common reasons why your Tesla key card may not be working—and how to fix each one in minutes.
If your Tesla won’t detect your key card, don’t panic. Follow these practical tips to get your car unlocked, started, and back on the road—without wasting time or calling roadside assistance.
Contents
Incorrect Scanning Position (Rewritten for Natural Flow)
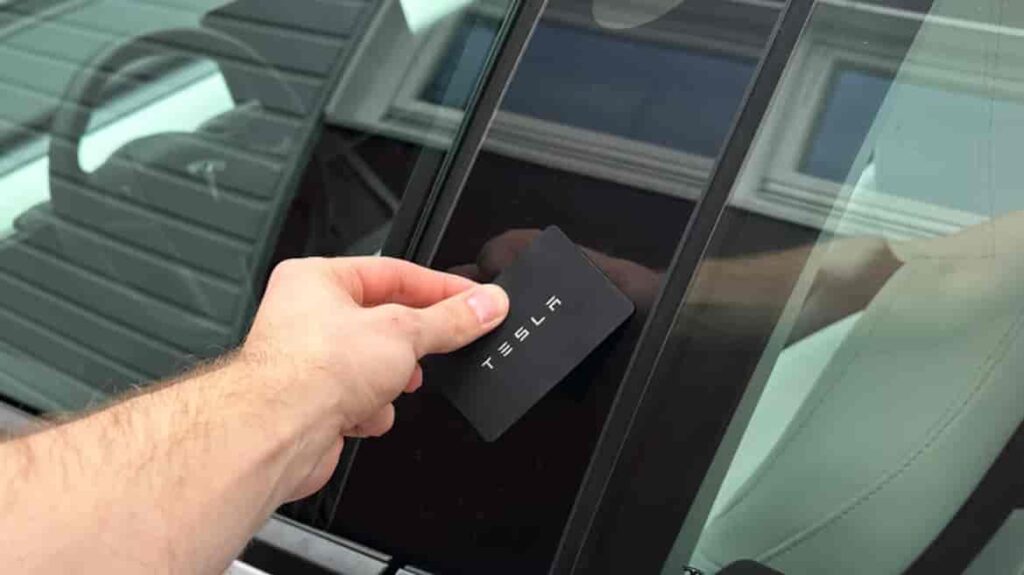
One of the most common reasons your Tesla key card isn’t working has nothing to do with the card itself—it’s all about placement. The key card uses RFID technology, which means the signal must align precisely with the car’s built-in sensor. A quick tap or a slight tilt might seem harmless, but even a few millimeters off can cause the system to miss the signal entirely.
In most Tesla models, the sensor is located on the driver’s side B-pillar, right below the camera. When unlocking, hold the card flat against the marked area and keep it there for about two seconds. Don’t hover or wave it—Tesla’s reader needs a stable contact to detect the RFID chip.
If you’re starting the car, the correct spot is on the center console, just behind the cup holders. Hold the card there until you see the confirmation on the screen. Many owners find that pressing too quickly or keeping the card in a thick wallet often causes the system to fail.
If your Tesla still doesn’t respond, try removing the card from any case or wallet and scan it directly. It’s also worth testing your spare key card to rule out hardware issues.
A simple rule to remember: the card should touch the surface completely, without barriers or metal objects nearby. Once you find the sweet spot, the system will recognize it instantly—proof that sometimes the smallest adjustment makes all the difference.
Damaged or Demagnetized Key Card
If your Tesla key card looks fine on the outside but still won’t unlock your car, physical or magnetic damage might be to blame. Unlike a phone key that relies on Bluetooth, Tesla’s key card works through passive RFID technology — a small chip inside the card communicates wirelessly with your car’s reader. When that chip is scratched, bent, or exposed to strong magnetic fields, it can lose its ability to transmit data.
Many owners don’t realize how fragile this technology can be. Keeping the key card in a tight wallet, near a phone magnet, or even next to certain electronic hotel key cards can slowly demagnetize it. Over time, the chip’s range weakens until one day, it stops responding entirely.
Before assuming the worst, try using your backup Tesla key card if you have one. If the spare works immediately, the issue lies with the damaged card, not the car’s sensor. Tesla Service can easily replace it — a new card usually costs around $35–$50 USD, and programming takes only a few minutes.
It’s worth taking a moment to inspect your card: if it’s warped, cracked, or faded, it’s likely compromised. To avoid repeating the problem, store your new key card flat in a soft sleeve and away from magnetic accessories.
Remember, your Tesla key card may look like a credit card, but it’s far more delicate — treat it as the digital key to your car’s identity.
Software Glitch After Update
It’s no secret that Tesla’s software updates bring exciting new features — from Autopilot improvements to better energy efficiency. But occasionally, those updates can also trigger temporary bugs. One of the most frustrating side effects reported by owners is the key card suddenly not being recognized after an update.
This usually happens because the update refreshes or resets parts of the car’s authentication cache — the digital memory that stores your key permissions. When that happens, your Tesla may momentarily “forget” your key card, even though it’s still registered.
The good news is that this problem is rarely permanent. Most of the time, a soft reset will restore communication between the system and your key card. To do this, sit in the car and press and hold both scroll wheels on the steering wheel until the Tesla logo appears on the screen. After the reboot, re-scan your key card on the center console to confirm that it’s recognized again.
If that doesn’t work, open the Controls > Locks > Add Key menu, and re-add the card using a registered phone key. This forces the system to reauthenticate the card and rebuild the access cache.
Many owners notice that their card starts working normally after the vehicle enters a sleep cycle — usually after locking it for 10–15 minutes. So, if your Tesla key card stops working right after an update, don’t panic. It’s almost always a temporary glitch that resolves with a quick reset or re-pairing.
Signal Interference from Metal or Electronic Devices
Sometimes, your Tesla key card isn’t broken at all — it’s just being drowned out by invisible noise. The Tesla key card uses RFID (Radio Frequency Identification), which relies on clean, short-range communication between the chip inside your card and the car’s sensor. But in a world full of wireless signals, that connection can easily be disrupted.
Objects made of metal or devices that emit strong electromagnetic fields — like smartphones, NFC-enabled credit cards, or RFID-blocking wallets — can interfere with the signal. Even your own phone case, especially if it has a magnetic mount or wallet compartment, can block the card’s frequency. That’s why your Tesla might fail to detect the key card one moment, then work perfectly fine a few meters away.
To test this, try stepping away from crowded areas such as underground parking garages, charging stations, or places filled with Wi-Fi routers and wireless transmitters. Hold your Tesla key card alone, without your phone or wallet nearby, and scan it directly on the pillar or console.
If it works instantly, you’ve found your culprit — signal interference, not a faulty key card.
For everyday use, keep the card separate from electronic devices and avoid RFID-blocking sleeves unless absolutely necessary. Sometimes, the smartest fix isn’t replacing the card but simply giving it a little breathing space from all that tech interference.
Dirty or Wet Sensor Area
Sometimes the problem isn’t the key card — it’s the surface you’re tapping it on. The sensor area on your Tesla’s B-pillar and center console is where the RFID reader communicates with the card. When that surface gets covered in dust, moisture, or fingerprints, the signal can’t pass through clearly.
Many Tesla owners encounter this after driving in the rain or through car washes. A light film of water or soap residue may remain on the sensor area, making the card appear unresponsive. The same happens with sunscreen, hand lotion, or even fine dust collecting near the trim — anything that adds a thin layer between the RFID reader and the card’s chip can block communication.
The easiest way to fix this is also the simplest: clean the sensor area gently. Use a dry, soft microfiber cloth and wipe the surface until it’s completely clear. Avoid alcohol wipes or harsh cleaners, as they may damage the paint or the protective coating. If you suspect moisture, let the surface air-dry for a few minutes before trying again.
A quick check that many Tesla owners forget: clean both the sensor and the key card itself. Dirt or oil on the card can also cause weak signal transmission.
It’s a small detail, but keeping these contact points clean can make the difference between a frustrating lockout and a seamless tap-to-unlock moment. Sometimes, maintenance is the best technology.
Unpaired or Deleted Key Card
If your Tesla key card suddenly stops working even though it looks fine and has no physical damage, it may have been accidentally unpaired or deleted from the vehicle’s system. This can happen after a factory reset, a major software update, or when ownership is transferred. In these cases, the car no longer recognizes the key card as an authorized device.
Tesla’s security system is built around digital authentication, meaning every card must be registered to the car’s internal “Locks” list. When that connection is lost, the RFID signal from your card won’t unlock or start the vehicle, no matter how many times you try.
To fix this, you’ll need to re-pair the key card. Sit inside your Tesla, open the main screen, and go to:
Controls → Locks → Add Key.
Then, place your key card on the center console where the RFID reader is located. You’ll need a verified “admin key” — usually your phone key or another working card — to confirm the pairing. Once approved, your key card will be reauthorized immediately.
If you see an error message or the system doesn’t recognize the card, double-check that you’re using the correct admin method. Only existing, registered keys can approve new ones.
Each Tesla can store up to three active key cards at once, so it’s a good idea to keep at least one spare paired and tested. That way, if a reset ever wipes your access, you’ll always have a backup ready to go.
Internal RFID Reader Failure
If you’ve tried every fix — from repositioning the key card to re-pairing it in the settings — and your Tesla key card still doesn’t respond, the issue might be deeper than expected. In rare cases, the problem isn’t with the card at all but with the vehicle’s internal RFID reader itself.
This small module, hidden behind the B-pillar trim and in the center console, is responsible for detecting and authenticating the signal from your key card. Over time, exposure to moisture, physical shock, or wiring faults can cause the reader to malfunction. Some Tesla owners report intermittent detection — the card works one day and fails the next — which often signals a weakening reader connection or antenna issue.
Unfortunately, this is not a problem you can fix at home. Because the RFID reader is connected to Tesla’s vehicle security and control system, opening the trim or attempting DIY repairs can void your warranty or damage the electronics.
The best step is to schedule a Tesla Service appointment through the app. Technicians can run a diagnostic scan to confirm whether the reader module is faulty. If needed, they’ll replace it and re-sync your key cards with the vehicle’s security database.
While hardware failure is rare, it’s reassuring to know that Tesla’s design allows these components to be replaced quickly. Once repaired, your key cards will function just like new — proof that even smart systems sometimes need a little human help.
Conclusion
When your Tesla key card isn’t working, it can feel like the world’s most high-tech car has suddenly forgotten who you are. But as we’ve seen, the solution is usually simple. Whether it’s a misplaced scan, a bit of interference, or a temporary software glitch, most issues can be fixed in minutes — no tools, no service visit, just a little patience and understanding of how your Tesla communicates with its RFID system.
Keeping your key card clean, flat, and properly paired can prevent nearly all of these problems. For long-term reliability, store it safely away from magnets, metal wallets, and moisture. And if you ever suspect a hardware issue, Tesla Service can easily diagnose and replace the faulty reader.
Your Tesla is designed to make life easier — and that includes getting you back on the road quickly. So the next time your key card doesn’t respond, take a deep breath, follow these quick checks, and you’ll likely solve it before you even finish your coffee.
Have you ever experienced this issue yourself? Share your fix or story below — your insight might save another Tesla owner from the same frustration.