Replacing a Mazda 3 cabin air filter involves locating the filter compartment, removing the old filter, and installing a compatible replacement in the correct airflow direction. The procedure varies by model year, but many Mazda 3 owners can complete the replacement themselves using basic tools or without specialized equipment.
The Mazda 3 cabin air filter removes airborne particles such as dust, pollen, and road debris from the air entering the passenger compartment through the heating, ventilation, and air conditioning (HVAC) system. As these particles accumulate, the filter can restrict airflow through the ventilation system. Replacing a clogged filter restores normal airflow when the filter is the source of the restriction and helps maintain effective cabin air filtration.
Mazda 3 cabin air filter replacement procedures differ across vehicle generations, including the 2004–2009, 2010–2013, 2014–2018, and 2019–present models. Filter compartment access, retaining components, and replacement filter specifications must be checked against the vehicle’s model year and configuration.
This guide explains where to find the Mazda 3 cabin air filter, which tools are required, how to remove and install the replacement, and how to verify correct installation. It also covers filter compatibility, replacement intervals, common installation mistakes, and the costs of DIY versus professional replacement.
Where Is the Cabin Air Filter Located in a Mazda 3?
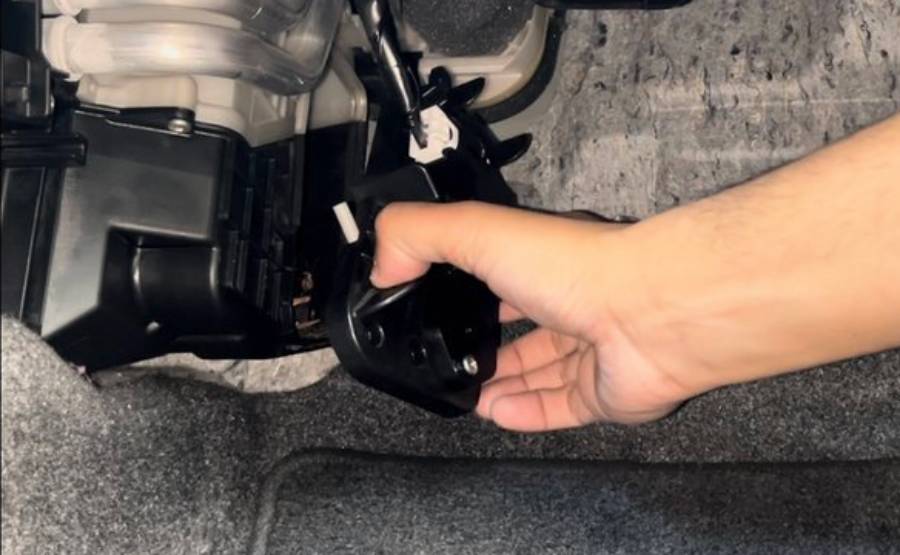
The Mazda 3 cabin air filter is located inside the vehicle’s HVAC system, typically behind the glove box or beneath the passenger-side dashboard. The exact filter location and access procedure depend on the Mazda 3 model year and generation. Most newer models provide access through the glove box area, while earlier generations require additional interior panel removal.
2004–2009 Mazda 3 (First Generation)
The first-generation Mazda 3 has its cabin air filter housing beneath the passenger-side dashboard, near the center console. Access is more complicated than on newer models because the filter compartment is positioned behind interior components.
Replacing the filter on these models generally requires removing passenger-side trim panels and accessing the filter housing from the lower dashboard area. Some configurations also require disconnecting electrical components or removing additional fasteners. The exact procedure should be verified using the service instructions for the vehicle’s model year and market.
2010–2013 Mazda 3 (Second Generation)
The second-generation Mazda 3 also places the cabin air filter within the passenger-side dashboard area. Access generally involves removing interior trim or panels near the glove box and center console rather than simply opening the glove box.
The filter housing is connected to the HVAC assembly, which directs outside air through the filter before distributing it through the cabin vents. Owners should identify the filter access cover before removing surrounding components to avoid unnecessary disassembly.
2014–2018 Mazda 3 (Third Generation)
The third-generation Mazda 3 typically has its cabin air filter directly behind the glove box. This design provides easier access because the glove box can be lowered or removed to expose the filter housing.
After opening the glove box and releasing its retaining components, the rectangular filter cover becomes accessible. The filter slides out of the HVAC housing, allowing the replacement to be installed without extensive dashboard disassembly.
2019–Present Mazda 3 (Fourth Generation)
Fourth-generation Mazda 3 models generally position the cabin air filter behind the passenger-side glove box. The filter compartment is accessible after releasing the glove box retaining components according to the vehicle’s service procedure.
The filter housing contains a removable cover that secures the filter inside the ventilation system. The replacement must match the housing dimensions and be installed according to the specified airflow direction.
For every Mazda 3 generation, confirm the filter location using the owner’s manual or model-specific service information before removing dashboard components.
What Tools Do You Need to Replace a Mazda 3 Cabin Air Filter?
The tools required for Mazda 3 cabin air filter replacement depend on the vehicle generation and filter access design. Many 2014 and newer Mazda 3 models allow filter replacement without specialized tools, while earlier generations may require screwdrivers, sockets, and additional trim removal.
The following items are useful when preparing for the replacement:
- Compatible replacement cabin air filter: Select a filter that matches the vehicle’s model year, market specification, and HVAC housing. Verify compatibility using the manufacturer’s parts catalog or the vehicle identification number (VIN).
- Phillips-head screwdriver: Used when the filter access procedure involves Phillips-head screws or interior panel fasteners.
- Socket wrench or nut driver: Required on certain earlier Mazda 3 configurations to remove fasteners securing components around the filter housing.
- Plastic trim removal tool: Helps release interior panels and retaining clips without scratching dashboard surfaces.
- Clean microfiber cloth or vacuum cleaner: Removes accessible loose dust and debris around the filter compartment without pushing contaminants deeper into the HVAC system.
A standard particulate cabin air filter captures airborne particles such as dust and pollen. An activated carbon cabin air filter adds a carbon layer designed to adsorb certain odors and gaseous contaminants. Both types must match the vehicle’s filter housing specifications.
Before beginning the replacement, park the Mazda 3 on a level surface, switch off the ignition, and turn off the HVAC system. Clear personal items from the glove box or passenger footwell to provide sufficient working space. For earlier models requiring electrical component removal, follow the applicable service manual’s safety and disconnection instructions.
How Do You Replace a Mazda 3 Cabin Air Filter Step by Step?
To replace a Mazda 3 cabin air filter, access the filter housing, remove the old filter, install a compatible replacement, and check the HVAC system for proper airflow. The procedure is relatively straightforward on most 2014 and newer models, while 2004–2013 Mazda 3 vehicles generally require additional dashboard component removal.
The following instructions focus on the glove box access design used in many third- and fourth-generation Mazda 3 models. Earlier generations require model-specific service instructions because their filter housing locations and removal procedures differ.
How Do You Access the Mazda 3 Cabin Air Filter Compartment?
Access the Mazda 3 cabin air filter compartment by opening the passenger-side glove box and releasing the components that prevent it from lowering. On many 2014 and newer models, the filter housing sits directly behind the glove box.
Follow these steps to reach the filter compartment:
- Turn off the ignition. Switch off the engine and HVAC system before working around the dashboard.
- Empty the glove box. Remove documents, accessories, and other stored items to prevent them from falling during removal.
- Open the glove box fully. Identify the retaining tabs, stops, or damper mechanism that restrict its movement.
- Release the retaining components. Carefully disengage the glove box stops according to the vehicle’s service procedure. Disconnect the damper if the design requires it.
- Lower the glove box. Move it downward to expose the HVAC housing behind the dashboard.
- Locate the filter cover. Identify the rectangular access panel covering the cabin air filter compartment.
The filter cover is generally secured by plastic retaining tabs. Release the tabs carefully rather than pulling the cover forcefully. Excessive pressure can damage the retaining clips and prevent the housing from closing securely.
For 2004–2013 Mazda 3 models, access typically involves removing passenger-side lower dashboard panels or other interior components. Use the service instructions for the exact vehicle configuration instead of applying the newer glove box removal procedure.
How Do You Remove the Old Mazda 3 Cabin Air Filter?
Remove the old Mazda 3 cabin air filter by opening the filter housing and carefully sliding the filter out of its compartment. Inspect the filter’s position and orientation before removing it to help identify the correct installation arrangement.
First, release the filter cover retaining tabs and remove the cover from the HVAC housing. Keep the cover in a clean location to prevent damage or contamination.
Next, grip the exposed edge of the cabin air filter and pull it straight out of the housing. Avoid twisting or crushing the filter because accumulated dust, pollen, and debris can fall into the ventilation compartment.
Observe the airflow arrow printed on the filter frame, if present. This arrow indicates the direction air should travel through the filter, not necessarily the direction the filter should face relative to the vehicle’s front or rear.
Inspect the removed filter for visible contamination. A used cabin air filter may contain dust, leaves, pollen, and other airborne particles collected during normal driving. Heavy debris accumulation or damaged filter material indicates that replacement is appropriate.
Finally, inspect the accessible filter compartment for loose debris. Remove surface contamination with a vacuum cleaner or clean cloth without pushing debris deeper into the HVAC housing. Avoid touching or damaging internal HVAC components.
Some earlier Mazda 3 configurations use a multi-piece filter arrangement. Record the removal order and orientation of each section before installing the replacement components.
How Do You Install the New Mazda 3 Cabin Air Filter?
Install the new Mazda 3 cabin air filter by matching its dimensions to the original filter and inserting it into the housing in the correct airflow direction. Proper installation allows air to pass through the filter material without leaving gaps around the frame.
Start by comparing the replacement filter with the removed filter. Check its length, width, thickness, frame shape, and any locating features. A compatible replacement should fit the housing without excessive pressure or modification.
Locate the airflow direction marking on the replacement filter. An arrow labeled “AIR FLOW” indicates the intended direction of air movement through the filter. Follow the vehicle’s specified airflow direction rather than assuming the arrow must always point upward or downward.
Some replacement filters use an “UP” marking instead of an airflow arrow. An “UP” marking indicates installation orientation and should not be interpreted as an airflow direction indicator.
Slide the new filter into the compartment while keeping its frame aligned with the housing guides. Apply gentle, even pressure until the filter reaches its intended seated position.
The filter should remain flat without folded edges, compressed corners, or visible gaps around its perimeter. A distorted filter can allow unfiltered air to bypass the filter media or restrict airflow through the HVAC system.
For Mazda 3 configurations with multiple filter sections, install each section in the sequence and orientation specified by the applicable service instructions.
How Do You Check the New Mazda 3 Cabin Air Filter Installation?
Check the Mazda 3 cabin air filter installation by securing the filter housing, reinstalling the glove box or removed panels, and testing the ventilation system. This final inspection helps identify installation errors before the vehicle returns to normal use.
Begin by positioning the filter cover over the compartment opening. Press the cover into place until its retaining tabs engage securely. Check that the cover sits flush against the housing without visible gaps.
Next, return the glove box to its original position. Reconnect the damper mechanism if it was detached, and engage the retaining stops. Open and close the glove box to confirm that it moves normally.
For models requiring dashboard panel removal, reinstall all components and fasteners according to the vehicle’s service procedure.
After reassembly, start the vehicle or switch the ignition to the appropriate operating mode. Turn on the HVAC blower and test several fan speeds.
Check for three installation indicators:
- Consistent airflow: Air should flow normally from the selected dashboard vents without an unexpected restriction.
- No abnormal blower noise: Rattling, scraping, or whistling may indicate a loose cover, displaced filter, or debris near the blower.
- Secure compartment closure: The filter cover and surrounding panels should remain firmly attached during operation.
A new cabin air filter does not automatically resolve every ventilation problem. Restricted airflow can also result from blower motor faults, obstructed air ducts, or other HVAC system issues.
If airflow becomes noticeably weaker or unusual noises appear immediately after replacement, switch off the blower and recheck the filter’s seating, airflow orientation, and housing cover.
Once the filter is correctly installed and the ventilation system operates normally, record the replacement date and vehicle mileage. This information provides a reference for future cabin air filter inspections and maintenance.
Which Cabin Air Filter Fits Your Mazda 3?
The correct cabin air filter for a Mazda 3 depends on its model year, vehicle generation, market specification, and HVAC system configuration. Mazda 3 models manufactured between 2004 and the present do not all use the same filter dimensions or installation design. Selecting a compatible replacement ensures the filter fits securely inside the housing and allows air to pass through the intended filtration surface.
Mazda 3 vehicles are divided into four main generations: 2004–2009 (BK), 2010–2013 (BL), 2014–2018 (BM/BN), and 2019–present (BP). These generation ranges provide a starting point for identifying compatible parts, although production dates and market-specific configurations can differ.
The most reliable way to identify the correct cabin air filter is to check the vehicle identification number (VIN) against a Mazda parts catalog or a reputable filter manufacturer’s compatibility database. The vehicle’s model year, body style, and market should also match the replacement filter listing. Comparing the new filter with the original filter provides an additional physical compatibility check.
OEM and aftermarket cabin air filters are the two main replacement options for Mazda 3 owners. OEM filters are supplied under Mazda’s original equipment parts specifications, while aftermarket filters are produced by independent manufacturers. Both can provide suitable filtration when the replacement meets the vehicle’s dimensional and performance requirements.
An OEM cabin air filter offers a straightforward compatibility reference when selected using the correct Mazda part number. Aftermarket alternatives provide additional choices in filter materials, filtration characteristics, and price. However, aftermarket filters should be evaluated using manufacturer specifications rather than assuming that every filter advertised for a Mazda 3 fits every generation.
Mazda 3 cabin air filters are also available in different filtration designs. The two common options are standard particulate filters and activated carbon filters.
A standard particulate cabin air filter captures airborne particles such as dust, pollen, and road debris as air passes through its filter media. Filtration efficiency depends on the material, particle size, and filter construction.
An activated carbon cabin air filter combines particulate filtration with a carbon layer that adsorbs certain gases and odors. This design can help reduce some traffic-related smells entering the cabin, although its effectiveness depends on the contaminants involved, carbon quantity, and filter condition. It does not eliminate every odor or harmful gas.
For Mazda 3 owners who primarily want to control dust and pollen, a compatible particulate filter is a practical choice. Drivers who frequently encounter traffic fumes or unpleasant outdoor odors may prefer an activated carbon filter with documented filtration specifications.
Regardless of filter type, correct fitment remains essential. A filter with the wrong dimensions can leave gaps inside the housing, allowing some incoming air to bypass the filter media. An oversized filter may become compressed during installation, increasing airflow resistance or preventing the housing cover from closing properly.
Before purchasing a replacement, verify the part number, filter dimensions, vehicle compatibility, and installation markings. These checks reduce the risk of buying an unsuitable filter and repeating the replacement procedure.
What Mistakes Should You Avoid When Replacing a Mazda 3 Cabin Air Filter?
The five main mistakes to avoid when replacing a Mazda 3 cabin air filter are installing it in the wrong orientation, selecting an incompatible filter, damaging the filter frame, breaking retaining clips, and leaving the filter housing improperly secured. Each mistake can affect filtration performance, airflow, or the condition of surrounding HVAC components.
1. Installing the filter in the wrong airflow direction
Installing a directional cabin air filter backward can prevent it from operating in the configuration intended by its manufacturer. Some filters have layered media, support structures, or construction features designed for a specific airflow direction.
Check the arrow printed on the replacement filter before inserting it. An arrow labeled “AIR FLOW” identifies the direction air should travel through the filter. An arrow labeled “UP” identifies the filter’s installation orientation. Follow the vehicle’s service instructions when determining the correct position.
2. Using an incompatible cabin air filter
An incorrectly sized filter may not seal against the housing or may require excessive force to install. Gaps around the filter allow air to bypass the filtration material, while a compressed filter can increase resistance to airflow.
Verify the replacement part against the Mazda 3 model year, generation, and relevant parts catalog. Compare its dimensions and frame design with the original filter before installation. Do not modify the filter frame to force an incompatible part into the compartment.
3. Bending or damaging the filter during installation
Excessive pressure can deform the filter frame, damage pleated media, or prevent the filter from seating evenly. These problems are especially relevant when the filter compartment has limited clearance.
Align the replacement filter with the housing guides and insert it using gentle, even pressure. Stop if the filter becomes stuck or begins to fold. Remove it and check the orientation, dimensions, and possible obstructions before attempting installation again.
4. Breaking glove box or filter housing retaining clips
Plastic retaining clips secure the glove box, access panels, and filter cover. Applying force in the wrong direction can crack these components or prevent them from locking into place during reassembly.
Identify each retaining mechanism before releasing it. Use the removal procedure specified for the Mazda 3 generation, and avoid pulling directly against an engaged clip. A plastic trim removal tool can help release certain panels without damaging surrounding surfaces.
5. Failing to secure the filter housing cover
An improperly installed filter cover can allow air leakage around the filter compartment or produce rattling noises when the HVAC blower operates. Loose surrounding panels may also create vibration during driving.
After installing the replacement filter, align the housing cover and engage all retaining tabs. Check that the cover sits flush and does not move when lightly inspected. Reinstall the glove box and other removed components before testing the ventilation system.
Avoiding these five mistakes helps maintain proper filter positioning, reduces the likelihood of damaged interior components, and supports normal HVAC operation. If unusual airflow restrictions or noises appear immediately after replacement, inspect the filter orientation, seating position, and housing cover before investigating other ventilation system components.
How Often Should You Replace a Mazda 3 Cabin Air Filter?
A Mazda 3 cabin air filter should be replaced according to the vehicle’s maintenance schedule or sooner when inspection reveals excessive contamination or airflow restriction. For many Mazda 3 models, the scheduled replacement interval is approximately 15,000 miles (24,000 km) or 24 months, although the exact recommendation varies by model year, market, and operating conditions.
The cabin air filter gradually collects dust, pollen, road debris, and other airborne particles as the HVAC system draws outside air into the passenger compartment. These contaminants accumulate within the filter media, increasing resistance to airflow. A heavily loaded filter can reduce the volume of air delivered through the dashboard vents, particularly at lower blower speeds.
Driving conditions directly influence how quickly a Mazda 3 cabin air filter becomes contaminated. Vehicles frequently operated on dusty roads, in heavy traffic, or in areas with high airborne particle concentrations may require earlier inspection and replacement. For example, a Mazda 3 regularly driven on unpaved roads can accumulate visible dust in its cabin air filter faster than a vehicle primarily used on clean, paved roads.
Mazda owners should consult the maintenance schedule for their specific vehicle rather than treating a general mileage estimate as a universal requirement. The manufacturer’s schedule provides the baseline interval, while filter condition and ventilation performance help determine whether earlier replacement is necessary.
Inspect the filter when airflow becomes noticeably weaker, persistent odors develop, or visible debris accumulates inside the filter pleats. Replace it when contamination restricts airflow, the filter media is damaged, or the scheduled replacement interval has been reached.
Recording the replacement date and odometer reading makes it easier to track cabin air filter maintenance and identify changes in filter lifespan under different driving conditions.
What Are the Signs of a Dirty Mazda 3 Cabin Air Filter?
The four main signs of a dirty Mazda 3 cabin air filter are reduced ventilation airflow, unpleasant cabin odors, slower window defogging, and visible contamination on the filter media. These symptoms indicate that the filter should be inspected, although they do not independently confirm that the filter is responsible for every HVAC problem.
1. Reduced airflow from the dashboard vents
A clogged cabin air filter can restrict the amount of air passing through the Mazda 3 ventilation system. As dust and debris accumulate within the filter pleats, airflow resistance increases, making it harder for the blower to move air through the HVAC housing.
Drivers may notice weaker airflow from the dashboard vents even when the fan is operating at its usual setting. For example, a ventilation system that previously delivered strong airflow at the second fan-speed setting may require a higher setting to produce a similar result.
However, weak airflow can also result from a failing blower motor, blocked air intake, or malfunctioning HVAC components. Inspecting the cabin air filter is a practical initial diagnostic step because it is a replaceable component within the airflow path.
2. Unpleasant odors from the ventilation system
A contaminated cabin air filter can contribute to unpleasant smells when the Mazda 3 heating or air conditioning system operates. Trapped organic debris, moisture, and accumulated contaminants can create conditions associated with musty odors.
These smells may become noticeable when the blower starts or when outside air enters the cabin. A filter containing damp leaves or other organic material, for example, may develop an unpleasant odor as air passes through the contaminated media.
Replacing a dirty filter removes the accumulated material within that component. However, odors originating from microbial growth on the air conditioning evaporator, moisture in the HVAC housing, or other ventilation components may persist after replacement and require separate inspection.
3. Slower windshield and window defogging
A heavily clogged Mazda 3 cabin air filter can contribute to slower windshield defogging by restricting airflow through the ventilation system. Effective defogging depends on directing sufficient conditioned air toward the glass to remove condensation.
When airflow is restricted, the HVAC system may deliver less air to the windshield vents, increasing the time required to clear moisture. This problem can become especially noticeable during rainy weather or when the temperature difference between the cabin and outside air causes condensation.
A dirty cabin air filter is not the only cause of poor defogging. Incorrect HVAC settings, excessive cabin humidity, air conditioning faults, and airflow distribution problems can produce similar symptoms. Persistent windshield fogging should be investigated promptly because reduced visibility affects driving safety.
4. Visible dust and debris inside the filter
Visible contamination provides direct evidence that a Mazda 3 cabin air filter has collected airborne particles. Dust deposits, leaves, insects, and other debris may accumulate on the filter surface during normal operation.
A filter containing substantial debris or damaged pleats should be replaced. However, a darkened filter does not automatically indicate that its airflow capacity has reached an unacceptable level, because appearance alone cannot reliably measure filtration performance or pressure restriction.
Inspect the filter for heavy debris accumulation, moisture damage, torn media, and distorted edges. These conditions provide more useful replacement indicators than color alone.
Replacing a contaminated cabin air filter can restore airflow when filter restriction is the underlying problem. If ventilation performance remains poor after installing a compatible replacement, the blower motor, air intake, ductwork, and other HVAC components should be examined for additional faults.
Read more: Hyundai Cabin Air Filter Replacement: Step-by-Step Guide
How Much Does It Cost to Replace a Mazda 3 Cabin Air Filter?
Mazda 3 cabin air filter replacement typically costs approximately $15–$40 for a DIY replacement and $40–$100 when performed by a professional mechanic in the United States. These are indicative price ranges rather than verified current quotes. The final cost depends on the filter brand, filtration material, vehicle generation, local labor rates, and accessibility of the filter compartment.
The replacement filter accounts for the main expense when owners perform the maintenance themselves. Standard aftermarket particulate filters commonly fall within an estimated $15–$25 range, while activated carbon filters and certain OEM replacements may cost approximately $20–$40 or more. Exact prices should be checked against a compatible part number before purchasing.
Professional replacement includes both the filter and labor. Many 2014 and newer Mazda 3 models have a filter compartment accessible through the glove box area, reducing the amount of disassembly required. Earlier generations, particularly 2004–2013 models, can involve additional interior panel removal and more complicated access procedures. These differences affect the time a mechanic needs to complete the job.
Is It Cheaper to Replace a Mazda 3 Cabin Air Filter Yourself?
Replacing a Mazda 3 cabin air filter yourself is generally cheaper than paying a mechanic because the owner avoids labor charges. The savings depend on the vehicle’s filter access design and whether additional tools are required.
For example, if a compatible replacement filter costs $25 and a repair shop charges $70 for the complete service, performing the replacement yourself saves $45 before accounting for any tool purchases. This example illustrates the cost difference rather than representing a fixed service price.
DIY replacement is particularly practical for Mazda 3 models with easily accessible filter compartments. Owners can purchase a compatible filter, follow the appropriate service procedure, and complete the installation without paying for professional labor.
However, earlier Mazda 3 generations may require additional dashboard disassembly. Professional service may be preferable when the procedure involves unfamiliar electrical connections, difficult-to-reach fasteners, or components that could be damaged during removal.
The most economical option depends on the total replacement cost, the owner’s mechanical experience, and the complexity of accessing the filter housing.
Can You Clean and Reuse a Mazda 3 Cabin Air Filter?
Most conventional Mazda 3 cabin air filters are disposable and should be replaced rather than washed and reused. Standard cabin air filters use filtration media designed to capture airborne particles during a specified service life. Washing or aggressive cleaning can damage the media, alter its structure, or reduce its filtration effectiveness.
A vacuum cleaner may remove loose surface debris, but it does not reliably restore the original filtration performance of a heavily contaminated filter. Fine particles remain embedded within the filter material, and physical cleaning can damage the pleats or supporting frame.
Water washing is particularly unsuitable for disposable paper-based or other non-washable filter media. Moisture can deform the material, weaken its structure, and create conditions for unwanted microbial growth if the filter is reinstalled before drying completely.
Reusable cabin air filters are a separate category. These products are specifically designed to withstand cleaning procedures established by their manufacturers. Owners should follow the manufacturer’s instructions for cleaning products, drying methods, and reuse intervals.
For a Mazda 3 equipped with a conventional disposable cabin air filter, replacement is the appropriate maintenance procedure when the filter is heavily contaminated, physically damaged, or due for scheduled service. A compatible new filter provides a more reliable solution than attempting to restore a worn disposable filter.