A clicking sound while turning often signals a worn CV joint. You may also notice vibration during acceleration or grease around the inside of a wheel. These warning signs usually appear gradually, so many drivers ignore them at first. Unfortunately, delaying a Honda Accord CV joint replacement can lead to expensive repairs and unexpected breakdowns.
The CV joint transfers engine power from the transmission to the front wheels. At the same time, it allows the suspension and steering system to move smoothly through different driving conditions. As the joint wears out, handling becomes less stable. The vehicle may also produce louder noises during turns or stronger vibrations while accelerating.
Most repair shops replace the complete CV axle instead of repairing only the damaged joint. This approach saves time and often provides better long term reliability. A complete axle assembly includes the axle shaft, inner CV joint, outer CV joint, protective boots, and factory packed grease.
This guide covers everything you need to know about Honda Accord CV joint replacement. You will learn how to identify common symptoms, diagnose the problem, estimate repair costs, choose the right replacement parts, and complete the repair safely. The guide also explains common installation mistakes, maintenance tips, and situations where professional assistance is the better option.
Honda Accord models differ by year, engine, transmission, and trim level. Always confirm the correct repair procedure and torque specifications before beginning any work.
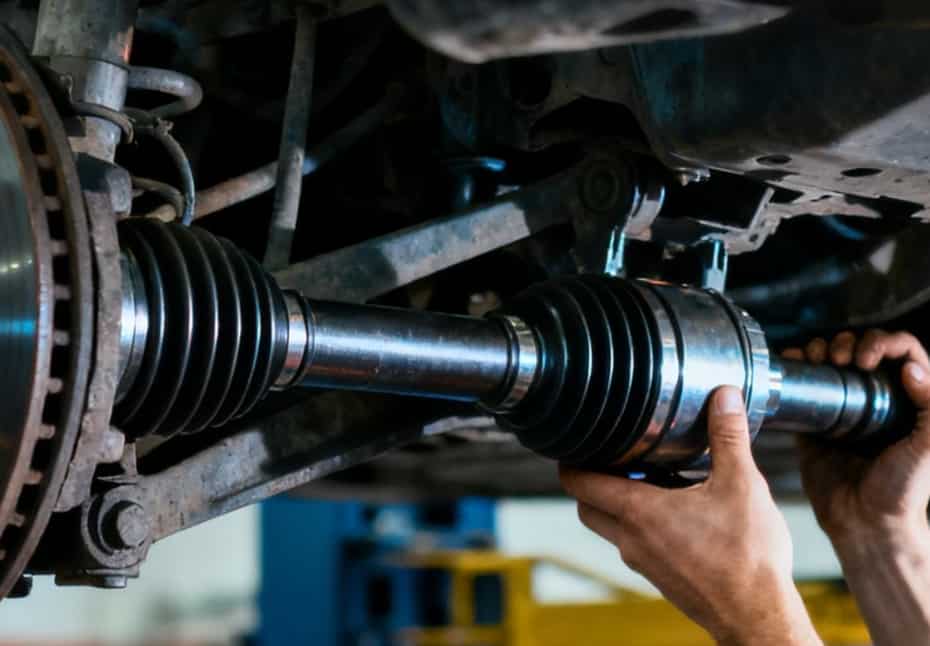
What Is a CV Joint on a Honda Accord?
A constant velocity joint, commonly called a CV joint, is an essential part of the front wheel drivetrain on a Honda Accord. Its primary job is to transfer engine power from the transmission to the drive wheels while allowing the suspension and steering system to move freely. Unlike a standard universal joint, a CV joint delivers smooth power at different operating angles. This design helps maintain consistent performance whether the vehicle is driving straight, turning a corner, or traveling over uneven roads.
A Honda Accord uses two CV joints on each front axle. The inner CV joint connects the axle shaft to the transmission. It allows the axle to move in and out as the suspension travels up and down. The outer CV joint connects the axle to the wheel hub. It works through a wider steering angle and allows the front wheels to turn without interrupting power delivery. Because of its operating angle, the outer joint usually wears faster than the inner joint.
Drivers often confuse a CV joint with a CV axle, but they are not the same component. A CV joint is only one part of the complete axle assembly. A complete CV axle includes the inner CV joint, outer CV joint, axle shaft, protective rubber boots, grease, retaining clips, and other necessary hardware. Since these parts work together as a single unit, many repair shops replace the entire axle assembly instead of replacing one worn joint. This method reduces labor time, improves reliability, and lowers the chance of future problems caused by worn internal components.
Understanding how the CV joint works makes it easier to recognize early signs of failure. When the protective boot tears, grease begins to leak out while dirt and moisture enter the joint. Over time, this contamination increases friction and accelerates wear. As the damage becomes more severe, the joint may produce clicking noises during turns, vibration under acceleration, or even complete axle failure if the problem is left unrepaired.
Common Honda Accord CV Joint Symptoms
A worn CV joint often shows several warning signs before it fails completely. Recognizing these symptoms early can help you avoid costly repairs and reduce the risk of unexpected breakdowns.
One of the most common symptoms is a clicking or popping noise while turning. This sound usually comes from the outer CV joint because it operates at a wider steering angle. The noise often becomes louder during slow, tight turns or while parking. If the clicking continues to get worse, the joint may have significant internal wear.
Vibration during acceleration is another common sign. Unlike wheel balance issues, this vibration usually appears only when the vehicle is under load. It may become stronger as you press the accelerator and decrease when you coast. A worn inner CV joint is often responsible for this problem.
A damaged CV boot can also reveal an early problem. The rubber boot keeps grease inside the joint and prevents dirt and moisture from entering. When the boot cracks or tears, grease leaks onto nearby suspension components. Once contamination reaches the joint, internal wear increases quickly.
You may also hear a clunking sound when accelerating or slowing down. Excessive wear inside the joint creates extra movement, causing the drivetrain to shift under changing loads. In severe cases, the vehicle may shudder at higher speeds or feel less stable during acceleration.
Although these symptoms strongly suggest a failing CV joint, similar problems can also result from worn wheel bearings, damaged suspension parts, or faulty engine mounts. A thorough inspection will help confirm the exact cause before replacing any components.
What Causes Honda Accord CV Joint Failure?
Several factors can shorten the lifespan of a Honda Accord CV joint. While normal wear is unavoidable, poor maintenance and harsh driving conditions often accelerate the damage.
The most common cause is a torn CV boot. The rubber boot seals grease inside the joint and keeps out water, dirt, and road debris. Once the boot cracks, grease begins to leak, and contaminants enter the joint. Without proper lubrication, the internal bearings wear quickly and create excessive friction.
High mileage also contributes to CV joint failure. Over thousands of miles, the moving parts experience constant stress during acceleration, braking, and steering. Even a well maintained Honda Accord may eventually require a CV joint replacement as the components reach the end of their service life.
Aggressive driving can increase wear as well. Hard acceleration, sharp turns, and rough road conditions place additional stress on the axle assembly. Frequent driving over potholes or uneven surfaces may also damage the protective boot or affect the alignment of drivetrain components.
Poor quality replacement parts are another common problem. Low quality CV axles often use weaker materials and lower grade grease. These components may wear out much sooner than genuine or high quality aftermarket parts, leading to repeated repairs.
Regular inspections can help identify small problems before they become major repairs. Checking the condition of the CV boots during routine maintenance allows you to detect grease leaks or cracks early. Replacing a damaged boot in time may prevent complete CV joint failure and extend the life of the entire axle assembly.
How to Diagnose a Bad CV Joint on a Honda Accord
Diagnosing a bad CV joint does not always require special equipment. In many cases, a careful road test and a visual inspection provide enough information to identify the problem. Detecting the issue early can prevent further damage to the axle assembly and nearby drivetrain components.
Start by listening for unusual noises during a short drive. Turn the steering wheel fully to the left and then to the right while driving at low speed. A repeated clicking sound during either turn often indicates a worn outer CV joint. If the vehicle vibrates only during acceleration, the inner CV joint may be the source of the problem.
After the road test, inspect the CV boots on both front axles. Look for cracks, tears, loose clamps, or grease around the wheel, suspension, or transmission area. A damaged boot allows grease to escape and lets dirt enter the joint, which greatly increases internal wear.
Next, raise the front of the vehicle safely and inspect the axle by hand. Hold the axle shaft near each joint and check for excessive movement. A small amount of play is normal, but noticeable looseness or rough movement may indicate worn internal components.
It is also important to rule out other possible causes. Worn wheel bearings, damaged control arms, loose ball joints, and failing engine mounts can produce similar symptoms. Inspecting these components helps ensure an accurate diagnosis before replacing the CV axle.
If multiple symptoms appear together, replacing the complete axle assembly is usually the most reliable and cost effective solution for a Honda Accord.
Honda Accord CV Joint Replacement Step by Step
Replacing a Honda Accord CV joint requires the right tools, careful preparation, and close attention to safety. Although many experienced DIY mechanics can complete the job at home, following the correct procedure is essential for a successful repair.
Begin by parking the vehicle on a level surface and applying the parking brake. Loosen the axle nut and front wheel lug nuts before lifting the vehicle. Raise the front of the car with a floor jack and support it securely with jack stands. Remove the front wheel to access the suspension and axle assembly.
Disconnect the necessary suspension components to create enough space for axle removal. Depending on the model year, this may include the lower ball joint, tie rod end, or stabilizer link. Carefully push the steering knuckle outward while sliding the outer end of the axle from the wheel hub.
Next, remove the inner end of the axle from the transmission. Some models require a gentle pry with a suitable tool to release the retaining clip. Avoid pulling on the axle shaft because excessive force can damage nearby components or the transmission seal.
Compare the new axle with the original part before installation. Make sure the overall length, spline count, and mounting points match exactly. Insert the inner end into the transmission until the retaining clip locks into place. Then guide the outer end through the wheel hub and reconnect all suspension components.
Finally, tighten every fastener to the manufacturer’s specifications. Install the wheel, lower the vehicle, and torque the axle nut correctly. Complete the repair with a short road test to confirm smooth acceleration, quiet turning, and proper drivetrain operation.
Honda Accord CV Joint Replacement Cost
The cost of a Honda Accord CV joint replacement depends on several factors. The model year, engine type, labor rates, and replacement part quality all affect the final repair bill. In most cases, repair shops replace the complete CV axle because it is more practical and reliable than replacing only the damaged joint.
A quality aftermarket CV axle typically costs between $60 and $180. An original equipment part usually ranges from $200 to $500 or more, depending on the specific Honda Accord model. Premium parts often provide better durability, improved fit, and longer service life.
Labor charges vary by location and repair shop. Most technicians complete the replacement in one to two hours. Labor costs generally range from $100 to $250. As a result, the total cost for a complete Honda Accord CV joint replacement usually falls between $160 and $750.
Additional repairs can increase the final price. A damaged transmission seal, worn wheel bearing, or loose suspension component may need replacement during the same visit. Replacing these parts at the same time can reduce future labor costs because the axle has already been removed.
Choosing the lowest priced part is not always the best decision. High quality replacement axles often last longer and reduce the risk of vibration, premature wear, or installation problems. Comparing warranty coverage, build quality, and manufacturer reputation can help you make a better long term investment while avoiding repeated repairs.
How to Extend the Life of Your Honda Accord CV Joint
Proper maintenance can significantly extend the life of your Honda Accord CV joint. Although every drivetrain component wears over time, regular inspections and careful driving habits can reduce unnecessary stress and prevent early failure.
Inspect the CV boots during every routine service or tire rotation. Look for cracks, tears, loose clamps, or grease leaks around the axle assembly. Replacing a damaged boot early costs much less than replacing an entire CV axle after contamination damages the joint.
Avoid aggressive acceleration whenever possible. Hard launches and rapid changes in speed place extra stress on the CV joints and axle shaft. Smooth acceleration helps reduce the load on drivetrain components and supports longer service life.
Drive carefully on rough roads. Large potholes, curbs, and uneven surfaces can damage the suspension and place additional force on the CV joints. Slowing down before crossing road hazards helps protect the axle assembly and other steering components.
Choose high quality replacement parts whenever repairs become necessary. A well manufactured CV axle usually offers better materials, stronger seals, and improved durability. Investing in reliable parts can reduce the chance of premature failure and improve overall driving performance.
Finally, pay attention to unusual noises or vibrations. A clicking sound during turns or vibration while accelerating should never be ignored. Addressing these symptoms early often prevents more expensive drivetrain repairs and keeps your Honda Accord operating safely and smoothly for many more miles.
Frequently Asked Questions
Can I drive with a bad CV joint?
You can drive for a short time with a worn CV joint, but it is not recommended. The damage will continue to worsen, and the joint may eventually fail without warning. Replacing the faulty component early helps prevent additional drivetrain damage and improves driving safety.
How long does a Honda Accord CV joint last?
A Honda Accord CV joint commonly lasts between 100,000 and 150,000 miles under normal driving conditions. Service life depends on road conditions, driving habits, and the condition of the protective CV boots. Regular inspections can help extend its lifespan.
Should I replace the CV joint or the entire axle?
Most repair shops recommend replacing the complete CV axle instead of only the damaged joint. A complete axle assembly reduces labor time, improves reliability, and often costs less than rebuilding a worn joint.
What happens if a CV boot tears?
A torn CV boot allows grease to leak out while dirt and moisture enter the joint. Without proper lubrication, the internal components wear quickly. Replacing the boot immediately may prevent complete CV joint failure if the damage is discovered early.
How long does Honda Accord CV joint replacement take?
An experienced technician usually completes a Honda Accord CV joint replacement in one to two hours. The repair may take longer if additional suspension or drivetrain components also require service.
Can I replace a Honda Accord CV axle at home?
Yes. Many experienced DIY mechanics can complete the repair with the proper tools and a repair manual. However, the job requires safe lifting equipment, correct torque specifications, and careful installation. If you are unsure about any step, professional service is the safer choice.
Conclusion
A timely Honda Accord CV joint replacement helps protect your vehicle from costly drivetrain repairs and improves overall driving safety. Common warning signs such as clicking noises during turns, vibration under acceleration, and grease leaking from a damaged CV boot should never be ignored. Identifying these symptoms early allows you to fix the problem before it affects other drivetrain or suspension components.
Whether you choose to replace the CV axle yourself or hire a professional technician, using high quality parts and following the correct repair procedure can make a significant difference. Proper installation improves reliability, restores smooth power delivery, and helps extend the service life of the new axle assembly.
Routine maintenance also plays an important role in preventing premature wear. Regularly inspecting the CV boots, driving carefully on rough roads, and responding quickly to unusual noises can help you avoid unexpected breakdowns and expensive repairs in the future.
We hope this guide has given you a clear understanding of the Honda Accord CV joint replacement process, common symptoms, repair costs, and maintenance tips. If you have questions about your specific Honda Accord model or want to share your repair experience, leave a comment below. Your feedback may help other drivers make informed repair decisions and keep their vehicles running smoothly for years to come.