Coolant reservoir tank replacement is necessary when the tank develops cracks, leaks, damaged hose connections, or structural defects that prevent it from functioning properly. A damaged reservoir can cause coolant loss, disrupt cooling system operation, and increase the risk of engine overheating. Replacing the faulty tank helps restore the cooling system’s ability to maintain the correct coolant level and manage coolant expansion.
The coolant reservoir stores excess engine coolant as it expands with heat and, depending on the cooling system design, allows coolant to return as the engine cools. Most reservoirs are made from heat-resistant plastic, which can deteriorate after repeated exposure to engine heat, pressure changes, and vibration. Visible cracks, coolant stains, and persistent coolant loss are common warning signs, although these symptoms can also originate from hoses, caps, or other cooling system components.
Replacing a coolant reservoir tank generally involves allowing the engine to cool, removing the old reservoir, installing a compatible replacement, refilling coolant, and checking for leaks. The exact procedure depends on the vehicle’s cooling system design, particularly whether the reservoir is pressurized.
This guide explains how to identify a failing coolant reservoir, replace it safely, estimate replacement costs, and verify proper cooling system operation. It also covers common causes of reservoir failure and when professional repair is the safer option.
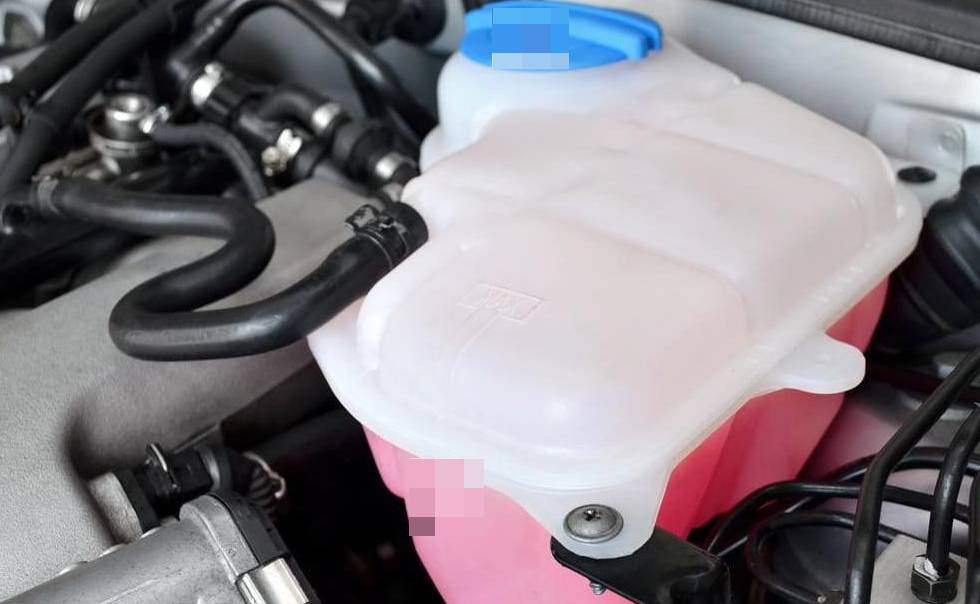
What Are the Signs of a Bad Coolant Reservoir Tank?
The 5 main signs of a bad coolant reservoir tank are visible cracks, coolant leaks, consistently low coolant levels, damaged hose connections, and engine overheating. These symptoms indicate that the reservoir may no longer contain coolant properly or maintain the pressure required by the vehicle’s cooling system. However, coolant loss and overheating can also result from problems elsewhere in the system.
Visible cracks are a direct indication of reservoir damage. Most coolant reservoirs are made from molded plastic that experiences repeated heating and cooling cycles during engine operation. Over time, thermal stress and material aging can weaken the tank, particularly around mounting points, molded seams, and hose connections. Small cracks may become more noticeable as the cooling system heats up and coolant expands.
Coolant leaks are another common sign of reservoir failure. Leaking coolant may leave colored puddles beneath the vehicle, wet areas around the reservoir, or dried residue near its seams and fittings. Coolant colors vary by formulation, including pink, orange, green, and blue. A leaking reservoir can gradually reduce the available coolant supply, especially when the engine reaches operating temperature.
A consistently low coolant level can also indicate a damaged reservoir. The coolant level normally changes between the MIN and MAX markings as the engine heats and cools. However, repeated coolant loss when checked under the same cold-engine conditions suggests a leak that requires investigation. The reservoir, hoses, radiator, water pump, and other cooling system components should be inspected to identify the actual source.
Damaged hose connections can prevent the reservoir from retaining coolant. Plastic hose fittings may crack, mounting points may break, and hose seals may deteriorate. These defects allow coolant to escape, particularly in pressurized expansion tank systems.
Engine overheating is a potentially serious consequence of coolant loss. When the cooling system contains insufficient coolant, it may struggle to transfer heat away from the engine. This can cause rising temperature readings, dashboard warnings, and, in severe cases, engine damage. Overheating alone does not confirm reservoir failure, so the cooling system must be inspected before replacing the tank.
When Should You Replace a Coolant Reservoir Tank?
Replace a coolant reservoir tank when it has structural damage, persistent leaks originating from the tank, broken integral fittings, or deformation that prevents proper sealing or operation. A reservoir does not have a universal replacement interval because its service life depends on material condition, operating temperatures, cooling system pressure, and vehicle design.
A cracked reservoir requires replacement when the crack compromises its ability to hold coolant. Cracks around the tank body, molded seams, or hose outlets can expand under repeated temperature and pressure changes. Applying adhesive or sealant is not a dependable permanent repair for a pressurized coolant reservoir because the damaged plastic continues to experience thermal expansion and mechanical stress.
Replacement is also necessary when an integrated hose fitting breaks or the reservoir becomes deformed. A broken fitting may prevent the coolant hose from sealing securely, while deformation around the filler neck can interfere with cap operation. On pressurized expansion tanks, an improper seal can prevent the cooling system from maintaining its specified operating pressure.
However, not every coolant leak requires replacing the reservoir tank. A defective pressure cap, loose hose clamp, damaged coolant hose, or worn sealing component may cause coolant loss even when the reservoir itself remains intact. For example, coolant residue around the filler neck may indicate a faulty cap rather than a cracked tank. Inspecting these components before replacement helps avoid unnecessary repairs.
A coolant reservoir should be inspected promptly when the coolant level repeatedly drops, visible leaks appear, or the engine temperature rises abnormally. A cooling system pressure test, performed with the appropriate equipment and according to the vehicle manufacturer’s specifications, can help locate leaks that are difficult to identify visually.
If the engine overheats or displays a high-temperature warning, stop driving as soon as it is safe. Allow the engine to cool completely before inspecting the cooling system, and never remove a pressurized coolant cap while the system is hot.
What Tools and Parts Do You Need to Replace a Coolant Reservoir Tank?
Replacing a coolant reservoir tank requires a compatible replacement reservoir, basic hand tools, the manufacturer-specified coolant, and equipment for safely collecting spilled fluid. The exact tools depend on the vehicle’s cooling system design, reservoir mounting arrangement, and hose connections. Most accessible reservoirs can be replaced using standard automotive tools, while some vehicles require specialized equipment to refill and bleed the cooling system.
The following tools and materials are commonly used for coolant reservoir tank replacement.
| Tool or Part | Purpose |
|---|---|
| Replacement coolant reservoir | Replaces the damaged tank |
| Socket wrench and socket set | Removes mounting bolts |
| Screwdrivers | Removes screws and certain hose clamps |
| Hose clamp pliers | Releases spring-type hose clamps |
| Drain pan | Collects coolant during removal |
| Manufacturer-approved coolant | Refills the cooling system |
| Funnel or coolant filling tool | Helps prevent spills during refilling |
| Protective gloves and safety glasses | Protects against coolant exposure |
| Clean shop towels | Cleans spilled coolant and connection points |
| Cooling system bleeding equipment | Removes trapped air when required |
The replacement reservoir must match the vehicle’s make, model, engine, and cooling system configuration. Reservoirs differ in capacity, mounting locations, hose outlet positions, pressure ratings, and coolant level sensor compatibility. Checking the original equipment part number or using the vehicle identification number (VIN) helps identify a compatible replacement.
Coolant selection is equally important because manufacturers specify formulations based on the cooling system’s materials and corrosion protection requirements. Coolant color alone does not establish compatibility. Use the specification listed in the vehicle owner’s manual or service documentation, and follow the manufacturer’s instructions for coolant concentration and mixing.
Inspect the reservoir cap, hose clamps, and connecting hoses before installation. A deteriorated cap seal, cracked hose, or weakened clamp can cause coolant leaks even after the reservoir has been replaced. Replace these components when inspection confirms damage or when the manufacturer requires their replacement.
How Do You Replace a Coolant Reservoir Tank Step by Step?
To replace a coolant reservoir tank, allow the engine to cool completely, remove coolant as necessary, disconnect the old reservoir, install the replacement tank, refill the cooling system, and check for leaks. The procedure generally involves 5 main stages, although individual steps vary between pressurized expansion tanks and non-pressurized coolant overflow reservoirs.
A straightforward replacement on an accessible reservoir may take less than an hour, excluding additional cooling, bleeding, or diagnostic time. Vehicles with restricted engine compartment access or complex cooling systems can require substantially longer. Always follow the vehicle manufacturer’s service procedure when it differs from these general instructions.
How Do You Prepare the Vehicle for Coolant Reservoir Replacement?
Prepare the vehicle by parking on a level surface, switching off the engine, allowing the cooling system to cool completely, and identifying the reservoir’s connections. Proper preparation prevents burns, reduces coolant spills, and makes the removal process more controlled.
First, park the vehicle securely, engage the parking brake, and turn off the ignition. Wait until the engine and cooling system are completely cool before touching the reservoir cap or disconnecting coolant hoses. Pressurized cooling systems can retain hot coolant capable of causing severe burns, even after the engine has been switched off.
Next, locate the coolant reservoir in the engine compartment. It is typically a translucent plastic container connected to the cooling system through one or more hoses. Some vehicles use a pressurized expansion tank with a pressure-rated cap, while others use a non-pressurized overflow reservoir connected to the radiator. Identifying the reservoir type determines whether opening or disconnecting it affects the pressurized cooling circuit.
Inspect the existing reservoir and identify its mounting bolts, hose connections, and electrical connectors. Some reservoirs contain a coolant level sensor that must be disconnected before removing the tank. Taking a photograph of the original installation can help ensure the replacement is installed in the correct position.
Place a suitable drain pan beneath the reservoir and surrounding hose connections. Remove or drain only the coolant necessary for the replacement, following the vehicle’s service instructions. On certain vehicles, lowering the coolant level below the reservoir connections is necessary to prevent substantial fluid loss.
Collect used coolant in a clean, suitable container and keep it away from children and animals. Automotive coolant can be toxic if swallowed and must be handled and disposed of according to local regulations.
How Do You Remove the Old Coolant Reservoir Tank?
Remove the old coolant reservoir tank by disconnecting its hoses and electrical connectors, releasing its mounting hardware, and lifting it out of the engine compartment. The removal sequence depends on the reservoir’s mounting arrangement and the accessibility of its connections.
Begin by disconnecting the coolant level sensor connector if the reservoir has one. Release the connector’s locking tab and pull on the connector housing rather than the electrical wires. This prevents damage to the wiring harness and sensor connection.
Next, loosen the hose clamps using hose clamp pliers, a screwdriver, or the appropriate tool for the installed clamp type. Slide the clamps away from the hose connection points. Carefully twist the hoses to release them from the reservoir fittings before pulling them free. Avoid applying excessive force because aged plastic fittings can become brittle and break.
Expect some coolant to escape when disconnecting hoses, even if the reservoir has already been partially drained. Position the drain pan beneath the connections and use shop towels to control minor spills. Inspect the removed hoses for cracks, swelling, hardened rubber, or damaged sealing surfaces.
Remove the reservoir mounting bolts, screws, or retaining clips. Some tanks are secured with bolts, while others slide into brackets or attach using molded mounting tabs. Support the reservoir while releasing its fasteners to prevent sudden movement or damage to surrounding components.
Carefully lift the reservoir out of the engine compartment. Avoid spilling remaining coolant onto electrical components or painted surfaces. Once removed, inspect the mounting bracket and surrounding area for damage, coolant residue, and signs of additional leaks.
Compare the old reservoir with the replacement before proceeding. Check the mounting points, hose connections, filler neck, and sensor openings. Do not install a replacement reservoir with incompatible fittings or mounting geometry, even if its overall shape appears similar.
How Do You Install a New Coolant Reservoir Tank?
Install the new coolant reservoir tank by positioning it in the original mounting location, securing its fasteners, reconnecting the coolant hoses, and restoring any electrical connections. Correct installation prevents movement, hose damage, and coolant leaks during engine operation.
First, inspect the new reservoir for shipping damage, manufacturing defects, and debris inside the tank. Verify that its hose outlets, mounting points, and sensor connections match the original component. Transfer reusable components, such as a compatible coolant level sensor or mounting hardware, only when the replacement design and manufacturer instructions permit it.
Position the new reservoir in the engine compartment and align its mounting points with the original brackets. Install the mounting bolts or retaining clips and secure them according to the vehicle manufacturer’s specifications. Avoid overtightening fasteners because excessive force can crack plastic mounting tabs or distort the reservoir housing.
Reconnect each coolant hose to its corresponding fitting. Push the hoses fully onto their connections and position the clamps over the intended sealing areas. Spring clamps should return to their original clamping positions, while screw-type clamps must be tightened to the appropriate specification. Incorrect clamp placement can allow coolant to escape when the cooling system reaches operating temperature.
Reconnect the coolant level sensor electrical connector if equipped. Confirm that the connector locks securely and that the wiring is routed away from moving parts, sharp edges, and high-temperature components.
Finally, check the reservoir’s alignment and surrounding clearance. The tank should sit securely without contacting moving engine components or placing excessive tension on coolant hoses. Verify that all connections are installed before adding coolant.
How Do You Refill and Bleed the Cooling System?
Refill the cooling system with the manufacturer-specified coolant and remove trapped air using the vehicle’s prescribed bleeding procedure. Proper bleeding is essential when reservoir replacement introduces air into the pressurized cooling circuit because air pockets can interfere with coolant circulation and cause unstable engine temperatures.
Start by confirming that all hoses, clamps, drain points, and electrical connectors are properly secured. Add the correct coolant mixture through the designated filling point. For systems with a pressurized expansion tank, this may be the reservoir itself. For non-pressurized overflow systems, the radiator or a separate filling point may require attention according to the service procedure.
Fill the system to the specified cold-fill level without exceeding the MAX marking. The reservoir must retain enough expansion space to accommodate changes in coolant volume as the engine heats up.
Some vehicles require manual bleeding through dedicated bleed screws, while others use automatic bleeding procedures, vacuum filling equipment, or electronically controlled coolant pumps. Follow the manufacturer’s instructions for the specific engine and cooling system. Do not assume that idling the engine with the reservoir cap removed is safe or sufficient for every vehicle.
After completing the prescribed filling and bleeding procedure, secure the pressure cap as instructed. Check the hose connections and reservoir body for visible coolant leaks. Monitor the engine temperature during the manufacturer’s specified warm-up procedure and stop the engine if overheating occurs.
Allow the engine to cool completely before checking the coolant level again. Add the specified coolant if the level is below the cold-fill mark, and investigate any continued or substantial coolant loss.
The replacement is complete only after the reservoir is securely installed, the cooling system has been filled and bled correctly, and no leaks or abnormal operating temperatures are detected. A final inspection after a normal driving cycle helps identify loose connections or remaining air in the system.
How Much Does Coolant Reservoir Tank Replacement Cost?
Coolant reservoir tank replacement typically costs $100–$400 for many passenger vehicles in the United States, including replacement parts and professional labor. The total cost depends on the vehicle’s make and model, reservoir design, replacement part quality, labor rates, and whether additional cooling system components require replacement. Vehicles with complex cooling systems or difficult-to-access reservoirs may cost more.
The following table provides approximate replacement cost ranges for common passenger vehicles. These are general budgeting estimates rather than verified quotes for a specific vehicle.
| Replacement Expense | Estimated Cost (USD) |
|---|---|
| Aftermarket coolant reservoir tank | $20–$100 |
| OEM coolant reservoir tank | $50–$200 |
| Professional labor | $75–$200 |
| Replacement coolant and supplies | $15–$50 |
| Typical total replacement | $100–$400 |
The replacement reservoir is one of the main factors affecting the repair cost. Aftermarket tanks generally cost less than original equipment manufacturer (OEM) components, although pricing varies by manufacturer, material quality, and integrated features. For example, a basic plastic overflow reservoir without sensors generally costs less than a pressurized expansion tank equipped with a coolant level sensor or specialized hose connections.
Labor costs depend on the time required to access, remove, and install the reservoir. A tank mounted near the top of the engine compartment may require approximately 0.5–1 hour of labor. Reservoirs positioned behind other components can require additional disassembly, increasing repair time and labor charges. Some vehicles also require specialized coolant filling or bleeding procedures, which add to the overall service time.
Additional expenses arise when the reservoir cap, coolant hoses, clamps, or coolant level sensor also need replacement. A cooling system pressure test may be necessary when the source of coolant loss remains uncertain. These services can increase the final bill beyond the basic reservoir replacement estimate.
DIY coolant reservoir replacement eliminates professional labor charges but does not eliminate parts, coolant, or equipment costs. Vehicle owners with suitable tools and mechanical experience may reduce expenses by performing the repair themselves. However, professional service is preferable when the cooling system requires specialized bleeding equipment or when the underlying cause of coolant loss has not been identified.
How Do You Check for Leaks After Replacing a Coolant Reservoir Tank?
Check for leaks after coolant reservoir tank replacement by inspecting the reservoir body, hose connections, mounting points, and coolant level before and after the engine reaches normal operating temperature. A successful installation must prevent coolant loss and allow the cooling system to operate within the manufacturer’s specified temperature and pressure ranges.
Begin with a visual inspection while the engine is completely cool. Examine the reservoir seams, filler neck, hose fittings, and surrounding components for wet surfaces, coolant droplets, or dried residue. Pay particular attention to hose connections because incorrectly positioned clamps and damaged hose ends are common sources of leaks after replacement.
Next, verify that the coolant level is within the manufacturer’s specified cold-fill range. Start the engine and follow the prescribed warm-up procedure while monitoring the temperature gauge or dashboard warnings. As the engine warms, cooling system pressure and coolant volume change, potentially revealing leaks that were not visible during the initial inspection. Keep clear of moving components and hot surfaces, and stop the engine if the temperature rises abnormally.
A cooling system pressure test provides a more controlled method of detecting leaks. A compatible pressure tester applies pressure to the cooling system according to the vehicle manufacturer’s specifications, allowing technicians to inspect connections without relying solely on engine heat. The test must not exceed the specified system pressure because excessive pressure can damage the reservoir, radiator, or other cooling system components.
After the inspection, allow the engine to cool completely and recheck the coolant level. A small level change may occur after the initial refill as remaining air is displaced, particularly when the cooling system has been opened. However, repeated coolant loss, visible leakage, or persistent overheating indicates that the system requires further diagnosis.
If coolant continues to disappear despite a dry reservoir and secure hose connections, inspect other components, including the radiator, water pump, thermostat housing, and associated coolant lines. A new reservoir will not resolve coolant loss caused by leaks elsewhere in the cooling system.
The cooling system should be considered ready for normal operation only when the coolant level remains stable under comparable cold-engine conditions, no leaks are detected, and the engine maintains its normal operating temperature. Rechecking the reservoir after subsequent driving cycles helps confirm that the repair remains effective.
What Causes a Coolant Reservoir Tank to Crack or Fail?
The 5 main causes of coolant reservoir tank failure are plastic deterioration, excessive cooling system pressure, repeated temperature changes, engine vibration, and physical damage. These factors can weaken the reservoir body, damage its mounting points, or compromise hose connections. Understanding the cause of failure is important because replacing the reservoir without correcting an underlying cooling system problem can result in another failure.
Plastic deterioration is a common cause of coolant reservoir cracking. Most automotive coolant reservoirs are manufactured from heat-resistant thermoplastic materials designed to withstand normal cooling system operating conditions. However, prolonged exposure to elevated temperatures, coolant chemicals, and environmental conditions can gradually reduce the material’s strength. Aging plastic may become brittle, discolored, or more susceptible to cracking around molded seams, mounting tabs, and hose outlets.
Excessive cooling system pressure can also damage a coolant reservoir, particularly in vehicles equipped with pressurized expansion tanks. The pressure cap regulates system pressure by releasing excess pressure at its specified threshold. A defective cap, restricted coolant passage, or abnormal cooling system condition can contribute to excessive pressure. When internal pressure exceeds the reservoir’s structural limits, weakened areas may crack or deform. The pressure cap and related cooling system components should therefore be inspected when reservoir damage suggests an overpressure problem.
Repeated temperature changes contribute to reservoir material fatigue through thermal expansion and contraction. During normal engine operation, coolant temperatures rise as the engine warms and decrease after shutdown. These cycles cause the reservoir material to expand and contract. Over extended service periods, repeated thermal stress can weaken vulnerable areas, especially around rigid mounting points and molded connections. The effect becomes more significant when combined with material aging or abnormal operating temperatures.
Engine vibration places additional mechanical stress on the reservoir and its connections. Although mounting brackets are designed to secure the tank, loose fasteners, damaged brackets, or improperly routed hoses can transfer excessive movement to plastic fittings. Continuous movement may eventually produce cracks near hose outlets or mounting tabs. For example, a reservoir that is not securely mounted can experience repeated pulling forces from attached coolant hoses during engine operation.
Physical damage is another cause of reservoir failure. Accidental impacts during engine repairs, incorrect installation, excessive fastener tightening, or contact with nearby components can crack the plastic housing. Damage may not immediately produce a visible leak, but cracks can expand as the cooling system heats up and develops pressure.
Preventing repeated reservoir failure requires identifying the original cause of damage. If a reservoir cracks because of abnormal cooling system pressure, replacing the tank alone will not correct the underlying problem. Inspecting the pressure cap, mounting hardware, coolant hoses, and cooling system operating conditions helps ensure the replacement reservoir operates within its intended limits.
Can You Drive With a Cracked Coolant Reservoir Tank?
Driving with a cracked coolant reservoir tank is not recommended because coolant loss can lead to engine overheating and serious mechanical damage. The level of immediate risk depends on the crack’s location, the amount of coolant escaping, and whether the vehicle uses a pressurized expansion tank or a non-pressurized overflow reservoir. A small crack may initially produce limited leakage, but continued engine operation can increase coolant loss and worsen the damage.
A cracked pressurized expansion tank presents a particularly serious risk because it forms part of the sealed cooling system. When the tank leaks, the system may lose both coolant and operating pressure. Reduced pressure lowers the coolant’s effective boiling temperature, increasing the likelihood of localized boiling and vapor formation under high engine temperatures. These conditions can interfere with coolant circulation and reduce the system’s ability to remove heat from the engine.
A cracked non-pressurized overflow reservoir may create a different failure pattern. In systems that use a separate radiator pressure cap, the overflow reservoir collects coolant discharged during thermal expansion and supplies it back to the radiator as the engine cools. If the reservoir leaks, the radiator may fail to recover the required coolant, gradually reducing the cooling system’s available coolant volume over repeated heating and cooling cycles. Although the immediate consequences may differ from those of a leaking pressurized tank, continued operation can still result in overheating.
Engine overheating can damage several critical components, including the cylinder head gasket, cylinder head, and engine block. Excessive temperatures can cause metal components to expand beyond their intended tolerances, potentially leading to cylinder head distortion, gasket failure, or internal engine damage. Repairing these failures can cost substantially more than replacing a damaged coolant reservoir.
Stop driving as soon as it is safe if the engine temperature gauge rises abnormally, an overheating warning appears, or steam escapes from the engine compartment. Turn off the engine and allow the cooling system to cool completely. Do not remove the radiator cap or pressurized reservoir cap while the system is hot because escaping coolant and steam can cause severe burns.
A vehicle with a visibly cracked reservoir should be inspected and repaired before further driving. Adding coolant does not provide a dependable solution because the damaged tank may continue leaking, particularly as temperatures and pressure increase. If coolant loss is substantial, overheating has occurred, or the vehicle cannot maintain its specified coolant level, towing is safer than attempting to drive to a repair facility.
Replacing the damaged reservoir and verifying the cooling system’s condition are necessary before returning the vehicle to normal service. The repair should include checking for additional leaks, confirming the correct coolant level, and ensuring the engine maintains its normal operating temperature.
Can You Replace a Coolant Reservoir Tank Yourself?
You can replace a coolant reservoir tank yourself if the tank is easily accessible, you have basic automotive repair skills, and the cooling system does not require specialized servicing equipment. The procedure typically involves removing mounting fasteners, disconnecting coolant hoses, installing a replacement reservoir, and restoring the correct coolant level. However, the difficulty varies depending on the vehicle’s engine layout, reservoir design, and cooling system configuration.
Coolant reservoir replacement is generally a manageable DIY repair on vehicles with externally mounted, non-pressurized overflow tanks. These reservoirs often have simple hose connections and accessible mounting brackets. For example, a reservoir secured by two mounting bolts and a single overflow hose may require only basic hand tools. Replacing a pressurized expansion tank can be more complicated because opening the cooling circuit may introduce air that must be removed using a manufacturer-specific bleeding procedure.
The main challenges of DIY coolant reservoir replacement are identifying the correct replacement part, preventing coolant spills, securing hose connections, and removing trapped air from the cooling system. Installing an incompatible reservoir can cause mounting problems or improper hose alignment. Incorrectly positioned hose clamps can create leaks, while incomplete bleeding can interfere with coolant circulation and contribute to engine overheating.
DIY replacement can reduce repair expenses by eliminating professional labor charges. However, the savings depend on the tools and materials already available. Vehicle owners who need to purchase specialized bleeding equipment, pressure-testing tools, or additional cooling system components may find professional service more practical. The repair should only be attempted when the correct vehicle-specific service instructions are available.
When Should a Mechanic Replace the Coolant Reservoir Tank?
A professional mechanic should replace the coolant reservoir tank when the cooling system requires specialized filling procedures, the reservoir is difficult to access, or the cause of coolant loss remains uncertain. Professional assistance is also advisable when the vehicle has experienced overheating, recurring coolant leaks, or abnormal cooling system pressure.
Some modern vehicles use electronically controlled coolant pumps, multiple cooling circuits, or manufacturer-specific bleeding sequences. These systems may require diagnostic equipment to activate pumps, control valves, or complete the coolant filling process. Improper servicing can leave trapped air inside the system, reducing cooling efficiency and increasing the risk of overheating.
A mechanic can also perform cooling system pressure tests and inspect related components to identify the original cause of reservoir failure. For example, repeated reservoir cracking may indicate excessive system pressure rather than defective replacement parts. Correcting the underlying problem helps prevent another failure and protects the engine from additional damage.
Read more: Coolant Reservoir Empty but No Leak: Causes & Fixes
What Is the Difference Between a Coolant Reservoir and an Expansion Tank?
The main difference between a coolant overflow reservoir and a pressurized expansion tank is how each component connects to the cooling system and manages coolant pressure. Both accommodate changes in coolant volume as engine temperature changes, but their operating principles and replacement requirements differ. Automotive terminology varies by manufacturer, and the term coolant reservoir is commonly used for both designs.
A non-pressurized coolant overflow reservoir stores coolant expelled from the radiator as the engine warms. When the engine cools, a functioning radiator pressure cap allows coolant to return from the reservoir through the overflow hose. The reservoir itself is not designed to maintain the cooling system’s operating pressure. These tanks commonly use a vented cap and a relatively simple hose connection.
A pressurized expansion tank, sometimes called a degas bottle, forms part of the sealed cooling circuit. It accommodates coolant expansion while maintaining system pressure through a pressure-rated cap. Depending on the vehicle’s design, the tank may also help separate trapped air from circulating coolant. Because it operates under pressure, its housing, cap, seals, and hose connections must meet the manufacturer’s specifications.
The following table summarizes the differences between these two reservoir designs.
| Feature | Coolant Overflow Reservoir | Pressurized Expansion Tank |
|---|---|---|
| System pressure | Non-pressurized | Pressurized |
| Cap type | Typically vented | Pressure-rated |
| Primary function | Stores and returns overflow coolant | Accommodates expansion within the pressurized circuit |
| Connection | Usually connected to radiator overflow | Connected directly to the cooling circuit |
| Replacement complexity | Generally simpler | May require cooling system bleeding |
| Failure consequence | Loss of coolant recovery | Coolant and pressure loss |
Identifying the reservoir type is essential before replacement because the two designs require different servicing precautions. Removing a non-pressurized overflow tank may not require opening the sealed cooling circuit, while replacing a pressurized expansion tank generally requires controlled coolant removal, refilling, and bleeding. Both designs must be serviced only after the engine has cooled completely.
How Can You Prevent Coolant Reservoir Tank Failure?
You can reduce the risk of coolant reservoir tank failure by maintaining the correct coolant level, using manufacturer-approved coolant, inspecting the reservoir for damage, and keeping the cooling system within its specified operating pressure. These preventive measures limit unnecessary stress on the reservoir and help identify developing problems before they cause substantial coolant loss.
Regular coolant level inspections help detect leaks before they affect engine temperature. Check the reservoir when the engine is completely cool and compare the coolant level with the manufacturer’s cold-fill markings. A gradual change in coolant level should be investigated rather than repeatedly corrected by adding coolant. Inspect the reservoir body, molded seams, and hose fittings for cracks, discoloration, wet areas, or dried coolant deposits.
Using the correct coolant formulation helps protect the cooling system against corrosion, deposits, and material deterioration. Automotive coolant contains corrosion inhibitors and other additives selected for specific cooling system materials. An incompatible coolant mixture can reduce corrosion protection or contribute to deposit formation. Follow the vehicle manufacturer’s coolant specifications and replacement intervals rather than selecting coolant based solely on color.
Cooling system pressure should also remain within the manufacturer’s specified range. A properly functioning pressure cap regulates pressure and helps prevent coolant from boiling under normal operating conditions. A defective cap or abnormal system pressure can place unnecessary stress on a pressurized reservoir. Inspect the cap seal and replace the cap when testing or visible damage confirms that it is defective.
Reservoir mounting hardware and coolant hoses require periodic inspection because vibration and mechanical tension can damage plastic connections. Ensure that mounting brackets are secure, hoses are correctly routed, and clamps remain positioned over their sealing surfaces. A hose that continuously pulls against a reservoir fitting can contribute to cracking around the connection.
Preventive maintenance cannot eliminate plastic aging, but it can reduce avoidable reservoir failures and reveal damage before coolant loss causes engine overheating. Inspecting the reservoir during routine vehicle maintenance and addressing cooling system abnormalities promptly helps preserve reliable engine temperature control.