You may have heard some people report their brake chamber leaking air. This is a common scenario, yet it does happen.
Unfortunately, it is quite concerning and commonly linked with a few other complications. This is why it is important to have the problem addressed sooner than later to minimize risks of an accident.
With all these things in mind, let us have a look at the most common reasons for this issue and the best troubleshooting techniques you can do about it.

Brake Chamber Leaking Air
Large trucks, especially those that weigh more than 10,000 pounds, as well as passenger buses, are usually equipped with air brakes. This system includes air lines, air compressor units, as well as air brake chambers or most commonly referred to as “pots”.
These are all critical components, and among these, the air chambers tend to wear out commonly over time. This is mostly because of the moving parts inside of this component, which is referred to as the diaphragm. As air leaks, the vehicle has a difficult time maintaining sufficient continuous air pressure. Hence, the brakes tend to set once the pressure becomes too low.
Unfortunately, it is not always very easy to spot leaks, especially when they are not very visible. Yet, you should be able to apply certain techniques to pinpoint the affected brake chamber.
For instance, you can use a small hammer to break a small portion of dry ice and reduce it to even tinier particles. Then, you should be able to place this into a metal can or a plastic cup. Afterwards, you can half-fill your container with dry ice.
Next, pour some water (room-temperature) into your container until it is a quarter full. By doing so, this can result in some fog rising out of your container as dry ice is released slowly from the water.
Another way to pinpoint the air leak is by crawling under the part of your vehicle where you can hear the sound of air leaking. Observe the fog’s direction carefully as you advance the reservoir. Continue to do so until you have finally identified the air leak’s location. You can then decide if this can be fixed or if the issue is too severe that the only option is to replace your air brake chamber.
Understanding the Brake Chamber
Perhaps you are wondering how your brake chambers function to better understand the problems that occur with it. Each time you step on your brake pedal, your brake chamber gets filled with compressed air to allow the diaphragm to move and activate the pushrod, which applies your brakes. Letting go of your pedal causes a release in pressure while placing the pushrod in the original position.
As you press on your brake pedal, this causes the pushrod to extend from your brake chamber and moves your slack adjuster in a forward motion. This is referred to as the pushrod stroke, and it relies on the compressed air’s pressure as this goes into the chamber.
Brake chambers vary in terms of sizes and shapes. This is why it is important to understand the right one that fits your needs. The most common ones include the spring brake and the service brake chambers. The difference between the two is that service brake chambers have a push rod, return spring, and diaphragm. On the other hand, a spring brake chamber activates the brakes through a coil spring, which then applies the force.
When determining the right one you need, it is important to understand the chamber size and brake type to the relevant brake adjustment limit. Each size, type, and style come with a specific limit to the pushrod stroke-adjustment, which must not go beyond the adjustment limit. Hence, careful attention is recommended to pick out the right brake chamber for your vehicle.
Next Steps
If you are certain that the problem is with your brake chamber, and it needs to be replaced, then you need to choose a replacement part that is similar to the original’s specifications. You can check the number corresponding to the diaphragm’s size.
Ideally, you need to get your brake chambers replaced at 100,000 miles. You also should make it a point to check your brake chambers during your air system tests before any trip. Inspect for some visual damage to your brake chamber, which includes dents, damaged pushrods, and corrosion. When there are damages, contaminants are at risk of getting into your chamber, which can result in corrosion build up on your pressure plate or power spring.
One thing you can do, as well, is to check brake chambers once you notice the brake pedal is starting to become soft or when vibrations become noticeable.
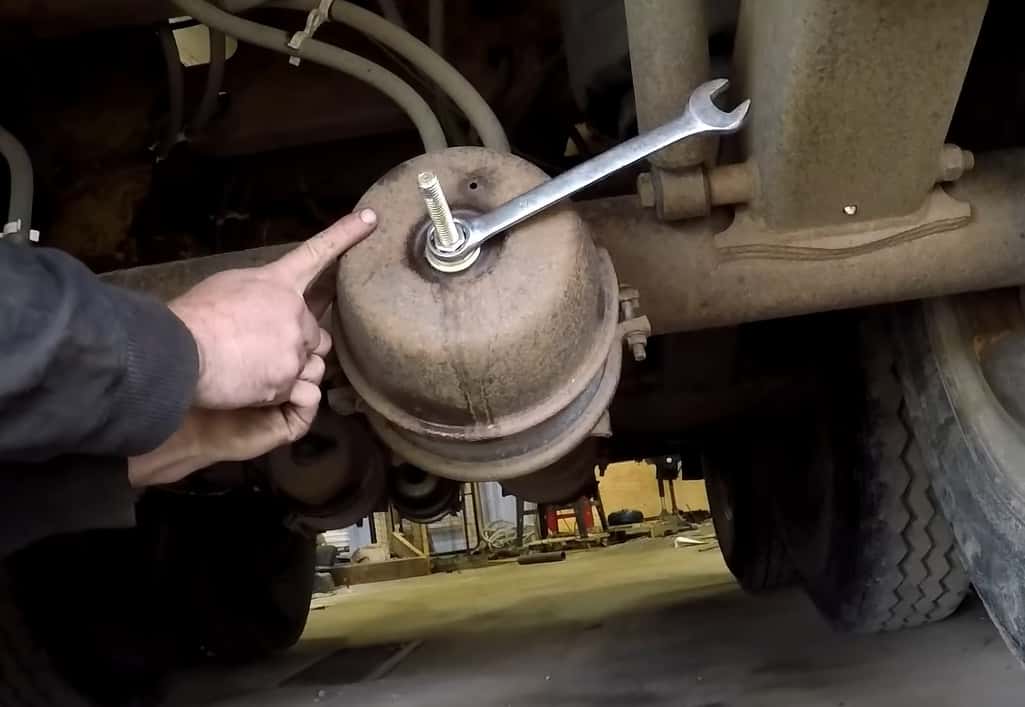
If you need to replace your brake chambers, there are certain steps to keep in mind when removing these components. First, you need to park your vehicle on a level and stable surface. Apply your emergency brakes as though it is hooked up to your semi. Go under your trailer right underneath the brake chamber. Afterwards, pull the plug from the back portion of your chamber.
Afterwards, put your caging tool into the brake chamber’s back part. Turn this component clockwise until locked into the groove. It is important to make sure that the caging tool does not move as you try to pull it out.
Next, tighten the caging tool’s nut using a wrench (3/4 -inch wrench). Then, pull your cotter pins right out of your clevis pins, so you can release your slack adjuster. Remove the service air lines and emergency air lines, as well as the fittings from your brake chamber with the help of a crescent wrench. And lastly, take out the mounting nuts from your brake chamber and replace this component accordingly.
Wrap Up
There are many reasons why you have a brake chamber leaking air. If you experience some symptoms of a damage, consider checking for air leaking or get your brake chamber replaced as needed to prevent further issues.