Replacing a Toyota cabin air filter involves removing the old filter from the vehicle’s HVAC system and installing a compatible replacement. In many Toyota models, including the Camry, Corolla, and RAV4, the cabin air filter is located behind the glove box. The replacement process typically requires no specialized tools and can be completed in approximately 5–15 minutes, depending on the vehicle’s model and year.
The cabin air filter traps dust, pollen, and other airborne particles before they enter the passenger compartment through the heating and air conditioning system. As debris accumulates, the filter can restrict airflow from the dashboard vents and reduce ventilation performance. Replacing a clogged filter restores airflow restricted by the filter and helps maintain effective cabin air filtration.
To replace the filter correctly, you need to locate the filter housing, remove the old filter, check the replacement filter’s fit and orientation, and reinstall the housing cover. The exact access procedure and filter specifications vary between Toyota models and production years.
This guide explains how to replace a Toyota cabin air filter step by step, where to find it, which tools are required, how often to change it, and how much replacement costs. It also covers filter compatibility, model-specific differences, and common installation mistakes.
How Do You Replace a Toyota Cabin Air Filter?
To replace a Toyota cabin air filter, access the filter housing, remove the old filter, insert a compatible replacement in the correct orientation, and secure the housing cover. On many Toyota models, including the Camry, Corolla, and RAV4, the filter housing sits behind the passenger-side glove box. The procedure generally takes 5–15 minutes and requires no specialized tools, although access methods vary by model and year.
Follow these six steps to replace the cabin air filter:
- Turn off the vehicle and HVAC system. Park on a level surface, switch off the ignition, and open the passenger-side glove box.
- Access the filter housing. Empty the glove box, disconnect its damper if equipped, and carefully release the retaining stops to lower the compartment.
- Remove the filter housing cover. Locate the rectangular filter compartment and release its retaining clips or tabs.
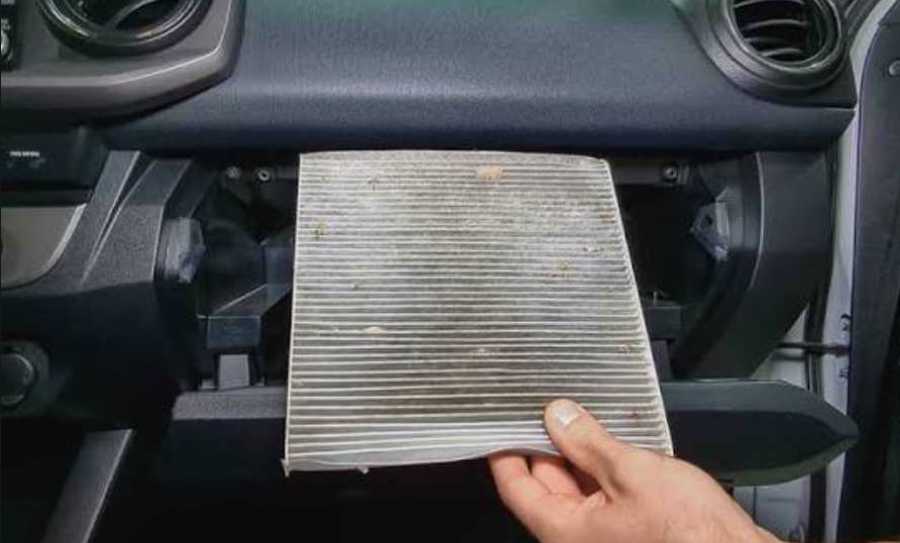
- Remove the old cabin air filter. Slide the filter out carefully, keeping accumulated dust and debris from falling into the housing.
- Install the replacement filter. Confirm the replacement part fits the vehicle and follow the airflow or orientation markings on the filter and housing.
- Reassemble and test the system. Secure the filter cover, restore the glove box to its original position, and check airflow through the dashboard vents.
These steps apply to common glove-box-mounted Toyota cabin filter systems. Consult the vehicle’s owner’s manual for model-specific access instructions.
How Do You Remove the Old Toyota Cabin Air Filter?
To remove the old Toyota cabin air filter, lower the glove box, open the filter housing, and slide the filter out of its compartment. Most glove-box-mounted configurations use plastic retaining clips that release without special equipment. However, some Toyota models have additional panels, dampers, or fasteners that must be removed before accessing the filter.
Start by emptying the glove box to prevent objects from falling when the compartment is lowered. On models equipped with a glove box damper, detach the damper arm according to the vehicle’s instructions. Gently release the glove box retaining stops and lower the compartment until the filter housing becomes accessible. Avoid forcing the plastic components because excessive pressure can damage the hinges or retaining tabs.
Next, release the filter housing cover and pull the old filter straight out. Inspect the filter for accumulated dust, leaves, insects, and other debris. A visibly clogged filter indicates that replacement is appropriate, particularly when accompanied by reduced ventilation airflow. Remove loose debris from accessible areas of the housing without pushing it into the blower motor or ventilation ducts.
Before discarding the old filter, note its position and any directional markings. This information helps identify the correct installation orientation for the replacement filter.
How Do You Install a New Toyota Cabin Air Filter?
To install a new Toyota cabin air filter, verify the replacement filter’s compatibility, position it according to its orientation markings, and slide it fully into the housing. The filter must fit the compartment without excessive compression or gaps that allow air to bypass the filtration material.
Check the replacement filter’s part number against the Toyota model, production year, and applicable vehicle specifications. Compare its dimensions and shape with the original filter before installation. A filter designed for a different Toyota model may not seal correctly, even when its overall appearance is similar.
Pay particular attention to the directional arrow printed on the filter. An arrow labeled “AIR FLOW” indicates the direction air should travel through the filter, while an arrow labeled “UP” indicates installation orientation. These markings serve different purposes and should not be treated as interchangeable. Follow the replacement filter manufacturer’s instructions and the vehicle’s housing markings.
Slide the new filter into the compartment without folding or crushing its edges. Reinstall the housing cover until its retaining clips engage securely. Return the glove box to its normal position, reconnect the damper if equipped, and verify that the compartment opens and closes correctly.
Finally, start the vehicle and operate the HVAC blower at several fan speeds. Air should flow through the dashboard vents without unusual rattling or whistling. A properly installed replacement filter restores airflow restricted by the old filter, although other HVAC problems can still affect ventilation performance.
Where Is the Cabin Air Filter Located in a Toyota?
The cabin air filter in many Toyota vehicles is located behind the passenger-side glove box, inside the HVAC air intake housing. This location allows the filter to capture dust, pollen, and airborne debris before air passes through the vehicle’s ventilation system and enters the passenger compartment. Toyota Camry, Corolla, RAV4, Highlander, and Prius models commonly use this configuration, although the exact access procedure varies by model and production year.
To locate the filter, open the glove box and inspect the area behind it. On many models, lowering the glove box reveals a rectangular plastic filter housing with a removable cover. The cover is typically secured by retaining clips or tabs, allowing access to the filter without removing the entire dashboard. Some configurations require disconnecting a glove box damper or removing additional trim components.
The Toyota Tacoma also has cabin air filter configurations accessible through the glove box area, but the location and access method depend on the vehicle’s generation and equipment. Not every Toyota vehicle uses the same filter housing design, and certain older configurations may not have a factory-installed replaceable cabin air filter.
Check the owner’s manual for the specific Toyota model and year before removing interior components. The manual identifies the appropriate filter access procedure and helps prevent damage to glove box hinges, retaining clips, and surrounding trim.
What Tools Do You Need to Replace a Toyota Cabin Air Filter?
Most Toyota cabin air filter replacements require a compatible replacement filter and no specialized tools. Many Toyota passenger vehicles use glove box retaining stops and snap-fit filter covers that can be released by hand. However, some models require a screwdriver or trim removal tool to access the filter compartment.
The following items are useful when replacing a Toyota cabin air filter:
- Replacement cabin air filter: Select a filter that matches the vehicle’s model, year, and applicable part specifications.
- Flashlight: Illuminate the filter housing and retaining clips, especially when access behind the glove box is limited.
- Protective gloves: Keep dust and accumulated debris off your hands while removing the old filter.
- Small vacuum cleaner: Remove loose leaves, dust, and debris from accessible areas of the filter housing.
- Screwdriver or plastic trim removal tool: Use only when the vehicle’s access procedure requires removing fasteners or trim panels.
Before starting, confirm that the replacement filter has the correct dimensions and orientation markings. Toyota cabin air filters are not universally interchangeable across models and production years. Using the correct replacement part prevents fitment problems and helps maintain proper airflow through the HVAC system.
How Often Should You Replace a Toyota Cabin Air Filter?
Toyota cabin air filters commonly require replacement every 15,000–30,000 miles or approximately 12–24 months, depending on the vehicle’s maintenance schedule and driving conditions. This range is a general maintenance reference, not a universal Toyota requirement. The correct replacement interval depends on the model, production year, filter condition, and recommendations in the vehicle’s maintenance guide.
Driving conditions directly affect how quickly a cabin air filter becomes clogged. Vehicles frequently operated on dusty roads, in heavy traffic, or in areas with high pollen concentrations can accumulate airborne particles faster than vehicles driven in cleaner environments. As debris builds up between the filter’s pleats, resistance to airflow increases, potentially reducing the amount of air delivered through the dashboard vents.
Inspecting the cabin air filter during routine vehicle maintenance helps determine whether replacement is necessary before the scheduled interval. A filter containing substantial dust, leaves, or other debris should be replaced when contamination restricts airflow or compromises filtration performance. Toyota owners should follow their model-specific maintenance schedule and inspect the filter more frequently when operating in dusty conditions.
What Are the Signs of a Dirty Toyota Cabin Air Filter?
The main signs of a dirty Toyota cabin air filter are reduced airflow from the vents, visible debris on the filter, and persistent unpleasant odors from the ventilation system. These symptoms indicate that the filter may be clogged or contaminated, although similar problems can originate from other HVAC components.
Reduced airflow is a common indication of filter restriction. As dust and debris accumulate within the filtration material, the blower motor must move air through a more restrictive passage. Drivers may notice weaker airflow at the same fan setting, particularly when using the air conditioning or heating system.
A musty or dusty smell when the ventilation system operates can also indicate a contaminated cabin air filter. However, persistent odors may originate from moisture or microbial growth on the air conditioning evaporator rather than the filter itself. Replacing the filter will not resolve odors caused by contamination elsewhere in the HVAC system.
Visible contamination provides another reason to replace the filter. When inspection reveals heavy dust accumulation, embedded leaves, or substantial debris between the pleats, installing a new filter helps restore airflow restricted by the old filter. If ventilation problems continue after replacement, the blower motor, evaporator, and air ducts may require further inspection.
How Much Does Toyota Cabin Air Filter Replacement Cost?
Toyota cabin air filter replacement typically costs $15–$40 for a DIY replacement and approximately $40–$100 at a dealership or independent repair shop in the United States. These are estimated price ranges rather than verified current quotes. Actual costs depend on the Toyota model, replacement filter type, local labor rates, and service provider.
For DIY replacement, the primary expense is purchasing a compatible cabin air filter. Standard particulate filters are generally less expensive than premium activated carbon filters, which include an additional layer designed to adsorb certain odors and gaseous contaminants. Toyota Genuine Parts and aftermarket manufacturers offer replacement filters at different price points, making part compatibility and filtration specifications important purchasing considerations.
Professional replacement includes both the filter price and labor charges. Although the procedure takes only a few minutes on many Toyota models, dealerships and repair shops may apply minimum labor charges or standard service pricing. Vehicles requiring additional trim removal can also involve higher labor costs.
The following table compares estimated replacement expenses:
| Replacement Method | Estimated Cost (USD) | Labor Cost |
|---|---|---|
| DIY with standard filter | $15–$30 | $0 |
| DIY with premium filter | $20–$40 | $0 |
| Independent repair shop | $40–$80 | Included |
| Toyota dealership | $50–$100 | Included |
Replacing the filter yourself eliminates professional labor charges. For example, purchasing a compatible $25 filter instead of paying $70 for a professional replacement results in a $45 saving. However, professional service may be preferable when the filter housing is difficult to access or interior components require additional disassembly.
Can You Replace a Toyota Cabin Air Filter Yourself?
Yes, most Toyota owners can replace a cabin air filter themselves without advanced mechanical knowledge or specialized equipment. Many Toyota passenger vehicles have accessible filter housings behind the glove box, allowing replacement through a straightforward removal and installation procedure.
The process generally takes approximately 5–15 minutes on models with easily accessible filter compartments. Removing the glove box stops, opening the filter housing, and exchanging the filter account for most of the work. Vehicles with additional trim panels, screws, or less accessible filter housings may require more time.
DIY replacement is appropriate when the owner can identify the correct filter, follow the vehicle’s access instructions, and handle plastic retaining clips without applying excessive force. The replacement does not normally involve opening refrigerant lines, disconnecting the blower motor, or modifying the air conditioning system.
Professional assistance is advisable when the filter compartment cannot be located, the glove box mechanism is damaged, or the replacement procedure requires removing unfamiliar dashboard components. A technician should also inspect the HVAC system when weak airflow, unusual blower noises, or persistent odors remain after installing a clean filter. These symptoms may indicate problems beyond normal cabin air filter contamination.
Is Toyota Cabin Air Filter Replacement the Same for Every Model?
Toyota cabin air filter replacement follows a similar process across many models, but filter access, housing design, and replacement parts vary by vehicle and production year. Most modern Toyota passenger vehicles use a cabin air filter housing behind the glove box, allowing owners to replace the filter without dismantling the dashboard. However, glove box retaining mechanisms, filter covers, and access requirements differ between vehicle generations.
The Toyota Camry, Corolla, RAV4, Highlander, and Prius commonly feature glove-box-accessible cabin air filters. On these vehicles, replacement generally involves lowering the glove box, removing the filter housing cover, and exchanging the filter. Some configurations require disconnecting a glove box damper, releasing retaining stops, or removing an additional access panel. Toyota Tacoma models also have generation-specific cabin filter arrangements, and some older vehicles lack a factory-installed replaceable cabin filter.
The following table summarizes common replacement characteristics across Toyota models.
| Toyota Model | Common Filter Location | Replacement Considerations |
|---|---|---|
| Toyota Camry | Behind glove box | Glove box retaining stops and damper arrangement vary by year |
| Toyota Corolla | Behind glove box | Filter housing cover and access method vary by generation |
| Toyota RAV4 | Behind glove box | Glove box removal procedure and filter specifications vary by year |
| Toyota Highlander | Behind glove box | Access components and filter dimensions depend on model year |
| Toyota Prius | Behind glove box | Filter access and housing design vary by generation |
| Toyota Tacoma | Glove box area on equipped models | Factory filter availability and access depend on generation |
These locations describe common configurations rather than every production year. Before purchasing a replacement filter or removing interior components, check the vehicle’s owner’s manual and confirm the correct part using the model year and vehicle identification number (VIN). This prevents installation problems caused by incompatible filters or incorrect access procedures.
Which Cabin Air Filter Should You Use for a Toyota?
Use a cabin air filter that matches your Toyota’s model, production year, and factory filtration specifications. A compatible filter must fit securely inside the housing, maintain the intended airflow path, and provide filtration suitable for the vehicle’s HVAC system. Toyota Genuine Parts and aftermarket manufacturers offer replacement options, including standard particulate filters and activated carbon filters.
Standard particulate cabin air filters capture airborne particles such as dust, pollen, and road debris. Their filtration performance depends on the filter material, construction, and particle capture efficiency. Activated carbon cabin air filters add a carbon layer that adsorbs certain odors and gaseous contaminants. However, activated carbon does not eliminate every airborne pollutant, and its adsorption capacity decreases as the material becomes saturated.
Filter dimensions and housing compatibility are essential selection criteria. An incorrectly sized filter can leave gaps around its edges, allowing unfiltered air to bypass the filtration material. A filter that is too thick or improperly shaped may also prevent the housing cover from closing correctly. Verify the replacement part number through Toyota’s parts catalog, the owner’s manual where applicable, or a manufacturer fitment guide.
What Is the Difference Between Toyota OEM and Aftermarket Cabin Air Filters?
Toyota OEM cabin air filters are genuine replacement parts supplied through Toyota’s parts network, while aftermarket cabin air filters are produced and marketed by independent manufacturers. Both categories can provide suitable filtration when the replacement filter meets the vehicle’s fitment requirements and has appropriate filtration characteristics.
Toyota Genuine Parts are identified through Toyota’s vehicle-specific parts catalog, which helps owners select components intended for their vehicle configuration. OEM filters offer a straightforward option for drivers who prefer genuine replacement components. Their purchase prices may be higher than those of comparable aftermarket products, depending on the supplier and filter specification.
Aftermarket cabin air filters offer additional choices in filtration media, odor control, and pricing. Manufacturers may provide conventional particulate filters, activated carbon filters, or products designed to capture smaller airborne particles. However, filtration claims should be evaluated using documented performance specifications rather than product descriptions alone. A higher price does not automatically indicate better filtration efficiency.
The following comparison highlights the main differences.
| Feature | Toyota OEM Filter | Aftermarket Filter |
|---|---|---|
| Manufacturer | Toyota Genuine Parts supply network | Independent parts manufacturers |
| Fitment | Matched through Toyota’s parts catalog | Requires manufacturer fitment verification |
| Filter materials | Depends on genuine part specification | Particulate and activated carbon options |
| Price | Depends on Toyota part and seller | Varies by brand and filter type |
| Filtration performance | Depends on filter specification | Depends on filter specification and testing |
| Availability | Toyota dealerships and genuine parts retailers | Auto parts stores and online retailers |
For most Toyota owners, correct fitment and documented filtration performance matter more than whether the filter is OEM or aftermarket. Choose a filter that matches the vehicle’s specifications, inspect its construction before installation, and follow the manufacturer’s orientation instructions. An activated carbon filter is worth considering when odor reduction is a priority, provided it is compatible with the vehicle’s filter housing.
Read more: Is WD-40 a Lubricant? Uses, Benefits, and Limits
What Happens If You Do Not Replace a Dirty Toyota Cabin Air Filter?
Failing to replace a dirty Toyota cabin air filter can reduce ventilation airflow, decrease filtration effectiveness, and contribute to unpleasant odors inside the vehicle. These problems develop as dust, pollen, leaves, and other airborne debris accumulate within the filter material, restricting the passage of air through the HVAC system.
Restricted airflow is one of the most noticeable consequences of a clogged cabin air filter. As debris fills the spaces between the filter’s pleats, resistance to airflow increases. The blower motor may deliver less air through the dashboard vents at the same fan setting, reducing the effectiveness of cabin heating and cooling. In severe cases, the restricted airflow can make it more difficult to maintain comfortable cabin temperatures or clear fogged windows.
A contaminated filter can also contribute to unpleasant odors when the ventilation system operates. Trapped organic debris and moisture may create conditions associated with musty smells. However, persistent odors can also originate from contamination on the air conditioning evaporator or inside ventilation ducts. Replacing the cabin air filter addresses filter contamination but does not eliminate every source of HVAC odors.
Replace a visibly clogged cabin air filter to restore airflow restricted by the filter and maintain effective particle filtration. If weak airflow or unpleasant odors persist after replacement, inspect other HVAC components rather than repeatedly replacing a clean filter.
What Are the Common Mistakes When Replacing a Toyota Cabin Air Filter?
The five common mistakes when replacing a Toyota cabin air filter are installing the filter in the wrong orientation, selecting an incompatible replacement, failing to seat the filter correctly, damaging glove box components, and leaving the filter housing cover unsecured. Each mistake can affect filtration performance, airflow, or the condition of surrounding interior components.
- Installing the filter in the wrong orientation. Cabin air filters may display an “AIR FLOW” arrow or an “UP” arrow, which have different meanings. The airflow arrow indicates the direction air passes through the filter, while the UP arrow indicates the intended installation orientation. Follow the filter manufacturer’s instructions and the vehicle’s housing markings instead of assuming every arrow should point in the same direction.
- Using an incompatible replacement filter. Toyota cabin air filter dimensions and specifications vary by model and production year. Installing a filter with incorrect dimensions can create gaps around the housing or prevent the cover from closing properly. Confirm compatibility using the vehicle’s model year, VIN, and the replacement manufacturer’s fitment information.
- Failing to seat the filter correctly. A folded, compressed, or misaligned filter may allow air to bypass the filtration material. Insert the filter evenly into its housing and check that its edges fit within the compartment without excessive force. Proper seating helps maintain the intended airflow path through the filter.
- Damaging glove box clips or retaining components. Forcing the glove box downward without releasing its retaining stops or damper can break plastic tabs, hinges, or attachment points. Identify the correct release mechanism before lowering the compartment, and apply gentle pressure only where the vehicle’s instructions specify.
- Leaving the filter housing cover unsecured. An improperly installed cover can create air leakage, vibration, or rattling noises when the blower operates. Reattach the cover until its retaining clips engage, then verify that it sits flush against the housing before reinstalling the glove box.
After replacement, operate the HVAC blower at different fan speeds and check for normal airflow and unusual noises. Confirm that the glove box opens and closes correctly and that no loose components remain behind the dashboard. These final checks help identify installation errors before the vehicle returns to regular use.