Replacing a Toyota RAV4 cabin air filter involves opening the passenger-side glove box, removing the filter housing cover, taking out the old filter, and installing a compatible replacement. Most Toyota RAV4 owners can complete this maintenance task in approximately 5–15 minutes without specialized tools, although the exact procedure varies by model year.
The cabin air filter removes airborne contaminants, including dust, pollen, and road debris, from air entering the vehicle through its heating, ventilation, and air conditioning (HVAC) system. A clogged filter can restrict airflow through the vents and contribute to unpleasant cabin odors. Replacing it helps restore proper airflow when filter blockage is the underlying cause.
On most Toyota RAV4 models, the cabin air filter sits behind the glove box, making it accessible without removing major dashboard components. However, glove box retaining mechanisms, filter housing designs, and compatible replacement filters can differ between vehicle generations.
This guide explains where to locate the Toyota RAV4 cabin air filter, which tools and replacement parts you need, and how to remove and install the filter correctly. It also covers replacement intervals, signs of a dirty filter, estimated replacement costs, and common installation problems.
Where Is the Cabin Air Filter Located in a Toyota RAV4?
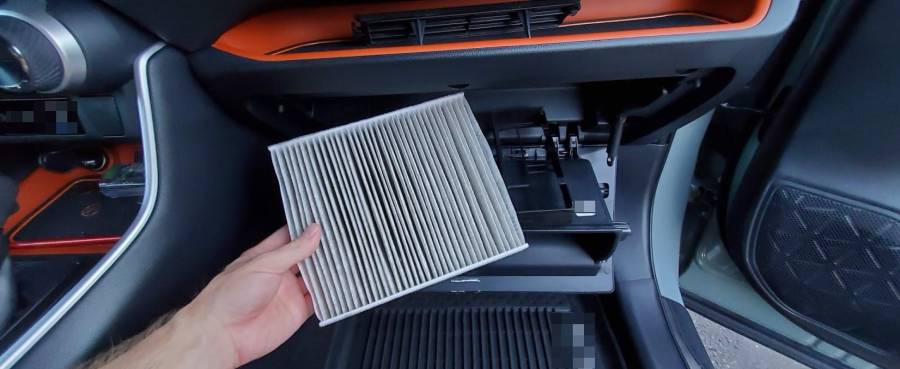
The Toyota RAV4 cabin air filter is located behind the passenger-side glove box, inside the heating, ventilation, and air conditioning (HVAC) filter housing. This position allows the filter to capture dust, pollen, and other airborne particles before air passes through the ventilation system and enters the passenger compartment.
To access the cabin air filter, open the glove box and locate the retaining mechanisms that prevent it from dropping fully downward. On many RAV4 models, you must disconnect a small damper arm on the side of the glove box and gently release the retaining stops. Lowering the glove box exposes a rectangular filter housing with a removable cover. The cabin air filter sits directly behind this cover.
The filter location remains generally consistent across Toyota RAV4 generations, including the third generation (2006–2012), fourth generation (2013–2018), and fifth generation (2019–2025). However, the glove box retaining clips, damper arrangement, and filter housing cover can differ between model years. Owners should consult their vehicle’s maintenance documentation before applying instructions intended for another generation.
The cabin air filter should not be confused with the engine air filter. The engine air filter is located in the engine compartment and protects the engine’s intake system, while the cabin air filter cleans air supplied through the vehicle’s ventilation system.
What Tools Do You Need to Replace a Toyota RAV4 Cabin Air Filter?
Most Toyota RAV4 cabin air filter replacements require only a compatible replacement filter and no specialized tools. The filter housing is generally accessible through the glove box, and its cover uses retaining tabs rather than bolts. This design allows owners to perform the replacement without removing dashboard panels or disconnecting electrical components.
A flashlight helps illuminate the filter compartment, particularly when checking the housing for accumulated leaves or debris. A clean microfiber cloth can remove loose dust around the housing opening. Avoid forcing retaining clips or inserting sharp tools into the filter compartment because damaged plastic components may prevent the cover from closing securely.
The replacement filter must match the vehicle’s model year and filter housing dimensions. Toyota genuine cabin air filters are designed for specific vehicle applications, while aftermarket manufacturers offer compatible particulate and activated carbon filters. A filter intended for one RAV4 generation should not be assumed to fit another, even when the filters appear similar.
To identify the correct replacement, check the vehicle owner’s manual, verify the original equipment part number through Toyota’s parts catalog, or use a filter manufacturer’s fitment guide. Confirm the model year and applicable vehicle configuration before purchasing. The replacement filter should fit inside the housing without folding, excessive gaps, or pressure against the cover.
How Do You Replace the Cabin Air Filter in a Toyota RAV4?
To replace a Toyota RAV4 cabin air filter, lower the passenger-side glove box, remove the filter housing cover, replace the old filter, and reassemble the components. The procedure generally takes 5–15 minutes on models with a conventional glove-box-mounted filter housing. The exact release mechanisms depend on the vehicle’s model year.
Park the vehicle on a level surface, switch off the engine and HVAC system, and remove loose items from the glove box before beginning. Keep the replacement filter nearby and check its packaging for installation instructions.
How Do You Remove the Old Toyota RAV4 Cabin Air Filter?
Remove the old Toyota RAV4 cabin air filter by lowering the glove box, opening the filter housing, and sliding the filter out of its compartment. The process involves accessing the housing without damaging the glove box stops, damper arm, or plastic retaining clips.
- Open the passenger-side glove box. Remove its contents to prevent objects from falling when the compartment is lowered. Inspect the sides of the glove box to identify the retaining stops and any attached damper mechanism.
- Disconnect the glove box damper if equipped. On models with a damper arm, carefully detach its connection from the glove box. Support the glove box while releasing the connection to avoid placing unnecessary tension on the mechanism.
- Release the glove box retaining stops. Gently press the glove box sides inward where the design permits, allowing the stops to clear the dashboard opening. Lower the glove box to expose the cabin air filter housing. Follow the model-specific removal method if the retaining arrangement differs.
- Remove the filter housing cover. Locate the rectangular access cover behind the glove box. Release its retaining tab or tabs and carefully pull the cover away from the housing. Note how the cover attaches so it can be reinstalled correctly.
- Slide out the existing cabin air filter. Pull the filter straight out while keeping it level to prevent accumulated dust and debris from falling into the housing. Observe the filter’s installed orientation and any arrows or markings before discarding it.
Inspect the removed filter for visible dust, leaves, pollen accumulation, and other debris. A heavily contaminated filter can restrict ventilation airflow because trapped particles increase resistance as air passes through the filter material.
Check the accessible housing opening for loose debris before installing the replacement. Remove visible material carefully with a clean cloth or suitable vacuum attachment without pushing debris deeper into the HVAC system.
How Do You Install a New Toyota RAV4 Cabin Air Filter?
Install the new Toyota RAV4 cabin air filter by matching its specified orientation to the housing, sliding it into position, and ensuring it fits without gaps or deformation. Correct installation allows incoming air to pass through the filter media rather than bypassing its edges.
First, compare the replacement filter with the removed filter. Check its overall dimensions, shape, and frame construction. A correctly matched filter should fit the housing without requiring excessive force. If the replacement is significantly larger or smaller, verify its part number and vehicle compatibility before proceeding.
Next, identify the directional markings printed on the filter frame. An arrow labeled “AIR FLOW” indicates the intended direction of airflow through the filter. An arrow labeled “UP” indicates which side should face upward. These markings have different meanings and should not be treated as interchangeable.
Follow the instructions supplied with the replacement filter and any orientation markings on the vehicle’s housing. Do not assume that every aftermarket filter uses the same arrow convention.
Slide the new filter into the compartment while keeping its frame aligned with the housing guides. Avoid bending or compressing the filter media, as deformation can create gaps around its edges.
Once inserted, inspect the visible edges to confirm that the filter is seated evenly. The filter should remain inside the housing without protruding into the path of the access cover.
How Do You Reassemble the Glove Box After Replacing the Filter?
Reassemble the Toyota RAV4 glove box by securing the filter housing cover, returning the glove box to its mounting position, and reconnecting the damper mechanism where equipped. Each component must be properly seated to prevent rattling, restricted glove box movement, or an unsecured filter compartment.
Begin by positioning the cabin air filter housing cover over its opening. Engage the appropriate retaining points and press the cover into place until its tabs lock securely. The cover should sit flush against the housing without visible gaps.
Raise the glove box toward its original position. On models with flexible retaining stops, carefully guide the stops past the dashboard opening until the glove box is properly supported. Reconnect the damper arm if it was detached during removal.
Open and close the glove box several times to confirm that it moves smoothly and remains securely attached. Resistance, uneven movement, or an improperly closing glove box indicates that a retaining stop or damper connection may not be positioned correctly.
Finally, start the vehicle or switch on the appropriate ignition mode and operate the HVAC fan. Check that air flows through the dashboard vents and listen for unusual rattling or vibration near the filter housing.
A properly installed cabin air filter should remain securely seated during HVAC operation. If airflow is unexpectedly weak or abnormal noises appear immediately after replacement, switch off the fan and recheck the filter position and housing cover before investigating other ventilation components.
How Can You Check Whether a Toyota RAV4 Cabin Air Filter Is Installed Correctly?
A Toyota RAV4 cabin air filter is installed correctly when it sits securely inside the housing, follows the specified orientation, and allows the HVAC system to operate without unusual noises or installation-related airflow restrictions. Checking these conditions immediately after replacement helps identify problems before the vehicle returns to regular use.
Start by inspecting the filter housing cover behind the glove box. The cover should sit flush against the housing, with its retaining tabs fully engaged. A loose cover can allow unfiltered air to bypass the filter or produce rattling noises when the blower motor operates. Confirm that the glove box opens and closes smoothly and that its damper arm, if equipped, is securely connected.
Next, turn on the HVAC system and select a moderate fan speed. Check the airflow from the dashboard vents, then increase the fan speed to verify that the system responds normally. Listen for whistling, rattling, or scraping sounds that were not present before the replacement. These noises can indicate a loose housing cover, incorrectly positioned filter, or debris near the blower motor.
If airflow remains weak after installing the new filter, inspect the filter’s fit and orientation before assuming the HVAC system has a mechanical fault. Persistent airflow problems can also result from a malfunctioning blower motor, blocked air intake, or ventilation control issue. A new cabin air filter removes filter-related airflow restrictions but does not repair unrelated HVAC problems.
How Often Should You Replace a Toyota RAV4 Cabin Air Filter?
Toyota RAV4 cabin air filter replacement intervals depend on the vehicle’s model year, maintenance schedule, and driving conditions. A commonly referenced maintenance interval is approximately 15,000–30,000 miles (24,000–48,000 kilometers), but this range is general guidance rather than a universal Toyota requirement. Owners should follow the cabin air filter inspection and replacement instructions in their specific vehicle’s maintenance guide.
The replacement interval depends partly on how quickly airborne contaminants accumulate in the filter media. Vehicles driven on dusty roads, through heavy traffic, or in areas with high pollen concentrations experience greater exposure to airborne particles. As the filter collects debris, airflow resistance increases, potentially reducing the amount of air delivered through the ventilation system.
For example, a Toyota RAV4 driven regularly on unpaved roads may require more frequent filter inspections than the same model used primarily on clean, paved highways. Similarly, vehicles operating in areas with seasonal pollen or airborne construction dust can accumulate filter contamination more quickly. These conditions justify checking the filter before its scheduled replacement date.
Filter condition also matters more than mileage alone. Inspect the cabin air filter when ventilation airflow becomes noticeably weaker, unpleasant odors develop, or visible debris accumulates on the filter surface. A filter that is heavily clogged, damaged, or contaminated should be replaced rather than returned to service.
During routine maintenance, record the replacement date and odometer reading to establish a service history. This information helps owners monitor filter service intervals and identify whether their driving environment requires more frequent inspections.
The most reliable replacement schedule combines Toyota’s model-specific maintenance recommendations with the filter’s actual condition and the vehicle’s operating environment.
What Are the Signs of a Dirty Toyota RAV4 Cabin Air Filter?
The main signs of a dirty Toyota RAV4 cabin air filter are reduced airflow from the vents, unpleasant cabin odors, visible filter contamination, and reduced windshield defogging performance. These symptoms develop when dust, pollen, leaves, and other airborne particles accumulate in the filter media or when trapped contaminants contribute to odors in the ventilation system.
Reduced airflow is a common indication of a clogged cabin air filter. As debris builds up between the filter fibers, resistance to airflow increases. The blower motor must move air through the restricted filter, which can reduce the volume of air reaching the passenger compartment. For example, a Toyota RAV4 may produce noticeably weaker airflow at the same fan setting than it did with a clean filter. However, weak airflow can also indicate a blower motor or ventilation system problem.
Unpleasant odors can also indicate filter contamination. Dust, organic debris, and moisture trapped in the filter may contribute to musty smells when the air conditioning or ventilation system operates. Replacing a contaminated filter removes accumulated material, although odors originating from the evaporator or other HVAC components may require additional cleaning.
Visible contamination provides another reason to replace the filter. A heavily loaded filter may contain compacted dust, leaves, insects, or other debris that obstructs its pleated surface. Inspecting the filter directly helps distinguish normal discoloration from substantial particle accumulation.
A severely restricted cabin air filter can also reduce airflow directed toward the windshield, making defogging less effective. However, windshield fogging also depends on humidity, temperature, air conditioning operation, and ventilation settings. Persistent fogging should not be attributed to the cabin air filter without checking these conditions.
How Much Does Toyota RAV4 Cabin Air Filter Replacement Cost?
Toyota RAV4 cabin air filter replacement costs depend on the filter brand, filtration material, vehicle compatibility, and whether the owner performs the replacement or pays for professional service. DIY replacement generally costs less because the owner pays for the replacement filter without additional labor charges.
For budgeting purposes, standard aftermarket cabin air filters are commonly estimated at approximately $10–$25 in the United States, while premium activated carbon filters and genuine Toyota replacement filters may cost approximately $20–$45 or more. These are indicative price ranges rather than verified current retail quotes. The actual price depends on the Toyota RAV4 model year, filter manufacturer, supplier, and available filtration features.
Professional replacement includes both the filter price and labor. An independent repair shop or dealership may charge approximately $40–$100 or more for the complete service, depending on local labor rates, parts pricing, and service policies. Some shops include cabin air filter replacement within a larger scheduled maintenance package, making the separately billed cost less apparent.
DIY replacement eliminates the labor portion of the expense. Since most Toyota RAV4 cabin air filters are accessible behind the glove box, owners can generally complete the procedure without specialized tools. For example, purchasing a compatible $20 filter and installing it yourself results in a $20 parts expense, excluding any optional supplies. Having a shop install the same filter adds the applicable labor and service charges.
Choosing the least expensive filter is not always the best approach. Correct dimensions, secure fitment, suitable filtration performance, and compatibility with the vehicle’s HVAC housing are more important than a small difference in purchase price. Owners should compare the replacement filter’s specifications and confirm model-year compatibility before purchasing.
DIY cabin air filter replacement is generally the more economical option for Toyota RAV4 owners who can safely access the glove box and follow the correct installation procedure. Professional service remains appropriate when the glove box mechanism is damaged, the filter housing is difficult to access, or additional HVAC problems require diagnosis.
Read more: Nissan Cabin Air Filter Replacement: Step-by-Step Guide
Which Type of Cabin Air Filter Is Best for a Toyota RAV4?
The best cabin air filter for a Toyota RAV4 is a vehicle-compatible filter that provides effective particulate filtration, fits securely inside the HVAC housing, and meets the owner’s air quality requirements. Genuine Toyota filters and reputable aftermarket alternatives can both be suitable choices, provided their dimensions and specifications match the vehicle’s model year.
Toyota genuine cabin air filters are designed for specific Toyota vehicle applications. Their primary advantage is manufacturer-specified fitment, which helps owners select a replacement compatible with the original filter housing. Genuine filters are available through Toyota dealerships and authorized parts suppliers, although part numbers and filtration features vary by vehicle application.
Aftermarket cabin air filters offer additional choices in filtration materials, features, and price. Standard particulate filters capture airborne contaminants such as dust, pollen, and road debris as air passes through their filter media. Their effectiveness depends on the filtration material, particle size, construction quality, and resistance to airflow. A correctly fitted aftermarket filter can provide a practical alternative to a genuine Toyota replacement.
Activated carbon cabin air filters contain an additional adsorbent layer designed to reduce certain gaseous pollutants and odors entering the passenger compartment. Activated carbon works by attracting and retaining certain gas molecules on its porous surface. This makes carbon filters useful for drivers who regularly encounter traffic exhaust odors or other airborne smells. However, activated carbon does not eliminate every pollutant, and its adsorption capacity decreases as the material becomes saturated.
Filter fitment remains the most important selection requirement. A filter that is too small can leave gaps around the housing, allowing air to bypass the filtration material. An oversized filter may become compressed during installation, potentially deforming the frame or preventing the housing cover from closing properly.
Toyota RAV4 owners should verify the replacement filter’s part number, model-year compatibility, and installation markings before purchasing. Choose a standard particulate filter for routine cabin air filtration or a compatible activated carbon filter when additional odor and gas reduction is a priority. Neither option eliminates the need for regular inspection and replacement.
What Problems Can Occur After Replacing a Toyota RAV4 Cabin Air Filter?
The most common problems after Toyota RAV4 cabin air filter replacement involve incorrect filter installation, an unsecured housing cover, reduced airflow, persistent odors, or improperly reassembled glove box components. These problems generally result from installation errors, incompatible replacement parts, or existing HVAC conditions that a new filter cannot resolve.
Incorrect filter orientation is a common installation concern. Cabin air filters may display an “AIR FLOW” arrow or an “UP” marking, and these labels indicate different installation requirements. An airflow arrow identifies the intended direction of air movement, while an upward arrow identifies the filter’s required vertical orientation. Following the manufacturer’s markings helps ensure the replacement filter is positioned correctly.
A loose filter housing cover can create rattling noises or allow air to bypass the filter. This problem occurs when the cover’s retaining tabs are not fully engaged or when an incorrectly sized filter prevents the cover from closing. Remove the cover, inspect the filter’s position, and reinstall the components without forcing the plastic clips.
Reduced airflow after replacement can indicate an incorrectly seated filter, an unsuitable replacement part, or debris obstructing the filter housing. Compare the new filter’s dimensions with the original and confirm that its frame sits evenly inside the compartment. If airflow remains weak after verifying installation, inspect other HVAC components, including the blower motor and air intake passages.
Persistent cabin odors do not necessarily indicate a defective replacement filter. Moisture accumulation, microbial growth on the air conditioning evaporator, or debris elsewhere in the ventilation system can produce unpleasant smells even when the cabin air filter is clean. These conditions require inspection of the affected HVAC components rather than repeated filter replacement.
Glove box problems can also appear after the replacement procedure. A disconnected damper arm, improperly positioned retaining stop, or misaligned glove box can cause uneven movement or prevent the compartment from closing securely. Recheck the original mounting points and restore the components according to the vehicle’s design.
When installation checks do not resolve persistent airflow problems, unusual noises, or unpleasant odors, further HVAC diagnosis is necessary. A qualified automotive technician can inspect the blower motor, ventilation ducts, evaporator, and related components to identify faults unrelated to the cabin air filter.