Fix-a-Flat is an aerosol tire sealant that temporarily seals small punctures in a tire’s tread and adds air pressure, allowing drivers to reach a tire repair shop without immediately changing the tire. To use Fix-a-Flat, park your vehicle safely, inspect the damaged tire, attach the can’s hose to the valve stem, and dispense the sealant according to the product instructions. After application, drive as directed to distribute the sealant, check the tire pressure, and arrange professional repair.
Fix-a-Flat works by injecting a liquid sealant and inflation gas into the tire through the valve stem. As the tire rotates, the sealant spreads across the inner surface and helps close eligible punctures. However, it cannot repair sidewall damage, large cuts, or tires with structural damage caused by driving while flat.
Using Fix-a-Flat correctly requires checking the tire’s condition, selecting the appropriate product size, and following the manufacturer’s application and driving instructions. This guide explains how to apply Fix-a-Flat step by step, how much sealant to use, what to do after application, and when a damaged tire requires professional repair or replacement.
What Is Fix-a-Flat and How Does It Work?
Fix-a-Flat is an aerosol tire sealant designed to temporarily seal small punctures in a tire’s tread while adding air pressure. It provides an emergency solution for drivers experiencing a flat tire caused by a nail, screw, or similar object. The product allows a vehicle to reach a tire repair facility without immediately installing a spare tire, provided the tire remains safe to drive.
Fix-a-Flat works by releasing a combination of liquid sealant and inflation gas through the tire’s valve stem. Once inside, the sealant spreads along the tire’s inner surface as the wheel rotates. When the sealant reaches a suitable puncture, escaping air carries it toward the opening, where it forms a temporary barrier that reduces air loss. The inflation gas also helps restore some tire pressure, although additional air may be necessary.
Fix-a-Flat is intended for small punctures in the tire’s tread, not structural tire damage. It cannot reliably seal sidewall tears, large holes, damaged tire beads, or tires that have suffered internal damage from being driven while severely underinflated. These conditions require professional inspection and potentially tire replacement.
What Should You Do Before Using Fix-a-Flat?
Before using Fix-a-Flat, park in a safe location, inspect the damaged tire, and confirm that the product is suitable for your tire size and puncture type. Proper preparation reduces the risk of applying sealant to a tire that cannot safely hold pressure.
Start by moving the vehicle away from traffic onto stable, level ground. Turn on the hazard lights, engage the parking brake, and switch off the engine. Inspect the tire’s tread, sidewall, and wheel rim for visible damage. A small nail puncture in the tread may be suitable for temporary sealing, while a torn sidewall, exposed tire cords, or a tire separated from the rim requires another recovery method.
Next, check the Fix-a-Flat can for its tire-size compatibility, expiration information, and application instructions. Different product versions have different capacities and dispensing requirements. Keep a tire pressure gauge available to check inflation after application, and use a portable air compressor if the sealant does not restore sufficient pressure.
Locate the tire’s valve stem and remove any dirt around the valve cap to prevent contamination during application. Do not remove an embedded nail or screw unless the product instructions specifically require it, because removing the object can enlarge the air leak. If the tire has significant structural damage or cannot safely support the vehicle, arrange roadside assistance instead of applying sealant.
How Do You Use Fix-a-Flat Step by Step?
To use Fix-a-Flat, inspect the damaged tire, connect the sealant can to the valve stem, dispense the product, and drive according to the manufacturer’s instructions to distribute the sealant. The process involves 8 steps and is intended for temporarily sealing eligible tread punctures so the vehicle can reach a professional tire repair facility.
Step 1: Park Your Vehicle in a Safe Location
Move your vehicle to a flat, stable surface away from moving traffic. Turn on the hazard lights, engage the parking brake, and switch off the engine. Avoid stopping on soft ground or steep slopes because the vehicle must remain stationary while you apply the sealant.
Step 2: Inspect the Flat Tire for Damage
Examine the tire tread, sidewall, and wheel rim to determine whether Fix-a-Flat is appropriate. Small punctures caused by nails or screws in the tread may be suitable for temporary sealing. Large cuts, sidewall punctures, exposed tire cords, or a tire detached from the rim cannot be safely repaired with aerosol sealant.
Do not attempt to drive on a tire showing structural damage, even if the sealant appears to restore some pressure.
Step 3: Prepare the Fix-a-Flat Can
Check that the Fix-a-Flat product matches your tire size and is within its usable shelf life. Read the instructions printed on the can, including any temperature requirements and preparation procedures.
Shake the can only if directed by the product label. Different Fix-a-Flat formulations and container designs may require different preparation methods.
Step 4: Connect the Hose to the Tire Valve Stem
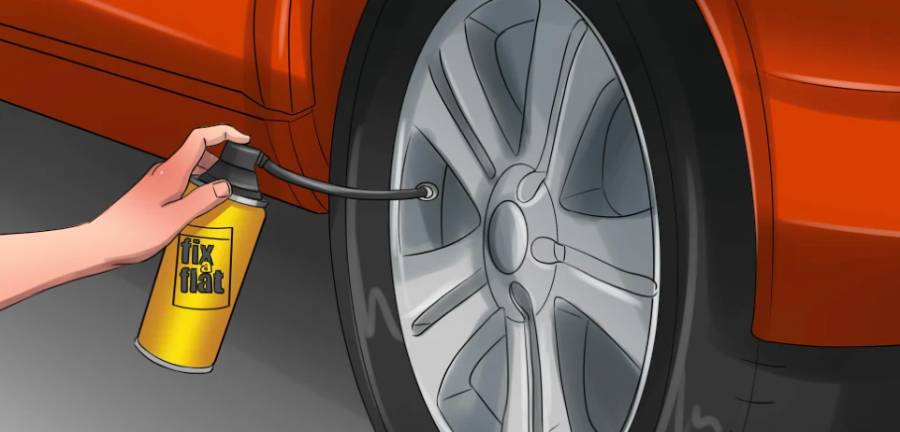
Locate the tire valve stem and remove its protective cap. Attach the Fix-a-Flat hose or connector securely to the valve stem according to the product’s instructions.
Ensure the connection is properly seated to prevent sealant from escaping around the valve. Keep the can positioned as directed by the manufacturer throughout the application.
Step 5: Dispense Fix-a-Flat Into the Tire
Activate the can using its designated button, nozzle, or connector mechanism. Allow the sealant and inflation gas to enter the tire for the duration specified on the product label.
The sealant enters through the valve stem and collects inside the tire. Use the amount recommended for your tire size rather than adding extra sealant to compensate for a large puncture. A single can may not restore the tire to its recommended operating pressure.
Step 6: Disconnect the Can and Inspect the Tire
Once dispensing is complete, disconnect the hose carefully and replace the valve cap. Check whether the tire has regained sufficient inflation and inspect it for obvious air loss or additional damage.
Use a tire pressure gauge to measure the pressure when practical. If the tire remains severely underinflated, cannot support the vehicle, or continues losing air rapidly, do not drive.
Step 7: Drive to Distribute the Sealant
Drive the vehicle only when the tire is sufficiently inflated and shows no signs of structural damage. Follow the initial driving distance and speed restrictions printed on the Fix-a-Flat can.
Wheel rotation distributes the liquid sealant around the tire’s interior. As the sealant reaches the puncture, escaping air helps carry it into the opening to form a temporary seal. Avoid aggressive acceleration, hard cornering, and unnecessary high-speed driving.
Step 8: Check Tire Pressure and Arrange Professional Repair
After completing the initial driving procedure, stop in a safe location and check the tire pressure using an accurate gauge. Add air if necessary to reach the pressure specified on the vehicle’s tire information placard, provided the tire remains safe to inflate.
Monitor the tire for continued pressure loss and visit a professional tire repair facility promptly. Tell the technician that Fix-a-Flat was used so the tire can be inspected and cleaned appropriately. Fix-a-Flat is a temporary emergency solution and does not replace a permanent tire repair.
How Much Fix-a-Flat Should You Put in a Tire?
The amount of Fix-a-Flat needed depends on the tire size and the coverage specified on the product can. Fix-a-Flat is sold in different container sizes designed for different tire categories, including compact cars, sedans, SUVs, and light trucks. Drivers should select the appropriate product and follow its dispensing instructions rather than estimate the amount based on the puncture size.
A correctly sized can is intended to deliver enough sealant and inflation gas for its specified tire category. However, the amount of air pressure restored depends on the tire’s volume, remaining pressure, and severity of the leak. A larger tire requires more inflation volume, while a puncture that continues leaking can prevent the tire from maintaining adequate pressure even after sealant application.
Do not add extra Fix-a-Flat simply because the tire remains underinflated. Excess sealant does not repair sidewall damage, large punctures, or internal tire damage. Instead, check the tire pressure with a gauge and use an air compressor when additional inflation is appropriate. If the tire cannot retain pressure, arrange professional assistance rather than repeatedly injecting sealant.
What Should You Do Immediately After Using Fix-a-Flat?
After using Fix-a-Flat, follow the product’s initial driving instructions, check the tire pressure, and arrange professional tire inspection as soon as possible. The sealant needs to spread inside the tire to reach the puncture, while the tire must maintain sufficient pressure to support the vehicle safely.
Before driving, confirm that the tire is adequately inflated and has no visible structural damage. Follow the driving procedure stated on the can, then stop in a safe location to measure the tire pressure. Watch for continued air loss, unusual vibrations, or changes in vehicle handling. These symptoms indicate that the tire may not be safe for further driving.
How Far Can You Drive After Using Fix-a-Flat?
You should drive only as far as necessary to reach a professional tire repair facility after using Fix-a-Flat. The product is designed for temporary emergency mobility, not continued everyday driving. The permitted driving distance and speed depend on the specific Fix-a-Flat formulation and the instructions printed on its container.
The initial drive helps distribute sealant around the tire’s interior, allowing it to reach an eligible puncture and reduce air loss. However, successful sealing does not establish that the tire is structurally sound. A tire that has been driven while severely underinflated may contain internal damage that cannot be identified from its exterior.
Follow the manufacturer’s driving limits and stop immediately if the tire loses pressure, vibrates excessively, or affects steering stability. If a repair shop cannot be reached safely, use roadside assistance instead of extending the trip.
Do You Need to Add Air After Using Fix-a-Flat?
You need to add air after using Fix-a-Flat if the tire pressure remains below the vehicle manufacturer’s recommended level. The aerosol can provides some inflation, but it does not guarantee that the tire will reach the correct operating pressure.
Measure the pressure with a tire gauge after following the product’s initial application and driving instructions. Find the recommended cold tire pressure on the driver’s door jamb placard or in the vehicle owner’s manual. For example, if the placard specifies 35 PSI and the tire measures 27 PSI, the tire is 8 PSI below its recommended pressure. Use a suitable air compressor to correct the pressure when the tire is safe to inflate, accounting for temperature-related differences in readings.
Check the pressure again after inflation to determine whether the tire is retaining air. If pressure continues dropping or the tire cannot support the vehicle safely, stop driving and arrange professional inspection. Maintaining the correct pressure is essential because underinflation increases tire flexing, heat buildup, and the risk of tire failure.
How Long Does Fix-a-Flat Last in a Tire?
Fix-a-Flat is designed to provide temporary puncture sealing until the tire can be professionally inspected and repaired. The manufacturer generally recommends having the tire repaired within 3 days or 100 miles, whichever comes first. This is an upper limit for temporary use, not a guarantee that the tire will remain safe or maintain pressure throughout that period. Drivers should check the instructions on their specific product because recommendations can vary.
The actual duration of the seal depends on the puncture’s size and location, the tire’s condition, and its ability to retain air. A small nail puncture in the tread may remain temporarily sealed as the liquid sealant blocks the opening. However, continued air loss, tire flexing, and changes in driving conditions can compromise the seal. Even when the tire maintains pressure, the sealant does not restore damaged internal components or the tire’s original structural integrity.
A tire that holds air after Fix-a-Flat application still requires professional inspection. A technician must locate the puncture, examine the tire’s interior, and determine whether a permanent repair is possible. Driving beyond the manufacturer’s temporary-use limits increases the risk of continued pressure loss and tire failure, particularly when the original puncture has not been properly assessed.
Can Fix-a-Flat Damage Your Tire or TPMS Sensor?
Fix-a-Flat is formulated for temporary use in compatible tires, but improper application and prolonged use can create maintenance problems involving sealant residue, tire inspection, and tire pressure monitoring components. Its compatibility with a tire pressure monitoring system (TPMS) depends on the product formulation and sensor design. Drivers should verify the compatibility information printed on their Fix-a-Flat container before application.
When Fix-a-Flat enters a tire, its liquid sealant coats portions of the inner surface as the wheel rotates. This residue must be considered during professional inspection because it can cover the puncture area and interfere with identifying damage until the tire is cleaned. The technician may need to remove the tire from the wheel, clean the affected surfaces, and inspect the inner liner before determining whether the tire qualifies for a permanent repair.
Many modern Fix-a-Flat formulations are marketed as TPMS-safe when used according to their instructions. However, TPMS compatibility does not eliminate the need for inspection after sealant application. Sealant residue can complicate servicing, and a tire pressure warning light may remain illuminated if the tire is underinflated or has an unresolved leak. The technician should check the tire pressure and inspect the sensor when necessary rather than assuming the sealant has damaged it.
Fix-a-Flat also cannot reverse structural tire damage caused by driving with insufficient pressure. Excessive sidewall flexing generates heat and can damage internal tire components, including the reinforcing cords and inner liner. These problems may exist even when the tire appears properly inflated after sealant application. Professional inspection is therefore necessary to distinguish a repairable tread puncture from damage requiring tire replacement.
Why Is Fix-a-Flat Not Working on Your Tire?
Fix-a-Flat may fail because the puncture is too large, the damage is outside the tire’s tread area, or the tire cannot retain sufficient air pressure. The sealant is designed to temporarily close small tread punctures, not repair structural damage or every type of air leak. Identifying the cause of failure determines whether additional inflation is appropriate or the vehicle requires roadside assistance.
One common reason is damage beyond the sealant’s capabilities. Sidewall punctures, large cuts, damaged valve stems, and leaks around the tire bead can prevent Fix-a-Flat from maintaining pressure. For example, a nail hole in the tread may be temporarily sealed, while a tear in the sidewall continues leaking because the damaged area flexes significantly as the tire rotates. Adding more sealant does not correct these conditions.
Insufficient tire inflation is another reason Fix-a-Flat may appear ineffective. The aerosol can contains a limited amount of inflation gas, and larger tires may require additional air from a compressor. A tire can also lose pressure faster than the sealant can close the puncture. Check the tire pressure with a gauge and compare it with the vehicle manufacturer’s recommended pressure. If the tire is structurally sound but remains below the required pressure, additional inflation may be necessary before driving.
Stop using Fix-a-Flat if the tire continues losing air rapidly or shows visible structural damage. Repeated sealant applications cannot restore damaged tire cords, repair a separated bead, or make a severely damaged tire safe. Use a suitable spare tire or contact roadside assistance to transport the vehicle to a repair facility. A professional inspection can identify the leak and determine whether the tire needs repair or replacement.
Read more: How Long Does Fix-a-Flat Last? Mileage & Safety
Is Fix-a-Flat Better Than a Tire Plug or Spare Tire?
Fix-a-Flat is more convenient for temporarily sealing an eligible tread puncture, while a tire plug kit or spare tire may be more appropriate depending on the damage and available equipment. These methods serve different purposes, and none is suitable for every flat tire. The correct choice depends on the puncture’s location, tire condition, and whether the vehicle can safely continue driving.
Fix-a-Flat requires no wheel removal or separate puncture insertion tools. Drivers connect the can to the valve stem and inject sealant to temporarily reduce air loss. This makes it useful for small tread punctures when changing a tire is impractical. However, the sealant cannot repair sidewall damage or restore a tire with compromised internal construction. It also requires professional follow-up.
A tire plug kit uses a rubber repair strip inserted into a puncture from outside the tire. It can temporarily reduce air loss from certain tread punctures, but the process requires locating the hole and using insertion tools. An external plug alone is not equivalent to a professional permanent repair. A proper repair generally involves removing the tire, inspecting its interior, and using an approved combination of puncture filling and inner-liner sealing when the damage meets repair standards.
A spare tire provides an alternative when the damaged tire cannot safely retain air or accept a temporary seal. Installing one requires the correct spare wheel, suitable tools, and a safe location for the tire change. Temporary compact spares also have their own speed, distance, and load restrictions, which must be followed.
For a small, eligible tread puncture, Fix-a-Flat offers a straightforward emergency solution. For a puncture suitable for repair, a professional internal repair provides a more durable solution. When the tire has major damage or cannot maintain pressure, a compatible spare tire or roadside assistance is the safer option.
Can You Use Fix-a-Flat More Than Once on the Same Tire?
Using Fix-a-Flat more than once on the same tire is not recommended unless the specific product instructions explicitly permit repeated application. Fix-a-Flat is designed as a temporary emergency sealant, and applying additional sealant does not guarantee a stronger seal or restore a tire that continues losing air.
Repeated applications can leave additional sealant residue inside the tire, complicating inspection, cleaning, and permanent puncture repair. More importantly, a recurring air leak may indicate a puncture that exceeds the sealant’s capabilities, a damaged valve stem, or internal tire damage. For example, a tire that loses pressure shortly after the first application may have a larger puncture or a leak outside the tread area that additional sealant cannot reliably close.
Have the tire professionally inspected instead of repeatedly applying Fix-a-Flat to stop an ongoing leak. A tire technician can identify the source of air loss, examine the internal structure, and determine whether a permanent repair meets tire safety standards. If the tire cannot maintain adequate pressure, use a compatible spare tire or arrange roadside assistance rather than continuing to drive.