Replacing a 6R140 valve body involves removing the transmission pan, disconnecting the valve body assembly, installing a compatible replacement, and completing the required fluid and electronic calibration procedures. The Ford 6R140 TorqShift six-speed automatic transmission uses a hydraulic valve body and electronically controlled solenoids to regulate fluid pressure, clutch engagement, and gear changes.
A faulty 6R140 valve body can cause harsh shifting, delayed gear engagement, shift flares, slipping, and transmission-related diagnostic trouble codes. However, these symptoms can also result from damaged solenoids, electrical faults, low transmission fluid pressure, or internal clutch wear. Accurate diagnosis is essential before replacing the assembly.
The replacement procedure requires basic transmission service tools, a torque wrench, the correct replacement valve body, approved transmission fluid, and access to vehicle-specific service specifications. Depending on the replacement assembly and vehicle calibration, a compatible diagnostic scan tool may also be necessary to update solenoid strategy information and perform adaptive learning procedures.
This guide explains how to diagnose a faulty 6R140 valve body, prepare the required tools and parts, remove and install the assembly, refill the transmission, and verify proper operation after replacement. It also covers replacement costs, component options, and common post-installation problems.
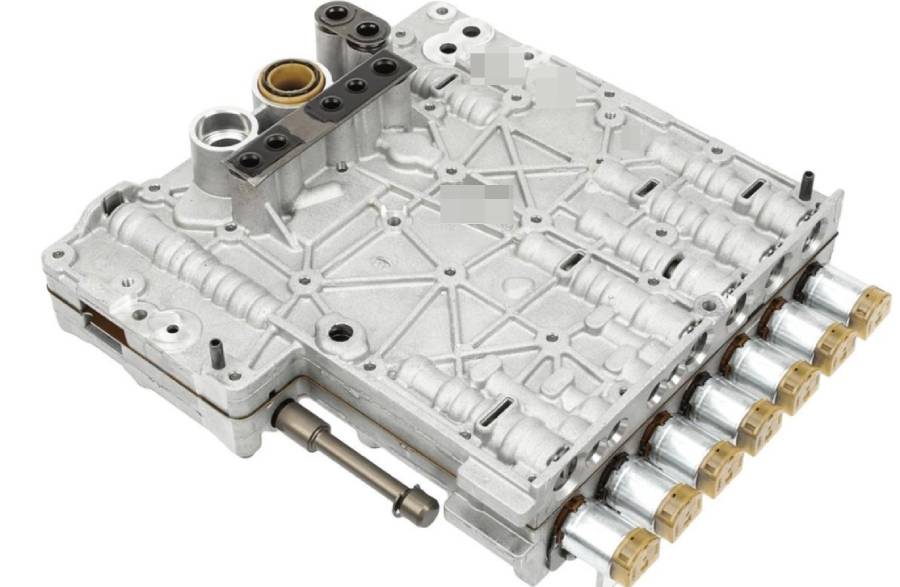
When Does a 6R140 Valve Body Need Replacement?
A 6R140 valve body needs replacement when diagnostic testing confirms that worn hydraulic valves, damaged valve body passages, or other internal valve body defects are preventing the transmission from controlling fluid pressure and gear engagement correctly. Common warning signs include harsh shifting, delayed engagement, shift flares, slipping, and inconsistent gear changes. However, these symptoms alone do not confirm valve body failure because solenoid faults, wiring problems, and internal transmission damage can produce similar behavior.
Harsh shifting occurs when clutch application pressure or timing is incorrect, causing the transmission to engage a gear abruptly. Delayed engagement happens when the transmission takes longer than expected to respond after selecting Drive or Reverse. A shift flare occurs when engine speed rises during a gear change before the next clutch fully engages. These conditions can indicate hydraulic control problems, but each requires further testing to identify the underlying cause.
Diagnosing a faulty 6R140 valve body begins with retrieving transmission diagnostic trouble codes using a Ford-compatible scan tool. The technician should examine transmission fluid level and condition, inspect electrical connectors and wiring, and evaluate solenoid operation. Hydraulic pressure testing and transmission operating data can help determine whether the problem originates in the valve body or another component.
Valve body replacement is justified when testing identifies a defect that cannot be corrected through an appropriate repair or component-level service. Metal debris in the transmission pan, for example, may indicate internal mechanical wear that requires additional inspection rather than valve body replacement alone. Replacing the valve body without identifying the original failure can leave the shifting problem unresolved.
What Tools and Parts Do You Need for 6R140 Valve Body Replacement?
Replacing a 6R140 valve body requires transmission service tools, a compatible replacement assembly, sealing components, and the correct automatic transmission fluid. The exact parts and service procedures depend on the vehicle model year, transmission configuration, and whether the replacement includes the solenoid body.
The main tools and materials include:
- Socket and ratchet set: Used to remove the transmission pan, valve body fasteners, and related components.
- Calibrated torque wrench: Required to tighten valve body and transmission pan fasteners to the applicable Ford specifications.
- Transmission fluid drain pan: Collects automatic transmission fluid during disassembly and helps contain spills.
- Vehicle lift or properly rated jack stands: Provides stable access to the underside of the transmission.
- Ford-compatible diagnostic scan tool: Retrieves transmission fault codes, monitors operating data, and performs supported solenoid strategy or adaptive learning procedures.
- Replacement 6R140 valve body: Must match the vehicle’s transmission application, part number requirements, and electronic configuration.
- Transmission filter and required seals: Replace these components according to their condition and the applicable service procedure.
- Approved automatic transmission fluid: The 6R140 uses fluid meeting Ford’s MERCON LV specification; confirm the applicable service requirements before filling.
Selecting the correct replacement valve body is essential because 6R140 assemblies can differ in part numbers, solenoid configurations, and calibration requirements. The vehicle identification number, transmission identification information, and original assembly part number should be checked against the replacement supplier’s compatibility data. An assembly that physically fits the transmission is not necessarily electronically compatible with the vehicle.
A new OEM valve body provides a factory-specified replacement option, while a remanufactured assembly has been inspected and reconditioned for reuse. Both options require correct application matching. When the replacement includes a different solenoid body, the repair may also require updating solenoid strategy information through a compatible diagnostic tool.
Before beginning the repair, prepare a clean workspace and obtain the vehicle-specific Ford service instructions. Hydraulic passages, solenoids, and sealing surfaces are sensitive to contamination and incorrect assembly. Keep removed fasteners organized by location, protect exposed transmission components from debris, and use the specified tightening sequence and torque values during reassembly. These precautions reduce the risk of hydraulic leaks, component damage, and shifting problems after installation.
How Do You Remove the Valve Body From a Ford 6R140 Transmission?
Removing the valve body from a Ford 6R140 transmission requires draining the transmission fluid, removing the transmission pan and filter, disconnecting the necessary electrical connections, and carefully unbolting the main control assembly. The procedure must follow the correct fastener locations and removal sequence to prevent damage to hydraulic passages, solenoids, and internal transmission components.
The 6R140 valve body is located inside the transmission, above the fluid pan. Because the assembly controls hydraulic pressure distribution and clutch engagement, contamination or improper handling during removal can affect transmission operation after reassembly.
How Do You Access the 6R140 Valve Body?
To access the 6R140 valve body, safely raise and support the vehicle, remove the transmission fluid pan, and detach the transmission filter. These steps expose the main control assembly and provide access to its mounting fasteners and electrical connections.
Step 1: Secure and prepare the vehicle. Park the truck on a level surface, engage the parking brake, and secure the wheels against movement. Raise the vehicle using a suitable lift or properly rated jack stands positioned at the manufacturer-approved lifting points. Allow the transmission to cool before working underneath it because automatic transmission fluid and metal components can remain hot after operation.
Step 2: Remove the transmission fluid pan. Position a large drain pan beneath the transmission and carefully loosen the fluid pan bolts. The pan may contain a substantial amount of automatic transmission fluid, so lower it gradually to control fluid discharge. Once the pan is removed, inspect the fluid for discoloration, unusual odors, and visible contamination. Excessive metal particles or friction material can indicate internal transmission damage that requires further diagnosis.
Step 3: Remove the transmission filter. Detach the filter using the procedure specified for the particular 6R140 application. Inspect the filter connection and sealing components for damage or deterioration. Ensure that any seal requiring removal is accounted for, because an incorrectly seated or damaged filter seal can interfere with transmission fluid supply after reassembly.
Step 4: Identify the valve body fasteners and electrical connections. With the filter removed, locate the main control assembly, solenoid-related connections, and mounting bolts. Compare the exposed components with the applicable Ford service diagram before disconnecting or removing anything. Identify fasteners by location because different bolt lengths or functions may be present within the assembly.
How Do You Disconnect and Remove the 6R140 Valve Body?
To disconnect and remove the 6R140 valve body, release the electrical connections specified in the service procedure, remove the main control mounting fasteners in the correct sequence, and lower the assembly while protecting its hydraulic and electronic components.
Step 1: Disconnect the required electrical connections. Locate the electrical connection points associated with the main control assembly. Release connector locking mechanisms according to the Ford service instructions rather than pulling directly on the wiring. Inspect accessible connector terminals for corrosion, damaged pins, fluid contamination, or signs of overheating.
Step 2: Identify and remove the mounting bolts. Use the vehicle-specific service diagram to distinguish main control mounting bolts from fasteners that secure other valve body components. Remove the designated bolts in the specified sequence while supporting the assembly. Keep fasteners organized by their original locations to prevent incorrect installation.
Step 3: Lower the valve body assembly carefully. Support the main control assembly as the final mounting bolts are removed. Lower it without forcing or twisting the assembly, and check for any remaining connections or mechanical engagement points before separating it completely from the transmission. Do not pry against machined hydraulic surfaces or pull on solenoid wiring.
Step 4: Inspect the removed valve body. Place the assembly on a clean, lint-free work surface and examine accessible components for damage. Inspect hydraulic passages, sealing surfaces, electrical connectors, and visible solenoid components. Look for scoring, contamination, damaged seals, or unusual wear that could explain the original shifting symptoms.
Step 5: Inspect the transmission before installing the replacement. Examine the exposed transmission mating surfaces and accessible internal components for debris, damaged seals, or evidence of mechanical failure. Metal fragments, excessive friction material, or damaged hydraulic components can indicate problems beyond the valve body. These findings should be investigated before proceeding with replacement.
The removal process is complete when the main control assembly has been safely separated from the transmission, all required components have been inspected, and the exposed hydraulic surfaces are protected from contamination. Store the removed valve body and fasteners in a clean location until the replacement assembly is ready for installation.
Important: Exact bolt locations, connector release methods, manual valve engagement details, and removal sequences vary with the applicable service configuration. Use Ford service information for the vehicle’s model year and transmission identification rather than treating this general workflow as a substitute for the factory repair procedure.
How Do You Install a Replacement 6R140 Valve Body?
Installing a replacement 6R140 valve body requires verifying component compatibility, preparing the transmission mating surfaces, positioning the main control assembly, and tightening the mounting fasteners according to Ford specifications. Correct installation is essential because misaligned hydraulic passages, damaged seals, or improperly secured components can cause pressure loss, delayed engagement, and shifting problems.
The replacement assembly must match the transmission configuration and electronic control requirements. Before installation, compare the original and replacement valve bodies to identify differences in mounting points, solenoid arrangements, electrical connections, and sealing components. Follow the service procedure for the specific vehicle model year rather than assuming all 6R140 valve bodies use identical installation requirements.
How Do You Prepare the Replacement Valve Body for Installation?
To prepare a replacement 6R140 valve body, inspect the assembly for damage, verify its compatibility, and ensure all hydraulic surfaces and sealing components are clean and correctly positioned. This preparation prevents contamination and assembly errors that could interfere with transmission operation.
Step 1: Verify the replacement valve body. Compare the replacement assembly’s part number and application information with the original component and vehicle identification data. Check whether the replacement includes the solenoid body and whether new calibration information must be entered after installation. A physically compatible assembly may still require specific electronic configuration.
Step 2: Inspect the replacement assembly. Examine the valve body for shipping damage, cracked components, damaged electrical connectors, and contamination. Check accessible hydraulic passages and mating surfaces for debris or visible defects. Do not disassemble a new or remanufactured assembly unless the supplier’s instructions or Ford service procedure specifically requires it.
Step 3: Prepare the transmission mating surfaces. Inspect the exposed transmission surfaces and remove contamination using approved cleaning methods. Avoid abrasive materials that could scratch machined surfaces or introduce particles into hydraulic passages. Ensure that no old sealing material, loose debris, or damaged components remain in the installation area.
Step 4: Check the required seals and related components. Confirm that the replacement includes or is accompanied by the correct seals, gaskets, and other service parts specified for the transmission. Replace components identified as non-reusable in the applicable Ford service instructions. Incorrectly positioned seals can allow internal fluid leakage and interfere with hydraulic pressure regulation.
How Do You Position and Secure the 6R140 Valve Body?
To position and secure the 6R140 valve body, align the assembly with the transmission mounting surfaces, engage the required mechanical and electrical interfaces, and tighten the mounting bolts using the specified sequence and torque values. The assembly should seat correctly without excessive force.
Step 1: Position the replacement valve body. Carefully raise the assembly into the transmission and align it with the designated mounting points. Verify that the required manual valve or shift linkage engagement is correct for the transmission configuration. Improper engagement can interfere with gear selection even when the valve body is securely mounted.
Step 2: Install the mounting fasteners. Insert the correct bolts into their designated locations and start them by hand to reduce the risk of cross-threading. Confirm that the assembly is properly seated before tightening. Follow the factory tightening sequence and torque specifications, because uneven clamping or excessive torque can distort the valve body or damage its mounting surfaces.
Step 3: Reconnect the electrical components. Reconnect the electrical interfaces according to the vehicle-specific service procedure. Verify that connectors are fully seated, locking mechanisms are engaged, and wiring is routed correctly. Damaged terminals or loose connections can cause solenoid control faults and abnormal transmission operation.
Step 4: Reinstall the transmission filter. Install the specified filter and required sealing components. Ensure that the filter is fully seated and that its seal is correctly positioned. A damaged or improperly installed filter seal can interfere with transmission fluid pickup and contribute to hydraulic pressure problems.
Step 5: Reinstall the transmission pan. Clean and inspect the transmission pan, gasket surfaces, and mounting flange. Remove accumulated debris and examine the pan for deformation or damage. Install the appropriate gasket or sealing components and tighten the pan bolts in the sequence and to the torque specified by Ford.
After reassembly, inspect the transmission exterior for loose connections, incorrectly routed wiring, or missing fasteners. Confirm that all components removed for access have been reinstalled correctly. Do not operate the transmission until the required fluid has been added and the applicable initial filling procedure has been completed.
How Do You Refill the 6R140 Transmission After Valve Body Replacement?
Refilling a 6R140 transmission after valve body replacement requires adding automatic transmission fluid that meets Ford’s MERCON LV specification and checking the fluid level under the specified operating conditions. The correct fluid level is essential because insufficient fluid can reduce hydraulic pressure, while excessive fluid can cause aeration and inconsistent transmission operation.
Begin by confirming that the transmission pan, filter, and related components are properly installed. Add the initial quantity of approved fluid through the designated filling point, following the applicable Ford service procedure. The amount required depends on how much fluid was removed during disassembly and whether additional transmission components were serviced. A valve body replacement does not normally drain the entire transmission, so the full dry-fill capacity should not be used as the refill quantity.
Start the engine only after completing the specified initial filling steps. Follow the factory procedure for circulating fluid through the transmission and selecting the required gear positions while keeping the vehicle stationary and securely restrained. Monitor transmission fluid temperature using an appropriate diagnostic tool when required by the service procedure.
Check the fluid level at the temperature and under the operating conditions specified for the particular 6R140 application. Add fluid in controlled amounts if the level is low, and correct an overfilled condition before operating the vehicle. Temperature matters because automatic transmission fluid expands as it warms, making measurements taken outside the specified range unreliable.
Once the fluid level is correct, inspect the transmission pan and accessible connections for leaks. Recheck the level after the required operating and verification procedures, particularly if fluid has circulated into components that were drained during service. Complete any necessary solenoid strategy or adaptive learning procedures before evaluating final shift quality.
Important: Use the Ford service manual for the exact filling method, fluid-temperature range, and level-checking procedure applicable to the vehicle. Incorrect fluid levels or unverified service specifications can damage the transmission.
Does a 6R140 Valve Body Need Programming After Replacement?
A 6R140 valve body replacement requires solenoid strategy programming when the replacement changes the calibrated solenoid body assembly. The transmission control system uses solenoid-specific calibration data to regulate hydraulic pressure and clutch engagement. Installing a different solenoid body without updating the required calibration information can result in harsh shifts, delayed engagement, or inconsistent transmission operation.
The 6R140 uses a solenoid body strategy and identification information associated with its calibrated solenoid assembly. This information allows the transmission control system to account for differences in individual solenoid characteristics. When a replacement assembly includes different calibrated solenoids, the corresponding strategy information must be entered using a compatible diagnostic tool and the applicable Ford service procedure.
Programming requirements depend on the components replaced. Replacing only mechanical valve body components while retaining the original calibrated solenoid body may not require a new solenoid strategy. However, the repair must still follow the applicable service instructions, including any required adaptive learning procedures.
To complete the electronic setup, the technician should first identify the replacement solenoid body’s strategy and identification information. A Ford-compatible diagnostic tool, such as Ford IDS or another tool supporting the required service functions, is then used to perform the applicable solenoid strategy programming procedure. The technician must verify that the entered information matches the installed assembly before completing the operation.
After programming, the transmission may require adaptive learning or a specified drive cycle. Adaptive learning allows the control system to adjust clutch pressure and shift timing based on operating conditions and transmission response. The exact procedure depends on the vehicle calibration and the repair performed. Skipping required programming or adaptive procedures can leave the transmission with abnormal shift behavior even when the replacement valve body is mechanically installed correctly.
How Do You Test a 6R140 Transmission After Valve Body Replacement?
Testing a 6R140 transmission after valve body replacement involves checking fluid level, inspecting for leaks, verifying electronic communication, and evaluating gear engagement and shift quality. The transmission should operate without abnormal delays, unexpected slipping, or persistent diagnostic trouble codes before the repair is considered complete.
Post-replacement testing should begin with stationary inspections and progress to a controlled road test. This sequence helps identify installation problems before the transmission is exposed to normal driving loads.
What Should You Check Before Road Testing the 6R140?
Before road testing a 6R140 transmission, verify the transmission fluid level, inspect for leaks, confirm electrical connections, and check for diagnostic trouble codes. These inspections establish whether the transmission is ready for operation.
Check the transmission fluid level. Follow the Ford-specified fluid-level procedure and temperature requirements. Incorrect fluid levels can affect hydraulic pressure and produce delayed engagement, slipping, or erratic shifting.
Inspect for fluid leaks. Examine the transmission pan gasket area, accessible seals, and connections disturbed during the repair. Fluid leakage can indicate damaged sealing components, incorrect assembly, or improperly tightened fasteners.
Scan for diagnostic trouble codes. Use a compatible diagnostic tool to check for active and pending transmission-related codes. Investigate any faults involving solenoid circuits, transmission control communication, or pressure regulation before proceeding.
Verify gear engagement. With the vehicle securely restrained and the service procedure followed, check engagement into Reverse and Drive. Engagement should occur without excessive delay or abnormal mechanical noise. Significant hesitation, harsh engagement, or unexpected movement requires further diagnosis.
Confirm electronic setup. Verify that any required solenoid strategy programming and initial adaptive procedures have been completed. Incorrect calibration data can affect transmission behavior even when no obvious installation defect is present.
What Should You Check During the 6R140 Road Test?
During a 6R140 road test, evaluate gear changes, shift timing, transmission temperature, and diagnostic data under controlled driving conditions. The purpose is to confirm that the replacement valve body regulates hydraulic operation correctly across the transmission’s normal operating range.
Step 1: Begin with light-throttle driving. Accelerate gradually and observe how the transmission shifts through the available gears. Gear changes should occur without excessive engine speed flare, slipping, or abrupt engagement. Avoid aggressive acceleration until basic transmission operation has been verified.
Step 2: Evaluate upshifts and downshifts. Observe transmission response during moderate acceleration and controlled deceleration. Delayed downshifts, repeated gear hunting, or unusually harsh shifts may indicate unresolved hydraulic, electronic, or mechanical problems.
Step 3: Monitor transmission operating data. Use a compatible diagnostic tool to observe relevant transmission parameters, including fluid temperature, commanded gear, and available shift-related data. Compare actual transmission behavior with commanded operation to identify inconsistencies requiring further testing.
Step 4: Complete the required adaptive learning procedure. Follow the Ford-specified adaptive learning process when applicable. Some shift characteristics may change as the transmission control system updates its learned values, but persistent slipping, severe harshness, or abnormal engagement should not be dismissed as normal adaptation.
Step 5: Perform a final inspection. After the road test, check for diagnostic trouble codes and inspect the transmission for leaks. Recheck the fluid level under the specified conditions and confirm that no new symptoms have developed.
A successful 6R140 valve body replacement should restore the transmission’s expected shifting behavior when the original problem was caused by the valve body. If harsh shifting, slipping, or delayed engagement continues, additional diagnosis is necessary. Possible causes include incorrect solenoid calibration, electrical faults, hydraulic pressure loss, or internal clutch damage.
The repair should not be considered complete until the transmission passes the required stationary checks, electronic verification, and road test without unresolved faults.
How Much Does a 6R140 Valve Body Replacement Cost?
A 6R140 valve body replacement typically costs approximately $900–$2,500 in the United States, including the replacement assembly, labor, transmission fluid, and related service expenses. This is a general budgeting estimate rather than a verified current market quote. The final price depends on the vehicle model year, valve body configuration, replacement part quality, local labor rates, and whether additional programming or transmission repairs are necessary.
The replacement valve body is a major expense. New OEM assemblies generally cost more than remanufactured alternatives because they use factory-specified components and are supplied through manufacturer-authorized parts channels. Remanufactured valve bodies offer a lower-cost option when they have been properly inspected, repaired, tested, and matched to the transmission application. Prices also depend on whether the assembly includes calibrated solenoids or only the hydraulic valve body components.
The following table provides approximate cost ranges for budgeting purposes. These figures are not supplier-verified quotations.
| Replacement Expense | Estimated Cost (USD) |
|---|---|
| Remanufactured valve body | $350–$800 |
| New OEM valve body | $600–$1,200 |
| Professional labor | $300–$700 |
| Transmission fluid, filter, and seals | $80–$200 |
| Diagnostic and programming services | $100–$300 |
Professional labor costs depend on shop hourly rates, vehicle accessibility, and the scope of the repair. A straightforward valve body replacement generally requires less disassembly than a complete transmission overhaul. However, additional diagnostic testing, damaged electrical connections, or contamination inside the transmission can increase the total repair time.
Programming expenses also affect the final cost when the replacement includes a different calibrated solenoid body. The technician may need to enter solenoid strategy information and complete the applicable adaptive learning procedure using a Ford-compatible diagnostic tool. These services may be included in the shop’s labor estimate or billed separately.
A DIY replacement eliminates professional installation labor but does not eliminate the cost of diagnostic equipment, approved transmission fluid, replacement seals, or programming services. Before purchasing parts, obtain a written estimate that identifies the valve body configuration, included components, warranty coverage, and any required electronic setup. This makes it easier to compare repair options without overlooking necessary services.
Should You Buy an OEM or Remanufactured 6R140 Valve Body?
An OEM 6R140 valve body is generally the better choice when factory-specified replacement components, documented compatibility, and manufacturer-backed parts support are the main priorities. A remanufactured valve body is a practical alternative when reducing repair costs is important and the supplier provides documented testing, correct calibration information, and reliable warranty coverage.
OEM valve bodies are manufactured or supplied to meet Ford’s applicable replacement specifications. They provide a defined parts application and reduce uncertainty when ordered using the correct vehicle identification and transmission information. However, an OEM assembly still requires proper installation, and replacement solenoid configurations may require electronic programming.
Remanufactured valve bodies are previously used assemblies that have undergone a restoration process. Depending on the supplier, remanufacturing can involve disassembly, cleaning, inspection of hydraulic passages, replacement of worn components, and functional testing. Quality varies because suppliers do not necessarily follow identical inspection standards or use the same replacement parts.
The main differences between OEM and remanufactured 6R140 valve bodies are summarized below.
| Comparison Factor | OEM Valve Body | Remanufactured Valve Body |
|---|---|---|
| Component condition | New factory-specified replacement | Previously used and reconditioned |
| Purchase price | Generally higher | Generally lower |
| Compatibility | Verified through OEM application data | Depends on supplier application matching |
| Testing | Manufacturer quality-control process | Depends on remanufacturer procedures |
| Warranty | Depends on OEM parts warranty terms | Depends on supplier warranty terms |
| Programming | Required when applicable | Required when applicable |
Compatibility is more important than price alone. The replacement assembly must match the vehicle’s 6R140 transmission configuration, including the correct hydraulic and electronic components. A mismatched solenoid body can create calibration problems even when the assembly physically fits the transmission.
Warranty terms should also be evaluated before purchasing. Compare coverage duration, exclusions, core return requirements, and whether the warranty covers only the replacement part or includes related labor expenses. A lower-priced valve body can become more expensive if an early failure requires additional transmission service.
For a truck used for heavy towing, commercial transportation, or other demanding applications, an OEM assembly or a thoroughly tested remanufactured unit from a reputable transmission specialist is preferable to an unverified used component. The final selection should balance compatibility, documented quality, warranty protection, and total installed cost rather than purchase price alone.
Read more: How Long Does a 6L90 Transmission Last? Full Guide
Can You Replace a 6R140 Valve Body Yourself?
You can replace a 6R140 valve body yourself if you have experience servicing automatic transmissions, access to the correct tools, and the ability to follow Ford’s vehicle-specific repair procedures. However, the job is not recommended for beginners because incorrect valve body installation, fluid-level adjustment, or solenoid programming can cause serious transmission problems.
The mechanical replacement involves removing the transmission pan and filter, disconnecting the main control assembly, installing a compatible valve body, and reassembling the transmission. Although the procedure does not normally require removing the entire transmission from the vehicle, it involves precision hydraulic components that must remain clean and properly aligned. Dirt entering a hydraulic passage or an incorrectly installed seal can interfere with fluid pressure regulation and clutch operation.
Three factors determine whether a DIY replacement is practical: mechanical experience, equipment availability, and electronic service requirements. A technician familiar with automatic transmission maintenance is better prepared to identify fastener locations, handle electrical connectors, and recognize signs of internal damage. A properly calibrated torque wrench, suitable vehicle support equipment, and accurate Ford service information are essential for completing the mechanical work.
Electronic calibration is another important consideration. When a replacement assembly includes a different calibrated solenoid body, the transmission control system requires the corresponding solenoid strategy information. A basic OBD-II code reader cannot necessarily perform this procedure. The repair may require Ford IDS or another compatible diagnostic tool that supports the necessary transmission service functions.
DIY replacement can reduce labor expenses, but the potential savings must be compared with the cost of specialized equipment and the consequences of installation errors. For example, purchasing a replacement valve body without verifying its solenoid configuration can result in additional programming expenses or the need to obtain another assembly. Incorrect fluid levels or damaged hydraulic seals can also require the transmission pan and valve body to be removed again.
Professional replacement is the better option when the transmission has extensive metal contamination, multiple electrical faults, unexplained hydraulic pressure problems, or suspected internal clutch damage. These conditions require diagnosis beyond a straightforward valve body replacement. A transmission specialist can evaluate whether the valve body is the primary cause of the problem or whether additional internal repairs are necessary.
For experienced DIY mechanics, the safest approach is to confirm the fault before purchasing parts, obtain the exact service instructions, and arrange access to the required programming equipment before disassembly. Completing these preparations reduces unnecessary repairs and improves the likelihood of restoring normal transmission operation.
Why Is a 6R140 Transmission Still Shifting Hard After Valve Body Replacement?
A 6R140 transmission may continue shifting hard after valve body replacement because of incorrect solenoid strategy programming, incomplete adaptive learning, improper transmission fluid level, electrical faults, or internal mechanical damage. Replacing the valve body corrects problems associated with a defective hydraulic control assembly, but it does not automatically resolve faults elsewhere in the transmission.
1. Incorrect solenoid strategy programming. The 6R140 transmission control system uses calibration information associated with the installed solenoid body. If the replacement includes different calibrated solenoids and the corresponding strategy information is not entered correctly, the control system may apply inappropriate pressure corrections. This can produce harsh engagement, inconsistent shifts, or abnormal clutch application. Verify the installed solenoid body’s identification and strategy information against the data stored in the control system.
2. Incomplete adaptive learning. The transmission control system adjusts shift timing and clutch pressure based on operating feedback. After certain repairs or calibration changes, the applicable adaptive learning procedure may be necessary to establish correct shift behavior. Some changes in shift feel can occur during adaptation, but severe harshness, persistent slipping, or repeated shift flares require diagnosis rather than continued driving.
3. Incorrect transmission fluid level. Both low and excessive fluid levels can affect hydraulic operation. Insufficient fluid can reduce available pressure and interfere with clutch engagement, while overfilling can contribute to fluid aeration and unstable hydraulic performance. Check the fluid level using the specified 6R140 procedure and transmission temperature conditions rather than relying on the quantity added during refilling.
4. Electrical connector or wiring problems. Damaged terminals, loose connectors, or wiring faults can interfere with solenoid control signals. A connector disturbed during valve body removal may not be fully seated after reassembly. Inspect the relevant electrical connections and retrieve diagnostic trouble codes to identify circuit-related faults. Electrical testing should follow Ford specifications to avoid damaging transmission control components.
5. Valve body installation errors. Incorrectly positioned seals, improperly tightened fasteners, or misaligned components can create internal hydraulic leakage or mechanical interference. For example, a damaged sealing component between hydraulic passages can prevent pressure from reaching the intended circuit correctly. If diagnostic testing points to an installation problem, the assembly may need to be removed and inspected again using the factory service procedure.
6. Internal transmission wear or damage. Worn clutch packs, damaged sealing rings, internal hydraulic leakage, and other mechanical defects can cause shifting problems that resemble valve body failure. Excessive metal particles or friction material found during transmission pan removal may indicate this type of damage. Installing a replacement valve body will not repair worn friction components or damaged internal transmission assemblies.
Troubleshooting should begin with the simplest verifiable conditions before progressing to internal transmission inspection. Check fluid level and condition, retrieve diagnostic trouble codes, confirm solenoid strategy information, and inspect accessible electrical connections. If these checks do not identify the problem, perform the appropriate hydraulic and mechanical diagnostic tests.
A successful repair is confirmed by correct gear engagement, consistent shift quality, appropriate transmission operating data, and the absence of unresolved diagnostic faults. Persistent harsh shifting after valve body replacement indicates that the original diagnosis, installation, calibration, or another transmission component requires further investigation.